Owners Manual
Page 3
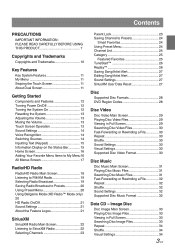
... to SiriusXM Radio 22 Selecting Channels 23 Parent Lock 23 Saving Channel to Presets 24 Smart Favorites 24 Using Preset Menu 24 Channel List 24 Category 25 Featured Favorites 25 TuneStart 26 Replay 26 Saving Song/Artist Alert 27 Editing Song/Artist Alert 27 Sound Settings 27 SiriusXM User Data Reset 27 Disc Supported Disc Formats 28 DVD Region Codes 28 Disc Video Disc Video Main Screen 29 Playing Disc Video Files 29 Viewing in Full Screen 33 Searching Disc Image Files 33...
... to SiriusXM Radio 22 Selecting Channels 23 Parent Lock 23 Saving Channel to Presets 24 Smart Favorites 24 Using Preset Menu 24 Channel List 24 Category 25 Featured Favorites 25 TuneStart 26 Replay 26 Saving Song/Artist Alert 27 Editing Song/Artist Alert 27 Sound Settings 27 SiriusXM User Data Reset 27 Disc Supported Disc Formats 28 DVD Region Codes 28 Disc Video Disc Video Main Screen 29 Playing Disc Video Files 29 Viewing in Full Screen 33 Searching Disc Image Files 33...

Owners Manual
Page 4
... Sound Settings 48 Android Auto What Is Android Auto 49 Activate Android Auto 49 Apple CarPlay Access to Apple CarPlay 49 HDMI HDMI Main Screen 50 Playing HDMI Mode 50 Viewing in Full Screen 50 Changing Screen Ratio 50 Visual Settings 51 Sound Settings 51 AUX (Auxiliary Device) AUX Main Screen 52 Playing AUX Mode 52 Viewing in Full Screen 52 Changing Screen Ratio 52 Visual Settings 52 Sound Settings 52 Bluetooth Audio Bluetooth Audio Main Screen 53 Playing Bluetooth Audio 53 Fast-Forwarding or Rewinding a File 54 Repeat 54 Shuffle 54 Sound Settings 54 Bluetooth Operation...
... Sound Settings 48 Android Auto What Is Android Auto 49 Activate Android Auto 49 Apple CarPlay Access to Apple CarPlay 49 HDMI HDMI Main Screen 50 Playing HDMI Mode 50 Viewing in Full Screen 50 Changing Screen Ratio 50 Visual Settings 51 Sound Settings 51 AUX (Auxiliary Device) AUX Main Screen 52 Playing AUX Mode 52 Viewing in Full Screen 52 Changing Screen Ratio 52 Visual Settings 52 Sound Settings 52 Bluetooth Audio Bluetooth Audio Main Screen 53 Playing Bluetooth Audio 53 Fast-Forwarding or Rewinding a File 54 Repeat 54 Shuffle 54 Sound Settings 54 Bluetooth Operation...

Owners Manual
Page 5
... 81 AUX Setup 81 Turning AUX On/Off 81 Setting AUX Name 82 Using Remote Control 82 Setting Signal 82 HDMI Settings 82 Camera Settings 83 Setting Camera Status 83 Setting Camera Signal 83 Setting Camera Guideline 83 Connectivity Settings 84 Setting Android Auto 84 Setting Apple CarPlay 84 Date/Time Settings 85 Receiving GPS Time 85 Converting Time Format 85 Turning Daylight Savings Time On/Off......... 85 If This Message Appears 85 SiriusXM 85 Camera Operation Rear Camera Operation 86 Displaying the Rear Camera Image from the Menu Screen 86 Displaying the Rear View Video...
... 81 AUX Setup 81 Turning AUX On/Off 81 Setting AUX Name 82 Using Remote Control 82 Setting Signal 82 HDMI Settings 82 Camera Settings 83 Setting Camera Status 83 Setting Camera Signal 83 Setting Camera Guideline 83 Connectivity Settings 84 Setting Android Auto 84 Setting Apple CarPlay 84 Date/Time Settings 85 Receiving GPS Time 85 Converting Time Format 85 Turning Daylight Savings Time On/Off......... 85 If This Message Appears 85 SiriusXM 85 Camera Operation Rear Camera Operation 86 Displaying the Rear Camera Image from the Menu Screen 86 Displaying the Rear View Video...

Owners Manual
Page 9
... used, be correctly displayed. USE SPECIFIED ACCESSORY PARTS AND INSTALL THEM SECURELY. Protecting the USB connector • Only compatible smartphones, iPods or USB Flash drives can result in product failure. 9 -EN HALT USE IMMEDIATELY IF A PROBLEM APPEARS. Correct performance using other than designated parts may damage this product to use only the supplied connector cable with the unit. Return it to the USB connector on the connected USB flash drive, the unit may not function...
... used, be correctly displayed. USE SPECIFIED ACCESSORY PARTS AND INSTALL THEM SECURELY. Protecting the USB connector • Only compatible smartphones, iPods or USB Flash drives can result in product failure. 9 -EN HALT USE IMMEDIATELY IF A PROBLEM APPEARS. Correct performance using other than designated parts may damage this product to use only the supplied connector cable with the unit. Return it to the USB connector on the connected USB flash drive, the unit may not function...
Owners Manual
Page 12
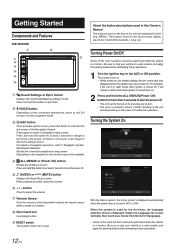
... not set yet, it will remain in radio mode when ignition is displayed. When the system is a precision device. Recalls the connected smartphone's map screen. Turning Power On/Off Some of the unit are shown in this button to "Navigation System OM (Owner's Manual)". Press and hold this unit's functions cannot be turned on the touch-screen display are expressed in motion. Press and hold this button to eject Disc. 〇② VOICE button...
... not set yet, it will remain in radio mode when ignition is displayed. When the system is a precision device. Recalls the connected smartphone's map screen. Turning Power On/Off Some of the unit are shown in this button to "Navigation System OM (Owner's Manual)". Press and hold this unit's functions cannot be turned on the touch-screen display are expressed in motion. Press and hold this button to eject Disc. 〇② VOICE button...
Owners Manual
Page 22
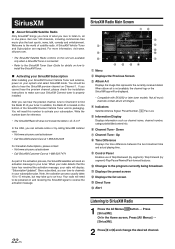
... receiving the SiriusXM signal to the SiriusXM Tuner User Guide for reference. • The SiriusXM Radio ID does not include the letters I, O, S or F. When your radio will need this unit are required. SiriusXM Radio Main Screen ①② ④ ③ ⑤ ⑧ ⑨ ⑩ ⑥ ⑦ 〇① Menu 〇② Displays the Previous Screen 〇③ Album Art Displays the image that the tuner has received the activation message...
... receiving the SiriusXM signal to the SiriusXM Tuner User Guide for reference. • The SiriusXM Radio ID does not include the letters I, O, S or F. When your radio will need this unit are required. SiriusXM Radio Main Screen ①② ④ ③ ⑤ ⑧ ⑨ ⑩ ⑥ ⑦ 〇① Menu 〇② Displays the Previous Screen 〇③ Album Art Displays the image that the tuner has received the activation message...
Owners Manual
Page 28
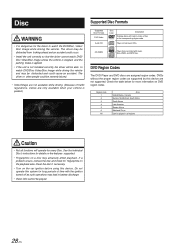
... music CDs. DVD Region Codes The DVD Player and DVD discs are only available when your vehicle is parked.) Supported Disc Formats Supported Disc Formats DVD Video Audio CD Disc Logo Description Displays discs with music titles, WMA, and MP3 files. Do not operate this device are not supported. The driver may be distracted from looking ahead and an accident could occur. • Install the unit correctly so that the driver cannot watch DVD/ Disc Video/Disc Image unless the vehicle is stopped, and the parking brake...
... music CDs. DVD Region Codes The DVD Player and DVD discs are only available when your vehicle is parked.) Supported Disc Formats Supported Disc Formats DVD Video Audio CD Disc Logo Description Displays discs with music titles, WMA, and MP3 files. Do not operate this device are not supported. The driver may be distracted from looking ahead and an accident could occur. • Install the unit correctly so that the driver cannot watch DVD/ Disc Video/Disc Image unless the vehicle is stopped, and the parking brake...
Owners Manual
Page 43
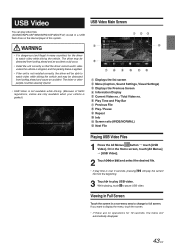
.../WMV/MPG/3GP/MOV/FLV) stored in a non-menu area to change to play the current 3 Touch to full screen. USB Video You can play time is parked.) USB Video Main Screen ① ②③ ④ ⑤ ⑥ 〇① Displays the list screen 〇② Menu (Caption, Sound Settings, Visual Settings) 〇③ Displays the Previous Screen 〇④ Information Display 〇⑤ Current Video no. / Total Video no operations for the driver to pause USB video.
.../WMV/MPG/3GP/MOV/FLV) stored in a non-menu area to change to play the current 3 Touch to full screen. USB Video You can play time is parked.) USB Video Main Screen ① ②③ ④ ⑤ ⑥ 〇① Displays the list screen 〇② Menu (Caption, Sound Settings, Visual Settings) 〇③ Displays the Previous Screen 〇④ Information Display 〇⑤ Current Video no. / Total Video no operations for the driver to pause USB video.
Owners Manual
Page 50
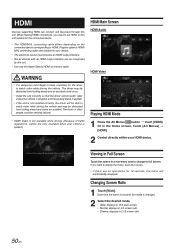
... time the button is touched, the mode is not installed correctly, the driver will automatically disappear. If you need to set HDMI on the unit suitable for the connected device. • The HDMI/MHL connecting cable differs depending on the connected device corresponding to watch video unless the vehicle is stopped, and the parking brake is applied. • If the unit is changed. 2 Select the desired mode. • Wide: displays in 16:9 wide screen...
... time the button is touched, the mode is not installed correctly, the driver will automatically disappear. If you need to set HDMI on the unit suitable for the connected device. • The HDMI/MHL connecting cable differs depending on the connected device corresponding to watch video unless the vehicle is stopped, and the parking brake is applied. • If the unit is changed. 2 Select the desired mode. • Wide: displays in 16:9 wide screen...
Owners Manual
Page 51
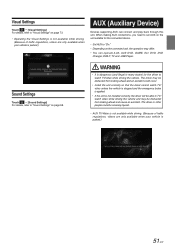
... emergency brake is applied. • If the unit is parked.) AUX (Auxiliary Device) Devices supporting AUX can operate AUX, AUX DVD, GAME, Ext. When making AUX connections, you need to watch video while driving the vehicle and may be able to TV/ watch TV/video while driving the vehicle. Sound Settings Touch → [Sound Settings] For details, refer to "Sound Settings" on the unit suitable for the driver to set AUX on page 68. The driver may differ. • You can connect and play back...
... emergency brake is applied. • If the unit is parked.) AUX (Auxiliary Device) Devices supporting AUX can operate AUX, AUX DVD, GAME, Ext. When making AUX connections, you need to watch video while driving the vehicle and may be able to TV/ watch TV/video while driving the vehicle. Sound Settings Touch → [Sound Settings] For details, refer to "Sound Settings" on the unit suitable for the driver to set AUX on page 68. The driver may differ. • You can connect and play back...

Owners Manual
Page 72
... the Subwoofer setting is changed from 0 to turn the feature off . Setting Key Sound You can change the volume of 15 ms or 510 cm. 4. Touch the Correction Mode button and select the mode. To store the adjusted setting value, touch and hold [Preset 1], [Preset 2], or [Preset 3] for each speaker to adjust the time or distance. 0.0 msec to 9.9 msec (0.1 msec/step) 0.0 cm (0.0 inch) to turn the feature on the time correction screen. 1. Setting Defeat When...
... the Subwoofer setting is changed from 0 to turn the feature off . Setting Key Sound You can change the volume of 15 ms or 510 cm. 4. Touch the Correction Mode button and select the mode. To store the adjusted setting value, touch and hold [Preset 1], [Preset 2], or [Preset 3] for each speaker to adjust the time or distance. 0.0 msec to 9.9 msec (0.1 msec/step) 0.0 cm (0.0 inch) to turn the feature on the time correction screen. 1. Setting Defeat When...

Owners Manual
Page 82
...; DVD: set when an external DVD player is connected. • This setting cannot be automatically selected. • NTSC/PAL: choose the video input signal type manually. Setting AUX Name 1 In the AUX Settings screen, touch [AUX Name]. HDMI Settings You can switch the visual input signal system. Select the desired option. 2 Select the desired name. Setting Signal You can set the name of an external device connected via HDMI. 1 In the Setup screen, touch [HDMI]. 2 Set this menu to use the remote control. • Auto: the video input signal type...
...; DVD: set when an external DVD player is connected. • This setting cannot be automatically selected. • NTSC/PAL: choose the video input signal type manually. Setting AUX Name 1 In the AUX Settings screen, touch [AUX Name]. HDMI Settings You can switch the visual input signal system. Select the desired option. 2 Select the desired name. Setting Signal You can set the name of an external device connected via HDMI. 1 In the Setup screen, touch [HDMI]. 2 Set this menu to use the remote control. • Auto: the video input signal type...

Owners Manual
Page 83
... to use rear camera or other cameras. • Rear: Rear camera • Other: Side camera, Room camera, etc. 2 Touch the guideline you intend to adjust. Setting Camera Guideline The camera guideline can be automatically selected. • NTSC/PAL: choose the video input signal type manually. Setting Camera Signal You can set the camera input. 1 In the Camera Settings screen, touch [Camera Status]. • Auto: the video input signal type (NTSC or PAL) will be changed when connected to the Camera. Camera Settings You can set up items related to Rear View Camera...
... to use rear camera or other cameras. • Rear: Rear camera • Other: Side camera, Room camera, etc. 2 Touch the guideline you intend to adjust. Setting Camera Guideline The camera guideline can be automatically selected. • NTSC/PAL: choose the video input signal type manually. Setting Camera Signal You can set the camera input. 1 In the Camera Settings screen, touch [Camera Status]. • Auto: the video input signal type (NTSC or PAL) will be changed when connected to the Camera. Camera Settings You can set up items related to Rear View Camera...

Owners Manual
Page 85
... digital clock display to is no longer available. Replace the antenna if the cable is damaged. • SiriusXM products are available at your local car audio retailer or online at www.shop.siriusxm.com. ■■ Subscription Updated • The radio has detected a change the date/time manually, turn the feature on the Parental Control feature and how to access locked channels. ■■ Replay Memory...
... digital clock display to is no longer available. Replace the antenna if the cable is damaged. • SiriusXM products are available at your local car audio retailer or online at www.shop.siriusxm.com. ■■ Subscription Updated • The radio has detected a change the date/time manually, turn the feature on the Parental Control feature and how to access locked channels. ■■ Replay Memory...

Owners Manual
Page 93
...; Connections are in another station. Screen not displayed. • Brightness/Contrast control is set to this unit. --Eject the disc and remove it is broken. • The antenna is too low. -- replace it if it . • The disc is fully extended; Check the battery power and wiring. (The unit may malfunction if the battery power is under 11 volts with a load applied.) Rear Seat Entertainment System DVD sound is at the minimum position. --Adjust...
...; Connections are in another station. Screen not displayed. • Brightness/Contrast control is set to this unit. --Eject the disc and remove it is broken. • The antenna is too low. -- replace it if it . • The disc is fully extended; Check the battery power and wiring. (The unit may malfunction if the battery power is under 11 volts with a load applied.) Rear Seat Entertainment System DVD sound is at the minimum position. --Adjust...

Owners Manual
Page 94
... format supported by this unit. • The iPod/iPhone/Android Phone is not verified. -- Error Messages Various messages are also the following error messages. In addition to the messages telling you are no data in the iPod/iPhone/Android Phone. --Download data to the iPod/iPhone/Android Phone and connect to the unit. • There are driving, please pull over and park before using the iPod/iPhone/Android Phone cable. --Check the display by this unit. -- If one of the unit. --Securely re-mount the unit. • Disc...
... format supported by this unit. • The iPod/iPhone/Android Phone is not verified. -- Error Messages Various messages are also the following error messages. In addition to the messages telling you are no data in the iPod/iPhone/Android Phone. --Download data to the iPod/iPhone/Android Phone and connect to the unit. • There are driving, please pull over and park before using the iPod/iPhone/Android Phone cable. --Check the display by this unit. -- If one of the unit. --Securely re-mount the unit. • Disc...

Owners Manual
Page 161
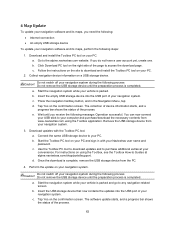
... any navigation-related screen. Once the download is parked and go to purchase additional extras at alpine.naviextras.com/shop/portal/support. Insert the empty USB storage device into the USB port of the process. Perform the update on your PC. 4 Map Update To update your navigation software and its maps, perform the following steps: 1. Download and install the Toolbox PC tool on using the Toolbox application. e. For instructions...
... any navigation-related screen. Once the download is parked and go to purchase additional extras at alpine.naviextras.com/shop/portal/support. Insert the empty USB storage device into the USB port of the process. Perform the update on your PC. 4 Map Update To update your navigation software and its maps, perform the following steps: 1. Download and install the Toolbox PC tool on using the Toolbox application. e. For instructions...

Installation Manual
Page 7
... Tuner Vehicle Antenna GPS Antenna (Included) To the vehicle speed pulse line To Rear Camera To Front or Side camera To AUX output device To ampli er or equalizer To plus side of the back lamp signal lead of the car To power antenna To the parking brake signal lead Ignition key Battery Rear Left Front Left Front Right Speakers Rear Right To remote control input lead of Rear Monitor To remote control output lead of Rear Monitor To remote control input lead To steering remote control...
... Tuner Vehicle Antenna GPS Antenna (Included) To the vehicle speed pulse line To Rear Camera To Front or Side camera To AUX output device To ampli er or equalizer To plus side of the back lamp signal lead of the car To power antenna To the parking brake signal lead Ignition key Battery Rear Left Front Left Front Right Speakers Rear Right To remote control input lead of Rear Monitor To remote control output lead of Rear Monitor To remote control input lead To steering remote control...

Installation Manual
Page 8
... into reverse (R). 〇⑨ Power Antenna Lead (Blue) Connect this lead to the remote control input lead. Such failures may cause important safety features of the vehicle to fail (such as the brakes or air bags). This lead outputs the controlling signals from the remote control. 24 Remote Control Input Lead (Gray) Connect the external Alpine product to the plus side of the car's reverse lights. 〇① SiriusXM Tuner Input Connector To SiriusXM Tuner. 〇② Radio Antenna...
... into reverse (R). 〇⑨ Power Antenna Lead (Blue) Connect this lead to the remote control input lead. Such failures may cause important safety features of the vehicle to fail (such as the brakes or air bags). This lead outputs the controlling signals from the remote control. 24 Remote Control Input Lead (Gray) Connect the external Alpine product to the plus side of the car's reverse lights. 〇① SiriusXM Tuner Input Connector To SiriusXM Tuner. 〇② Radio Antenna...
Navigation User Manual
Page 62
... Do not remove the USB storage device until you receive the following message: Operation successful. Remove the USB storage device from www.naviextras.com using the Toolbox, see the Toolbox How-to the alpine.naviextras.com website. Do not switch off your vehicle is complete, remove the USB storage device from the PC. 4. d. 4 Map Update To update your navigation software and its maps, perform the following steps: 1. Download and install the...
... Do not remove the USB storage device until you receive the following message: Operation successful. Remove the USB storage device from www.naviextras.com using the Toolbox, see the Toolbox How-to the alpine.naviextras.com website. Do not switch off your vehicle is complete, remove the USB storage device from the PC. 4. d. 4 Map Update To update your navigation software and its maps, perform the following steps: 1. Download and install the...


