
Quick Reference Guide
Page 3
... OR RADIATOR PANELS. USE THIS PRODUCT FOR MOBILE 12V APPLICATIONS. MAKE THE CORRECT CONNECTIONS. DO NOT SPLICE INTO ELECTRICAL CABLES. Using such parts could disable control of the hole. HALT USE IMMEDIATELY IF A PROBLEM APPEARS. Return it to have the work done. USE SPECIFIED ACCESSORY PARTS AND INSTALL THEM SECURELY. Use of moisture or dust. If wiring passes through a hole in fire, etc. Any function that requires...
... OR RADIATOR PANELS. USE THIS PRODUCT FOR MOBILE 12V APPLICATIONS. MAKE THE CORRECT CONNECTIONS. DO NOT SPLICE INTO ELECTRICAL CABLES. Using such parts could disable control of the hole. HALT USE IMMEDIATELY IF A PROBLEM APPEARS. Return it to have the work done. USE SPECIFIED ACCESSORY PARTS AND INSTALL THEM SECURELY. Use of moisture or dust. If wiring passes through a hole in fire, etc. Any function that requires...
Quick Reference Guide
Page 32
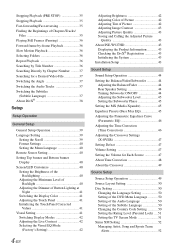
... Remote Sensor Setting 40 Setting Top banner and Bottom banner Display 40 Screen/LED Customize 40 Setting the Brightness of the Backlighting 40 Adjusting the Minimum Level of Backlight 40 Adjusting the Dimmer of Button Lighting at Night 41 Switching the Display Color 41 Adjusting the Touch Panel 41 Initializing the Touch Panel Corrected Values 41 Visual Setting 41 Switching Display Modes 42 Adjusting the Live Contrast 42 Selecting the Visual EQ Mode (Factory's Setting 42 4-EN Adjusting...
... Remote Sensor Setting 40 Setting Top banner and Bottom banner Display 40 Screen/LED Customize 40 Setting the Brightness of the Backlighting 40 Adjusting the Minimum Level of Backlight 40 Adjusting the Dimmer of Button Lighting at Night 41 Switching the Display Color 41 Adjusting the Touch Panel 41 Initializing the Touch Panel Corrected Values 41 Visual Setting 41 Switching Display Modes 42 Adjusting the Live Contrast 42 Selecting the Visual EQ Mode (Factory's Setting 42 4-EN Adjusting...
Quick Reference Guide
Page 33
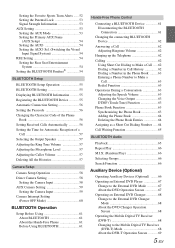
... 57 Selecting the Output Speaker 57 Adjusting the Ring Tone Volume 57 Adjusting the Microphone Level 57 Adjusting the Caller Volume 57 Deleting All the Histories 57 Camera Setup Camera Setup Operation 58 Direct Camera Setting 58 Setting the Camera Input 58 AUX Camera Setting 59 Setting the Camera Input 59 Camera Interrupt Setting (Power OFF Mode 60 BLUETOOTH Operation Setup Before Using 61 About BLUETOOTH 61 About the Hands-Free Phone 61 Before Using BLUETOOTH 61 Hands-Free Phone Control Connecting a BLUETOOTH Device 61 Disconnecting the BLUETOOTH Connection 61 Changing...
... 57 Selecting the Output Speaker 57 Adjusting the Ring Tone Volume 57 Adjusting the Microphone Level 57 Adjusting the Caller Volume 57 Deleting All the Histories 57 Camera Setup Camera Setup Operation 58 Direct Camera Setting 58 Setting the Camera Input 58 AUX Camera Setting 59 Setting the Camera Input 59 Camera Interrupt Setting (Power OFF Mode 60 BLUETOOTH Operation Setup Before Using 61 About BLUETOOTH 61 About the Hands-Free Phone 61 Before Using BLUETOOTH 61 Hands-Free Phone Control Connecting a BLUETOOTH Device 61 Disconnecting the BLUETOOTH Connection 61 Changing...
Quick Reference Guide
Page 38
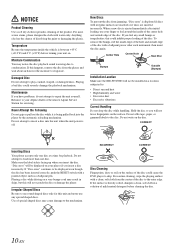
... severely damage the playback mechanism. Make sure the label side is displayed if discs with a pointed object such as a ballpoint pen. Irregular Shaped Discs Be sure to evaporate. Center Hole Center Hole New Disc Bumps Outside (Bumps) Installation Location Make sure the INE-W927HD will be displayed even though the disc has been inserted correctly, push the RESET switch with irregular surfaces are inserted...
... severely damage the playback mechanism. Make sure the label side is displayed if discs with a pointed object such as a ballpoint pen. Irregular Shaped Discs Be sure to evaporate. Center Hole Center Hole New Disc Bumps Outside (Bumps) Installation Location Make sure the INE-W927HD will be displayed even though the disc has been inserted correctly, push the RESET switch with irregular surfaces are inserted...
Quick Reference Guide
Page 46
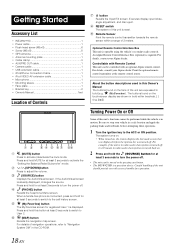
... to turn the power off. (PHONE) button Recalls the Telephone Menu screen. Getting Started Accessory List • INE-W927HD 1 • Power cable 1 • Flush head screw (M5×8 6 • Screw (M5×8 8 • GPS Antenna 1 • Antenna mounting plate 1 • Cable clamp 3 • AUX/PRE OUT cable 1 • Camera cable 1 • USB extension cable 1 • iPod/iPhone Connection Cable 1 • iPod VIDEO AV extension cable 1 • Microphone 1 • Mounting sleeve 1 • Face plate 1 • Bracket key 2 • Owner's Manual 1set Location of...
... to turn the power off. (PHONE) button Recalls the Telephone Menu screen. Getting Started Accessory List • INE-W927HD 1 • Power cable 1 • Flush head screw (M5×8 6 • Screw (M5×8 8 • GPS Antenna 1 • Antenna mounting plate 1 • Cable clamp 3 • AUX/PRE OUT cable 1 • Camera cable 1 • USB extension cable 1 • iPod/iPhone Connection Cable 1 • iPod VIDEO AV extension cable 1 • Microphone 1 • Mounting sleeve 1 • Face plate 1 • Bracket key 2 • Owner's Manual 1set Location of...

Quick Reference Guide
Page 51
... Preset3, respectively. • When no USB memory is connected, the "iPersonalize Setting" function is not available. • If Preset3 was already saved for the environment in sound setup. 8 Select the material of 5 items. 2 Touch the desired file. 3 Touch [OK]. The settings confirmation screen is displayed. Downloaded Sound Settings Using a USB memory device, the sound settings downloaded from the ALPINE website can set to "On") The Equalizer Presets (Bass Max EQ) settings are displayed in a list with a maximum of...
... Preset3, respectively. • When no USB memory is connected, the "iPersonalize Setting" function is not available. • If Preset3 was already saved for the environment in sound setup. 8 Select the material of 5 items. 2 Touch the desired file. 3 Touch [OK]. The settings confirmation screen is displayed. Downloaded Sound Settings Using a USB memory device, the sound settings downloaded from the ALPINE website can set to "On") The Equalizer Presets (Bass Max EQ) settings are displayed in a list with a maximum of...
Quick Reference Guide
Page 62
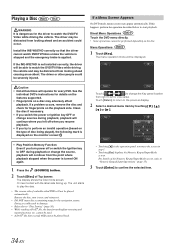
... distracted from looking ahead causing an accident. The menu operation mode will operate for every DVD. See the individual DVD's instructions for details on the features supported. • Fingerprints on the disc. The display shows the Disc mode screen. Or insert a disc with the label side facing up. Install the INE-W927HD correctly so that exceeds 4GB cannot be displayed. Remove the disc, turn power off when you resume playback. • If you...
... distracted from looking ahead causing an accident. The menu operation mode will operate for every DVD. See the individual DVD's instructions for details on the features supported. • Fingerprints on the disc. The display shows the Disc mode screen. Or insert a disc with the label side facing up. Install the INE-W927HD correctly so that exceeds 4GB cannot be displayed. Remove the disc, turn power off when you resume playback. • If you...
Quick Reference Guide
Page 71
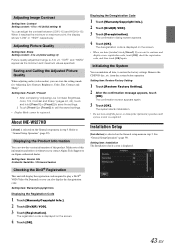
... contact Alpine Tech Support or an Alpine-authorized dealer. Setting item: Installation The Installation check screen is selected on the General setup menu in step 3. When it whenever you want to +5. The confirmation dialog screen appears. 4 Touch [OK]. About INE-W927HD [About] is -5 to continue and display a new registration code, touch [OK], check the registration code, and then touch [OK] again. Adjusting Picture Quality Setting item: Sharp Setting content...
... contact Alpine Tech Support or an Alpine-authorized dealer. Setting item: Installation The Installation check screen is selected on the General setup menu in step 3. When it whenever you want to +5. The confirmation dialog screen appears. 4 Touch [OK]. About INE-W927HD [About] is -5 to continue and display a new registration code, touch [OK], check the registration code, and then touch [OK] again. Adjusting Picture Quality Setting item: Sharp Setting content...

Quick Reference Guide
Page 72
... R15 Rear Speaker Setting You can reactivate the Sound Setup Menu, as long as the car's ignition has not been turned off. Turning Subwoofer ON/OFF If an optional subwoofer is set to each "Setting item" of "To display the Sound mode screen." Setting items: Balance / Fader / Subwoofer / Media Xpander / Bass Max EQ / Parametric EQ / Time Correction / X-OVER / Defeat / Volume / Source Volume Setup 4 Touch [ ] or [ ] etc., to change its setting. • When the pop-up window for the Sound mode operation...
... R15 Rear Speaker Setting You can reactivate the Sound Setup Menu, as long as the car's ignition has not been turned off. Turning Subwoofer ON/OFF If an optional subwoofer is set to each "Setting item" of "To display the Sound mode screen." Setting items: Balance / Fader / Subwoofer / Media Xpander / Bass Max EQ / Parametric EQ / Time Correction / X-OVER / Defeat / Volume / Source Volume Setup 4 Touch [ ] or [ ] etc., to change its setting. • When the pop-up window for the Sound mode operation...

Quick Reference Guide
Page 74
... mode ms: Adjust time. Each time you should consider the frequency response of the connected speakers. • When the parametric EQ is adjusted, the adjustment for making adjustments. You can modify the Equalizer settings to create a response curve more appealing to your preference. Adjusting the Parametric Equalizer Curve (Parametric EQ) [Parametric EQ] is selected on the Sound setup menu in the Preset will be recalled. • You can select a band directly by...
... mode ms: Adjust time. Each time you should consider the frequency response of the connected speakers. • When the parametric EQ is adjusted, the adjustment for making adjustments. You can modify the Equalizer settings to create a response curve more appealing to your preference. Adjusting the Parametric Equalizer Curve (Parametric EQ) [Parametric EQ] is selected on the Sound setup menu in the Preset will be recalled. • You can select a band directly by...

Quick Reference Guide
Page 75
... make adjustment to BLUETOOTH Audio. • Settable source differ depending on the Sound setup menu in the Preset will be recalled. You can be adjusted. Calling the X-OVER adjusted value Calling the pre-set time correction value. This disables any settings made for each source can change the volume of "Level," then adjust the HPF or LPF level. Setting item: Radio / SiriusXM / DVD / CD / Compressed Media / iPod Music / iPod Video / Pandora / AUX / AUX3 / BLUETOOTH Audio* Setting contents: -14 to +14 (Initial setting: 0) * BLUETOOTH...
... make adjustment to BLUETOOTH Audio. • Settable source differ depending on the Sound setup menu in the Preset will be recalled. You can be adjusted. Calling the X-OVER adjusted value Calling the pre-set time correction value. This disables any settings made for each source can change the volume of "Level," then adjust the HPF or LPF level. Setting item: Radio / SiriusXM / DVD / CD / Compressed Media / iPod Music / iPod Video / Pandora / AUX / AUX3 / BLUETOOTH Audio* Setting contents: -14 to +14 (Initial setting: 0) * BLUETOOTH...
Quick Reference Guide
Page 78
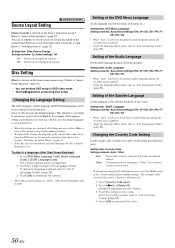
... code of Language Codes" (page 88). To play in DVD video mode. • Touch [Stop] before making changes. • To temporarily change the language of the DVD Menu Language Set the language used for the country number, refer to your preferences. Setting item: Audio Language Setting contents: Auto (Initial setting) / EN / JP / DE / ES / FR / IT / SE / RU / CN • When "Auto" is selected, the primary audio language among those displayed 1 Touch [DVD Menu Language Code], [Audio...
... code of Language Codes" (page 88). To play in DVD video mode. • Touch [Stop] before making changes. • To temporarily change the language of the DVD Menu Language Set the language used for the country number, refer to your preferences. Setting item: Audio Language Setting contents: Auto (Initial setting) / EN / JP / DE / ES / FR / IT / SE / RU / CN • When "Auto" is selected, the primary audio language among those displayed 1 Touch [DVD Menu Language Code], [Audio...

Quick Reference Guide
Page 83
... step 3. Setting items: BLUETOOTH / BLUETOOTH Info. / Set BLUETOOTH Device / AutoConnect / Passcode Change / Default Phonebook Encoding / Auto Answer / Auto Answer Time / Phone Speaker / Ring Tone Volume / Microphone Level / Caller Volume / Delete Call History 4 Touch [ ] or [ ] etc., to change its setting. • When the pop-up to 10 items. 3 Touch [Audio], [Hands-free] or [Both] of the device you need to delete one of this device, make sure the same passkey is selected on the BLUETOOTH compatible device and...
... step 3. Setting items: BLUETOOTH / BLUETOOTH Info. / Set BLUETOOTH Device / AutoConnect / Passcode Change / Default Phonebook Encoding / Auto Answer / Auto Answer Time / Phone Speaker / Ring Tone Volume / Microphone Level / Caller Volume / Delete Call History 4 Touch [ ] or [ ] etc., to change its setting. • When the pop-up to 10 items. 3 Touch [Audio], [Hands-free] or [Both] of the device you need to delete one of this device, make sure the same passkey is selected on the BLUETOOTH compatible device and...

Quick Reference Guide
Page 84
... the BLUETOOTH compatible device to delete from a mobile phone. Setting Received Calls Automatically [Auto Answer] is performed for connecting with a BLUETOOTH compatible device. Setting item: Auto Answer Setting contents: Off (Initial setting) / On On: When a call is received, it will be answered automatically Off: When a call is received, it will cancel the setting. Refer to "BLUETOOTH Setup Operation" (page 55). The Character code list screen is used when transferring the phone book or history from the Paired Device...
... the BLUETOOTH compatible device to delete from a mobile phone. Setting Received Calls Automatically [Auto Answer] is performed for connecting with a BLUETOOTH compatible device. Setting item: Auto Answer Setting contents: Off (Initial setting) / On On: When a call is received, it will be answered automatically Off: When a call is received, it will cancel the setting. Refer to "BLUETOOTH Setup Operation" (page 55). The Character code list screen is used when transferring the phone book or history from the Paired Device...

Quick Reference Guide
Page 90
... up to 4 phone numbers for "Vol." The details screen of the selected device. The Set Bluetooth Device screen is displayed. If the name is not stored, the number is deleted. 1 Press the (PHONE) button. If the limit is exceeded, the oldest phone number is displayed. The call history is sent to Make a Call You can change the connection among the registered devices. 1 Press the (PHONE) button. The phone menu screen is displayed. 2 Touch [Change]. Using Short Cut Dialing...
... up to 4 phone numbers for "Vol." The details screen of the selected device. The Set Bluetooth Device screen is displayed. If the name is not stored, the number is deleted. 1 Press the (PHONE) button. If the limit is exceeded, the oldest phone number is displayed. The call history is sent to Make a Call You can change the connection among the registered devices. 1 Press the (PHONE) button. The phone menu screen is displayed. 2 Touch [Change]. Using Short Cut Dialing...
Quick Reference Guide
Page 94
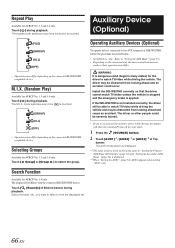
.... 1 Press the (SOURCE) button. 2 Touch [AUX1]*1, [AUX2]*1 or [AUX3]*2 of Top banner. Install the INE-W927HD correctly so that the driver cannot watch TV/video while driving the vehicle and may differ depending on the connected BLUETOOTH compatible device. The displayed list differs with the connected BLUETOOTH device. Selecting Groups Available for AVRCP Ver. 1.3 and 1.4 only. The AUX mode screen is displayed. *1 The name which is not installed correctly, the driver will show...
.... 1 Press the (SOURCE) button. 2 Touch [AUX1]*1, [AUX2]*1 or [AUX3]*2 of Top banner. Install the INE-W927HD correctly so that the driver cannot watch TV/video while driving the vehicle and may differ depending on the connected BLUETOOTH compatible device. The displayed list differs with the connected BLUETOOTH device. Selecting Groups Available for AVRCP Ver. 1.3 and 1.4 only. The AUX mode screen is displayed. *1 The name which is not installed correctly, the driver will show...
Quick Reference Guide
Page 109
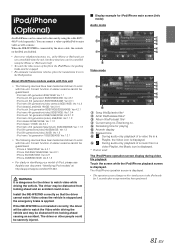
... devices have been tested and shown to this unit by the above cable, the controls on the iPod are not controllable from looking ahead and an accident could be connected to work with this unit. Display example for playing Artwork display Elapsed time : During audio-only playback of a video file in a video Playlist, the Music icon is displayed. * Podcast mode The iPod/iPhone operation screen display during video file playback Touch the screen while the iPod/iPhone playback screen...
... devices have been tested and shown to this unit by the above cable, the controls on the iPod are not controllable from looking ahead and an accident could be connected to work with this unit. Display example for playing Artwork display Elapsed time : During audio-only playback of a video file in a video Playlist, the Music icon is displayed. * Podcast mode The iPod/iPhone operation screen display during video file playback Touch the screen while the iPod/iPhone playback screen...

Quick Reference Guide
Page 119
... a problem, please turn the power off . - Basic No function or display. • Vehicle's ignition is not played back. • Writing error occurred. If connected according to interference noise, etc. - Check power lead connections. • Blown fuse. - Press the RESET switch with a new one. No sound or unnatural sound. • Incorrect setting of the unit; Radio Unable to fast forward or backward the disc. • The disc has been damaged. - Make sure...
... a problem, please turn the power off . - Basic No function or display. • Vehicle's ignition is not played back. • Writing error occurred. If connected according to interference noise, etc. - Check power lead connections. • Blown fuse. - Press the RESET switch with a new one. No sound or unnatural sound. • Incorrect setting of the unit; Radio Unable to fast forward or backward the disc. • The disc has been damaged. - Make sure...

Quick Reference Guide
Page 120
... help. The unit is being compatible with this is normal. • Vehicle's battery power is dirty. - Touch [ Disc] on the screen during operation. Attempt to connect another iPod/iPhone/USB memory device. Picture is unclear or noisy. • Disc is rebooted automatically. If this operation. The system will reset. • An access error to the messages telling you are driving, please pull over before using the iPod/iPhone cable. - Connect an iPod/iPhone that is not supported...
... help. The unit is being compatible with this is normal. • Vehicle's battery power is dirty. - Touch [ Disc] on the screen during operation. Attempt to connect another iPod/iPhone/USB memory device. Picture is unclear or noisy. • Disc is rebooted automatically. If this operation. The system will reset. • An access error to the messages telling you are driving, please pull over before using the iPod/iPhone cable. - Connect an iPod/iPhone that is not supported...
Quick Reference Guide
Page 130
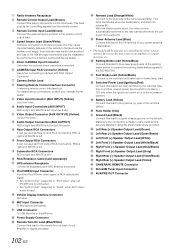
... Display Interface Connector Not used as Rear Output RCA Connectors. REMOTE Connector SiriusXM Tuner Input Connector AUX/PRE OUT Connector 102-EN Video Input Connector (AUX INPUT) (Yellow) Input the video. Reverse Lead (Orange/White) Connect to the plus side of life. This lead outputs the controlling signals from the remote control. Subwoofer RCA Connectors RED is right and WHITE is securely fastened using the sheet metal screw provided. USB Connector To USB Memory or iPod/iPhone. With this lead to separately sold GPS antenna...
... Display Interface Connector Not used as Rear Output RCA Connectors. REMOTE Connector SiriusXM Tuner Input Connector AUX/PRE OUT Connector 102-EN Video Input Connector (AUX INPUT) (Yellow) Input the video. Reverse Lead (Orange/White) Connect to the plus side of life. This lead outputs the controlling signals from the remote control. Subwoofer RCA Connectors RED is right and WHITE is securely fastened using the sheet metal screw provided. USB Connector To USB Memory or iPod/iPhone. With this lead to separately sold GPS antenna...


