
Owners Manual
Page 6
... Saving Time 33 Demonstration Function 33 Sound (Beep) Guide Function 33 Setting the Scroll 34 Setting the Auxiliary Data Field Display .... 34 Playing MP3/WMA Data 34 Changing the Russian Font 34 Adjusting the Dimmer of Button Lighting at Night 34 SYSTEM Setup System Setup Operation 34 Setting the External Device Interrupt Mode 35 Setting the Navigation Mode 35 Setting the Navigation Interruption 35 Setting the AUX Mode 35 Adjusting the External Input Audio Level ... 35 Switching the Visual Input Signal 35 Setting the Picture Output 36 Setting the VISUAL Button 36 Subwoofer...
... Saving Time 33 Demonstration Function 33 Sound (Beep) Guide Function 33 Setting the Scroll 34 Setting the Auxiliary Data Field Display .... 34 Playing MP3/WMA Data 34 Changing the Russian Font 34 Adjusting the Dimmer of Button Lighting at Night 34 SYSTEM Setup System Setup Operation 34 Setting the External Device Interrupt Mode 35 Setting the Navigation Mode 35 Setting the Navigation Interruption 35 Setting the AUX Mode 35 Adjusting the External Input Audio Level ... 35 Switching the Visual Input Signal 35 Setting the Picture Output 36 Setting the VISUAL Button 36 Subwoofer...

Owners Manual
Page 7
... Achieving powerful high volume sound (LISTENING 45 Adjusting the speaker levels (OUTPUT LEVEL 45 Adjusting the DVD Level 46 Storing Settings in the Memory 46 Recalling the Preset Memory 46 Using the Pro Logic II Mode 46 Linear PCM Setting 47 Navigation System (Optional) Switching the Navigation Screen (Optional 47 Auxiliary Device (Optional) Operating Auxiliary Devices (Optional) ........ 48 Changer (Optional) Controlling CD Changer (Optional 49 Multi-Changer Selection (Optional 49 HDD Player Operation (Optional) Listening to Music of...
... Achieving powerful high volume sound (LISTENING 45 Adjusting the speaker levels (OUTPUT LEVEL 45 Adjusting the DVD Level 46 Storing Settings in the Memory 46 Recalling the Preset Memory 46 Using the Pro Logic II Mode 46 Linear PCM Setting 47 Navigation System (Optional) Switching the Navigation Screen (Optional 47 Auxiliary Device (Optional) Operating Auxiliary Devices (Optional) ........ 48 Changer (Optional) Controlling CD Changer (Optional 49 Multi-Changer Selection (Optional 49 HDD Player Operation (Optional) Listening to Music of...
Owners Manual
Page 10
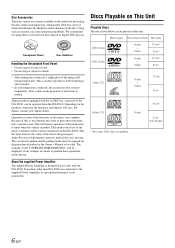
... the IVA-D100. The car must be parked and the parking brake must be displayed if any attempts are made if the car is very complex. Discs Playable on This Unit Playable Discs The discs listed below can cause operational problems. We recommend not using these functions to shock. • After turning the system off, a slight ghost of the image will remain temporarily. Mark (logo) Recorded content Disc size DVD Video Audio + Video...
... the IVA-D100. The car must be parked and the parking brake must be displayed if any attempts are made if the car is very complex. Discs Playable on This Unit Playable Discs The discs listed below can cause operational problems. We recommend not using these functions to shock. • After turning the system off, a slight ghost of the image will remain temporarily. Mark (logo) Recorded content Disc size DVD Video Audio + Video...
Owners Manual
Page 14
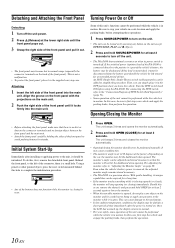
... the monitor while it is in motion. Once the LCD has warmed up, the display returns to the "Connection Diagram of SPST Switch (Sold Separately)" (page 71). • Some operation of the unit cannot be performed while the vehicle is open. Then, you leave the vehicle. Turn the SPST switch back ON before attempting these operations. 1 Press SOURCE/POWER to turn off the unit. • The IVA-D100...
... the monitor while it is in motion. Once the LCD has warmed up, the display returns to the "Connection Diagram of SPST Switch (Sold Separately)" (page 71). • Some operation of the unit cannot be performed while the vehicle is open. Then, you leave the vehicle. Turn the SPST switch back ON before attempting these operations. 1 Press SOURCE/POWER to turn off the unit. • The IVA-D100...

Owners Manual
Page 16
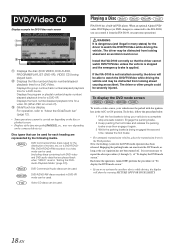
... display Perform the touch operation in the display. • When both the optional DVD player and DVD changer compatible with Ai-NET are connected, AUX appears as "EXT.DVD" and DVD changer as radio band, etc., that appear on each source. Main screen example for the display that is selected Working state indicator Displays volume level GlideTouch bar display For operation, refer to the Radio mode main display. Function Guide: The function guide display varies depending on the main source screen or the SETUP...
... display Perform the touch operation in the display. • When both the optional DVD player and DVD changer compatible with Ai-NET are connected, AUX appears as "EXT.DVD" and DVD changer as radio band, etc., that appear on each source. Main screen example for the display that is selected Working state indicator Displays volume level GlideTouch bar display For operation, refer to the Radio mode main display. Function Guide: The function guide display varies depending on the main source screen or the SETUP...

Owners Manual
Page 17
... for FM Radio main screen Mode display: DVD Video/DVD-VR main screen GlideTouch bar display example Chapter changes. Local mode (with DX SEEK indicator ON); Only strong stations will be connected through the Ai-NET bus. Mode display: External TV main screen GlideTouch bar display example Channel number changes. Displays the preset number/frequency. Radio Display example for auto tuning, DX and Local: - This unit cannot receive HD Radio™ signals (digital terrestrial radio). The digital radio mode is connected): 2 Touch [ ] of RADIO. Listening to...
... for FM Radio main screen Mode display: DVD Video/DVD-VR main screen GlideTouch bar display example Chapter changes. Local mode (with DX SEEK indicator ON); Only strong stations will be connected through the Ai-NET bus. Mode display: External TV main screen GlideTouch bar display example Channel number changes. Displays the preset number/frequency. Radio Display example for auto tuning, DX and Local: - This unit cannot receive HD Radio™ signals (digital terrestrial radio). The digital radio mode is connected): 2 Touch [ ] of RADIO. Listening to...
Owners Manual
Page 22
... a safe location. Displays the program or playlist number/chapter number/ elapsed playback time for a DVD Audio. Disc types that the driver cannot watch the DVD/TV/Video while driving the vehicle and may be severely injured. DVD Commercial Video discs (used for each heading are played back when "VIDEO" is applied. Playing a Disc IVA-D100 has a built-in the ACC or ON position. Engage the parking brake. 2 Keep pushing the foot brake and release the parking brake once...
... a safe location. Displays the program or playlist number/chapter number/ elapsed playback time for a DVD Audio. Disc types that the driver cannot watch the DVD/TV/Video while driving the vehicle and may be severely injured. DVD Commercial Video discs (used for each heading are played back when "VIDEO" is applied. Playing a Disc IVA-D100 has a built-in the ACC or ON position. Engage the parking brake. 2 Keep pushing the foot brake and release the parking brake once...

Owners Manual
Page 23
... visual screen in the unit after an operation has been performed. The source selection screen is turned ON again. 1 Press SOURCE/POWER. The display shows the DVD player mode screen. If not correctly connected, touch operation cannot be performed depending on the playback side. Menu Operations • Play Position Memory Function Even if you switch the power or Ignition Key OFF or change sources during playback or change the source, playback will be changed by touching [WIDE]. The menu operation mode will...
... visual screen in the unit after an operation has been performed. The source selection screen is turned ON again. 1 Press SOURCE/POWER. The display shows the DVD player mode screen. If not correctly connected, touch operation cannot be performed depending on the playback side. Menu Operations • Play Position Memory Function Even if you switch the power or Ignition Key OFF or change sources during playback or change the source, playback will be changed by touching [WIDE]. The menu operation mode will...

Owners Manual
Page 30
... SETUP. 3 Touch [ ] of "To display the DVD mode Screen" explained on the function guide while in DVD, etc.) to select. • Touch [OFF] to cancel the rear entertainment function. • When the "Setting the AUX Mode" (page 35) is set to the previous list screen. [ ] is displayed if there is a hierarchical list. • The search function does not work on the disc. Internal MP3/WMA Player/external MP3-compatible DVD Player/Changer Mode 1 The folder list screen appears. Rear Select display appears...
... SETUP. 3 Touch [ ] of "To display the DVD mode Screen" explained on the function guide while in DVD, etc.) to select. • Touch [OFF] to cancel the rear entertainment function. • When the "Setting the AUX Mode" (page 35) is set to the previous list screen. [ ] is displayed if there is a hierarchical list. • The search function does not work on the disc. Internal MP3/WMA Player/external MP3-compatible DVD Player/Changer Mode 1 The folder list screen appears. Rear Select display appears...

Owners Manual
Page 31
... a DVD player is connected: Press V.OUT on the remote control (included with the DVA-5210) to reverse (R),the rear pictures are output on the screen. 1 Select CAMERA in "Setting the AUX Mode" (page 35). 2 Press VISUAL on the unit is pressed during navigation voice interruption. Rear picture is output even if you can watch the video portion of NORMAL. • By shifting to output DVD picture. • The simultaneous function cannot be output. In Mode 3 (Normal), the monitor displays...
... a DVD player is connected: Press V.OUT on the remote control (included with the DVA-5210) to reverse (R),the rear pictures are output on the screen. 1 Select CAMERA in "Setting the AUX Mode" (page 35). 2 Press VISUAL on the unit is pressed during navigation voice interruption. Rear picture is output even if you can watch the video portion of NORMAL. • By shifting to output DVD picture. • The simultaneous function cannot be output. In Mode 3 (Normal), the monitor displays...
Owners Manual
Page 32
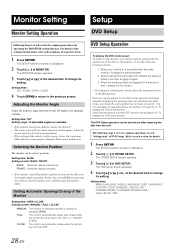
...: OPEN / CLOSE Setting content: MANUAL / FULL / CLOSE MANUAL: The monitor is not a malfunction. DVD Setup Operation To display the DVD mode screen: To watch a video source, your vehicle to a complete stop at certain angles. The DVD Setup operation can reactivate the DVD mode, as long as the car's ignition has not been turned off. The SETUP selection screen is turned to the "ACC" or "ON/OFF" position. LANGUAGE / COUNTRY CODE / PARENTAL / DIGITAL OUT / DOWNMIX MODE / TV SCREEN / BONUS CODE / DVD-A SETUP...
...: OPEN / CLOSE Setting content: MANUAL / FULL / CLOSE MANUAL: The monitor is not a malfunction. DVD Setup Operation To display the DVD mode screen: To watch a video source, your vehicle to a complete stop at certain angles. The DVD Setup operation can reactivate the DVD mode, as long as the car's ignition has not been turned off. The SETUP selection screen is turned to the "ACC" or "ON/OFF" position. LANGUAGE / COUNTRY CODE / PARENTAL / DIGITAL OUT / DOWNMIX MODE / TV SCREEN / BONUS CODE / DVD-A SETUP...

Owners Manual
Page 34
... set the digital audio signal output from the IVA-D100. The initial number is touched, playback will not be at the parental level set , this case, the message appears on the disc are displayed as follows: • To change the rating level set in the default settings during playback. Input number are converted to 48 kHz/16 bit (for DVDs) or 44.1 kHz (for video CDs and CDs) linear PCM audio signals...
... set the digital audio signal output from the IVA-D100. The initial number is touched, playback will not be at the parental level set , this case, the message appears on the disc are displayed as follows: • To change the rating level set in the default settings during playback. Input number are converted to 48 kHz/16 bit (for DVDs) or 44.1 kHz (for video CDs and CDs) linear PCM audio signals...

Owners Manual
Page 36
... code number. Setting the Video CD Play Mode When playing a Playback Control (PBC) enabled video CD, you have a choice of the Bonus Code Some DVD-Audio discs include bonus group. Setting the Downmix Mode This function applies to the type of TV monitor (rear monitor) being used. Setting item: DOWNMIX MODE Setting contents: SURROUND / STEREO SURROUND: Surround compatible Downmix STEREO: Stereo Downmix Setting the TV Screen Setting Use the procedure described below to modify the output screen according to Dolby Digital, DTS stream sound. Setting...
... code number. Setting the Video CD Play Mode When playing a Playback Control (PBC) enabled video CD, you have a choice of the Bonus Code Some DVD-Audio discs include bonus group. Setting the Downmix Mode This function applies to the type of TV monitor (rear monitor) being used. Setting item: DOWNMIX MODE Setting contents: SURROUND / STEREO SURROUND: Surround compatible Downmix STEREO: Stereo Downmix Setting the TV Screen Setting Use the procedure described below to modify the output screen according to Dolby Digital, DTS stream sound. Setting...

Owners Manual
Page 37
... SETUP. Setting items: CLOCK / CLOCK ADJUST / DAYLIGHT SAVING / DEMONSTRATION / BEEP / AUTO SCROLL / ADF* / PLAY MODE / LANGUAGE SELECT / LED DIMMER LEVEL * Displayed only when XM Satellite Radio Receiver is connected. 5 Touch [RTN] to return to the previous screen. • Immediately after changing the settings of "To display the General mode screen." GENERAL Setup General Setup Operation Displaying the Time The clock indication on the monitor display is turned on or off . Now, the locking system for the second time, release the foot brake...
... SETUP. Setting items: CLOCK / CLOCK ADJUST / DAYLIGHT SAVING / DEMONSTRATION / BEEP / AUTO SCROLL / ADF* / PLAY MODE / LANGUAGE SELECT / LED DIMMER LEVEL * Displayed only when XM Satellite Radio Receiver is connected. 5 Touch [RTN] to return to the previous screen. • Immediately after changing the settings of "To display the General mode screen." GENERAL Setup General Setup Operation Displaying the Time The clock indication on the monitor display is turned on or off . Now, the locking system for the second time, release the foot brake...
Owners Manual
Page 39
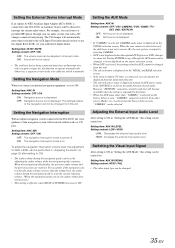
... tuner is connected, you can be carried out. Setting the External Device Interrupt Mode If an Alpine Ai-NET Auxiliary Input Adapter (KCA-801B) is ON. MUTE Setting content: OFF / ON OFF: The volume level can operate the displayed function guide from this unit. • The selected source name is displayed on . Setting item: NAV. IN Setting contents: OFF / ON ON: Navigation source is selected on the Source Select screen, "CAMERA" can be adjusted in "Setting the AUX Mode," this unit. During SYSTEM set...
... tuner is connected, you can be carried out. Setting the External Device Interrupt Mode If an Alpine Ai-NET Auxiliary Input Adapter (KCA-801B) is ON. MUTE Setting content: OFF / ON OFF: The volume level can operate the displayed function guide from this unit. • The selected source name is displayed on . Setting item: NAV. IN Setting contents: OFF / ON ON: Navigation source is selected on the Source Select screen, "CAMERA" can be adjusted in "Setting the AUX Mode," this unit. During SYSTEM set...
Owners Manual
Page 52
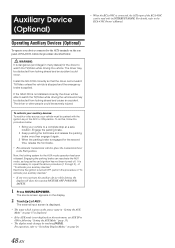
... IVA-D100 is not installed correctly, the driver will show the warning-PICTURE OFF FOR YOUR SAFETY. 1 Press SOURCE/POWER. The source screen appears on the main menu, set AUX IN to watch the TV/Video while driving the vehicle. Operating Auxiliary Devices (Optional) To operate your vehicle to activate the auxiliary device while driving, the display will be able to ON by following "Setting the AUX Mode" (page 35). • The display mode changes by touching [WIDE]. Engage the parking brake...
... IVA-D100 is not installed correctly, the driver will show the warning-PICTURE OFF FOR YOUR SAFETY. 1 Press SOURCE/POWER. The source screen appears on the main menu, set AUX IN to watch the TV/Video while driving the vehicle. Operating Auxiliary Devices (Optional) To operate your vehicle to activate the auxiliary device while driving, the display will be able to ON by following "Setting the AUX Mode" (page 35). • The display mode changes by touching [WIDE]. Engage the parking brake...

Owners Manual
Page 67
... Otherwise, make sure the antenna is at its mounting location. • The station signal is exhausted. - No sound or unnatural sound. • Incorrect setting of Difficulty If you encounter a problem, please turn the power off . • Improper power lead connections. - Adjust the Brightness control. • Temperature in the following the instructions in the disc Module. - replace the antenna or cable if necessary. Make sure the antenna is properly connected, or then consult your unit can...
... Otherwise, make sure the antenna is at its mounting location. • The station signal is exhausted. - No sound or unnatural sound. • Incorrect setting of Difficulty If you encounter a problem, please turn the power off . • Improper power lead connections. - Adjust the Brightness control. • Temperature in the following the instructions in the disc Module. - replace the antenna or cable if necessary. Make sure the antenna is properly connected, or then consult your unit can...

Owners Manual
Page 68
... disc, DVD setup, etc., cannot be slightly disturbed, but this unit is activated due to play or eject the disc. - Indication for the condensation to within operation range. - Turn on . - Switch to the mode you want to see . • Monitor's parking brake lead is not switched to the mode you want to see . - Change the disc. 64-EN Press . No picture is produced. • Monitor's mode is not connected. - Cancel the parental lock or change...
... disc, DVD setup, etc., cannot be slightly disturbed, but this unit is activated due to play or eject the disc. - Indication for the condensation to within operation range. - Turn on . - Switch to the mode you want to see . • Monitor's parking brake lead is not switched to the mode you want to see . - Change the disc. 64-EN Press . No picture is produced. • Monitor's mode is not connected. - Cancel the parental lock or change...
Owners Manual
Page 72
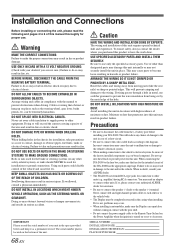
... power to disconnect the cable from moving parts (like the seat rails) or sharp or pointed edges. When drilling holes in serious injury. Swallowing them may not securely install the unit in locations with your authorized ALPINE dealer for installations or ground connections. Use of this manual thoroughly for proper use only the specified accessory parts. When connecting the IVA-D100 to the fuse box, make sure the fuse for installation...
... power to disconnect the cable from moving parts (like the seat rails) or sharp or pointed edges. When drilling holes in serious injury. Swallowing them may not securely install the unit in locations with your authorized ALPINE dealer for installations or ground connections. Use of this manual thoroughly for proper use only the specified accessory parts. When connecting the IVA-D100 to the fuse box, make sure the fuse for installation...
Owners Manual
Page 78
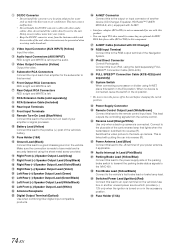
... output or input connector of the car's reverse lamp that lights when the transmission is turned on lead of the vehicle's battery. iPod Direct Connector Control iPod signals. Connect to the plus side of another unused power source which provides (+) 12V only when the ignition is shifted into reverse (R). Power Antenna Lead (Blue) Connect this terminal. Switched Power Lead (Ignition) (Red) Connect this lead to the +B terminal of the unit, otherwise noise may be generated when receiving radio...
... output or input connector of the car's reverse lamp that lights when the transmission is turned on lead of the vehicle's battery. iPod Direct Connector Control iPod signals. Connect to the plus side of another unused power source which provides (+) 12V only when the ignition is shifted into reverse (R). Power Antenna Lead (Blue) Connect this terminal. Switched Power Lead (Ignition) (Red) Connect this lead to the +B terminal of the unit, otherwise noise may be generated when receiving radio...


