
Owners Manual
Page 3
... the Front Panel ........ 6 Initial System Start-Up 6 Adjusting Volume 6 Lowering Volume Quickly 7 Setting Time 7 Radio Listening to Radio 7 Presetting Stations Manually 8 Presetting Stations Automatically 8 Tuning to Preset Stations 8 CD/MP3/WMA/AAC Playback 8 Repeat Play 9 M.I.X. (Random Play 9 Searching from CD Text 9 File/Folder Name Search (concerning MP3/WMA/AAC 10 Quick Search 10 About MP3...
... the Front Panel ........ 6 Initial System Start-Up 6 Adjusting Volume 6 Lowering Volume Quickly 7 Setting Time 7 Radio Listening to Radio 7 Presetting Stations Manually 8 Presetting Stations Automatically 8 Tuning to Preset Stations 8 CD/MP3/WMA/AAC Playback 8 Repeat Play 9 M.I.X. (Random Play 9 Searching from CD Text 9 File/Folder Name Search (concerning MP3/WMA/AAC 10 Quick Search 10 About MP3...
Owners Manual
Page 8
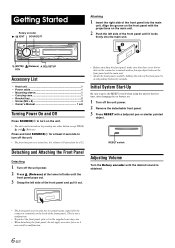
.../SETUP RTN Accessory List • Head unit 1 • Power cable 1 • Mounting sleeve 1 • Carrying case 1 • Bracket key 2 • Screw (M5 × 8 4 • Owner's Manual 1 set Turning Power On and Off Press SOURCE/ to avoid pushing buttons by pressing any other button except TITLE, and (Release). This is no dirt...
.../SETUP RTN Accessory List • Head unit 1 • Power cable 1 • Mounting sleeve 1 • Carrying case 1 • Bracket key 2 • Screw (M5 × 8 4 • Owner's Manual 1 set Turning Power On and Off Press SOURCE/ to avoid pushing buttons by pressing any other button except TITLE, and (Release). This is no dirt...
Owners Manual
Page 9
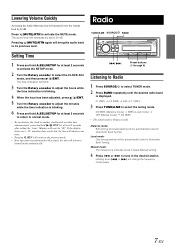
...repeatedly until the desired radio band is performed for 60 seconds, the unit will return to normal mode automatically. to the previous mode. • If no operation is displayed. Press (MUTE)/RTN to select the tuning mode. The audio level will return to tune in steps (Manual tuning). 4 Press or...do this, the time will advance one hour. • Pressing /RTN will decrease by 20 dB. DX SEEK (Distance mode) SEEK (Local mode) OFF (Manual mode) DX SEEK • The initial mode is blinking. 6 Press and hold A.SEL/SETUP for at least 2 seconds to return to normal mode. •...
...repeatedly until the desired radio band is performed for 60 seconds, the unit will return to normal mode automatically. to the previous mode. • If no operation is displayed. Press (MUTE)/RTN to select the tuning mode. The audio level will return to tune in steps (Manual tuning). 4 Press or...do this, the time will advance one hour. • Pressing /RTN will decrease by 20 dB. DX SEEK (Distance mode) SEEK (Local mode) OFF (Manual mode) DX SEEK • The initial mode is blinking. 6 Press and hold A.SEL/SETUP for at least 2 seconds to return to normal mode. •...
Owners Manual
Page 10
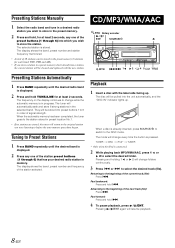
... Pressing and holding 1 or 2 will automatically seek and store 6 strong stations in the selected band. Presetting Stations Manually 1 Select the radio band and tune in a desired radio station you wish to store in the preset memory. 2 Press and hold, for at least 2 seconds. The ...lights up . The disc will be pulled into preset buttons 1 to before the auto memory procedure began. Fast forward: Press and hold . CD/MP3/WMA/AAC /ESC Rotary encoder // ENT SOURCE/ /RTN 1 2 45 TITLE Presetting Stations Automatically 1 Press BAND repeatedly until the desired ...
... Pressing and holding 1 or 2 will automatically seek and store 6 strong stations in the selected band. Presetting Stations Manually 1 Select the radio band and tune in a desired radio station you wish to store in the preset memory. 2 Press and hold, for at least 2 seconds. The ...lights up . The disc will be pulled into preset buttons 1 to before the auto memory procedure began. Fast forward: Press and hold . CD/MP3/WMA/AAC /ESC Rotary encoder // ENT SOURCE/ /RTN 1 2 45 TITLE Presetting Stations Automatically 1 Press BAND repeatedly until the desired ...
Owners Manual
Page 12
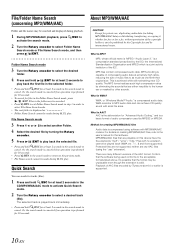
...least 2 seconds in the search mode to return to cancel. Quick Search You can achieve CD quality sound with no operation is a basic format of audio compression used conforms to the user's manual for a fee, without permission of the copyright holder is a joint activity institution of the ... 9 are raw AAC files (using software with MP3/WMA/AAC codecs. WMA, or "Windows Media™ Audio," is achieved while still maintaining near CD quality. File/Folder Name Search (concerning MP3/WMA/AAC) Folder and file names may be searched and displayed during playback. 1 During MP3/WMA/AAC ...
...least 2 seconds in the search mode to return to cancel. Quick Search You can achieve CD quality sound with no operation is a basic format of audio compression used conforms to the user's manual for a fee, without permission of the copyright holder is a joint activity institution of the ... 9 are raw AAC files (using software with MP3/WMA/AAC codecs. WMA, or "Windows Media™ Audio," is achieved while still maintaining near CD quality. File/Folder Name Search (concerning MP3/WMA/AAC) Folder and file names may be searched and displayed during playback. 1 During MP3/WMA/AAC ...
Owners Manual
Page 17
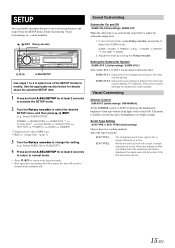
.... (e.g. SUBW BASS TREBLE BAL FADER DEFEAT VOLUME SUBW 2 Adjust the level by turning the Rotary encoder. Visual Customizing Dimmer Control DIM AUTO (Initial setting) / DIM MANUAL Set the DIMMER control to AUTO to decrease the illumination brightness of the unit with the head lights of the SETUP modes to select one...
.... (e.g. SUBW BASS TREBLE BAL FADER DEFEAT VOLUME SUBW 2 Adjust the level by turning the Rotary encoder. Visual Customizing Dimmer Control DIM AUTO (Initial setting) / DIM MANUAL Set the DIMMER control to AUTO to decrease the illumination brightness of the unit with the head lights of the SETUP modes to select one...
Owners Manual
Page 19
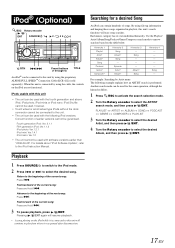
...(1 through 6) TITLE An iPod® can be used with software versions earlier than "2006-06-28". When this unit by using the proprietary ALPINE FULL SPEED™ Connection Cable (KCE-422i) (sold separately). For example: Searching by using file tag information and keeping these songs organized in ... and above iPod, iPod photo, iPod minis or iPod nano. Each music category has its own individual hierarchy. Song - Advance to the iPod Instruction Manual. Playback 1 Press SOURCE/ to switch to the iPod mode. 2 Press or to select the desired Album, and then press / /ENT. Fast ...
...(1 through 6) TITLE An iPod® can be used with software versions earlier than "2006-06-28". When this unit by using the proprietary ALPINE FULL SPEED™ Connection Cable (KCE-422i) (sold separately). For example: Searching by using file tag information and keeping these songs organized in ... and above iPod, iPod photo, iPod minis or iPod nano. Each music category has its own individual hierarchy. Song - Advance to the iPod Instruction Manual. Playback 1 Press SOURCE/ to switch to the iPod mode. 2 Press or to select the desired Album, and then press / /ENT. Fast ...
Owners Manual
Page 23
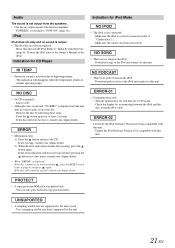
...Remove the disc by the unit. 21-EN If not ejecting, consult your Alpine dealer. • Mechanism error. 1) Press the button and eject the CD. If the disc still does not eject, consult your Alpine dealer. 2) When the error indication remains after pressing the button for iPod Mode... recognized. - Download songs to the iPod and connect to the Owner's Manual of the internal amplifier. - Make sure the cable is activated due to "Connections"). If the disc still cannot be ejected, consult your Alpine dealer. • When "ERROR" is correctly connected (refer to high ...
...Remove the disc by the unit. 21-EN If not ejecting, consult your Alpine dealer. • Mechanism error. 1) Press the button and eject the CD. If the disc still does not eject, consult your Alpine dealer. 2) When the error indication remains after pressing the button for iPod Mode... recognized. - Download songs to the iPod and connect to the Owner's Manual of the internal amplifier. - Make sure the cable is activated due to "Connections"). If the disc still cannot be ejected, consult your Alpine dealer. • When "ERROR" is correctly connected (refer to high ...
Owners Manual
Page 25
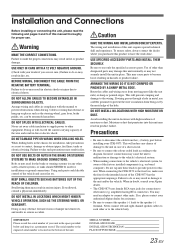
... USE SPECIFIED ACCESSORY PARTS AND INSTALL THEM SECURELY. Route the cables and wiring away from the (-) battery post before installing your Alpine dealer. • The CDE-9873 uses female RCA-type jacks for proper use only the specified accessory parts. If wiring passes through a hole in fire or... OF PURCHASE: 23-EN Installation and Connections Before installing or connecting the unit, please read the following and pages 3 and 5 of this manual thoroughly for connection to other units (e.g. USE ONLY IN CARS WITH A 12 VOLT NEGATIVE GROUND. (Check with your unit in the space ...
... USE SPECIFIED ACCESSORY PARTS AND INSTALL THEM SECURELY. Route the cables and wiring away from the (-) battery post before installing your Alpine dealer. • The CDE-9873 uses female RCA-type jacks for proper use only the specified accessory parts. If wiring passes through a hole in fire or... OF PURCHASE: 23-EN Installation and Connections Before installing or connecting the unit, please read the following and pages 3 and 5 of this manual thoroughly for connection to other units (e.g. USE ONLY IN CARS WITH A 12 VOLT NEGATIVE GROUND. (Check with your unit in the space ...

Owners Manual
Page 31
... CANADA ONLY: This Warranty is not valid unless your Alpine car audio product has been installed in your Dealer or contact Alpine at one year from an Authorized Alpine Dealer. Should you read it is in the Owner's manual. Speaker mechanical failure (e.g. Cracked or damaged LCD panels...some do not allow the exclusion or limitation of the product, who must be presented to an Authorized Alpine Service Center or Alpine, Alpine will , at ; http://www.alpine-usa.com ALPINE ELECTRONICS OF AMERICA, INC., 19145 Gramercy Place, Torrance, California 90501, U.S.A. WHO IS COVERED: This ...
... CANADA ONLY: This Warranty is not valid unless your Alpine car audio product has been installed in your Dealer or contact Alpine at one year from an Authorized Alpine Dealer. Should you read it is in the Owner's manual. Speaker mechanical failure (e.g. Cracked or damaged LCD panels...some do not allow the exclusion or limitation of the product, who must be presented to an Authorized Alpine Service Center or Alpine, Alpine will , at ; http://www.alpine-usa.com ALPINE ELECTRONICS OF AMERICA, INC., 19145 Gramercy Place, Torrance, California 90501, U.S.A. WHO IS COVERED: This ...


