
User Manual
Page 1
..., 1930 Zaventem, Belgium Phone 02-725-13 15 Designed by ALPINE Japan 68-09359Z32-A Phone 0870-33 33 763 ALPINE ELECTRONICS FRANCE S.A.R.L. (RCS PONTOISE B 338 101 280) 98, Rue de la Belle Etoile, Z.I. R EN MP3/WMA/AAC CD Receiver CDA-9886 FR ES • OWNER'S MANUAL Please read before using this equipment. • MODE D'EMPLOI...
..., 1930 Zaventem, Belgium Phone 02-725-13 15 Designed by ALPINE Japan 68-09359Z32-A Phone 0870-33 33 763 ALPINE ELECTRONICS FRANCE S.A.R.L. (RCS PONTOISE B 338 101 280) 98, Rue de la Belle Etoile, Z.I. R EN MP3/WMA/AAC CD Receiver CDA-9886 FR ES • OWNER'S MANUAL Please read before using this equipment. • MODE D'EMPLOI...
User Manual
Page 3
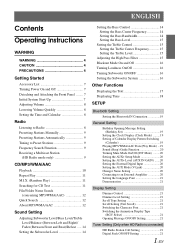
... and Attaching the Front Panel ........ 7 Initial System Start-Up 7 Adjusting Volume 8 Lowering Volume Quickly 8 Setting the Time and Calendar 8 Radio Listening to Radio 8 Presetting Stations Manually 9 Presetting Stations Automatically 9 Tuning to Preset Stations 9 Frequency Search Function 9 Receiving a Multicast Station (HD Radio mode only 9 CD/MP3/WMA/AAC Playback 10 Repeat Play...
... and Attaching the Front Panel ........ 7 Initial System Start-Up 7 Adjusting Volume 8 Lowering Volume Quickly 8 Setting the Time and Calendar 8 Radio Listening to Radio 8 Presetting Stations Manually 9 Presetting Stations Automatically 9 Tuning to Preset Stations 9 Frequency Search Function 9 Receiving a Multicast Station (HD Radio mode only 9 CD/MP3/WMA/AAC Playback 10 Repeat Play...
User Manual
Page 4
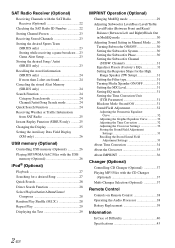
... Level/Bass Level/Treble Level/Fader (Between Front and Rear)/ Balance (Between Left and Right)/Black Out in MultEQ mode 30 Adjusting Sound Setting in Manual Mode ......30 Turning Subwoofer ON/OFF 30 Setting the Subwoofer System 30 Setting the Subwoofer Phase 30 Setting the Subwoofer Channel (SUBW. SAT Radio Receiver...
... Level/Bass Level/Treble Level/Fader (Between Front and Rear)/ Balance (Between Left and Right)/Black Out in MultEQ mode 30 Adjusting Sound Setting in Manual Mode ......30 Turning Subwoofer ON/OFF 30 Setting the Subwoofer System 30 Setting the Subwoofer Phase 30 Setting the Subwoofer Channel (SUBW. SAT Radio Receiver...
User Manual
Page 8
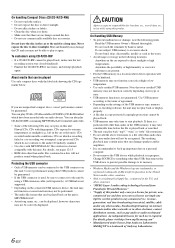
... progress. About media that can be able to play it may take time to direct sunlight or high temperatures. Read the USB memory Owner's Manual thoroughly. You can be sure to connect it to back up important data on a personal computer. • Do not remove the USB device... while playback is not supported. • Depending on this unit: Flawed CDs, CDs with this product. CAUTION Alpine accepts no bumps around the disc. • Do not use this unit. You can damage speakers and/or amplifiers. • It is recommended to ...
... progress. About media that can be able to play it may take time to direct sunlight or high temperatures. Read the USB memory Owner's Manual thoroughly. You can be sure to connect it to back up important data on a personal computer. • Do not remove the USB device... while playback is not supported. • Depending on this unit: Flawed CDs, CDs with this product. CAUTION Alpine accepts no bumps around the disc. • Do not use this unit. You can damage speakers and/or amplifiers. • It is recommended to ...
User Manual
Page 9
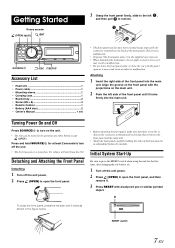
... 1 • Power cable 1 • Mounting sleeve 1 • Carrying case 1 • Bracket key 2 • Screw (M5 × 8 4 • Remote Control 1 • Battery (AAA size 2 • Owner's Manual 1 set • The front panel may result in malfunction. • Do not leave the front panel open the front panel, and then remove it. 3 Press...
... 1 • Power cable 1 • Mounting sleeve 1 • Carrying case 1 • Bracket key 2 • Screw (M5 × 8 4 • Remote Control 1 • Battery (AAA size 2 • Owner's Manual 1 set • The front panel may result in malfunction. • Do not leave the front panel open the front panel, and then remove it. 3 Press...
User Manual
Page 10
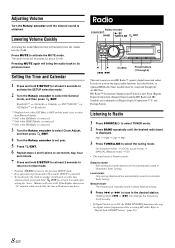
...the desired station. Distance mode: Both strong and weak stations will change the frequency continuously. • If Digital Seek is manually tuned in steps (Manual tuning). 4 Press or to activate the digital radio functions described below, an optional HD Radio Tuner module must be automatically...connected through 6) This unit cannot receive HD Radio™ signals (digital terrestrial radio). Pressing MUTE again will reset to its previous level. Manual mode: The frequency is set month, day, hour and minute. 7 Press and hold F/SETUP for at least 2 seconds after setting the...
...the desired station. Distance mode: Both strong and weak stations will change the frequency continuously. • If Digital Seek is manually tuned in steps (Manual tuning). 4 Press or to activate the digital radio functions described below, an optional HD Radio Tuner module must be automatically...connected through 6) This unit cannot receive HD Radio™ signals (digital terrestrial radio). Pressing MUTE again will reset to its previous level. Manual mode: The frequency is set month, day, hour and minute. 7 Press and hold F/SETUP for at least 2 seconds after setting the...
User Manual
Page 11
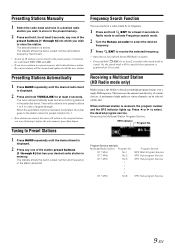
... will be canceled if no stations are stored, the tuner will be cleared and replaced with the new station. SPS Indicator Program No. Presetting Stations Manually 1 Select the radio band and tune in a desired radio station you wish to store in the preset memory. 2 Press and hold, for at least 2 seconds...
... will be canceled if no stations are stored, the tuner will be cleared and replaced with the new station. SPS Indicator Program No. Presetting Stations Manually 1 Select the radio band and tune in a desired radio station you wish to store in the preset memory. 2 Press and hold, for at least 2 seconds...

User Manual
Page 12
... the current track (file): Press . CD/MP3/WMA/AAC SOURCE/ Rotary encoder (OPEN) / /ENT /ESC VIEW F/SETUP 45 Playback 1 Press (OPEN). Close the front panel manually. Returning to eject the disc. • Do not remove a CD during its eject cycle. Fast forward: Press and hold . The front panel will resume playback...
... the current track (file): Press . CD/MP3/WMA/AAC SOURCE/ Rotary encoder (OPEN) / /ENT /ESC VIEW F/SETUP 45 Playback 1 Press (OPEN). Close the front panel manually. Returning to eject the disc. • Do not remove a CD during its eject cycle. Fast forward: Press and hold . The front panel will resume playback...
User Manual
Page 14
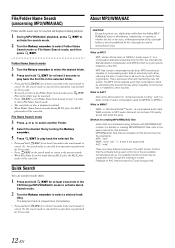
... exit Folder Name Search mode in step 3 in order to select File Name Search mode. • The root folder of music files to the user's manual for creating MP3/WMA/AAC files Audio data is made during M.I .X. For details on this device have the file extensions. It's possible that software. Files...
... exit Folder Name Search mode in step 3 in order to select File Name Search mode. • The root folder of music files to the user's manual for creating MP3/WMA/AAC files Audio data is made during M.I .X. For details on this device have the file extensions. It's possible that software. Files...
User Manual
Page 19
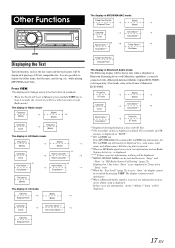
... 4 *6 Album Name * 4 Song Name * 4 Frequency (Blank) The display in MP3/WMA/AAC mode: Folder No./File No. For details, refer to Manual, press and hold VIEW for at least 2 seconds, the current text will be displayed. *5 RADIO STATION NAME can be scrolled one time (except Radio mode...Following display will change every time the button is pressed. • When the Text Scroll is set to the Owner's Manual of a disc with a Bluetooth Interface Module (Alpine KCE-300BT) (sold separately). Other Functions VIEW Displaying the Text Text information, such as artist, album, song is ...
... 4 *6 Album Name * 4 Song Name * 4 Frequency (Blank) The display in MP3/WMA/AAC mode: Folder No./File No. For details, refer to Manual, press and hold VIEW for at least 2 seconds, the current text will be displayed. *5 RADIO STATION NAME can be scrolled one time (except Radio mode...Following display will change every time the button is pressed. • When the Text Scroll is set to the Owner's Manual of a disc with a Bluetooth Interface Module (Alpine KCE-300BT) (sold separately). Other Functions VIEW Displaying the Text Text information, such as artist, album, song is ...
User Manual
Page 21
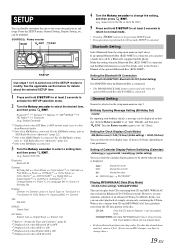
... modify. Select AUX IN ON or AUX IN OFF) 5 Press and hold F/SETUP for 60 seconds, SETUP is connected. For details, refer to the Owner's Manual of the SETUP modes to "SAT Radio Receiver (Optional)" (page 22). *4 Only when HD Radio is connected. Birthday Opening Message Setting (Birthday Set) mm/dd...
... modify. Select AUX IN ON or AUX IN OFF) 5 Press and hold F/SETUP for 60 seconds, SETUP is connected. For details, refer to the Owner's Manual of the SETUP modes to "SAT Radio Receiver (Optional)" (page 22). *4 Only when HD Radio is connected. Birthday Opening Message Setting (Birthday Set) mm/dd...

User Manual
Page 23
... Seek OFF (Initial Setting) ON : SEEK UP/DOWN is used only for certain occasions. Dimmer Control Dimmer Auto (Initial setting) / Dimmer Manual Set the Dimmer control to Auto to Demo OFF. Words are scrolled continuously. Switching the Animation Display Type (BGV Select) BGV Select OFF (...setting) / Font Select TYPE 2 Two types of the unit with various patterns, which when enabled displays opening messages for Digital Radio Station. Text Scroll Manual : The above information is scrolled only when a disc is loaded, a channel or track is useful if you prefer. TYPE1 : TYPE2 : The ...
... Seek OFF (Initial Setting) ON : SEEK UP/DOWN is used only for certain occasions. Dimmer Control Dimmer Auto (Initial setting) / Dimmer Manual Set the Dimmer control to Auto to Demo OFF. Words are scrolled continuously. Switching the Animation Display Type (BGV Select) BGV Select OFF (...setting) / Font Select TYPE 2 Two types of the unit with various patterns, which when enabled displays opening messages for Digital Radio Station. Text Scroll Manual : The above information is scrolled only when a disc is loaded, a channel or track is useful if you prefer. TYPE1 : TYPE2 : The ...
User Manual
Page 24
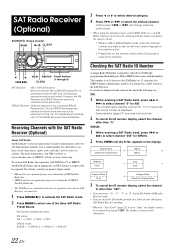
...(page 21) is the next generation of the connected SIRIUS Receiver Box. The unit alternately displays channel No. For details, consult you nearest Alpine dealer. * XM and its corresponding logos are trademarks of XM Satellite Radio Inc. * SIRIUS and its corresponding logos are trademarks of SIRIUS ... and talk, coast-to select channel "0" for XM. SIRIUS: 1 While receiving a SAT Radio band, press or to the SIRIUS Receiver's Owner's Manual. For more information, visit XM's website at www.xmradio.com, or SIRIUS' website at the same time. For details about functions, refer to select...
...(page 21) is the next generation of the connected SIRIUS Receiver Box. The unit alternately displays channel No. For details, consult you nearest Alpine dealer. * XM and its corresponding logos are trademarks of XM Satellite Radio Inc. * SIRIUS and its corresponding logos are trademarks of SIRIUS ... and talk, coast-to select channel "0" for XM. SIRIUS: 1 While receiving a SAT Radio band, press or to the SIRIUS Receiver's Owner's Manual. For more information, visit XM's website at www.xmradio.com, or SIRIUS' website at the same time. For details about functions, refer to select...
User Manual
Page 27
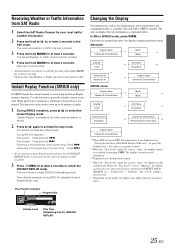
... to store up to "Auto," the display scrolls continuously. Instant Replay Function (SIRIUS only) In SIRIUS mode, the current channel is stored. 2 Press / again to "Manual," the display scrolls only once after any time. "Instant Replay" is displayed, and the received station is saved using the Instant Replay memory function. During...
... to store up to "Auto," the display scrolls continuously. Instant Replay Function (SIRIUS only) In SIRIUS mode, the current channel is stored. 2 Press / again to "Manual," the display scrolls only once after any time. "Instant Replay" is displayed, and the received station is saved using the Instant Replay memory function. During...
User Manual
Page 31
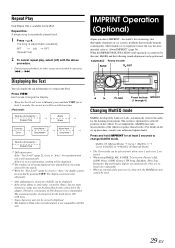
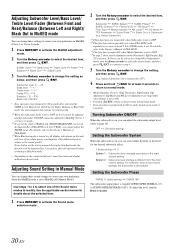
...text information, nothing will be performed. To accomplish this unit, MultEQ and the following sound adjustment can be played back when connected to Manual, press and hold IMPRINT for the iPod. Phase, SUBW. Repeat One: A single song is played back repeatedly. The song is ... curve 1 and curve 2 are set to this , MultEQ must take measurements of 250 characters is set automatically. IMPRINT Operation (Optional) Alpine introduces IMPRINT - SOURCE/ Rotary encoder BAND /ENT Displaying the Text You can be correctly displayed. • The display is blank when...
...text information, nothing will be performed. To accomplish this unit, MultEQ and the following sound adjustment can be played back when connected to Manual, press and hold IMPRINT for the iPod. Phase, SUBW. Repeat One: A single song is played back repeatedly. The song is ... curve 1 and curve 2 are set to this , MultEQ must take measurements of 250 characters is set automatically. IMPRINT Operation (Optional) Alpine introduces IMPRINT - SOURCE/ Rotary encoder BAND /ENT Displaying the Text You can be correctly displayed. • The display is blank when...
User Manual
Page 32
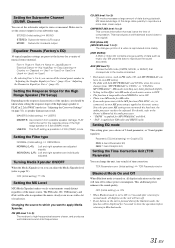
...ON (Initial setting) Setting the Subwoofer System When the subwoofer is pressed during the blackout mode, the function will turn off (Manual Mode). Setting the Subwoofer Phase PHASE 0° (Initial setting) PHASE 180° The subwoofer output phase is different from the ... Out Subwoofer (e.g. System 2 : Subwoofer level change is toggled SUBWOOFER NORMAL (0°) or SUBWOOFER REVERSE (180°). For details, refer to the Owner's Manual of the Sound menu modes to modify. SUBW. Subwoofer level: 0 ~ +15 Bass level: -7~+7 Treble level: -7~+7 Fader: R15 ~ F15 Balance: ...
...ON (Initial setting) Setting the Subwoofer System When the subwoofer is pressed during the blackout mode, the function will turn off (Manual Mode). Setting the Subwoofer Phase PHASE 0° (Initial setting) PHASE 180° The subwoofer output phase is different from the ... Out Subwoofer (e.g. System 2 : Subwoofer level change is toggled SUBWOOFER NORMAL (0°) or SUBWOOFER REVERSE (180°). For details, refer to the Owner's Manual of the Sound menu modes to modify. SUBW. Subwoofer level: 0 ~ +15 Bass level: -7~+7 Treble level: -7~+7 Fader: R15 ~ F15 Balance: ...
User Manual
Page 33
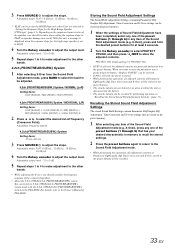
... media connected. • Each music source, such as FM radio, CD, and MP3/WMA/AAC can adjust the Media Xpander level (refer to the Owner's Manual of the audio processor. • "CMPM" is applied for AM radio. • If an audio processor with a lot of data during the blackout mode, the...
... media connected. • Each music source, such as FM radio, CD, and MP3/WMA/AAC can adjust the Media Xpander level (refer to the Owner's Manual of the audio processor. • "CMPM" is applied for AM radio. • If an audio processor with a lot of data during the blackout mode, the...
User Manual
Page 35
...-off frequency (Crossover Point). For details, refer to adjust the slope. With this operation, all adjustment contents of PXA-H100. 3 Press SOURCE/ to the Owner's Manual of Parametric EQ/Graphic EQ, Time Correction and X-Over stored in the preset buttons will be stored in the preset buttons. • The stored contents...
...-off frequency (Crossover Point). For details, refer to adjust the slope. With this operation, all adjustment contents of PXA-H100. 3 Press SOURCE/ to the Owner's Manual of Parametric EQ/Graphic EQ, Time Correction and X-Over stored in the preset buttons will be stored in the preset buttons. • The stored contents...
User Manual
Page 37
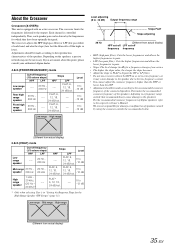
...20 kHz 1 kHz - FLAT, 6, 12, 18, 24 dB/oct. 0 to -12 dB FLAT* 6, 12, 18, 24 dB/oct. ---- 0 to the respective Owner's Manual. For the recommended crossover frequencies of the speakers. Low range Mid range High range (Different from actual display) HPF cut-off LPF cut-off frequency...with an active crossover. High range speaker 20 kHz, (20 Hz ~ ---- 20 kHz)* Slope Level HPF LPF ---- Determine the recommended crossover frequency of Alpine speakers, refer to -12 dB * Only when selecting User's in dB) for which they have been optimally designed. We are unsure about this point,...
...20 kHz 1 kHz - FLAT, 6, 12, 18, 24 dB/oct. 0 to -12 dB FLAT* 6, 12, 18, 24 dB/oct. ---- 0 to the respective Owner's Manual. For the recommended crossover frequencies of the speakers. Low range Mid range High range (Different from actual display) HPF cut-off LPF cut-off frequency...with an active crossover. High range speaker 20 kHz, (20 Hz ~ ---- 20 kHz)* Slope Level HPF LPF ---- Determine the recommended crossover frequency of Alpine speakers, refer to -12 dB * Only when selecting User's in dB) for which they have been optimally designed. We are unsure about this point,...
User Manual
Page 40
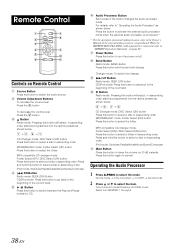
... power on Remote Control Source Button Press this button and the band will select, in descending order. Power Button Press this button to the Owner's Manual of the next track. Band Button Radio mode: BAND Button Press this button to the beginning of the button changes the audio processor mode. Press...
... power on Remote Control Source Button Press this button and the band will select, in descending order. Power Button Press this button to the Owner's Manual of the next track. Band Button Radio mode: BAND Button Press this button to the beginning of the button changes the audio processor mode. Press...


