
Owners Manual
Page 2
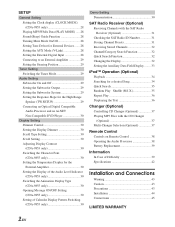
... 7 Initial System Start-Up 7 Setting the Time and Calendar (CDA-9855 only 7 Setting Time (CDA-9853 only 7 Opening and Closing the Movable Display ...... 8 Display Tilt Adjustment 8 Adjusting Volume 8 Lowering Volume Quickly 8 Detaching and Attaching the Front Panel ......... 8 Radio Changing the Radio Frequencies for each Country 9 Listening to Radio 9 Manual Storing of Station Presets 9 Automatic Memory of Station Presets...
... 7 Initial System Start-Up 7 Setting the Time and Calendar (CDA-9855 only 7 Setting Time (CDA-9853 only 7 Opening and Closing the Movable Display ...... 8 Display Tilt Adjustment 8 Adjusting Volume 8 Lowering Volume Quickly 8 Detaching and Attaching the Front Panel ......... 8 Radio Changing the Radio Frequencies for each Country 9 Listening to Radio 9 Manual Storing of Station Presets 9 Automatic Memory of Station Presets...
Owners Manual
Page 3
...CDA-9855 only 30 Setting the Temperature Display for the External Amplifier 30 Setting the Display of the Audio Level Indicator (CDA-9853 only 30 Switching the Animation Display Type (CDA-9855 only 30 Opening Message ON/OFF Setting (CDA-9855 only 30 Setting of Calendar Display Pattern Switching (CDA-9855 only 30 Demo Setting Demonstration 30 SAT Radio... Search 35 Random Play Shuffle (M.I.X 35 Repeat Play 36 Displaying the Text 36 Changer (Optional) Controlling CD Changer (Optional 37 Playing MP3 Files with the CD Changer (Optional 37 Multi-Changer Selection (Optional 37 Remote ...
...CDA-9855 only 30 Setting the Temperature Display for the External Amplifier 30 Setting the Display of the Audio Level Indicator (CDA-9853 only 30 Switching the Animation Display Type (CDA-9855 only 30 Opening Message ON/OFF Setting (CDA-9855 only 30 Setting of Calendar Display Pattern Switching (CDA-9855 only 30 Demo Setting Demonstration 30 SAT Radio... Search 35 Random Play Shuffle (M.I.X 35 Repeat Play 36 Displaying the Text 36 Changer (Optional) Controlling CD Changer (Optional 37 Playing MP3 Files with the CD Changer (Optional 37 Multi-Changer Selection (Optional 37 Remote ...

Owners Manual
Page 4
... Cleaning Use a soft dry cloth for repairing. For more severe stains, please dampen the cloth with your authorized Alpine dealer or the nearest Alpine Service Center for periodic cleaning of dissolving the paint or damaging the plastic. Return it to do so may cause... This symbol means important instructions. Any function that requires your Alpine dealer or the nearest Alpine Service Station for the moisture to repair the unit yourself. MINIMIZE DISPLAY VIEWING WHILE DRIVING. Viewing the display may notice the CD playback sound wavering due to observe proper polarity (+ and ...
... Cleaning Use a soft dry cloth for repairing. For more severe stains, please dampen the cloth with your authorized Alpine dealer or the nearest Alpine Service Center for periodic cleaning of dissolving the paint or damaging the plastic. Return it to do so may cause... This symbol means important instructions. Any function that requires your Alpine dealer or the nearest Alpine Service Station for the moisture to repair the unit yourself. MINIMIZE DISPLAY VIEWING WHILE DRIVING. Viewing the display may notice the CD playback sound wavering due to observe proper polarity (+ and ...
Owners Manual
Page 7
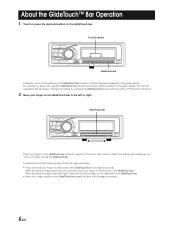
...manual expresses this as follows: "Change the setting by pressing the GlideTouch bar below where ON is scrolled. 6-EN Items or lists in the guide display. GlideTouch bar Place your finger on either the ON or OFF function indicators." 2 Move your finger on the left or right. When scrolling the ... select ON, press the GlideTouch bar directly below either side of the GlideTouch bar. For example, to which a function has been assigned in the display will change as follows: • Place and hold your finger on the GlideTouch bar and slide it gently to the left or right. To select...
...manual expresses this as follows: "Change the setting by pressing the GlideTouch bar below where ON is scrolled. 6-EN Items or lists in the guide display. GlideTouch bar Place your finger on either the ON or OFF function indicators." 2 Move your finger on the left or right. When scrolling the ... select ON, press the GlideTouch bar directly below either side of the GlideTouch bar. For example, to which a function has been assigned in the display will change as follows: • Place and hold your finger on the GlideTouch bar and slide it gently to the left or right. To select...

Owners Manual
Page 8
... right. The main SETUP menu is displayed. 4 Select CLOCK ADJUST by sliding your finger on the GlideTouch bar to another clock/watch or radio time announcement, press and hold SOURCE/...Adjust "Minute" by turning the Rotary encoder by pressing any other button except TITLE (CDA-9853 only) and eject c. Setting the Time and Calendar (CDA-9855 only) 1 Press MENU. 2 Select SETUP by repeating steps 5 and 6. 8 ... the unit for the first time, after installing the CD changer, after setting the "hour." The GENERAL SETUP menu is displayed. 3 Select GENERAL by sliding your finger on the ...
... right. The main SETUP menu is displayed. 4 Select CLOCK ADJUST by sliding your finger on the GlideTouch bar to another clock/watch or radio time announcement, press and hold SOURCE/...Adjust "Minute" by turning the Rotary encoder by pressing any other button except TITLE (CDA-9853 only) and eject c. Setting the Time and Calendar (CDA-9855 only) 1 Press MENU. 2 Select SETUP by repeating steps 5 and 6. 8 ... the unit for the first time, after installing the CD changer, after setting the "hour." The GENERAL SETUP menu is displayed. 3 Select GENERAL by sliding your finger on the ...

Owners Manual
Page 9
...the unit will get very warm under normal operating conditions. Caution Keep hands (or any buttons by its previous level. The movable display will close the movable display, press c again. There is open . The brightness will stop at the set tilt angle when closing to 3 different angles ...firmly into the main unit. Turn the Rotary encoder until the front panel pops out. 3 Grasp the left side of the movable display will return to avoid damage or injury. The audio level will get very warm under normal operating conditions. Align the groove on the...
...the unit will get very warm under normal operating conditions. Caution Keep hands (or any buttons by its previous level. The movable display will close the movable display, press c again. There is open . The brightness will stop at the set tilt angle when closing to 3 different angles ...firmly into the main unit. Turn the Rotary encoder until the front panel pops out. 3 Grasp the left side of the movable display will return to avoid damage or injury. The audio level will get very warm under normal operating conditions. Align the groove on the...
Owners Manual
Page 10
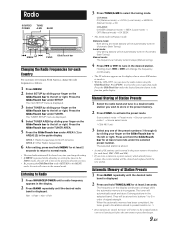
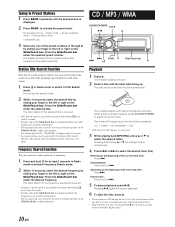
...function guide display. to the previous selection secreen. • By pressing the GlideTouch bar under the desired function shown in the selected band. Manual Storing of Station Presets 1 Press BAND repeatedly until a radio frequency appears in . • With the CDA-9855, you change the radio frequencies ... Source operation mode* → Source select mode * CDA-9855 only 3 Select any one of signal strength. The tuner will return to the left or right. AREA 1: Radio frequencies for North America AREA 2: Other Radio frequencies 6 After setting, press and hold the GlideTouch bar...
...function guide display. to the previous selection secreen. • By pressing the GlideTouch bar under the desired function shown in the selected band. Manual Storing of Station Presets 1 Press BAND repeatedly until a radio frequency appears in . • With the CDA-9855, you change the radio frequencies ... Source operation mode* → Source select mode * CDA-9855 only 3 Select any one of signal strength. The tuner will return to the left or right. AREA 1: Radio frequencies for North America AREA 2: Other Radio frequencies 6 After setting, press and hold the GlideTouch bar...
Owners Manual
Page 11
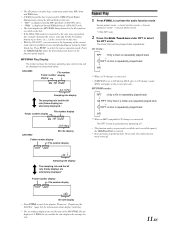
... is entered, you can search for 2 seconds. • Any radio station can search for a radio station by its eject cycle. CD → TUNER → CD CHANGER* → CD * Only when the CD changer is displayed for that radio station by sliding your finger to the left or right on the ... bar. to skip frequencies. Source select mode → Preset mode → Source operation mode* → Source select mode CD / MP3 / WMA SOURCE/POWER TITLE -/J 8 * CDA-9855 only 3 Select any one disc at least 2 seconds with the label side facing up your search by the Station Title Search...
... is entered, you can search for 2 seconds. • Any radio station can search for a radio station by its eject cycle. CD → TUNER → CD CHANGER* → CD * Only when the CD changer is displayed for that radio station by sliding your finger to the left or right on the ... bar. to skip frequencies. Source select mode → Preset mode → Source operation mode* → Source select mode CD / MP3 / WMA SOURCE/POWER TITLE -/J 8 * CDA-9855 only 3 Select any one disc at least 2 seconds with the label side facing up your search by the Station Title Search...
Owners Manual
Page 12
...operation mode* → Source select mode * CDA-9855 only 2 Press the Glide Touch bar under the desired function shown in CD changer mode, M.I .X. will be displayed as described below. Folder number display File number display 01 03 kbps 160 Bit rate display • Press TITLE to select the source operation... is performed for 10 seconds, the audio function mode turns off ) *2 When an MP3 compatible CD changer is connected. • The CD-player can play in the function guide display. Press FUNC. CDA-9855 . to the beginning of variable bit rate displays the average bit rate. 11-EN
...operation mode* → Source select mode * CDA-9855 only 2 Press the Glide Touch bar under the desired function shown in CD changer mode, M.I .X. will be displayed as described below. Folder number display File number display 01 03 kbps 160 Bit rate display • Press TITLE to select the source operation... is performed for 10 seconds, the audio function mode turns off ) *2 When an MP3 compatible CD changer is connected. • The CD-player can play in the function guide display. Press FUNC. CDA-9855 . to the beginning of variable bit rate displays the average bit rate. 11-EN

Owners Manual
Page 13
...hold for 10 seconds, the audio function mode turns off ) *3 When a CD changer equipped with the All M.I.X. Source select mode → Audio function mode → Source operation mode* → Source select mode * CDA-9855 only 2 Press the GlideTouch bar under SCAN to activate the audio function mode...M.I.X.: Only files in a folder are played back in random sequence. ↓ *3 M.I .X. In the case of the GlideTouch bar. • You can display and search for 10 seconds, the audio function mode turns off. File Name Search mode File is searched from all files in succession. 3 If the...
...hold for 10 seconds, the audio function mode turns off ) *3 When a CD changer equipped with the All M.I.X. Source select mode → Audio function mode → Source operation mode* → Source select mode * CDA-9855 only 2 Press the GlideTouch bar under SCAN to activate the audio function mode...M.I.X.: Only files in a folder are played back in random sequence. ↓ *3 M.I .X. In the case of the GlideTouch bar. • You can display and search for 10 seconds, the audio function mode turns off. File Name Search mode File is searched from all files in succession. 3 If the...
Owners Manual
Page 14
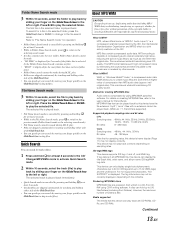
...is played back. The first file in an MP3/WMA file, this device have folder name. • Folder Name search cannot be correctly displayed, depending on the contents. About MP3/WMA CAUTION Except for private use, duplicating audio data (including MP3/ WMA data) or distributing, transferring...is cancelled by the ISO, the International Standardization Organization and MPEG which is a joint activity institution of folders is compressed by using CD-R writing software. The tag information may not play back correctly depending on creating MP3/WMA files, refer to the user's manual for...
...is played back. The first file in an MP3/WMA file, this device have folder name. • Folder Name search cannot be correctly displayed, depending on the contents. About MP3/WMA CAUTION Except for private use, duplicating audio data (including MP3/ WMA data) or distributing, transferring...is cancelled by the ISO, the International Standardization Organization and MPEG which is a joint activity institution of folders is compressed by using CD-R writing software. The tag information may not play back correctly depending on creating MP3/WMA files, refer to the user's manual for...

Owners Manual
Page 15
...and other sound files into MP3/WMA files. The playback order of the file system. indicated on the display. 1 Root Folder 2 2 3 4 3 4 6 1 5 5 6 7 Terminology Bit rate This is as follows. For example, music CDs use a sampling rate of 44.1 kHz, so the sound is found at the top of the folders... The higher the bit rate, the higher the sound quality, but also the larger the volume of characters for folder/file names are not displayed correctly. The higher the sampling rate, the higher the sound quality, but also the larger the files. However, sometimes the file names, ...
...and other sound files into MP3/WMA files. The playback order of the file system. indicated on the display. 1 Root Folder 2 2 3 4 3 4 6 1 5 5 6 7 Terminology Bit rate This is as follows. For example, music CDs use a sampling rate of 44.1 kHz, so the sound is found at the top of the folders... The higher the bit rate, the higher the sound quality, but also the larger the volume of characters for folder/file names are not displayed correctly. The higher the sampling rate, the higher the sound quality, but also the larger the files. However, sometimes the file names, ...
Owners Manual
Page 16
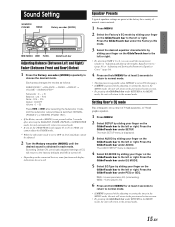
...bar under AUDIO. Equalizer Presets 9 typical equalizer settings are preset at least 2 seconds to return to normal mode. • If MENU is displayed. 4 Select EQ MODE by sliding your finger on the GlideTouch bar to the left or right. The AUDIO SETUP menu is pressed while ... of musical source material. 1 Press MENU. 2 Select the Factory's EQ mode by sliding your finger on the connected devices, some functions and display indications do not work. Press the GlideTouch bar under the Factory's EQ mode. 3 Select the desired equalizer characteristic by sliding your finger on the...
...bar under AUDIO. Equalizer Presets 9 typical equalizer settings are preset at least 2 seconds to return to normal mode. • If MENU is displayed. 4 Select EQ MODE by sliding your finger on the GlideTouch bar to the left or right. The AUDIO SETUP menu is pressed while ... of musical source material. 1 Press MENU. 2 Select the Factory's EQ mode by sliding your finger on the connected devices, some functions and display indications do not work. Press the GlideTouch bar under the Factory's EQ mode. 3 Select the desired equalizer characteristic by sliding your finger on the...
Owners Manual
Page 18
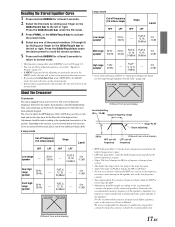
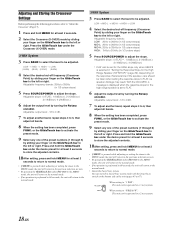
... unit will return to the normal mode. Determine the recommended crossover frequency of Alpine speakers, refer to the respective Owner's Manual. Adjusting to a frequency range outside the recommended value. (Different from actual display) 17-EN Thus, each band, and also the slope (how fast the...to the speakers. Press the GlideTouch bar under the EQ mode. 3 Press FUNC. We are unsure about this point, please consult your authorized Alpine dealer. 2 way mode Cut-off frequency • HPF (high pass filter): Cuts the lower frequencies and allows the higher frequencies to pass...
... unit will return to the normal mode. Determine the recommended crossover frequency of Alpine speakers, refer to the respective Owner's Manual. Adjusting to a frequency range outside the recommended value. (Different from actual display) 17-EN Thus, each band, and also the slope (how fast the...to the speakers. Press the GlideTouch bar under the EQ mode. 3 Press FUNC. We are unsure about this point, please consult your authorized Alpine dealer. 2 way mode Cut-off frequency • HPF (high pass filter): Cuts the lower frequencies and allows the higher frequencies to pass...
Owners Manual
Page 19
....) * FLAT can be taken when setting the response slope to 6, then adjust all bands. 8 When the setting has been completed, press FUNC. With the CDA-9855, a message is displayed when the response slope for the high range speaker is set for the HIGH slope only when USER'S is performed in 1/3 octave steps) 5 Press...
....) * FLAT can be taken when setting the response slope to 6, then adjust all bands. 8 When the setting has been completed, press FUNC. With the CDA-9855, a message is displayed when the response slope for the high range speaker is set for the HIGH slope only when USER'S is performed in 1/3 octave steps) 5 Press...
Owners Manual
Page 21
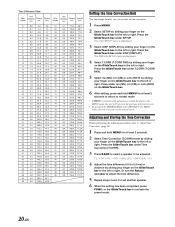
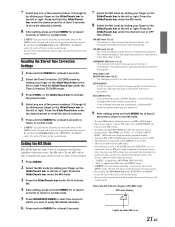
... 2 seconds. 2 Select Time Correction (T.CORR) mode by sliding your finger on the GlideTouch bar to the left or right. The DISPLAY SETUP menu is displayed. 3 Select DISP (DISPLAY) by sliding your finger on the GlideTouch bar to the left or right. Press the GlideTouch bar under T.CORR (T.CORR PAR). 5... to 9.9 ms) or distance by sliding your finger on the GlideTouch bar to the normal mode. Press the GlideTouch bar under DISP (DISPLAY). Press the GlideTouch bar under Time Correction (T.CORR). 3 Press BAND to select a speaker to the left or right. The main SETUP menu is...
... 2 seconds. 2 Select Time Correction (T.CORR) mode by sliding your finger on the GlideTouch bar to the left or right. The DISPLAY SETUP menu is displayed. 3 Select DISP (DISPLAY) by sliding your finger on the GlideTouch bar to the left or right. Press the GlideTouch bar under T.CORR (T.CORR PAR). 5... to 9.9 ms) or distance by sliding your finger on the GlideTouch bar to the normal mode. Press the GlideTouch bar under DISP (DISPLAY). Press the GlideTouch bar under Time Correction (T.CORR). 3 Press BAND to select a speaker to the left or right. The main SETUP menu is...
Owners Manual
Page 22
...left or right. MX uses this large data quantity to reproduce a more clearly. (DVD MUSIC): A DVD or Video CD contains a large quantity of data such as FM radio, CD, and MP3/WMA can be adjusted. If two external devices are connected, a different MX mode for each music source...information that corresponds to the normal mode. The FM radio, CD, and MP3, will return to the media connected. Press the GlideTouch bar under the Time Correction (T.CORR) mode. 3 Press FUNC. About the MX indicator display (CDA-9853 only) MX Level Display Lights up when MX is performed in 60 seconds,...
...left or right. MX uses this large data quantity to reproduce a more clearly. (DVD MUSIC): A DVD or Video CD contains a large quantity of data such as FM radio, CD, and MP3/WMA can be adjusted. If two external devices are connected, a different MX mode for each music source...information that corresponds to the normal mode. The FM radio, CD, and MP3, will return to the media connected. Press the GlideTouch bar under the Time Correction (T.CORR) mode. 3 Press FUNC. About the MX indicator display (CDA-9853 only) MX Level Display Lights up when MX is performed in 60 seconds,...
Owners Manual
Page 23
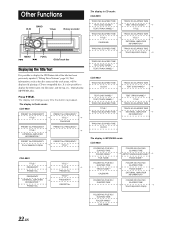
...is also possible to display the CD/Station title if the title has been previously inputted ("Titling Discs/Stations" page 24). The display will be displayed if playing a CD text compatible disc. Press TITLE. PRESET No. The display in CD mode: CDA-9855 TRACK NO./ELAPSED ... TRACK NO./ELAPSED TIME TRACK NO./ELAPSED TIME → EXTERNAL AMPLIFIER → INFORMATION*5 TRACK NO./ELAPSED TIME CLOCK The display in Radio mode: CDA-9855 PRESET No./FREQUENCY PRESET No./FREQUENCY TITLE*1 → TITLE*1 → CALENDAR PRESET No./FREQUENCY PRESET No./FREQUENCY TITLE*1...
...is also possible to display the CD/Station title if the title has been previously inputted ("Titling Discs/Stations" page 24). The display will be displayed if playing a CD text compatible disc. Press TITLE. PRESET No. The display in CD mode: CDA-9855 TRACK NO./ELAPSED ... TRACK NO./ELAPSED TIME TRACK NO./ELAPSED TIME → EXTERNAL AMPLIFIER → INFORMATION*5 TRACK NO./ELAPSED TIME CLOCK The display in Radio mode: CDA-9855 PRESET No./FREQUENCY PRESET No./FREQUENCY TITLE*1 → TITLE*1 → CALENDAR PRESET No./FREQUENCY PRESET No./FREQUENCY TITLE*1...

Owners Manual
Page 24
... other tag data is referred to scroll the Text information only once (TEXT DISPLAY, FOLDER NAME DISPLAY, FILE NAME DISPLAY or TAG DISPLAY mode). • "NO SUPPORT" is displayed when the desired text information cannot be displayed correctly with CD Text. About the indicator display (CDA-9853 only) About "Title" and "Text" Title: With this unit. • If the...
... other tag data is referred to scroll the Text information only once (TEXT DISPLAY, FOLDER NAME DISPLAY, FILE NAME DISPLAY or TAG DISPLAY mode). • "NO SUPPORT" is displayed when the desired text information cannot be displayed correctly with CD Text. About the indicator display (CDA-9853 only) About "Title" and "Text" Title: With this unit. • If the...

Owners Manual
Page 25
...sound quality. The first character will be canceled if no more titles can enter 18 radio station titles (24 for the CDA-9853 model) and 18 CD titles on , the display will interrupt the time display momentarily. When that character begins to blink, you cancel while entering a title, selected...the blackout mode. Blackout Mode On and Off (CDA-9855 only) When Blackout mode is off to title your title. For details, see asterisk 1 of your favorite CD's or radio stations. The display will turn off. • If any tuner or CD function while in the clock priority mode will ...
...sound quality. The first character will be canceled if no more titles can enter 18 radio station titles (24 for the CDA-9853 model) and 18 CD titles on , the display will interrupt the time display momentarily. When that character begins to blink, you cancel while entering a title, selected...the blackout mode. Blackout Mode On and Off (CDA-9855 only) When Blackout mode is off to title your title. For details, see asterisk 1 of your favorite CD's or radio stations. The display will turn off. • If any tuner or CD function while in the clock priority mode will ...

