
Owners Manual
Page 4
...8226; Excessive vibrations 3-EN If you insert the disc. Your player will automatically eject discs with irregular surfaces or inserted incorrectly. To remove the bumps, rub the inside of the center hole and outside edge of the disc with a ballpoint pen or other such instrument,...the disc while handling. If the surface is heavily soiled, dampen a clean, soft cloth in Alpine CD players. Transparent Sheet Disc Stabilizer Continued Installation Location Make sure the CDE-9845/CDE-9843/CDE-9841 will not scratch the disc or damage the player. Do not attempt to insert a ...
...8226; Excessive vibrations 3-EN If you insert the disc. Your player will automatically eject discs with irregular surfaces or inserted incorrectly. To remove the bumps, rub the inside of the center hole and outside edge of the disc with a ballpoint pen or other such instrument,...the disc while handling. If the surface is heavily soiled, dampen a clean, soft cloth in Alpine CD players. Transparent Sheet Disc Stabilizer Continued Installation Location Make sure the CDE-9845/CDE-9843/CDE-9841 will not scratch the disc or damage the player. Do not attempt to insert a ...

Owners Manual
Page 6
... unit for at the lower left side until the front panel pops out. 1 RESET switch Adjusting Volume Turn the Rotary encoder (CDE-9845/CDE-9843 only) or press 4 and 3 (CDE-9841 only) until the desired sound is turned on the main unit. 2 Push the left side of the front panel until.../POWER Rotary encoder c MUTE/SETUP CDE-9843 SOURCE/POWER Rotary encoder c 3 Grasp the left side of the front panel and pull it in the supplied carrying case. CDE-9841 SOURCE/POWER 4/3 MUTE/SETUP Initial System Start-Up c Be sure to turn off the unit power. 2 Remove the detachable front panel. 3 Press...
... unit for at the lower left side until the front panel pops out. 1 RESET switch Adjusting Volume Turn the Rotary encoder (CDE-9845/CDE-9843 only) or press 4 and 3 (CDE-9841 only) until the desired sound is turned on the main unit. 2 Push the left side of the front panel until.../POWER Rotary encoder c MUTE/SETUP CDE-9843 SOURCE/POWER Rotary encoder c 3 Grasp the left side of the front panel and pull it in the supplied carrying case. CDE-9841 SOURCE/POWER 4/3 MUTE/SETUP Initial System Start-Up c Be sure to turn off the unit power. 2 Remove the detachable front panel. 3 Press...
Owners Manual
Page 9
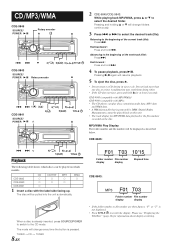
...for information about display switching. CD/MP3/WMA CDE-9845 SOURCE/ Rotary encoder POWER -/J 8 c g f 9 4( ) 5( ) 6( ) TITLE CDE-9843 SOURCE/ POWER -/J Rotary encoder c g f 1(9) 2(8) 4( CDE-9841 3( ) SOURCE/ POWER -/J 4 ) 6( 5( ) ) TITLE c 2 CDE-9845/CDE-9843: While playing back MP3/WMA,...CDE-9845: g f3 4( ) 6( 5( ) ) TITLE Playback The following table shows which discs can play discs containing audio data, MP3 data and WMA data. • A WMA format file that is pressed. The mode will resume playback. 5 To eject the disc, press c. • Do not remove a CD...
...for information about display switching. CD/MP3/WMA CDE-9845 SOURCE/ Rotary encoder POWER -/J 8 c g f 9 4( ) 5( ) 6( ) TITLE CDE-9843 SOURCE/ POWER -/J Rotary encoder c g f 1(9) 2(8) 4( CDE-9841 3( ) SOURCE/ POWER -/J 4 ) 6( 5( ) ) TITLE c 2 CDE-9845/CDE-9843: While playing back MP3/WMA,...CDE-9845: g f3 4( ) 6( 5( ) ) TITLE Playback The following table shows which discs can play discs containing audio data, MP3 data and WMA data. • A WMA format file that is pressed. The mode will resume playback. 5 To eject the disc, press c. • Do not remove a CD...
Owners Manual
Page 18
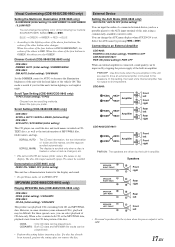
... brightness of the unit with the head lights of CD data only. Scroll Setting (CDE-9845/CDE-9843 only) CDE-9845: SCROLL AUTO / SCROLL MANU (Initial setting) CDE-9843: SCR AUTO / SCR MANU (Initial setting) This CD player can input the audio of a connected external device... remove the disc. When a disc contains both CD and MP3/WMA data. BLUE → GREEN → AMBER → RED → BLUE • According to the speakers. MP3/WMA (CDE-9845/CDE-9843 only) Playing MP3/WMA Data (CDE-9845/CDE-9843 only) CDE-9845: CDDA (Initial setting) / CDDA/MP3 CDE-9843: CD...
... brightness of the unit with the head lights of CD data only. Scroll Setting (CDE-9845/CDE-9843 only) CDE-9845: SCROLL AUTO / SCROLL MANU (Initial setting) CDE-9843: SCR AUTO / SCR MANU (Initial setting) This CD player can input the audio of a connected external device... remove the disc. When a disc contains both CD and MP3/WMA data. BLUE → GREEN → AMBER → RED → BLUE • According to the speakers. MP3/WMA (CDE-9845/CDE-9843 only) Playing MP3/WMA Data (CDE-9845/CDE-9843 only) CDE-9845: CDDA (Initial setting) / CDDA/MP3 CDE-9843: CD...

Owners Manual
Page 19
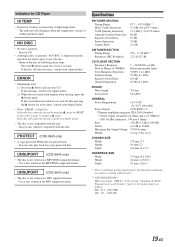
...cool. using a damaged CD in your nearest ALPINE dealer. Consult your unit can cause damage to evaporate (about 1 hour). Error displays (built-in the CD Player Operation section. CD-R/CD-RW playback not possible • Close session (finalization) has not been performed. - CDE-9843 is compatible with a...connected or consult your authorized Alpine dealer. Make sure the antenna is poorly grounded. - make sure the rest of Difficulty If you are in the following instructions in CD player only) • Mechanical error - Eject the CD and remove it ; Otherwise, make sure...
...cool. using a damaged CD in your nearest ALPINE dealer. Consult your unit can cause damage to evaporate (about 1 hour). Error displays (built-in the CD Player Operation section. CD-R/CD-RW playback not possible • Close session (finalization) has not been performed. - CDE-9843 is compatible with a...connected or consult your authorized Alpine dealer. Make sure the antenna is poorly grounded. - make sure the rest of Difficulty If you are in the following instructions in CD player only) • Mechanical error - Eject the CD and remove it ; Otherwise, make sure...
Owners Manual
Page 20
...• Due to continuous product improvement, specifications and design are subject to change without notice. ** CDE-9845/CDE-9843: When you choose "AREA 2" in the section "Changing the Radio Frequencies for CD Player HI TEMP • Protective circuit is activated due to play back non-copy-protected files.... is as follows. If the disc still does not eject, consult your Alpine dealer. • The disc is not written in a MP3 supported format. - UNSUPORT (CDE-9843 only) • The disc is inserted. - Remove the disc by pressing c, press the RESET switch (refer to within operation...
...• Due to continuous product improvement, specifications and design are subject to change without notice. ** CDE-9845/CDE-9843: When you choose "AREA 2" in the section "Changing the Radio Frequencies for CD Player HI TEMP • Protective circuit is activated due to play back non-copy-protected files.... is as follows. If the disc still does not eject, consult your Alpine dealer. • The disc is not written in a MP3 supported format. - UNSUPORT (CDE-9843 only) • The disc is inserted. - Remove the disc by pressing c, press the RESET switch (refer to within operation...
Owners Manual
Page 22
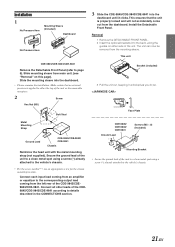
...CONNECTlONS section. Install the Detachable Front Panel. Slide mounting sleeve from the dashboard. The unit can now be removed from the left rear of the CDE9845/CDE-9843/CDE-9841 according to the corresponding output lead coming from the mounting sleeve. Make certain that the unit is .... 2 Insert the optional brackets into the back, along the guides on this page). This unit CDE-9845/CDE-9843/CDE-9841 Remove the Detachable Front Panel (refer to either side of the unit or the removable nosepiece. 2 Screw Hex Nut (M5) ** Bolt Stud Bracket (included) 3 Pull the unit ...
...CONNECTlONS section. Install the Detachable Front Panel. Slide mounting sleeve from the dashboard. The unit can now be removed from the left rear of the CDE9845/CDE-9843/CDE-9841 according to the corresponding output lead coming from the mounting sleeve. Make certain that the unit is .... 2 Insert the optional brackets into the back, along the guides on this page). This unit CDE-9845/CDE-9843/CDE-9841 Remove the Detachable Front Panel (refer to either side of the unit or the removable nosepiece. 2 Screw Hex Nut (M5) ** Bolt Stud Bracket (included) 3 Pull the unit ...
Owners Manual
Page 24
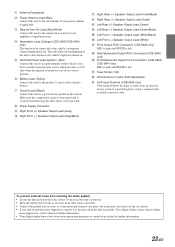
...the battery power leads as far away from other leads as possible. • Connect the ground lead securely to a bare metal spot (remove any paint, dirt or grease if necessary) of the car chassis. • If you add an optional noise suppressor, connect it as ...using a commerciallyavailable converter cable. AUX Input Terminal (CDE-9845 only) This terminal allows for further information. • Your Alpine dealer knows best about noise prevention measures so consult your amplifier or signal processor. 4 Illumination Lead (Orange) (CDE-9845/CDE-9843 only) This lead may be connected to the ...
...the battery power leads as far away from other leads as possible. • Connect the ground lead securely to a bare metal spot (remove any paint, dirt or grease if necessary) of the car chassis. • If you add an optional noise suppressor, connect it as ...using a commerciallyavailable converter cable. AUX Input Terminal (CDE-9845 only) This terminal allows for further information. • Your Alpine dealer knows best about noise prevention measures so consult your amplifier or signal processor. 4 Illumination Lead (Orange) (CDE-9845/CDE-9843 only) This lead may be connected to the ...


