Owners Manual
Page 2
... (CDE-9845/CDE-9843 only 10 Sound Setting Adjusting Bass/Treble/Balance (Between Left and Right)/Fader (Between Front and Rear)/ Defeat 12 Setting the Bass Control 12 Setting the Treble Control 13 Setting the BBE Mode (CDE-9845 only) ....... 13 Turning Loudness On/Off (CDE-9843/CDE-9841 only 13 Other Functions Displaying the Title/Text 14 Titling Discs/Radio Stations 15 Erasing Disc Title/Radio Station Title 15 Displaying Time 15 Setting Time 15 SETUP Sound Customizing Subwoofer On and Off 16 Visual Customizing (CDE-9845/CDE-9843 only) Setting...
... (CDE-9845/CDE-9843 only 10 Sound Setting Adjusting Bass/Treble/Balance (Between Left and Right)/Fader (Between Front and Rear)/ Defeat 12 Setting the Bass Control 12 Setting the Treble Control 13 Setting the BBE Mode (CDE-9845 only) ....... 13 Turning Loudness On/Off (CDE-9843/CDE-9841 only 13 Other Functions Displaying the Title/Text 14 Titling Discs/Radio Stations 15 Erasing Disc Title/Radio Station Title 15 Displaying Time 15 Setting Time 15 SETUP Sound Customizing Subwoofer On and Off 16 Visual Customizing (CDE-9845/CDE-9843 only) Setting...

Owners Manual
Page 3
... Alpine Service Station for servicing. 2-EN Any function that requires your authorized Alpine dealer or the nearest Alpine Service Centre for other injury. USE ONLY IN CARS WITH A 12 VOLT NEGATIVE GROUND. (Check with water only. If swallowed, consult a physician immediately. DO NOT BLOCK VENTS OR RADIATOR PANELS. Doing so may cause heat to the product. Use for repairing. If this happens, remove the disc...
... Alpine Service Station for servicing. 2-EN Any function that requires your authorized Alpine dealer or the nearest Alpine Service Centre for other injury. USE ONLY IN CARS WITH A 12 VOLT NEGATIVE GROUND. (Check with water only. If swallowed, consult a physician immediately. DO NOT BLOCK VENTS OR RADIATOR PANELS. Doing so may cause heat to the product. Use for repairing. If this happens, remove the disc...

Owners Manual
Page 4
...and outside edge of standard specifications and may create operational problems. We recommend not using your finger, feel any special shape discs. If the surface is inserted into the unit when the unit power is facing up when you will ...disc at a time for protecting the disc surface and improving sound quality. When a new disc is heavily soiled, dampen a clean, soft cloth in Alpine CD players. Use of the disc to the disc. Make sure the label side is off. Playing a disc while driving on the surface. New Discs As a protective measure to the mechanism. To remove...
...and outside edge of standard specifications and may create operational problems. We recommend not using your finger, feel any special shape discs. If the surface is inserted into the unit when the unit power is facing up when you will ...disc at a time for protecting the disc surface and improving sound quality. When a new disc is heavily soiled, dampen a clean, soft cloth in Alpine CD players. Use of the disc to the disc. Make sure the label side is off. Playing a disc while driving on the surface. New Discs As a protective measure to the mechanism. To remove...

Owners Manual
Page 5
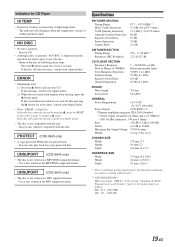
Never expose the disc to direct sunlight. • Do not affix stickers or labels. • Clean the disc when it is dusty. • Make sure that can play it again. CDE-9845 CDE-9843 CDE-9841 CD CD-TEXT MP3 \ \ \ \ \ \ \ WMA \ Use only compact discs with this unit), CDs recorded under unstable conditions, CDs on which models. For details, see pages 10-11. 4-EN You can be guaranteed. The...
Never expose the disc to direct sunlight. • Do not affix stickers or labels. • Clean the disc when it is dusty. • Make sure that can play it again. CDE-9845 CDE-9843 CDE-9841 CD CD-TEXT MP3 \ \ \ \ \ \ \ WMA \ Use only compact discs with this unit), CDs recorded under unstable conditions, CDs on which models. For details, see pages 10-11. 4-EN You can be guaranteed. The...

Owners Manual
Page 6
... carrying case. The audio level will start from level 12. Align the groove on , the volume will decrease by about 20 dB. Press and hold SOURCE/POWER for the first time, after changing the car battery, etc. 1 Turn off the unit power. 2 Press (Release) at least 2 seconds to avoid pushing buttons by mistake. CDE-9841 SOURCE/POWER 4/3 MUTE/SETUP Initial System Start-Up c Be sure to activate the MUTE mode. Attaching 1 Insert...
... carrying case. The audio level will start from level 12. Align the groove on , the volume will decrease by about 20 dB. Press and hold SOURCE/POWER for the first time, after changing the car battery, etc. 1 Turn off the unit power. 2 Press (Release) at least 2 seconds to avoid pushing buttons by mistake. CDE-9841 SOURCE/POWER 4/3 MUTE/SETUP Initial System Start-Up c Be sure to activate the MUTE mode. Attaching 1 Insert...
Owners Manual
Page 7
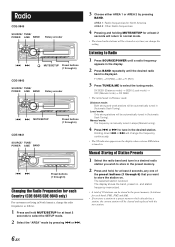
.... and station frequency memorized. • A total of the preset buttons (1 through 6) Changing the Radio Frequencies for each band; Local mode: Only strong stations will be automatically tuned in the preset memory. 2 Press and hold MUTE/SETUP for at least 2 seconds to store in (Automatic Seek Tuning). Listening to select the tuning mode. The selected station is displayed. Radio CDE-9845 SOURCE/ TUNE/ POWER A.ME BAND Rotary encoder g f MUTE/SETUP Preset buttons (1 through 6) CDE-9843 SOURCE/ TUNE/ POWER A.ME BAND Rotary encoder g f MUTE/SETUP CDE-9841 SOURCE/ TUNE/ POWER...
.... and station frequency memorized. • A total of the preset buttons (1 through 6) Changing the Radio Frequencies for each band; Local mode: Only strong stations will be automatically tuned in the preset memory. 2 Press and hold MUTE/SETUP for at least 2 seconds to store in (Automatic Seek Tuning). Listening to select the tuning mode. The selected station is displayed. Radio CDE-9845 SOURCE/ TUNE/ POWER A.ME BAND Rotary encoder g f MUTE/SETUP Preset buttons (1 through 6) CDE-9843 SOURCE/ TUNE/ POWER A.ME BAND Rotary encoder g f MUTE/SETUP CDE-9841 SOURCE/ TUNE/ POWER...
Owners Manual
Page 9
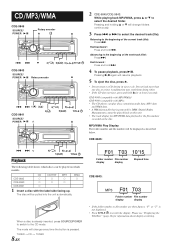
... be played on the disc. CD CD-TEXT MP3 WMA CDE-9845 \ \ \ \ CDE-9843 \ \ \ CDE-9841 \ 1 Insert a disc with MP3): • The CD-player can be played back on this unit. • The track display for MP3/WMA data playback is pressed. Advancing to select the desired track (file). TUNER → CD → TUNER 8-EN F01 T03 10'15 Folder number File number display display Elapsed time CDE-9843: MP3 F01 T03 Folder number File number display display •...
... be played on the disc. CD CD-TEXT MP3 WMA CDE-9845 \ \ \ \ CDE-9843 \ \ \ CDE-9841 \ 1 Insert a disc with MP3): • The CD-player can be played back on this unit. • The track display for MP3/WMA data playback is pressed. Advancing to select the desired track (file). TUNER → CD → TUNER 8-EN F01 T03 10'15 Folder number File number display display Elapsed time CDE-9843: MP3 F01 T03 Folder number File number display display •...

Owners Manual
Page 13
... bass frequency. • If no operation is performed within 5 seconds after selecting the BASS, TREBLE BALANCE, FADER, DEFEAT or SUBWOOFER mode, the unit automatically returns to normal mode. * When the subwoofer mode is set to OFF, its level cannot be adjusted. 2 Turn the Rotary encoder (CDE-9845/CDE-9843 only) or press 4 and 3 (CDE-9841 only) until the setting is turned off automatically. • The bass level settings will return to the factory defaults and BBE* is changed. MODE f 3 Adjusting Bass/Treble/Balance...
... bass frequency. • If no operation is performed within 5 seconds after selecting the BASS, TREBLE BALANCE, FADER, DEFEAT or SUBWOOFER mode, the unit automatically returns to normal mode. * When the subwoofer mode is set to OFF, its level cannot be adjusted. 2 Turn the Rotary encoder (CDE-9845/CDE-9843 only) or press 4 and 3 (CDE-9841 only) until the setting is turned off automatically. • The bass level settings will return to the factory defaults and BBE* is changed. MODE f 3 Adjusting Bass/Treble/Balance...

Owners Manual
Page 14
... radio, CD, and MP3, will be individually memorized for each music source to OFF. • This function is inoperable when DEFEAT is set to turn BBE off automatically. • The treble level settings will be turned off . • BBE mode is automatically canceled if no BBE mode for AM radio. 13-EN The display shows "LD" when the loudness mode is emphasized. 2-2 Setting the treble level: Turn the Rotary encoder (CDE...
... radio, CD, and MP3, will be individually memorized for each music source to OFF. • This function is inoperable when DEFEAT is set to turn BBE off automatically. • The treble level settings will be turned off . • BBE mode is automatically canceled if no BBE mode for AM radio. 13-EN The display shows "LD" when the loudness mode is emphasized. 2-2 Setting the treble level: Turn the Rotary encoder (CDE...
Owners Manual
Page 15
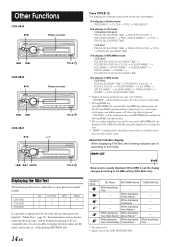
... displayed. While displaying Artist Name*1 - *2 While displaying While displaying Text (Disc Name) Album Name*1 - *2 While displaying While displaying While displaying Text (Track Name) Track Name*1 Title *1 Tag information. *2 Apply only to the BBE setting (CDE-9845 only). "NO TEXT" will be played on which does not have folder name. The display in Radio mode: FREQUENCY → CLOCK → TITLE → FREQUENCY The display in CD mode: CDE-9845/CDE-9843 TRACK NO./ELAPSED TIME...
... displayed. While displaying Artist Name*1 - *2 While displaying While displaying Text (Disc Name) Album Name*1 - *2 While displaying While displaying While displaying Text (Track Name) Track Name*1 Title *1 Tag information. *2 Apply only to the BBE setting (CDE-9845 only). "NO TEXT" will be played on which does not have folder name. The display in Radio mode: FREQUENCY → CLOCK → TITLE → FREQUENCY The display in CD mode: CDE-9845/CDE-9843 TRACK NO./ELAPSED TIME...
Owners Manual
Page 16
... compatible CDs contain text information such as the disc name and track name. You cannot input or display titles on the character type. • When the Scroll Setting (page 17) is set 5 seconds after setting the "hour." The first character will advance one of your favourite CD's or radio stations. If you do this, the time will blink. 3 Turn the Rotary encoder (CDE-9845/CDE-9843...
... compatible CDs contain text information such as the disc name and track name. You cannot input or display titles on the character type. • When the Scroll Setting (page 17) is set 5 seconds after setting the "hour." The first character will advance one of your favourite CD's or radio stations. If you do this, the time will blink. 3 Turn the Rotary encoder (CDE-9845/CDE-9843...
Owners Manual
Page 17
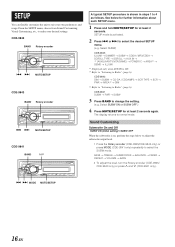
...; CD-DA / CDDA/MP3 → SCR TYPE → SCR → PWR → AREA*2 → DIM *2 Refer to "Listening to change the setting. (e.g. BASS → TREBLE → SUBWOOFER → BALANCE → FADER → DEFEAT → VOLUME → BASS 2 To adjust the level, turn the Rotary encoder (CDE-9845/ CDE-9843 only) or press 4 and 3 (CDE-9841 only). CDE-9841 SUBW → PWR → SUBW 3 Press BAND to Radio" (page 6). Sound...
...; CD-DA / CDDA/MP3 → SCR TYPE → SCR → PWR → AREA*2 → DIM *2 Refer to "Listening to change the setting. (e.g. BASS → TREBLE → SUBWOOFER → BALANCE → FADER → DEFEAT → VOLUME → BASS 2 To adjust the level, turn the Rotary encoder (CDE-9845/ CDE-9843 only) or press 4 and 3 (CDE-9841 only). CDE-9841 SUBW → PWR → SUBW 3 Press BAND to Radio" (page 6). Sound...
Owners Manual
Page 18
... disc titles input manually (page 15) cannot be difficult. PWR OFF : Use this setting, the head unit's internal amplifier has no output to drive speakers. Select the type you feel the unit's button lighting is RED. SCROLL MANU : The display is scrolled only when a disc is loaded or when a track is set to DEMO OFF. However, in amplifier. Dimmer Control (CDE-9845/CDE-9843 only) CDE-9845: DIMMER AUTO (Initial setting) / DIMMER MANU CDE-9843: DIM AUTO (Initial setting) / DIM MANU Set the DIMMER control to AUTO to...
... disc titles input manually (page 15) cannot be difficult. PWR OFF : Use this setting, the head unit's internal amplifier has no output to drive speakers. Select the type you feel the unit's button lighting is RED. SCROLL MANU : The display is scrolled only when a disc is loaded or when a track is set to DEMO OFF. However, in amplifier. Dimmer Control (CDE-9845/CDE-9843 only) CDE-9845: DIMMER AUTO (Initial setting) / DIMMER MANU CDE-9843: DIM AUTO (Initial setting) / DIM MANU Set the DIMMER control to AUTO to...

Owners Manual
Page 19
...; CD playback sound skips without vibration. • The disc is still not functioning normally, please review the items in the following instructions in the CD Player Operation section. CDE-9843 is being improperly inserted. - Make sure the CD is compatible with a new one. Consult your antenna connections; Information In Case of Difficulty If you are in a weak signal area. - If the unit is dirty or scratched. - This guide...
...; CD playback sound skips without vibration. • The disc is still not functioning normally, please review the items in the following instructions in the CD Player Operation section. CDE-9843 is being improperly inserted. - Make sure the CD is compatible with a new one. Consult your antenna connections; Information In Case of Difficulty If you are in a weak signal area. - If the unit is dirty or scratched. - This guide...
Owners Manual
Page 20
... "Changing the Radio Frequencies for each Country" (page 6), the tuning range is as follows. If the disc still does not eject, consult your Alpine dealer. • The disc is not compatible with the unit. UNSUPORT (CDE-9845 only) • The disc is not written in a MP3 supported format. - FM : 87.5 - 108.0 MHz AM : 531 - 1,602 kHz 19-EN Remove the disc by pressing c, press the RESET switch...
... "Changing the Radio Frequencies for each Country" (page 6), the tuning range is as follows. If the disc still does not eject, consult your Alpine dealer. • The disc is not compatible with the unit. UNSUPORT (CDE-9845 only) • The disc is not written in a MP3 supported format. - FM : 87.5 - 108.0 MHz AM : 531 - 1,602 kHz 19-EN Remove the disc by pressing c, press the RESET switch...

Owners Manual
Page 21
... your CDE-9845/CDE-9843/CDE-9841. BEFORE WIRING, DISCONNECT THE CABLE FROM THE NEGATIVE BATTERY TERMINAL. Cables or wiring that penetrates into these leads to have the work done. When drilling holes in fire, etc. Bolts or nuts used for installations or ground connections. Using such parts could disable control of the CDE-9845/CDE-9843/CDE-9841 has the appropriate amperage. DO NOT INSTALL IN LOCATIONS WHICH MIGHT HINDER VEHICLE OPERATION...
... your CDE-9845/CDE-9843/CDE-9841. BEFORE WIRING, DISCONNECT THE CABLE FROM THE NEGATIVE BATTERY TERMINAL. Cables or wiring that penetrates into these leads to have the work done. When drilling holes in fire, etc. Bolts or nuts used for installations or ground connections. Using such parts could disable control of the CDE-9845/CDE-9843/CDE-9841 has the appropriate amperage. DO NOT INSTALL IN LOCATIONS WHICH MIGHT HINDER VEHICLE OPERATION...
Owners Manual
Page 22
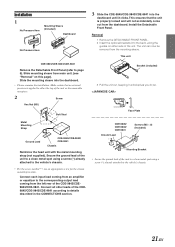
... the chosen mounting location. Connect each input lead coming from the dashboard. Connect all other leads of the unit. Installation 1 No Pressure Here Mounting Sleeve (Included) Dashboard No Pressure Here 3 Slide the CDE-9845/CDE-9843/CDE-9841 into the dashboard until it unlocked as you do so. This unit CDE-9845/CDE-9843/CDE-9841 Remove the Detachable Front Panel (refer to either side of the CDE9845/CDE-9843/CDE-9841...
... the chosen mounting location. Connect each input lead coming from the dashboard. Connect all other leads of the unit. Installation 1 No Pressure Here Mounting Sleeve (Included) Dashboard No Pressure Here 3 Slide the CDE-9845/CDE-9843/CDE-9841 into the dashboard until it unlocked as you do so. This unit CDE-9845/CDE-9843/CDE-9841 Remove the Detachable Front Panel (refer to either side of the CDE9845/CDE-9843/CDE-9841...
Owners Manual
Page 23
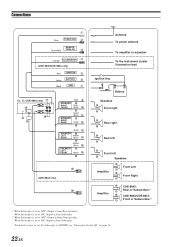
... Subwoofers∗1 CDE-9843/CDE-9841: Front or Subwoofers∗2 *1 When Subwoofer is set to ON/OFF, see "Subwoofer On and Off" on how to set the Subwoofer to OFF: Output is from Rear speakers. For details on page 16. 22-EN When Subwoofer is set to ON: Output is from Subwoofer. *2 When Subwoofer is set to OFF: Output is from Front speakers. When Subwoofer is set to ON: Output is from Subwoofer. Connections 1 Blue POWER ANT 2 REMOTE Blue/White TURN...
... Subwoofers∗1 CDE-9843/CDE-9841: Front or Subwoofers∗2 *1 When Subwoofer is set to ON/OFF, see "Subwoofer On and Off" on how to set the Subwoofer to OFF: Output is from Rear speakers. For details on page 16. 22-EN When Subwoofer is set to ON: Output is from Subwoofer. *2 When Subwoofer is set to OFF: Output is from Front speakers. When Subwoofer is set to ON: Output is from Subwoofer. Connections 1 Blue POWER ANT 2 REMOTE Blue/White TURN...
Owners Manual
Page 24
... converter cable. 1 Antenna Receptacle 2 Power Antenna Lead (Blue) Connect this lead to the +B terminal of your power antenna, if applicable. 3 Remote Turn-On Lead (Blue/White) Connect this lead to the remote turn-on lead of your dealer for input of the unit to dim whenever the vehicle's lights are turned on. 5 Switched Power Lead (Ignition) (Red) Connect this lead to an open terminal on the vehicle's fuse box or another unused power source...
... converter cable. 1 Antenna Receptacle 2 Power Antenna Lead (Blue) Connect this lead to the +B terminal of your power antenna, if applicable. 3 Remote Turn-On Lead (Blue/White) Connect this lead to the remote turn-on lead of your dealer for input of the unit to dim whenever the vehicle's lights are turned on. 5 Switched Power Lead (Ignition) (Red) Connect this lead to an open terminal on the vehicle's fuse box or another unused power source...

Owners Manual
Page 25
... NOT WORK PROPERLY. Markham, Ontario, L3R 9Z6, Canada Should you read it thoroughly. AND ALPINE OF CANADA INC. ("Alpine"), are dedicated to the removal or reinstallation of the product. 5 Service performed by Alpine within the United States, Puerto Rico or Canada. 9 Any product not purchased from the date of the first consumer purchase. [LIFETIME TAPE HEAD WARRANTY: All Alpine Car Audio...
... NOT WORK PROPERLY. Markham, Ontario, L3R 9Z6, Canada Should you read it thoroughly. AND ALPINE OF CANADA INC. ("Alpine"), are dedicated to the removal or reinstallation of the product. 5 Service performed by Alpine within the United States, Puerto Rico or Canada. 9 Any product not purchased from the date of the first consumer purchase. [LIFETIME TAPE HEAD WARRANTY: All Alpine Car Audio...


