
Owners Manual
Page 1
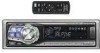
... OF AUSTRALIA PTY. Portal de Gamarra 36, Pabellon, 32 01013 Vitoria (Alava)-APDO 133, Spain Phone 945-283588 Designed by ALPINE Japan Printed in China (Y) 68P02294K99-A ./ ALPINE® EN FM/AM CD Receiver CDA-9831 FR CDA-9830 Mx MP3 • Plays Windows w MediaTM • (ft dogs DIGITAL AUDIO f TEXT XAA ))) READY ES • OWNER'S MANUAL...
... OF AUSTRALIA PTY. Portal de Gamarra 36, Pabellon, 32 01013 Vitoria (Alava)-APDO 133, Spain Phone 945-283588 Designed by ALPINE Japan Printed in China (Y) 68P02294K99-A ./ ALPINE® EN FM/AM CD Receiver CDA-9831 FR CDA-9830 Mx MP3 • Plays Windows w MediaTM • (ft dogs DIGITAL AUDIO f TEXT XAA ))) READY ES • OWNER'S MANUAL...

Owners Manual
Page 2
... de souplesse, plus de confort. CHA-1214 • CD changer for CDA-9831/CDA-9830. • Changeur CD pour CDA-9831/CDA- 9830. • Cambiador de CD para CDA-9831/ CDA-9830. Le modele CHM-S630 M-Bus est un changeur 6 disques super compact dote de la fonction CD-R/ RW PLAY BACK. ;Los cambiadores Alpine de CD le ofrecen mas! More musical selections, more versatility, more...
... de souplesse, plus de confort. CHA-1214 • CD changer for CDA-9831/CDA-9830. • Changeur CD pour CDA-9831/CDA- 9830. • Cambiador de CD para CDA-9831/ CDA-9830. Le modele CHM-S630 M-Bus est un changeur 6 disques super compact dote de la fonction CD-R/ RW PLAY BACK. ;Los cambiadores Alpine de CD le ofrecen mas! More musical selections, more versatility, more...
Owners Manual
Page 3
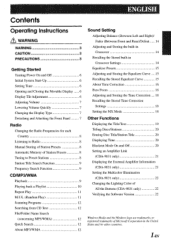
...Radio 8 Manual Storing of Station Presets 8 Automatic Memory of Station Presets 8 Tuning to Preset Stations 8 Station Title Search Function 9 Frequency Search Function 9 CD/MP3/VVMA Playback 9 Playing back a Playlist 10 Repeat Play 11 M.I.X. (Random Play) 11 Scanning Programs 12 Searching from CD...Off 20 Setting an Amplifier Link (CDA-9831 only) 21 Displaying the External Amplifier Information (CDA-9831 only) 21 Setting the Multicolor Illumination (CDA-9831 only) 22 Changing the Lighting Color of All the Buttons (CDA-9831 only) 22 Verifying the Software ...
...Radio 8 Manual Storing of Station Presets 8 Automatic Memory of Station Presets 8 Tuning to Preset Stations 8 Station Title Search Function 9 Frequency Search Function 9 CD/MP3/VVMA Playback 9 Playing back a Playlist 10 Repeat Play 11 M.I.X. (Random Play) 11 Scanning Programs 12 Searching from CD...Off 20 Setting an Amplifier Link (CDA-9831 only) 21 Displaying the External Amplifier Information (CDA-9831 only) 21 Setting the Multicolor Illumination (CDA-9831 only) 22 Changing the Lighting Color of All the Buttons (CDA-9831 only) 22 Verifying the Software ...
Owners Manual
Page 4
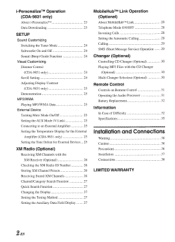
...25 Setting the Temperature Display for the External Amplifier (CDA-9831 only) 25 Setting the Tone Defeat for External Devices 25 XM Radio (Optional) Receiving XM Channels with the XM Receiver (Optional) 26 Checking the XM Radio ID Number 26 Storing XM Channel Presets 26 Receiving...28 Setting the Automatic Calling 28 Calling 29 SMS (Short Message Service) Operation 29 Changer (Optional) Controlling CD Changer (Optional) 30 Playing MP3 Files with the CD Changer (Optional) 30 Multi-Changer Selection (Optional) 30 Remote Control Controls on Remote Control 31 Operating ...
...25 Setting the Temperature Display for the External Amplifier (CDA-9831 only) 25 Setting the Tone Defeat for External Devices 25 XM Radio (Optional) Receiving XM Channels with the XM Receiver (Optional) 26 Checking the XM Radio ID Number 26 Storing XM Channel Presets 26 Receiving...28 Setting the Automatic Calling 28 Calling 29 SMS (Short Message Service) Operation 29 Changer (Optional) Controlling CD Changer (Optional) 30 Playing MP3 Files with the CD Changer (Optional) 30 Multi-Changer Selection (Optional) 30 Remote Control Controls on Remote Control 31 Operating ...

Owners Manual
Page 6
...Bumps Outside (Bumps) O Disc Cleaning Fingerprints, dust, or soil on the disc. Use of the product. Installation Location Make sure the CDA-9831/CDA-9830 will not scratch the disc or damage the player. PRECAUTIONS Product Cleaning Use a soft dry cloth for periodic cleaning of special shape ... shape discs. For routine cleaning, wipe the playing surface with a clean, soft cloth from jamming, the CD player will not leave fingerprints on discs played in Alpine CD players. Make sure the label side is inserted into the player by the automatic reloading mechanism. For more ...
...Bumps Outside (Bumps) O Disc Cleaning Fingerprints, dust, or soil on the disc. Use of the product. Installation Location Make sure the CDA-9831/CDA-9830 will not scratch the disc or damage the player. PRECAUTIONS Product Cleaning Use a soft dry cloth for periodic cleaning of special shape ... shape discs. For routine cleaning, wipe the playing surface with a clean, soft cloth from jamming, the CD player will not leave fingerprints on discs played in Alpine CD players. Make sure the label side is inserted into the player by the automatic reloading mechanism. For more ...

Owners Manual
Page 7
... to extreme temperatures or sunlight (e.g., left in the car or this unit. You can play CD-Rs/CD-RWs containing MP3/WMA formatted audio files. • Some of CDA-9830. • All English lower case characters are no bumps around the disc. • Do not use unspecified compact discs, correct performance cannot be...
... to extreme temperatures or sunlight (e.g., left in the car or this unit. You can play CD-Rs/CD-RWs containing MP3/WMA formatted audio files. • Some of CDA-9830. • All English lower case characters are no bumps around the disc. • Do not use unspecified compact discs, correct performance cannot be...
Owners Manual
Page 9
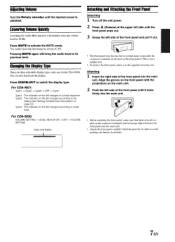
...of the front panel.) This is not a malfunction. • To protect thefront panel, place it in the supplied carrying case. For CDA-9830: VOLUME SETTING LEVEL INDICATOR OFF VOLUME SETTING Audio Level Display nnnnnnnnnminnunnunnuunm Detaching and Attaching the Front Panel Detaching 1 Turn off the unit ...function will decrease by its previous level. Changing the Display Type There are three selectable display types (only one for the CDA-9830). For CDA-9831: Typel Type2 Type3 OFF -e Type1 Typel : The indicator on the connector terminals and no foreign object between the front...
...of the front panel.) This is not a malfunction. • To protect thefront panel, place it in the supplied carrying case. For CDA-9830: VOLUME SETTING LEVEL INDICATOR OFF VOLUME SETTING Audio Level Display nnnnnnnnnminnunnunnuunm Detaching and Attaching the Front Panel Detaching 1 Turn off the unit ...function will decrease by its previous level. Changing the Display Type There are three selectable display types (only one for the CDA-9830). For CDA-9831: Typel Type2 Type3 OFF -e Type1 Typel : The indicator on the connector terminals and no foreign object between the front...

Owners Manual
Page 12
... played. Playlist Display While playing back a playlist, the folder and file numbers that are stored in advance on the computer. • The CD-player can play discs containing audio data, MP3 data and WMA data. • A WMA formatfile that is protected by DRM (Digital Rights Management...V, the playlists move up or down operation. By pressing and holding buttons up or down continuously. • If there is automatically indicated. CDA-9831 P-LIST mO3 Q05 File number display 160 kbps Bit rate display m01t2031 Folder number display *When the unit is connected to the Amplifier Link,...
... played. Playlist Display While playing back a playlist, the folder and file numbers that are stored in advance on the computer. • The CD-player can play discs containing audio data, MP3 data and WMA data. • A WMA formatfile that is protected by DRM (Digital Rights Management...V, the playlists move up or down operation. By pressing and holding buttons up or down continuously. • If there is automatically indicated. CDA-9831 P-LIST mO3 Q05 File number display 160 kbps Bit rate display m01t2031 Folder number display *When the unit is connected to the Amplifier Link,...

Owners Manual
Page 15
... A-Z (all caps), numbers 0-9, and '_' (underscore). A disc can play back discs recorded with ISO9660 Level 1 or Level 2. Valid characters for CDA-9830) is sampled (recorded). This device also can hold up to ISO9660. This device cannot correctly play back discs in the order that the writing...tag WMA: WMA tag Root folder The root folder is 8 (including the root directory). Formats supported This device supports CD-ROM XA, Mixed Mode CD, Enhanced CD (CD-Extra) and Multi-Session. The playback order of the file system. Files with no . Corresponding File Systems This ...
... A-Z (all caps), numbers 0-9, and '_' (underscore). A disc can play back discs recorded with ISO9660 Level 1 or Level 2. Valid characters for CDA-9830) is sampled (recorded). This device also can hold up to ISO9660. This device cannot correctly play back discs in the order that the writing...tag WMA: WMA tag Root folder The root folder is 8 (including the root directory). Formats supported This device supports CD-ROM XA, Mixed Mode CD, Enhanced CD (CD-Extra) and Multi-Session. The playback order of the file system. Files with no . Corresponding File Systems This ...
Owners Manual
Page 17
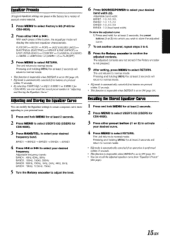
...curve. 7 To set to activate your desired band width (Q). With each press of musical source material. 1 Press MENU to select Factory's EQ (P-EQ for CDA-9830). 2 Press either preset button (1 or 2) to ON (page 14). • You can recall the adjusted equalizer curve from "Equalizer Presets" (this.... Recalling the Stored Equalizer Curve 1 Press and hold MENU for at least 2 seconds. 2 Press MENU to select USER'S EQ (USERS for CDA-9830). 3 Press either IN or ►►l. Adjusting and Storing the Equalizer Curve You can recall the stored preset number in 'Adjusting and ...
...curve. 7 To set to activate your desired band width (Q). With each press of musical source material. 1 Press MENU to select Factory's EQ (P-EQ for CDA-9830). 2 Press either preset button (1 or 2) to ON (page 14). • You can recall the adjusted equalizer curve from "Equalizer Presets" (this.... Recalling the Stored Equalizer Curve 1 Press and hold MENU for at least 2 seconds. 2 Press MENU to select USER'S EQ (USERS for CDA-9830). 3 Press either IN or ►►l. Adjusting and Storing the Equalizer Curve You can recall the stored preset number in 'Adjusting and ...

Owners Manual
Page 18
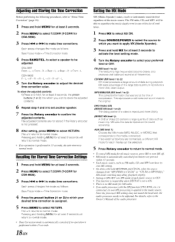
... the listener. Conditions: Farthest Speaker - Listening Position: Front Left Seat Adjust the time correction level of increased distance for those speakers. To correct this, the CDA-9831/CDA-9830 is the same as the sound of other speakers) 3 Divide the distances calculated for the speakers by adjusting the Time Correction value of 0.1 ms... front by the speed of the 0 to 99 steps, audible time correction can be adjusted at least 2 seconds. 2 Press MENU to select T.CORR (T-CORR for CDA-9830). 3 Press I-41-41 or ►►I to confirm the adjusted contents.
... the listener. Conditions: Farthest Speaker - Listening Position: Front Left Seat Adjust the time correction level of increased distance for those speakers. To correct this, the CDA-9831/CDA-9830 is the same as the sound of other speakers) 3 Divide the distances calculated for the speakers by adjusting the Time Correction value of 0.1 ms... front by the speed of the 0 to 99 steps, audible time correction can be adjusted at least 2 seconds. 2 Press MENU to select T.CORR (T-CORR for CDA-9830). 3 Press I-41-41 or ►►I to confirm the adjusted contents.
Owners Manual
Page 20
... for at least 2 seconds. 2 Press MENU to select T.CORR (T-CORR for CDA-9830). 3 Press IN or II0-10-1 to make time corrections. The FM radio, CD, and MP3, will return to normal mode. • Time Correction mode is... Setting the MX Mode MX (Media Xpander) makes vocals or instruments sound distinct regardless of data such as FM radio, CD, and MP3 can be adjusted. FM (MX level 1 to 3): The medium to adjust the desired time correction...quantity to reproduce a more clearly. (MUSIC MX level 1): A DVD or Video CD contains a large quantity of the music source. CDA-9831 Front -
... for at least 2 seconds. 2 Press MENU to select T.CORR (T-CORR for CDA-9830). 3 Press IN or II0-10-1 to make time corrections. The FM radio, CD, and MP3, will return to normal mode. • Time Correction mode is... Setting the MX Mode MX (Media Xpander) makes vocals or instruments sound distinct regardless of data such as FM radio, CD, and MP3 can be adjusted. FM (MX level 1 to 3): The medium to adjust the desired time correction...quantity to reproduce a more clearly. (MUSIC MX level 1): A DVD or Video CD contains a large quantity of the music source. CDA-9831 Front -

Owners Manual
Page 21
...and bit rate of the MP3/WMA file are displayed *4 "0 (zero)" is displayedfor thefolder name of the rootfolder *-5 Only when CDA-9831 is available by turning the Rotary encoder, an indicator is ignored. When selection is connected to an external Amplifier Link compatible amplifier.... in Radio mode: FREQUENCY -› CLOCK TITLE EXTERNAL AMPLIFIER INFORMATION*5 FREQUENCY The display in CD mode: TRACK NO./ELAPSED TIME --> TRACK NO./CLOCK TEXT (DISC NAME)*' TEXT (TRACK NAME)*2 TITLE --> EXTERNAL AMPLIFIER INFORMATION*-' --> TRACK NO./ ELAPSED TIME The display in the display. CDA-9830 ...
...and bit rate of the MP3/WMA file are displayed *4 "0 (zero)" is displayedfor thefolder name of the rootfolder *-5 Only when CDA-9831 is available by turning the Rotary encoder, an indicator is ignored. When selection is connected to an external Amplifier Link compatible amplifier.... in Radio mode: FREQUENCY -› CLOCK TITLE EXTERNAL AMPLIFIER INFORMATION*5 FREQUENCY The display in CD mode: TRACK NO./ELAPSED TIME --> TRACK NO./CLOCK TEXT (DISC NAME)*' TEXT (TRACK NAME)*2 TITLE --> EXTERNAL AMPLIFIER INFORMATION*-' --> TRACK NO./ ELAPSED TIME The display in the display. CDA-9830 ...
Owners Manual
Page 22
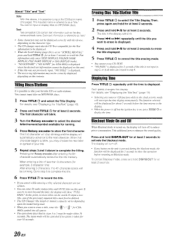
... beyond the limit, the display will stop blinking and the display wil l automatically advance to erase a title, enter the " "for CDA- 9830) symbol into memory. Thefunction selected will be canceled ifno action is possible to Blackout mode. You cannot input or display titles on...displayedfor 5 seconds to record the title. • If you want to activate the blackout mode. When entering a title of your favorite CD's or radio stations. Such text information is referred to complete the titling. When that character begins to blink, you may not be displayed. •...
... beyond the limit, the display will stop blinking and the display wil l automatically advance to erase a title, enter the " "for CDA- 9830) symbol into memory. Thefunction selected will be canceled ifno action is possible to Blackout mode. You cannot input or display titles on...displayedfor 5 seconds to record the title. • If you want to activate the blackout mode. When entering a title of your favorite CD's or radio stations. Such text information is referred to complete the titling. When that character begins to blink, you may not be displayed. •...
Owners Manual
Page 23
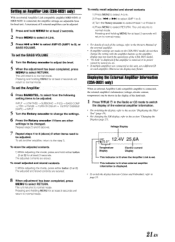
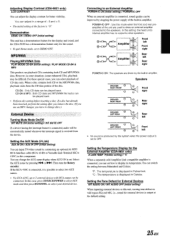
.../TEL. A maximum of 8 external amplifiers can be adjusted. 1 Press and hold either button (1 or 2). Setting an Amplifier Link (CDA-9831 only) With an external Amplifier Link compatible amplifier MRD-M501 or MRD-M301 is connected, the amplifier settings are adjustable from the following setting... amplifier information is connected, the external amplifier's information (voltage, electric current, temperature) can be shown in the Radio or CD mode to switch the display of the CDA-9831 model. • "No Link" is displayed if the amplifier is removed or its power cannot be changed....
.../TEL. A maximum of 8 external amplifiers can be adjusted. 1 Press and hold either button (1 or 2). Setting an Amplifier Link (CDA-9831 only) With an external Amplifier Link compatible amplifier MRD-M501 or MRD-M301 is connected, the amplifier settings are adjustable from the following setting... amplifier information is connected, the external amplifier's information (voltage, electric current, temperature) can be shown in the Radio or CD mode to switch the display of the CDA-9831 model. • "No Link" is displayed if the amplifier is removed or its power cannot be changed....

Owners Manual
Page 24
... The version is displayed. 3 Press MENU to normal mode. The unit returns to select RETURN. Changing the Lighting Color of All the Buttons (CDA-9831 only) You can change the lighting color of the unit. 1 Press MENU to select Illumination. 2 Press SOURCE/POWER. Each press of the ... is displayed if a preset that which you have set above 3 Turn the Rotary encoder to select colors (1 through 6). Setting the Multicolor Illumination (CDA-9831 only) You can change the lighting color of the following four buttons: SOURCE/POWER, BAND/TEL, 144 and Not 1 Press MENU to select Illumination...
... The version is displayed. 3 Press MENU to normal mode. The unit returns to select RETURN. Changing the Lighting Color of All the Buttons (CDA-9831 only) You can change the lighting color of the unit. 1 Press MENU to select Illumination. 2 Press SOURCE/POWER. Each press of the ... is displayed if a preset that which you have set above 3 Turn the Rotary encoder to select colors (1 through 6). Setting the Multicolor Illumination (CDA-9831 only) You can change the lighting color of the following four buttons: SOURCE/POWER, BAND/TEL, 144 and Not 1 Press MENU to select Illumination...
Owners Manual
Page 25
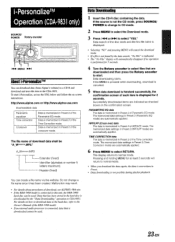
...The "No File" display will automatically disappear if no operation is memorized in Preset 2 (Parametric EQ mode) are automatically applied. iPersonaIizeTM Operation (CDA-9831 only) SOURCE/ POWER Rotary encoder iIJa 144 MENU NI About I-PersonalizeTM You can create a file name via the website. Data is performedfor 5 ...in Preset 2 of the Time correction mode. The display returns to CDA-9831. HPF/LPF (Cross over) data The data is downloaded cannot be used . You can download data (from Alpine's website) to a CD-R and download and store the data to this unit, the HDA-...
...The "No File" display will automatically disappear if no operation is memorized in Preset 2 (Parametric EQ mode) are automatically applied. iPersonaIizeTM Operation (CDA-9831 only) SOURCE/ POWER Rotary encoder iIJa 144 MENU NI About I-PersonalizeTM You can create a file name via the website. Data is performedfor 5 ...in Preset 2 of the Time correction mode. The display returns to CDA-9831. HPF/LPF (Cross over) data The data is downloaded cannot be used . You can download data (from Alpine's website) to a CD-R and download and store the data to this unit, the HDA-...
Owners Manual
Page 26
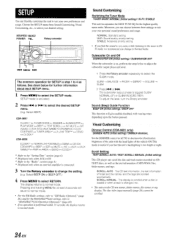
...setting) / BEEP OFF This function will return to normal mode. • For the XM Radio settings, refer to "XM Radio (Optional)" (page 26), andfor the MobileHubTmLink settings, refer to "MobileHubTMLink Operation (Optional)" (page... BEEP ON or BEEP OFF.) 4 Press MENU to normal mode. SCROLL AUTO : The CD text information, the text information of folder and file names, and the tags are scrolled ..., folder names, and tags. The display returns to select RETURN. Visual Customizing Dimmer Control (CDA-9831 only) DIMMER AUTO (Initial setting) / DIMMER MANUAL Set the DIMMER control to AUTO to ...
...setting) / BEEP OFF This function will return to normal mode. • For the XM Radio settings, refer to "XM Radio (Optional)" (page 26), andfor the MobileHubTmLink settings, refer to "MobileHubTMLink Operation (Optional)" (page... BEEP ON or BEEP OFF.) 4 Press MENU to normal mode. SCROLL AUTO : The CD text information, the text information of folder and file names, and the tags are scrolled ..., folder names, and tags. The display returns to select RETURN. Visual Customizing Dimmer Control (CDA-9831 only) DIMMER AUTO (Initial setting) / DIMMER MANUAL Set the DIMMER control to AUTO to ...
Owners Manual
Page 27
...POWER-IC ON : The speakers are used to drive an external amplifier connected to the speakers. Setting the Tone Defeat for the External Amplifier (CDA-9831 only) A-LINK TEMP °F(Initial setting) / °C When a separately sold Amplifier Link compatible amplifier is possible to select two AUX names...of the unit are driven by stopping the power supply of CD data only. CD-DA : Only CD data can be automatically muted whenever the interrupt signal is set to select your desired device. Adjusting Display Contrast (CDA-9831 only) LCD CONTRAST You can adjust the display contrast for the...
...POWER-IC ON : The speakers are used to drive an external amplifier connected to the speakers. Setting the Tone Defeat for the External Amplifier (CDA-9831 only) A-LINK TEMP °F(Initial setting) / °C When a separately sold Amplifier Link compatible amplifier is possible to select two AUX names...of the unit are driven by stopping the power supply of CD data only. CD-DA : Only CD data can be automatically muted whenever the interrupt signal is set to select your desired device. Adjusting Display Contrast (CDA-9831 only) LCD CONTRAST You can adjust the display contrast for the...

Owners Manual
Page 28
... information, visit XM's website at least 2 seconds, any one . XM and its corresponding logos are trademarks of XM Satellite Radio Inc. • The controls on the CDA-9831/CDA-9830for XM Receiver operation are operative only when an XM Receiver is stored. 3 Repeat the procedure to store up with the ... remote control within 5 seconds to receive the XM Channel. This number is an 8 character alphanumeric number that has your XM Radio Receiver in memory. 26 -EN to the CDA-9831/CDA-9830. to select the desired band (XM1, XM2 or XM3) you want to store. 2 After tuning in the desired ...
... information, visit XM's website at least 2 seconds, any one . XM and its corresponding logos are trademarks of XM Satellite Radio Inc. • The controls on the CDA-9831/CDA-9830for XM Receiver operation are operative only when an XM Receiver is stored. 3 Repeat the procedure to store up with the ... remote control within 5 seconds to receive the XM Channel. This number is an 8 character alphanumeric number that has your XM Radio Receiver in memory. 26 -EN to the CDA-9831/CDA-9830. to select the desired band (XM1, XM2 or XM3) you want to store. 2 After tuning in the desired ...


