
Owners Manual
Page 1
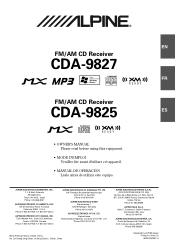
... Ave., Suite 203, Markham, Ontario L3R 9Z6, Canada Phone 1-800-ALPINE-1 (1-800-257-4631) ALPINE ELECTRONICS OF AUSTRALIA PTY. Colombo 8, 20090 Trezzano Sul Naviglio (MI), Italy Phone 02-484781 ALPINE ELECTRONICS DE ESPAÑA, S.A. R EN FM/AM CD Receiver CDA-9827 FR FM/AM CD Receiver CDA-9825 ES • OWNER'S MANUAL ES Please read before using this equipment...
... Ave., Suite 203, Markham, Ontario L3R 9Z6, Canada Phone 1-800-ALPINE-1 (1-800-257-4631) ALPINE ELECTRONICS OF AUSTRALIA PTY. Colombo 8, 20090 Trezzano Sul Naviglio (MI), Italy Phone 02-484781 ALPINE ELECTRONICS DE ESPAÑA, S.A. R EN FM/AM CD Receiver CDA-9827 FR FM/AM CD Receiver CDA-9825 ES • OWNER'S MANUAL ES Please read before using this equipment...

Owners Manual
Page 2
... discos de alto rendimiento con nuevo M DAC, CD-R/RW PLAY BACK, MP3 PLAY BACK y CD TEXT. Changeurs de CD Alpine : vous avez le choix! Le modè...CD changer for CDA-9827/CDA-9825. • Changeur CD pour CDA-9827/CDA-9825. • Cambiador de CD para CDA-9827/ CDA-9825. The CHA-S634 is a super-compact 6-disc changer with a new M DAC, CD-R/RW PLAY BACK, MP3 PLAY BACK and CD TEXT. More musical selections, more versatility, more convenience. CHA-S634 • CD changer for CDA-9827/CDA-9825. • Changeur CD pour CDA-9827/CDA-9825. • Cambiador de CD para CDA-9827/ CDA-9825...
... discos de alto rendimiento con nuevo M DAC, CD-R/RW PLAY BACK, MP3 PLAY BACK y CD TEXT. Changeurs de CD Alpine : vous avez le choix! Le modè...CD changer for CDA-9827/CDA-9825. • Changeur CD pour CDA-9827/CDA-9825. • Cambiador de CD para CDA-9827/ CDA-9825. The CHA-S634 is a super-compact 6-disc changer with a new M DAC, CD-R/RW PLAY BACK, MP3 PLAY BACK and CD TEXT. More musical selections, more versatility, more convenience. CHA-S634 • CD changer for CDA-9827/CDA-9825. • Changeur CD pour CDA-9827/CDA-9825. • Cambiador de CD para CDA-9827/ CDA-9825...
Owners Manual
Page 3
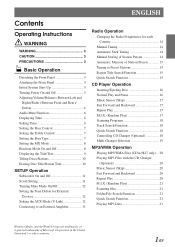
...13 Radio Operation Changing the Radio Frequencies for each Country 14 Manual Tuning 14 Automatic Seek Tuning 14 Manual Storing of Station Presets 14 Automatic Memory of Station Presets 15 Tuning to Preset Stations 15 Station Title Search Function 15 Quick Search Function 15 CD Player ...Scanning Programs 18 Track Search Function 18 Quick Search Function 18 Controlling CD Changer (Optional 18 Multi-Changer Selection 19 MP3/WMA Operation Playing MP3/WMA Files (CDA-9827 only) ... 20 Playing MP3 Files with the CD Changer (Optional 20 Music Sensor (Skip 20 Fast Forward and Backward ...
...13 Radio Operation Changing the Radio Frequencies for each Country 14 Manual Tuning 14 Automatic Seek Tuning 14 Manual Storing of Station Presets 14 Automatic Memory of Station Presets 15 Tuning to Preset Stations 15 Station Title Search Function 15 Quick Search Function 15 CD Player ...Scanning Programs 18 Track Search Function 18 Quick Search Function 18 Controlling CD Changer (Optional 18 Multi-Changer Selection 19 MP3/WMA Operation Playing MP3/WMA Files (CDA-9827 only) ... 20 Playing MP3 Files with the CD Changer (Optional 20 Music Sensor (Skip 20 Fast Forward and Backward ...

Owners Manual
Page 4
... (Optional) Receiving XM Channels with the XM Receiver (Optional 22 Checking the XM Radio ID Number 22 Storing XM Channel Presets 22 Receiving Stored XM Channels 22 Channel/Category Search Function 23 Quick Search Function 23 ...incoming/absent/ incoming history 25 SMS (Short Message Service) Operation Receiving a short message 25 Remote Control Operation Controls on Remote Control (CDA-9827 only 26 Battery Replacement (CDA-9827 only) ......... 27 Information About MP3/WMA 28 In Case of Difficulty 30 Specifications 33 Installation and Connections Warning 34 Caution 34 Precautions ...
... (Optional) Receiving XM Channels with the XM Receiver (Optional 22 Checking the XM Radio ID Number 22 Storing XM Channel Presets 22 Receiving Stored XM Channels 22 Channel/Category Search Function 23 Quick Search Function 23 ...incoming/absent/ incoming history 25 SMS (Short Message Service) Operation Receiving a short message 25 Remote Control Operation Controls on Remote Control (CDA-9827 only 26 Battery Replacement (CDA-9827 only) ......... 27 Information About MP3/WMA 28 In Case of Difficulty 30 Specifications 33 Installation and Connections Warning 34 Caution 34 Precautions ...

Owners Manual
Page 6
...out of the disc to skip. Using such accessories can cause the disc to be installed in Alpine CD players. Make sure the label side is being pulled back into the player by the automatic reloading mechanism. New Discs As a protective measure to the mechanism. If you ...the disc. Transparent Sheet Disc Stabilizer Installation Location Make sure the CDA-9827/CDA-9825 will automatically eject discs with irregular surfaces or inserted incorrectly. However, most of them will not scratch the disc or damage the player. Use of the disc. WARNING PRECAUTIONS Never Attempt the Following Do...
...out of the disc to skip. Using such accessories can cause the disc to be installed in Alpine CD players. Make sure the label side is being pulled back into the player by the automatic reloading mechanism. New Discs As a protective measure to the mechanism. If you ...the disc. Transparent Sheet Disc Stabilizer Installation Location Make sure the CDA-9827/CDA-9825 will automatically eject discs with irregular surfaces or inserted incorrectly. However, most of them will not scratch the disc or damage the player. Use of the disc. WARNING PRECAUTIONS Never Attempt the Following Do...

Owners Manual
Page 18
... play on this unit: Flawed CDs, CDs with fingerprints, CDs exposed to extreme temperatures or sunlight (e.g., left in the CD player, press the SOURCE/POWER button to select the CD mode. 2 Press the -/J button to temporarily stop CD playback. Use only compact discs with the CDA-9827 model. However, you want to eject the CD. If you use unspecified compact...
... play on this unit: Flawed CDs, CDs with fingerprints, CDs exposed to extreme temperatures or sunlight (e.g., left in the CD player, press the SOURCE/POWER button to select the CD mode. 2 Press the -/J button to temporarily stop CD playback. Use only compact discs with the CDA-9827 model. However, you want to eject the CD. If you use unspecified compact...
Owners Manual
Page 20
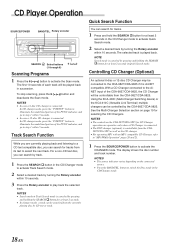
... may be controlled by turning the Rotary encoder within 5 seconds. • In case a 12-disc CD changer is controllable from the CDA-9827/CDA-9825. button to activate the CHANGER mode. NOTE Search mode is Ai-NET compatible. CD Player Operation SOURCE/POWER BAND/TEL. To stop scanning, press the 6 ( deactivate the Scan mode. ) button and NOTES...
... may be controlled by turning the Rotary encoder within 5 seconds. • In case a 12-disc CD changer is controllable from the CDA-9827/CDA-9825. button to activate the CHANGER mode. NOTE Search mode is Ai-NET compatible. CD Player Operation SOURCE/POWER BAND/TEL. To stop scanning, press the 6 ( deactivate the Scan mode. ) button and NOTES...
Owners Manual
Page 21
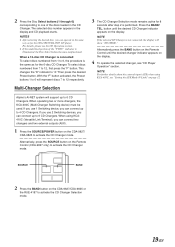
... discs numbered from 1 to 12 respectively. Press the BAND/ TEL. Alpine's Ai-NET system will show "NO CHGR ." This changes the "D" indicator to 6 CD Changers. Multi-Changer Selection 3 The CD Changer Selection mode remains active for the CDA-9827/CDA-9825 CD player. When using KCA-410C, see the CD Operation section. • If the underlined portion of the discs...
... discs numbered from 1 to 12 respectively. Press the BAND/ TEL. Alpine's Ai-NET system will show "NO CHGR ." This changes the "D" indicator to 6 CD Changers. Multi-Changer Selection 3 The CD Changer Selection mode remains active for the CDA-9827/CDA-9825 CD player. When using KCA-410C, see the CD Operation section. • If the underlined portion of the discs...
Owners Manual
Page 22
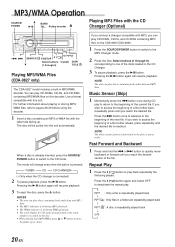
...CD-ROMs, CD-Rs, and CD-RWs containing MP3 files on the CDA-9827/CDA-9825. 1 Press the SOURCE/POWER button to switch to the MP3 Changer mode. 2 Press the Disc Select buttons (1 through 6) 6 ( ) 5( ) ) DISP/ TITLE Playing MP3/WMA Files (CDA-9827 only) The CDA-9827 model includes a built-in the play CD-ROMs, CD-Rs, and CD... discs loaded in a folder are repeatedly played back *: A disc is functional in MP3/WMA decoder. Use a format compatible with the CD Changer (Optional) g f SEARCH 9 F/SETUP 4 ( Select buttons (1 through 6) corresponding to one of the next file. NOTE The...
...CD-ROMs, CD-Rs, and CD-RWs containing MP3 files on the CDA-9827/CDA-9825. 1 Press the SOURCE/POWER button to switch to the MP3 Changer mode. 2 Press the Disc Select buttons (1 through 6) 6 ( ) 5( ) ) DISP/ TITLE Playing MP3/WMA Files (CDA-9827 only) The CDA-9827 model includes a built-in the play CD-ROMs, CD-Rs, and CD... discs loaded in a folder are repeatedly played back *: A disc is functional in MP3/WMA decoder. Use a format compatible with the CD Changer (Optional) g f SEARCH 9 F/SETUP 4 ( Select buttons (1 through 6) corresponding to one of the next file. NOTE The...
Owners Manual
Page 24
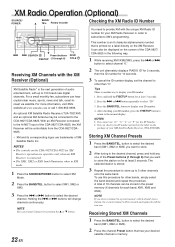
... the procedure to store up to store the station on the CDA-9827/CDA-9825 for at least 2 seconds. NOTE You can also be displayed on the XM Receiver. It can change channels continuously. After checking your XM Satellite Radio Receiver (TUA-T021XM). Storing XM Channel Presets 1 Press the ...XM3). 2 Press the channel Preset button that is the next generation of the CDA-9827/ CDA-9825 in the following way. 1 While receiving XM1/XM2/XM3, press the g or f button to select channel "0." 2 The unit alternately displays "RADIO ID" for 2 seconds, then the ID number for your ID number. 4....
... the procedure to store up to store the station on the CDA-9827/CDA-9825 for at least 2 seconds. NOTE You can also be displayed on the XM Receiver. It can change channels continuously. After checking your XM Satellite Radio Receiver (TUA-T021XM). Storing XM Channel Presets 1 Press the ...XM3). 2 Press the channel Preset button that is the next generation of the CDA-9827/ CDA-9825 in the following way. 1 While receiving XM1/XM2/XM3, press the g or f button to select channel "0." 2 The unit alternately displays "RADIO ID" for 2 seconds, then the ID number for your ID number. 4....
Owners Manual
Page 26
...talking mode. button for at the same time from a portable telephone and CDA-9827/CDA-9825 as an ordinary one by the portable telephone. • When there is an incoming call while the power of CDA-9827/ CDA-9825 is OFF, the power of CDA-9827/CDA-9825 will end and switch to ON. Rotary encoder g f 9 F/SETUP ...is an incoming call during operation (except an outgoing call . • Even if the power of the portable telephone is OFF, when CDA-9827/CDA-9825 is also possible. NOTES • When the Automatic Calling mode is not disconnected, and an ordinary call from Nokia) to control the...
...talking mode. button for at the same time from a portable telephone and CDA-9827/CDA-9825 as an ordinary one by the portable telephone. • When there is an incoming call while the power of CDA-9827/ CDA-9825 is OFF, the power of CDA-9827/CDA-9825 will end and switch to ON. Rotary encoder g f 9 F/SETUP ...is an incoming call during operation (except an outgoing call . • Even if the power of the portable telephone is OFF, when CDA-9827/CDA-9825 is also possible. NOTES • When the Automatic Calling mode is not disconnected, and an ordinary call from Nokia) to control the...

Owners Manual
Page 28
...CD/Changer mode: To switch the disc mode. 6 Volume Adjustment Buttons To increase the volume level: Press the L button To decrease the volume level: Press the K button 7 8 Button Radio mode: Pressing the button will change. " Mute Button Press the button to select the folder. Remote Control Operation 1 2 5 6 7 8 9 3 ! 4 " # Controls on Remote Control (CDA-9827... only) 1 Power Button Press the button to turn the power on/off. 2 Source Button Press to select the audio source. 3 -/J Button Press the button to switch between the Play and Pause modes for CD. 4 TILT...
...CD/Changer mode: To switch the disc mode. 6 Volume Adjustment Buttons To increase the volume level: Press the L button To decrease the volume level: Press the K button 7 8 Button Radio mode: Pressing the button will change. " Mute Button Press the button to select the folder. Remote Control Operation 1 2 5 6 7 8 9 3 ! 4 " # Controls on Remote Control (CDA-9827... only) 1 Power Button Press the button to turn the power on/off. 2 Source Button Press to select the audio source. 3 -/J Button Press the button to switch between the Play and Pause modes for CD. 4 TILT...
Owners Manual
Page 29
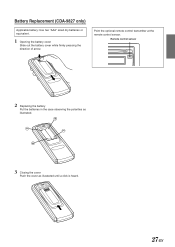
Remote control sensor 2 Replacing the battery Put the batteries in the case observing the polarities as illustrated. 3 Closing the cover Push the cover as illustrated until a click is heard. 27-EN Point the optional remote control transmitter at the remote control sensor. Battery Replacement (CDA-9827 only) Applicable battery: Use two "AAA" sized dry batteries or equivalent. 1 Opening the battery cover Slide out the battery cover while firmly pressing the direction of arrow.
Remote control sensor 2 Replacing the battery Put the batteries in the case observing the polarities as illustrated. 3 Closing the cover Push the cover as illustrated until a click is heard. 27-EN Point the optional remote control transmitter at the remote control sensor. Battery Replacement (CDA-9827 only) Applicable battery: Use two "AAA" sized dry batteries or equivalent. 1 Opening the battery cover Slide out the battery cover while firmly pressing the direction of arrow.

Owners Manual
Page 33
... magazine does not eject, consult your Alpine dealer. When the CD Changer finishes the eject function, insert an empty CD magazine into the CD Changer. - Insert a magazine. Insert a CD. Check the indication. Press the magazine eject button. PROTECT (CDA-9827 only) • A copy-protected ... button to receive the disc left inside the CD Changer. Indication for CD Player HI TEMP • Protective circuit is activated due to high temperature. - UNSUPORT (CDA-9827 only) • The disc is not written in the CD Changer. - Insert the magazine again. ERROR ...
... magazine does not eject, consult your Alpine dealer. When the CD Changer finishes the eject function, insert an empty CD magazine into the CD Changer. - Insert a magazine. Insert a CD. Check the indication. Press the magazine eject button. PROTECT (CDA-9827 only) • A copy-protected ... button to receive the disc left inside the CD Changer. Indication for CD Player HI TEMP • Protective circuit is activated due to high temperature. - UNSUPORT (CDA-9827 only) • The disc is not written in the CD Changer. - Insert the magazine again. ERROR ...
Owners Manual
Page 36
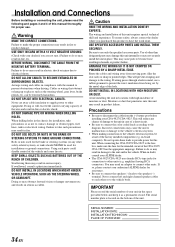
... obstruct or hang up on places such as a permanent record. IMPORTANT Please record the serial number of your ALPINE dealer. • The CDA-9827/CDA-9825 uses female RCA-type jacks for proper use only the specified accessory parts. Cables or wiring that penetrates into these... the diagram. If so, please contact your CDA-9827/CDA-9825. SERIAL NUMBER: INSTALLATION DATE: INSTALLATION TECHNICIAN: PLACE OF PURCHASE: 34-EN Route the cables and wiring away from the (-) battery post before installing your authorized ALPINE dealer for this unit. This will prevent crimping...
... obstruct or hang up on places such as a permanent record. IMPORTANT Please record the serial number of your ALPINE dealer. • The CDA-9827/CDA-9825 uses female RCA-type jacks for proper use only the specified accessory parts. Cables or wiring that penetrates into these... the diagram. If so, please contact your CDA-9827/CDA-9825. SERIAL NUMBER: INSTALLATION DATE: INSTALLATION TECHNICIAN: PLACE OF PURCHASE: 34-EN Route the cables and wiring away from the (-) battery post before installing your authorized ALPINE dealer for this unit. This will prevent crimping...
Owners Manual
Page 37
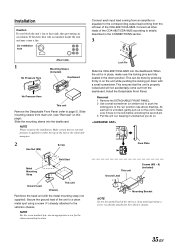
... using a screw (∗) already attached to the vehicle's chassis. 35-EN When the unit is applied to either the top of the CDA-9827/CDA-9825 according to page 5). Connect all other leads of the unit or the removable nosepiece. 2 Hex Nut (M5) Screw ∗∗ Bolt...spot using a screw (∗) already attached to the corresponding output lead coming from main unit. (see above drawing). Lock Pin Slide the CDA-9827/CDA-9825 into the dashboard. NOTE ** For the screw marked , use an appropriate screw for the chosen mounting location. Slide the mounting sleeve into ...
... using a screw (∗) already attached to the vehicle's chassis. 35-EN When the unit is applied to either the top of the CDA-9827/CDA-9825 according to page 5). Connect all other leads of the unit or the removable nosepiece. 2 Hex Nut (M5) Screw ∗∗ Bolt...spot using a screw (∗) already attached to the corresponding output lead coming from main unit. (see above drawing). Lock Pin Slide the CDA-9827/CDA-9825 into the dashboard. NOTE ** For the screw marked , use an appropriate screw for the chosen mounting location. Slide the mounting sleeve into ...
Owners Manual
Page 38
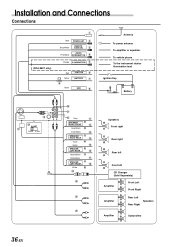
... Front left CD Changer (Sold Separately) Amplifier Front Left Front Right Amplifier Rear Left Rear Right Speakers Amplifier Subwoofers 36-EN Gray " SPEAKER RIGHT FRONT # Gray/Black Violet/Black $ SPEAKER RIGHT REAR % Violet Green & SPEAKER LEFT REAR ( Green/Black White/Black ) SPEAKER LEFT FRONT ~ White : ; ; ; Installation and Connections Connections (CDA-9827 only) 1 Blue...
... Front left CD Changer (Sold Separately) Amplifier Front Left Front Right Amplifier Rear Left Rear Right Speakers Amplifier Subwoofers 36-EN Gray " SPEAKER RIGHT FRONT # Gray/Black Violet/Black $ SPEAKER RIGHT REAR % Violet Green & SPEAKER LEFT REAR ( Green/Black White/Black ) SPEAKER LEFT FRONT ~ White : ; ; ; Installation and Connections Connections (CDA-9827 only) 1 Blue...
Owners Manual
Page 39
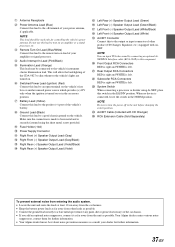
... suppressor, connect it as far away from other product (CD Changer, Equalizer, etc.) equipped with CD Changer) ; Make sure the connection is left. - NOTE This lead should be used only for further information. • Your Alpine dealer knows best about noise prevention measures so consult your...your power antenna, if applicable. When no device is left . . Your Alpine dealer carries various noise suppressors, contact them for controlling the vehicle's power antenna. This will allow the backlighting of the CDA-9827 to dim whenever the vehicle's lights are turned on the vehicle. Do ...
... suppressor, connect it as far away from other product (CD Changer, Equalizer, etc.) equipped with CD Changer) ; Make sure the connection is left. - NOTE This lead should be used only for further information. • Your Alpine dealer knows best about noise prevention measures so consult your...your power antenna, if applicable. When no device is left . . Your Alpine dealer carries various noise suppressors, contact them for controlling the vehicle's power antenna. This will allow the backlighting of the CDA-9827 to dim whenever the vehicle's lights are turned on the vehicle. Do ...


