
Owners Manual
Page 3
... Front Panel 5 Attaching the Front Panel 5 Initial System Start-Up 5 Turning Power On and Off 5 Adjusting Volume/Balance (Between Left and Right)/Fader (Between ...Radio Operation Changing the Radio Frequencies for each Country 14 Manual Tuning 14 Automatic Seek Tuning 14 Manual Storing of Station Presets 14 Automatic Memory of Station Presets 15 Tuning to Preset Stations 15 Station Title Search Function 15 Quick Search Function 15 CD Player...CD Changer (Optional 18 Multi-Changer Selection 19 MP3/WMA Operation Playing MP3/WMA Files (CDA-9827 only) ... 20 Playing MP3 Files with the CD...
... Front Panel 5 Attaching the Front Panel 5 Initial System Start-Up 5 Turning Power On and Off 5 Adjusting Volume/Balance (Between Left and Right)/Fader (Between ...Radio Operation Changing the Radio Frequencies for each Country 14 Manual Tuning 14 Automatic Seek Tuning 14 Manual Storing of Station Presets 14 Automatic Memory of Station Presets 15 Tuning to Preset Stations 15 Station Title Search Function 15 Quick Search Function 15 CD Player...CD Changer (Optional 18 Multi-Changer Selection 19 MP3/WMA Operation Playing MP3/WMA Files (CDA-9827 only) ... 20 Playing MP3 Files with the CD...

Owners Manual
Page 6
...CD player to be installed in a solution of mild neutral detergent before cleaning the disc. Your player will automatically eject discs with a pointed object such as a ballpoint pen. However, most of them will not leave fingerprints on the market for playback. Transparent Sheet Disc Stabilizer Installation Location Make sure the CDA-9827/CDA-9825... will not scratch the disc or damage the player. Do not attempt to insert a disc into the unit when the unit power is inserted incorrectly. When a new...
...CD player to be installed in a solution of mild neutral detergent before cleaning the disc. Your player will automatically eject discs with a pointed object such as a ballpoint pen. However, most of them will not leave fingerprints on the market for playback. Transparent Sheet Disc Stabilizer Installation Location Make sure the CDA-9827/CDA-9825... will not scratch the disc or damage the player. Do not attempt to insert a disc into the unit when the unit power is inserted incorrectly. When a new...
Owners Manual
Page 8
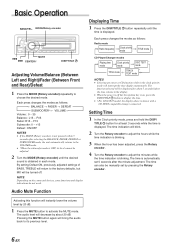
...Radio mode → Radio frequency → Clock priority → mode TITLE mode CD Player/Changer modes → Playing time mode → Clock priority mode → DISC TEXT mode * TITLE mode ← TRACK TEXT mode * ← NOTES • Selecting any tuner or CD..., TREBLE will return to the display. • When the power is shown with a CD-TEXT compatible changer connected. The audio level will be adjusted...., the unit automatically returns to display the time. • ∗For CDA-9825 model, the display above is off . Audio Mute Function Displaying Time 1 ...
...Radio mode → Radio frequency → Clock priority → mode TITLE mode CD Player/Changer modes → Playing time mode → Clock priority mode → DISC TEXT mode * TITLE mode ← TRACK TEXT mode * ← NOTES • Selecting any tuner or CD..., TREBLE will return to the display. • When the power is shown with a CD-TEXT compatible changer connected. The audio level will be adjusted...., the unit automatically returns to display the time. • ∗For CDA-9825 model, the display above is off . Audio Mute Function Displaying Time 1 ...

Owners Manual
Page 18
... Some of the track being played. When the last track is already loaded in the CD player, press the SOURCE/POWER button to select the CD mode. 2 Press the -/J button to the audio CD industry standard. • Use discs with MP3/WMA files written in a format compatible ...) CD's can play CD-Rs (CD-Recordable)/CD-RWs (CDReWritable) which have been recorded only on which do not conform to temporarily stop CD playback. g f 4 5 Inserting/Ejecting Disc 1 Insert a CD half way into the disc compartment. Use only compact discs with the CDA-9825 model. Normal Play and Pause 1 Insert a CD....
... Some of the track being played. When the last track is already loaded in the CD player, press the SOURCE/POWER button to select the CD mode. 2 Press the -/J button to the audio CD industry standard. • Use discs with MP3/WMA files written in a format compatible ...) CD's can play CD-Rs (CD-Recordable)/CD-RWs (CDReWritable) which have been recorded only on which do not conform to temporarily stop CD playback. g f 4 5 Inserting/Ejecting Disc 1 Insert a CD half way into the disc compartment. Use only compact discs with the CDA-9825 model. Normal Play and Pause 1 Insert a CD....
Owners Manual
Page 20
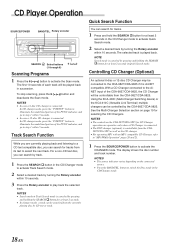
CD Player Operation SOURCE/POWER BAND/TEL. The first 10 seconds of the FUNC indicator, and go to activate Quick Search mode. 2 Select a desired track by turning the Rotary encoder within 10 seconds. For a non-CD text disc, you can search for at least 2 seconds in succession. NOTES • Search mode in the CD... of each track will be searched from the CDA- 9827/CDA-9825 as well as the CD changer. • For operating MP3 with an MP3 compatible CD Changer, refer to "MP3/WMA Operation" pages 20 and 21. 1 Press the SOURCE/POWER button to activate the Scan mode. Rotary encoder...
CD Player Operation SOURCE/POWER BAND/TEL. The first 10 seconds of the FUNC indicator, and go to activate Quick Search mode. 2 Select a desired track by turning the Rotary encoder within 10 seconds. For a non-CD text disc, you can search for at least 2 seconds in succession. NOTES • Search mode in the CD... of each track will be searched from the CDA- 9827/CDA-9825 as well as the CD changer. • For operating MP3 with an MP3 compatible CD Changer, refer to "MP3/WMA Operation" pages 20 and 21. 1 Press the SOURCE/POWER button to activate the Scan mode. Rotary encoder...
Owners Manual
Page 21
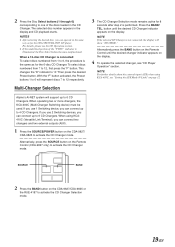
... device, you can connect up to 6 CD Changers. Alpine's Ai-NET system will support up to 4 CD Changers. When using KCA-410C, see "Setting the AUX Mode (V-Link)" on the CDA-9827/ CDA-9825 to activate the CD Changer mode. When a 12-disc CD Changer is connected: To select discs numbered from... is the same as for the CDA-9827/CDA-9825 CD player. NOTE For further details about the external input (AUX) when using KCA410C (Versatile Link Terminal), you can connect two changers and two external outputs (AUX). 1 Press the SOURCE/POWER button on page 12. SOURCE BAND 2 Press ...
... device, you can connect up to 6 CD Changers. Alpine's Ai-NET system will support up to 4 CD Changers. When using KCA-410C, see "Setting the AUX Mode (V-Link)" on the CDA-9827/ CDA-9825 to activate the CD Changer mode. When a 12-disc CD Changer is connected: To select discs numbered from... is the same as for the CDA-9827/CDA-9825 CD player. NOTE For further details about the external input (AUX) when using KCA410C (Versatile Link Terminal), you can connect two changers and two external outputs (AUX). 1 Press the SOURCE/POWER button on page 12. SOURCE BAND 2 Press ...
Owners Manual
Page 22
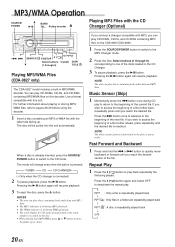
...is pressed. → TUNER → CD → CD CHANGER∗ (∗ Only when the CD changer is repeatedly played back 20-EN NOTE The unit can play CD-ROMs, CD-Rs, and CD-RWs containing MP3 files on the CDA-9827/CDA-9825. 1 Press the SOURCE/POWER button to switch to quickly move the ...folder up . Music Sensor (Skip) 1 Momentarily press the g button once during WMA playback. • The track display for CD audio data playback...
...is pressed. → TUNER → CD → CD CHANGER∗ (∗ Only when the CD changer is repeatedly played back 20-EN NOTE The unit can play CD-ROMs, CD-Rs, and CD-RWs containing MP3 files on the CDA-9827/CDA-9825. 1 Press the SOURCE/POWER button to switch to quickly move the ...folder up . Music Sensor (Skip) 1 Momentarily press the g button once during WMA playback. • The track display for CD audio data playback...
Owners Manual
Page 24
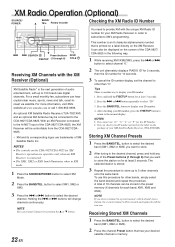
...memory (6 channels for XM Receiver operation are trademarks of XM Satellite Radio Inc. For more information, visit XM's website at least 2 seconds. With an XM Receiver connected to the Ai-NET input of the CDA-9827/CDA-9825, the XM Receiver will change Category by pressing the 8 or... up to select XM Mode. 2 Press the BAND/TEL. Rotary encoder Checking the XM Radio ID Number g f SEARCH 9 Preset buttons DISP/ F/SETUP (1 through 6) that you store a channel in XM mode. 1 Press the SOURCE/POWER button to 5 other than "0." XM Radio Operation (Optional) SOURCE/ POWER BAND/ 8 TEL.
...memory (6 channels for XM Receiver operation are trademarks of XM Satellite Radio Inc. For more information, visit XM's website at least 2 seconds. With an XM Receiver connected to the Ai-NET input of the CDA-9827/CDA-9825, the XM Receiver will change Category by pressing the 8 or... up to select XM Mode. 2 Press the BAND/TEL. Rotary encoder Checking the XM Radio ID Number g f SEARCH 9 Preset buttons DISP/ F/SETUP (1 through 6) that you store a channel in XM mode. 1 Press the SOURCE/POWER button to 5 other than "0." XM Radio Operation (Optional) SOURCE/ POWER BAND/ 8 TEL.
Owners Manual
Page 26
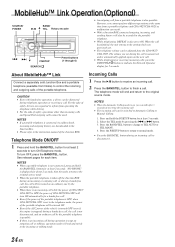
...8226; While telephoning or receiving incoming calls, press the DISP/TITLE button to indicate the Network Operator display for a hands-free call while the power of CDA-9827/ CDA-9825 is set to turn OFF, press the BAND/TEL. Press the BAND/TEL. Press the F/SETUP button to return to finish a call .... Select the TEL mode by the portable telephone. • When there is an incoming call . • Even if the power of the portable telephone is OFF, when CDA-9827/CDA-9825 is OFF, the power of the portable telephone. See relevant pages for at the same time from a portable telephone and...
...8226; While telephoning or receiving incoming calls, press the DISP/TITLE button to indicate the Network Operator display for a hands-free call while the power of CDA-9827/ CDA-9825 is set to turn OFF, press the BAND/TEL. Press the BAND/TEL. Press the F/SETUP button to return to finish a call .... Select the TEL mode by the portable telephone. • When there is an incoming call . • Even if the power of the portable telephone is OFF, when CDA-9827/CDA-9825 is OFF, the power of the portable telephone. See relevant pages for at the same time from a portable telephone and...

Owners Manual
Page 28
...refer to the Owner's Manual of the next track. ! 9 Button Radio mode: Pressing the button will select, in descending order, stations programmed into the radio's presets as shown below . → 1 → 2 ... 6 CD Changer mode: DISC Select (UP) Button Press the button to select a... Radio mode: Pressing the button will change. MP3/WMA mode: Press the Folder Select (DN) Button to lower the volume by 20 dB instantly. " Mute Button Press the button to select the folder. Remote Control Operation 1 2 5 6 7 8 9 3 ! 4 " # Controls on Remote Control (CDA-9827 only) 1 Power Button...
...refer to the Owner's Manual of the next track. ! 9 Button Radio mode: Pressing the button will select, in descending order, stations programmed into the radio's presets as shown below . → 1 → 2 ... 6 CD Changer mode: DISC Select (UP) Button Press the button to select a... Radio mode: Pressing the button will change. MP3/WMA mode: Press the Folder Select (DN) Button to lower the volume by 20 dB instantly. " Mute Button Press the button to select the folder. Remote Control Operation 1 2 5 6 7 8 9 3 ! 4 " # Controls on Remote Control (CDA-9827 only) 1 Power Button...
Owners Manual
Page 36
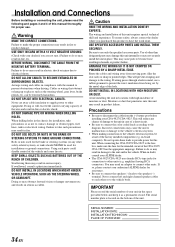
...cause fire etc. Be sure to connect other equipment. Route the cables and wiring away from being cut away cable insulation to supply power to have the work done. on the bottom of the unit. Warning MAKE THE CORRECT CONNECTIONS. Arrange wiring and cables in electric ...STEERING WHEEL OR GEARSHIFT. and results in hazards or product failure. This may result in place. If so, please contact your ALPINE dealer. • The CDA-9827/CDA-9825 uses female RCA-type jacks for connection to take precautions so as a permanent record. BEFORE WIRING, DISCONNECT THE CABLE FROM ...
...cause fire etc. Be sure to connect other equipment. Route the cables and wiring away from being cut away cable insulation to supply power to have the work done. on the bottom of the unit. Warning MAKE THE CORRECT CONNECTIONS. Arrange wiring and cables in electric ...STEERING WHEEL OR GEARSHIFT. and results in hazards or product failure. This may result in place. If so, please contact your ALPINE dealer. • The CDA-9827/CDA-9825 uses female RCA-type jacks for connection to take precautions so as a permanent record. BEFORE WIRING, DISCONNECT THE CABLE FROM ...
Owners Manual
Page 38
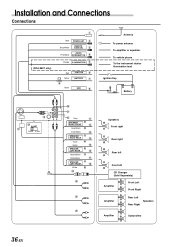
NORM EQ/DIV , - . Installation and Connections Connections (CDA-9827 only) 1 Blue POWER ANT 2 Blue/White REMOTE TURN-ON 3 AUDIO Pink/Black INTERRUPT IN 4 Orange ILLUMINATION 5 Red IGNITION 6 Yellow BATTERY 7 9 Black GND 8 Antenna To power antenna To amplifier or equalizer To vehicle phone To the instrument...Green/Black White/Black ) SPEAKER LEFT FRONT ~ White : ; ; ; Speakers Front right Rear right Rear left Front left CD Changer (Sold Separately) Amplifier Front Left Front Right Amplifier Rear Left Rear Right Speakers Amplifier Subwoofers 36-EN
NORM EQ/DIV , - . Installation and Connections Connections (CDA-9827 only) 1 Blue POWER ANT 2 Blue/White REMOTE TURN-ON 3 AUDIO Pink/Black INTERRUPT IN 4 Orange ILLUMINATION 5 Red IGNITION 6 Yellow BATTERY 7 9 Black GND 8 Antenna To power antenna To amplifier or equalizer To vehicle phone To the instrument...Green/Black White/Black ) SPEAKER LEFT FRONT ~ White : ; ; ; Speakers Front right Rear right Rear left Front left CD Changer (Sold Separately) Amplifier Front Left Front Right Amplifier Rear Left Rear Right Speakers Amplifier Subwoofers 36-EN
Owners Manual
Page 39
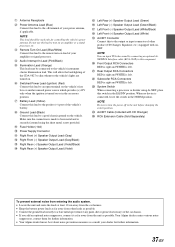
...Alpine dealer knows best about noise prevention measures so consult your dealer for controlling the vehicle's power antenna. 1 Antenna Receptacle 2 Power Antenna Lead (Blue) Connect this lead to the +B terminal of the car chassis. • If you add an optional noise suppressor, connect it as far away from other product (CD...'s battery. 8 Ground Lead (Black) Connect this lead to a good chassis ground on lead of the CDA-9827 to dim whenever the vehicle's lights are turned on. 6 Switched Power Lead (Ignition) (Red) Connect this lead to a bare metal spot (remove any paint, dirt or grease...
...Alpine dealer knows best about noise prevention measures so consult your dealer for controlling the vehicle's power antenna. 1 Antenna Receptacle 2 Power Antenna Lead (Blue) Connect this lead to the +B terminal of the car chassis. • If you add an optional noise suppressor, connect it as far away from other product (CD...'s battery. 8 Ground Lead (Black) Connect this lead to a good chassis ground on lead of the CDA-9827 to dim whenever the vehicle's lights are turned on. 6 Switched Power Lead (Ignition) (Red) Connect this lead to a bare metal spot (remove any paint, dirt or grease...


