Owners Manual
Page 1
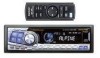
... Kreuzerkamp 7-11 40878 Ratingen, Germany Tel.: 02102-45 50 ALPINE ITALIA S.p.A. Markham, Ontario L3R 9Z6, Canada Tel.: 1-800-ALPINE-1 (1-800-257-4631) ALPINE ELECTRONICS OF AUSTRALIA PTY. R EN FM/AM CD Player FM/AM CD Receiver CDA-7995/CDA-7894 FR FM/AM CD Receiver CDA-7893/CDA-7892 ES ES • OWNER'S MANUAL Please read before using this equipment. • MODE D'EMPLOI...
... Kreuzerkamp 7-11 40878 Ratingen, Germany Tel.: 02102-45 50 ALPINE ITALIA S.p.A. Markham, Ontario L3R 9Z6, Canada Tel.: 1-800-ALPINE-1 (1-800-257-4631) ALPINE ELECTRONICS OF AUSTRALIA PTY. R EN FM/AM CD Player FM/AM CD Receiver CDA-7995/CDA-7894 FR FM/AM CD Receiver CDA-7893/CDA-7892 ES ES • OWNER'S MANUAL Please read before using this equipment. • MODE D'EMPLOI...
Owners Manual
Page 3
... an External Amplifier (CDA-7894/CDA-7893/CDA-7892 Only) .. 16 Setting the Defeat of the External Input ......... 16 Demonstration 17 Adjusting Display Contrast (CDA-7995 only 17 Radio Operation Manual Tuning 18 Automatic Seek Tuning 18 Manual Storing of Station Presets 18 Automatic Memory of Station Presets 19 Tuning to Preset Stations 19 CD Player Operation Opening and Closing...
... an External Amplifier (CDA-7894/CDA-7893/CDA-7892 Only) .. 16 Setting the Defeat of the External Input ......... 16 Demonstration 17 Adjusting Display Contrast (CDA-7995 only 17 Radio Operation Manual Tuning 18 Automatic Seek Tuning 18 Manual Storing of Station Presets 18 Automatic Memory of Station Presets 19 Tuning to Preset Stations 19 CD Player Operation Opening and Closing...
Owners Manual
Page 8
...EN NOTE Depending on , press the CLK button to display the time. •∗ For CDA-7893/CDA-7892 models, the display above is off but MX will decrease by 20 dB. 1 Press ... the Rotary encoder. Each press changes the modes as follows: Radio mode → Radio frequency → Clock priority → mode TITLE mode CD Player/Changer modes → Playing time mode → Clock priority...the display. • When the power is shown with a CD-TEXT compatible changer connected. The time can also be manually set 5 seconds after selecting the BALANCE, FADER, DEFEAT or ...
...EN NOTE Depending on , press the CLK button to display the time. •∗ For CDA-7893/CDA-7892 models, the display above is off but MX will decrease by 20 dB. 1 Press ... the Rotary encoder. Each press changes the modes as follows: Radio mode → Radio frequency → Clock priority → mode TITLE mode CD Player/Changer modes → Playing time mode → Clock priority...the display. • When the power is shown with a CD-TEXT compatible changer connected. The time can also be manually set 5 seconds after selecting the BALANCE, FADER, DEFEAT or ...
Owners Manual
Page 11
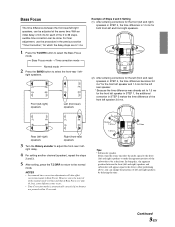
...front-rear) speakers Example of the 0 to 39 steps, audible time correction can be at the same time. However, since the interval of the manual mode is automatically canceled if no buttons are 0.1 ms. 1 Press the T.CORR button to select the Bass Focus mode. → Bass Focus... setting another channel (speaker), repeat the steps 2 and 3. 5 After setting, press the T.CORR to return to the driver. NOTES • Any manual time correction adjustments will appear equal to the normal mode. Bass Focus The time difference between the front (left and right) speakers and subwoofer will...
...front-rear) speakers Example of the 0 to 39 steps, audible time correction can be at the same time. However, since the interval of the manual mode is automatically canceled if no buttons are 0.1 ms. 1 Press the T.CORR button to select the Bass Focus mode. → Bass Focus... setting another channel (speaker), repeat the steps 2 and 3. 5 After setting, press the T.CORR to return to the driver. NOTES • Any manual time correction adjustments will appear equal to the normal mode. Bass Focus The time difference between the front (left and right) speakers and subwoofer will...

Owners Manual
Page 14
... "SCROLL MANUAL", press and hold the TITLE button for at least 3 seconds to display the CD/Station title if the title has been previously inputted. Text: Text compatible CDs contain text information such as "text." Radio mode: ↓ FREQUENCY DISPLAY ↓ CLOCK DISPLAY ↓ TITLE DISPLAY CD mode: (Text is displayed for the CDA-7893/CDA7892 models...
... "SCROLL MANUAL", press and hold the TITLE button for at least 3 seconds to display the CD/Station title if the title has been previously inputted. Text: Text compatible CDs contain text information such as "text." Radio mode: ↓ FREQUENCY DISPLAY ↓ CLOCK DISPLAY ↓ TITLE DISPLAY CD mode: (Text is displayed for the CDA-7893/CDA7892 models...
Owners Manual
Page 16
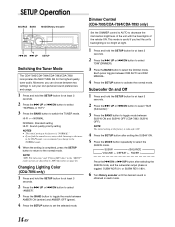
...least 3 seconds. 2 Press the f UP or g DN button to select "AMBER". 3 Press the BAND button to toggle the mode between DIM AUTO and DIM MANUAL. 4 Press the SETUP button to decrease the illumination brightness of the unit with the head lights of the vehicle ON. Changing Lighting Color... control to AUTO to activate the normal mode. SETUP Operation SOURCE BAND MODE/Rotary encoder g DN f UP SETUP Switching the Tuner Mode The CDA-7995/CDA-7894/CDA-7893/CDA-7892 incorporates the MAX TUNE SQ for at the factory is subwoofer ON. 4 Press the SETUP button after selecting the SUB-W mode, and ...
...least 3 seconds. 2 Press the f UP or g DN button to select "AMBER". 3 Press the BAND button to toggle the mode between DIM AUTO and DIM MANUAL. 4 Press the SETUP button to decrease the illumination brightness of the unit with the head lights of the vehicle ON. Changing Lighting Color... control to AUTO to activate the normal mode. SETUP Operation SOURCE BAND MODE/Rotary encoder g DN f UP SETUP Switching the Tuner Mode The CDA-7995/CDA-7894/CDA-7893/CDA-7892 incorporates the MAX TUNE SQ for at the factory is subwoofer ON. 4 Press the SETUP button after selecting the SUB-W mode, and ...

Owners Manual
Page 17
... between BEEP ON and BEEP OFF. Scroll Setting This CD player can scroll the disc and track names recorded on CD-TEXT discs, as well as the text information of folder and file names, and the ID3 tags are scrolled automatically. • SCR MANUAL: the display is scrolled only when a disc is ...-EN To select the mode, press the BAND button on or off the MUTE mode. Sound (Beep) Guide Function This function will be used for CDA-7893/CDA-7892 models if the changer compatible with varying tones depending upon the button pressed. 1 Press and hold the SETUP button for at least 3 seconds. ...
... between BEEP ON and BEEP OFF. Scroll Setting This CD player can scroll the disc and track names recorded on CD-TEXT discs, as well as the text information of folder and file names, and the ID3 tags are scrolled automatically. • SCR MANUAL: the display is scrolled only when a disc is ...-EN To select the mode, press the BAND button on or off the MUTE mode. Sound (Beep) Guide Function This function will be used for CDA-7893/CDA-7892 models if the changer compatible with varying tones depending upon the button pressed. 1 Press and hold the SETUP button for at least 3 seconds. ...
Owners Manual
Page 20
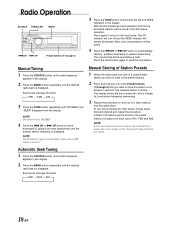
... tuned in the preset memory. 2 Press and hold any one step respectively until the desired radio band is displayed. Manual Tuning 1 Press the SOURCE button until the desired radio band is displayed. Manual Storing of the Preset buttons (1 through 6) 3 Press the TUNE button to the local mode... SEEK indicators in a preset memory which already has a station, the current station will stop at least 2 seconds. FM1, FM2 and AM). Radio Operation SOURCE TUNE/A.ME BAND g DN f UP Preset buttons (1 through 6) that you want to automatically seek for a station downward or upward ...
... tuned in the preset memory. 2 Press and hold any one step respectively until the desired radio band is displayed. Manual Tuning 1 Press the SOURCE button until the desired radio band is displayed. Manual Storing of the Preset buttons (1 through 6) 3 Press the TUNE button to the local mode... SEEK indicators in a preset memory which already has a station, the current station will stop at least 2 seconds. FM1, FM2 and AM). Radio Operation SOURCE TUNE/A.ME BAND g DN f UP Preset buttons (1 through 6) that you want to automatically seek for a station downward or upward ...
Owners Manual
Page 28
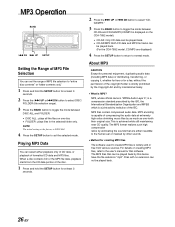
...). 3 Press the BAND button to create MP3 files is a joint activity institution of the IEC. For details on creating MP3 files, refer to the user's manual for at the factory is MP3? DA/MP3." 3 Press the BAND button to normal mode. About MP3 CAUTION Except for personal enjoyment, duplicating audio data... displayed) 4 Press the SETUP button to return to toggle the mode between DISC ALL and FOLDER. • DISC ALL : plays all the files on the CDA-7892 model). • CD-DA: Only CD data can be played back. 26-EN Files with no extension can not be played back. •...
...). 3 Press the BAND button to create MP3 files is a joint activity institution of the IEC. For details on creating MP3 files, refer to the user's manual for at the factory is MP3? DA/MP3." 3 Press the BAND button to normal mode. About MP3 CAUTION Except for personal enjoyment, duplicating audio data... displayed) 4 Press the SETUP button to return to toggle the mode between DISC ALL and FOLDER. • DISC ALL : plays all the files on the CDA-7892 model). • CD-DA: Only CD data can be played back. 26-EN Files with no extension can not be played back. •...
Owners Manual
Page 31
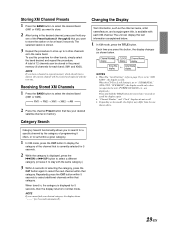
...automatically. 29-EN Changing the Display Text information, such as the channel name, artist name/feature, and song/program title, is set to "SCR MANUAL" (CDA-7892: "SCR MANU"), the display scrolls only when you operate the unit (POWER ON, BAND, etc., are displayed.) Press and hold any one...CAT button within 5 seconds to select the next channel within that has your desired category, the display shows "----" for each XM channel. When the CD Text Scroll Setting is displayed, press the g DN or f UP button to select a different category (or leave it offers, or to surf ...
...automatically. 29-EN Changing the Display Text information, such as the channel name, artist name/feature, and song/program title, is set to "SCR MANUAL" (CDA-7892: "SCR MANU"), the display scrolls only when you operate the unit (POWER ON, BAND, etc., are displayed.) Press and hold any one...CAT button within 5 seconds to select the next channel within that has your desired category, the display shows "----" for each XM channel. When the CD Text Scroll Setting is displayed, press the g DN or f UP button to select a different category (or leave it offers, or to surf ...
Owners Manual
Page 32
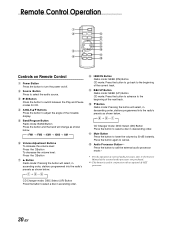
...; ∗ For the operation of external audio processor, refer to lower the volume by 20 dB instantly. " Mute Button Press the button to the Owner's Manual of the external audio processor you purchased. ∗∗ This button is used in descending order. Remote Control Operation 1 2 5 6 7 8 9 3... Lbutton To decrease the volume level: Press the Kbutton 7 8 Button Radio mode: Pressing the button will select, in ascending order, stations programmed into the radio's presets as shown below. → 1 → 2 ... 6 CD Changer mode: DISC Select (UP) Button Press the button to select ...
...; ∗ For the operation of external audio processor, refer to lower the volume by 20 dB instantly. " Mute Button Press the button to the Owner's Manual of the external audio processor you purchased. ∗∗ This button is used in descending order. Remote Control Operation 1 2 5 6 7 8 9 3... Lbutton To decrease the volume level: Press the Kbutton 7 8 Button Radio mode: Pressing the button will select, in ascending order, stations programmed into the radio's presets as shown below. → 1 → 2 ... 6 CD Changer mode: DISC Select (UP) Button Press the button to select ...
Owners Manual
Page 38
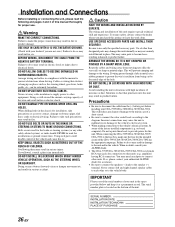
... the CDA-7995/CDA-7894/CDA-7893/ CDA-7892 to the vehicle's electrical system, be extremely hazardous. IMPORTANT Please record the serial number of your ALPINE dealer. • The CDA-7995/CDA-7894/CDA-7893/CDA-7892 ...ALPINE dealer for the intended circuit of the CDA-7995/CDA-7894/CDA-7893/CDA-7892 has the appropriate amperage. If so, please contact your CDA-7995/CDA-7894/CDA-7893/CDA-7892. DO NOT ALLOW CABLES TO BECOME ENTANGLED IN SURROUNDING OBJECTS. Installation and Connections Before installing or connecting the unit, please read the following and pages 3 and 4 of this manual...
... the CDA-7995/CDA-7894/CDA-7893/ CDA-7892 to the vehicle's electrical system, be extremely hazardous. IMPORTANT Please record the serial number of your ALPINE dealer. • The CDA-7995/CDA-7894/CDA-7893/CDA-7892 ...ALPINE dealer for the intended circuit of the CDA-7995/CDA-7894/CDA-7893/CDA-7892 has the appropriate amperage. If so, please contact your CDA-7995/CDA-7894/CDA-7893/CDA-7892. DO NOT ALLOW CABLES TO BECOME ENTANGLED IN SURROUNDING OBJECTS. Installation and Connections Before installing or connecting the unit, please read the following and pages 3 and 4 of this manual...

Owners Manual
Page 43
... or Canada. [WHAT IS COVERED: This Warranty covers defects in materials or workmanship (parts and labor) in the Owner's manual. 3 Damage caused by act of God, including without limitation, earthquake, fire, flood, storms or other rights which service is not valid...or limitation of Canada, Inc., Suite 203, 7300 Warden Ave. Products purchased in the Canada. U.S.A. 1-800-ALPINE-1 (1-800-257-4631) CANADA 1-800-ALPINE-1 (1-800-257-4631) Alpine Electronics of the telephone numbers listed below. [PRODUCTS COVERED: This Warranty covers Car Audio/Visual Products and Related Accessories...
... or Canada. [WHAT IS COVERED: This Warranty covers defects in materials or workmanship (parts and labor) in the Owner's manual. 3 Damage caused by act of God, including without limitation, earthquake, fire, flood, storms or other rights which service is not valid...or limitation of Canada, Inc., Suite 203, 7300 Warden Ave. Products purchased in the Canada. U.S.A. 1-800-ALPINE-1 (1-800-257-4631) CANADA 1-800-ALPINE-1 (1-800-257-4631) Alpine Electronics of the telephone numbers listed below. [PRODUCTS COVERED: This Warranty covers Car Audio/Visual Products and Related Accessories...


