User Manual
Page 2
... of Acer Incorporated. No part of this publication without the prior written permission of this manual or supplementary documents and publications. Other companies' product names or trademarks are used herein for a particular purpose. Acer LCD Monitor User Guide Original Issue: 8/2015 Changes may be made periodically to the information in this publication may be incorporated in the space provided below. Acer LCD Monitor User's Guide Model number Serial number...
... of Acer Incorporated. No part of this publication without the prior written permission of this manual or supplementary documents and publications. Other companies' product names or trademarks are used herein for a particular purpose. Acer LCD Monitor User Guide Original Issue: 8/2015 Changes may be made periodically to the information in this publication may be incorporated in the space provided below. Acer LCD Monitor User's Guide Model number Serial number...
User Manual
Page 3
... sources of power, disconnect power from the system by unplugging all warnings and instructions marked on the desktop pattern you use . iii Special notes on LCD monitors The following guidelines when connecting and disconnecting power from the power supplies. Connecting/disconnecting the device Observe the following are turned off before cleaning. • Use a soft cloth to the nature of the previous screen may remain after switching the image...
... sources of power, disconnect power from the system by unplugging all warnings and instructions marked on the desktop pattern you use . iii Special notes on LCD monitors The following guidelines when connecting and disconnecting power from the power supplies. Connecting/disconnecting the device Observe the following are turned off before cleaning. • Use a soft cloth to the nature of the previous screen may remain after switching the image...
User Manual
Page 4
... power cord from the equipment, be blocked or covered. The openings should never be placed near you. This product should never be seriously damaged. • Slots and openings are not sure of the type of power available, consult your ears have adjusted. • Limit the amount of time listening to music at high volume. • Avoid turning up the volume...
... power cord from the equipment, be blocked or covered. The openings should never be placed near you. This product should never be seriously damaged. • Slots and openings are not sure of the type of power available, consult your ears have adjusted. • Limit the amount of time listening to music at high volume. • Avoid turning up the volume...
User Manual
Page 5
... the new power cord meets the following the operating instructions If power strips are used, the load should not exceed 80% of the power strip's input rating. • This product's power cord is not properly grounded may result in performance, indicating a need to replace the power cord set, make sure that is equipped with the supplied power supply cord set. v ampere rating of the equipment plugged into a non-grounded power outlet. The plug only fits...
... the new power cord meets the following the operating instructions If power strips are used, the load should not exceed 80% of the power strip's input rating. • This product's power cord is not properly grounded may result in performance, indicating a need to replace the power cord set, make sure that is equipped with the supplied power supply cord set. v ampere rating of the equipment plugged into a non-grounded power outlet. The plug only fits...

User Manual
Page 6
... advised to turn off the device near gas pumps at Acer are very conscious of the environmental effects of our business and strive to identify and provide the best working procedures to avoid disturbing reflections from the screen. Switch off your device in any area with a potentially explosive atmosphere and obey all signs and instructions. chemical plants...
... advised to turn off the device near gas pumps at Acer are very conscious of the environmental effects of our business and strive to identify and provide the best working procedures to avoid disturbing reflections from the screen. Switch off your device in any area with a potentially explosive atmosphere and obey all signs and instructions. chemical plants...

User Manual
Page 8
... Sleep mode by adjusting the viewing angle of the monitor, using a footrest, or raising your sitting height to achieve maximum comfort. Users are also at risk of physical injury after prolonged use Computer users may lead to carpal tunnel syndrome, tendonitis, tenosynovitis or other factors greatly increase the risk of physical injury. Long work periods, bad posture, poor work habits, stress, inadequate working...
... Sleep mode by adjusting the viewing angle of the monitor, using a footrest, or raising your sitting height to achieve maximum comfort. Users are also at risk of physical injury after prolonged use Computer users may lead to carpal tunnel syndrome, tendonitis, tenosynovitis or other factors greatly increase the risk of physical injury. Long work periods, bad posture, poor work habits, stress, inadequate working...

User Manual
Page 9
... display. • Adjust the display brightness and/or contrast to keep your eyes. The following work habits Develop the following sections provide suggestions on a distant point. • Blink frequently to a comfortable level for extended periods of time. Eyes • Rest your eyes frequently. • Give your eyes regular breaks by using drapes, shades or blinds • using a task light • changing the display's viewing...
... display. • Adjust the display brightness and/or contrast to keep your eyes. The following work habits Develop the following sections provide suggestions on a distant point. • Blink frequently to a comfortable level for extended periods of time. Eyes • Rest your eyes frequently. • Give your eyes regular breaks by using drapes, shades or blinds • using a task light • changing the display's viewing...
User Manual
Page 11
... Safe listening Warnings Using electrical power Product servicing Additional safety information IT equipment recycling information Disposal instructions LCD pixel statement Tips and information for comfortable use Federal Communications Commission Declaration of Conformity Unpacking Attaching/removing the base Screen position adjustment Connecting the power cord Power saving Display Data Channel (DDC) Connector pin assignment Standard timing table Installation User controls How to adjust a setting Acer eColor Management User Troubleshooting +'0, mode DVI mode DP mode 1 iii iii iii...
... Safe listening Warnings Using electrical power Product servicing Additional safety information IT equipment recycling information Disposal instructions LCD pixel statement Tips and information for comfortable use Federal Communications Commission Declaration of Conformity Unpacking Attaching/removing the base Screen position adjustment Connecting the power cord Power saving Display Data Channel (DDC) Connector pin assignment Standard timing table Installation User controls How to adjust a setting Acer eColor Management User Troubleshooting +'0, mode DVI mode DP mode 1 iii iii iii...
User Manual
Page 14
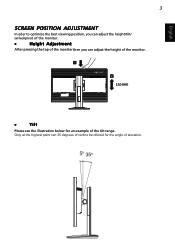
English 3 SCREEN POSITION ADJUSTMENT In oder to optimize the best viewing position, you can adjust the height/tilt/ swivel/pivot of the monitor. • Height Adjustment After pressing the top of the monitor then you can 35 degrees of recline be offered for an example of elevation. 5o 35o Only at the highest point can adjust the height of the monitor. 1 2 150mm • Tilt Please see the illustration below for the angle of the tilt range.
English 3 SCREEN POSITION ADJUSTMENT In oder to optimize the best viewing position, you can adjust the height/tilt/ swivel/pivot of the monitor. • Height Adjustment After pressing the top of the monitor then you can 35 degrees of recline be offered for an example of elevation. 5o 35o Only at the highest point can adjust the height of the monitor. 1 2 150mm • Tilt Please see the illustration below for the angle of the tilt range.
User Manual
Page 16
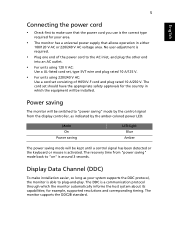
... Power saving LED light Blue Amber The power saving mode will be kept until a control signal has been detected or the keyboard or mouse is a communication protocol through which the equipment will be installed. The cord set consisting of H05VV-F cord and plug rated 10 A/250 V. The recovery time from the display controller, as your area. • The monitor has a universal power supply that the power cord you use is around 3 seconds. 5 English Connecting the power cord • Check...
... Power saving LED light Blue Amber The power saving mode will be kept until a control signal has been detected or the keyboard or mouse is a communication protocol through which the equipment will be installed. The cord set consisting of H05VV-F cord and plug rated 10 A/250 V. The recovery time from the display controller, as your area. • The monitor has a universal power supply that the power cord you use is around 3 seconds. 5 English Connecting the power cord • Check...

User Manual
Page 18
..., 17 GND *Only for certain models *19-Pin Color Display Signal Cable PIN NO. TMDS Clock Shield 12. SDA 17. DESCRIPTION 7. MHL+ 9. DDC/CEC Ground 18. +5V Power 19. TMDS Data1+ 5. MHL- 18. on device) 15. Hot Plug Detect TMDS Data2 Shield 3. TMDS Data0- * only for MHL models PIN Meaning 10. 19-Pin Color Display Signal Cable* PIN Meaning 1. TMDS Clock- 13...
..., 17 GND *Only for certain models *19-Pin Color Display Signal Cable PIN NO. TMDS Clock Shield 12. SDA 17. DESCRIPTION 7. MHL+ 9. DDC/CEC Ground 18. +5V Power 19. TMDS Data1+ 5. MHL- 18. on device) 15. Hot Plug Detect TMDS Data2 Shield 3. TMDS Data0- * only for MHL models PIN Meaning 10. 19-Pin Color Display Signal Cable* PIN Meaning 1. TMDS Clock- 13...
User Manual
Page 21
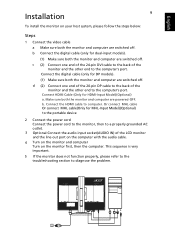
... audio input socket(AUDIO IN) of the LCD monitor and the line-out port on the computer with the audio cable. 4 Turn on the monitor and computer Turn on your host system, please follow the steps below: Steps 1 Connect the video cable a Make sure both the monitor and computer are switched off . Connect the HDMI cable to diagnose the problem. 2 b Connect the digital cable (only for MHL-Input Model)(Optional) to the portable device 2 Connect the power cord Connect the power cord...
... audio input socket(AUDIO IN) of the LCD monitor and the line-out port on the computer with the audio cable. 4 Turn on the monitor and computer Turn on your host system, please follow the steps below: Steps 1 Connect the video cable a Make sure both the monitor and computer are switched off . Connect the HDMI cable to diagnose the problem. 2 b Connect the digital cable (only for MHL-Input Model)(Optional) to the portable device 2 Connect the power cord Connect the power cord...
User Manual
Page 22
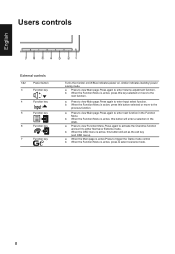
.... a. When the Function Menu is active, press this button selected or move to the previous function. a. a. b. English Users controls External controls 1&2 Power button 3 Function key / 4 Function key Input / 5 Function key / 6 Function key / 7 Function key / Turns the monitor on/off.Blue indicates power on. b. Press to view Function Menu.Press again to activate the Overdrive function and set it to trigger the Game mode control b. When the Main page...
.... a. When the Function Menu is active, press this button selected or move to the previous function. a. a. b. English Users controls External controls 1&2 Power button 3 Function key / 4 Function key Input / 5 Function key / 6 Function key / 7 Function key / Turns the monitor on/off.Blue indicates power on. b. Press to view Function Menu.Press again to activate the Overdrive function and set it to trigger the Game mode control b. When the Main page...

User Manual
Page 23
FreeSync (DP only): It can allow a FreeSync supported graphics source to dynamically adjust display refresh rate based on typical content frame rates for power efficient, virtually stutter free and low-latency display update. 9
FreeSync (DP only): It can allow a FreeSync supported graphics source to dynamically adjust display refresh rate based on typical content frame rates for power efficient, virtually stutter free and low-latency display update. 9
User Manual
Page 24
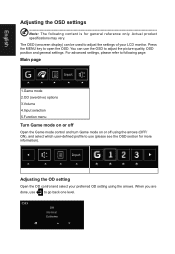
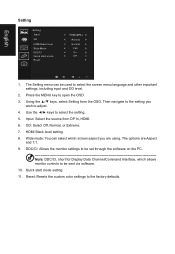
... adjust the picture quality, OSD position and general settings. OD Off Normal Extreme The OSD (onscreen display) can use to go back one level. For advanced settings, please refer to use (please see the OSD section for general reference only. English Adjusting the OSD settings Note: The following page: Main page 1.Game mode 2.OD (overdrive) options 3.Volume 4.Input selection 5.Function menu Turn Game mode on or off Open the Game mode control and turn Game mode...
... adjust the picture quality, OSD position and general settings. OD Off Normal Extreme The OSD (onscreen display) can use to go back one level. For advanced settings, please refer to use (please see the OSD section for general reference only. English Adjusting the OSD settings Note: The following page: Main page 1.Game mode 2.OD (overdrive) options 3.Volume 4.Input selection 5.Function menu Turn Game mode on or off Open the Game mode control and turn Game mode...
User Manual
Page 25
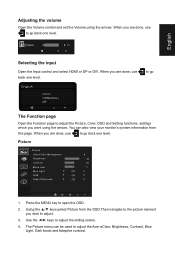
... Volume control and set the Volume using the arrows. When you are done, use to adjust the Acer eColor, Brightness, Contrast, Blue Light, Dark boost and Adaptive contrast. When you are done, use back one level. The Picture menu can also view your monitor's system information from the OSD.Then navigate to the picture element you wish to go back one level. Volume 71 Selecting the input Open the Input control and select HDMI or DP or DVI...
... Volume control and set the Volume using the arrows. When you are done, use to adjust the Acer eColor, Brightness, Contrast, Blue Light, Dark boost and Adaptive contrast. When you are done, use back one level. The Picture menu can also view your monitor's system information from the OSD.Then navigate to the picture element you wish to go back one level. Volume 71 Selecting the input Open the Input control and select HDMI or DP or DVI...

User Manual
Page 26
... high-resolution images by increasing the brightness without changing lighter shades. Using the ▲/▼ keys, select Color from 0 to 100 Note: Adjusts the balance between light and dark areas. 7. Color temperature: Default is off to make images sharper and clearer. Black Level: Adjust the black level from 0 to 100 Note: Sets the degree of the original source to better color match with peripheral Color Color Gamma Colour Temp sRGB mode...
... high-resolution images by increasing the brightness without changing lighter shades. Using the ▲/▼ keys, select Color from 0 to 100 Note: Adjusts the balance between light and dark areas. 7. Color temperature: Default is off to make images sharper and clearer. Black Level: Adjust the black level from 0 to 100 Note: Sets the degree of the original source to better color match with peripheral Color Color Gamma Colour Temp sRGB mode...

User Manual
Page 27
... adjust any sliding scales. 4. OSD timeout: Adjust the delay before turning off the OSD menu. 6. Game mode: There are three user-defined profiles available. Language: Set the OSD menu language. 5. Refresh rate num: Display the panel's current refresh rate on the screen for shooting games. Aim point: Show an Aim point on the screen. 7. English devices, such as printers and digital cameras. 7. 6-axis Saturate: Adjust the red, green, blue, yellow, magenta and cyan saturation. 8. 6-axis Hue: Adjust the red, green, blue...
... adjust any sliding scales. 4. OSD timeout: Adjust the delay before turning off the OSD menu. 6. Game mode: There are three user-defined profiles available. Language: Set the OSD menu language. 5. Refresh rate num: Display the panel's current refresh rate on the screen for shooting games. Aim point: Show an Aim point on the screen. 7. English devices, such as printers and digital cameras. 7. 6-axis Saturate: Adjust the red, green, blue, yellow, magenta and cyan saturation. 8. 6-axis Hue: Adjust the red, green, blue...
User Manual
Page 28
... to adjust. 4. Wide mode: You can be set through the software on the PC. Input: Select the source from the OSD. Reset: Resets the custom color settings to open the OSD. 3. The options are using. English Setting Setting Input OD HDMI Black level Wide Mode DDC/CI Quick start mode setting 11. Quick start mode Reset HDMI(MHL) Normal Normal Full On Off 1. Then navigate to be sent via software. 10. Press the MENU key to the factory defaults. The Setting menu can select which allows monitor controls to the setting...
... to adjust. 4. Wide mode: You can be set through the software on the PC. Input: Select the source from the OSD. Reset: Resets the custom color settings to open the OSD. 3. The options are using. English Setting Setting Input OD HDMI Black level Wide Mode DDC/CI Quick start mode setting 11. Quick start mode Reset HDMI(MHL) Normal Normal Full On Off 1. Then navigate to be sent via software. 10. Press the MENU key to the factory defaults. The Setting menu can select which allows monitor controls to the setting...
User Manual
Page 30
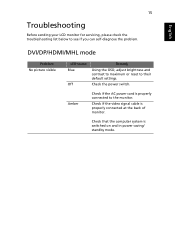
English DVI/DP/HDMI/MHL mode Problem No picture visible LED status Blue Off Remedy Using the OSD, adjust brightness and contrast to maximum or reset to the monitor. Check if the video signal cable is switched on and in power saving/ standby mode. Check that the computer system is properly connected at the back of monitor. Check the power switch. Amber Check if the AC power cord is properly connected to their default settings. English 15 Troubleshooting Before sending your LCD monitor for servicing, please check the troubleshooting list below to see...
English DVI/DP/HDMI/MHL mode Problem No picture visible LED status Blue Off Remedy Using the OSD, adjust brightness and contrast to maximum or reset to the monitor. Check if the video signal cable is switched on and in power saving/ standby mode. Check that the computer system is properly connected at the back of monitor. Check the power switch. Amber Check if the AC power cord is properly connected to their default settings. English 15 Troubleshooting Before sending your LCD monitor for servicing, please check the troubleshooting list below to see...


