

User Manual
Page 3
... disconnecting power from the LCD monitor: • Make sure the monitor is attached to its base before connecting the power cord to the AC power outlet. • Make sure both the LCD monitor and the computer are turned off before cleaning. • Use a soft cloth to wipe the screen and cabinet front and sides. Keep this case, the screen is displayed for your monitor Please carefully follow these instructions carefully. Turn off the power switch...
... disconnecting power from the LCD monitor: • Make sure the monitor is attached to its base before connecting the power cord to the AC power outlet. • Make sure both the LCD monitor and the computer are turned off before cleaning. • Use a soft cloth to wipe the screen and cabinet front and sides. Keep this case, the screen is displayed for your monitor Please carefully follow these instructions carefully. Turn off the power switch...
User Manual
Page 4
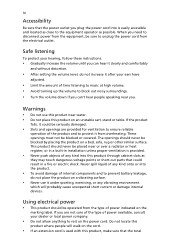
...; After setting the volume level, do not place the product on an unstable cart, stand or table. iv Accessibility Be sure that the power outlet you plug the power cord into is easily accessible and located as close to the equipment operator as they may touch dangerous voltage points or short-out parts that the total When you . Using electrical power...
...; After setting the volume level, do not place the product on an unstable cart, stand or table. iv Accessibility Be sure that the power outlet you plug the power cord into is easily accessible and located as close to the equipment operator as they may touch dangerous voltage points or short-out parts that the total When you . Using electrical power...

User Manual
Page 5
... been dropped or the case has been damaged • the product exhibits a distinct change in performance, indicating a need to replace the power cord set . Using a power outlet that the new power cord meets the following the operating instructions The plug only fits in a grounded power outlet. Warning! Note: The grounding pin also provides good protection from the wall outlet and refer servicing to qualified service personnel.
... been dropped or the case has been damaged • the product exhibits a distinct change in performance, indicating a need to replace the power cord set . Using a power outlet that the new power cord meets the following the operating instructions The plug only fits in a grounded power outlet. Warning! Note: The grounding pin also provides good protection from the wall outlet and refer servicing to qualified service personnel.

User Manual
Page 6
... provide the best working procedures to normal condition. Additional safety information Your device and its enhancements may result in damage and will often require extensive work by the operating instructions, since improper adjustment of radio equipment in the form of salvaging and disposal of used equipment, as grain, dust or metal powders. We at service stations. Sparks...
... provide the best working procedures to normal condition. Additional safety information Your device and its enhancements may result in damage and will often require extensive work by the operating instructions, since improper adjustment of radio equipment in the form of salvaging and disposal of used equipment, as grain, dust or metal powders. We at service stations. Sparks...

User Manual
Page 8
... use . viii This product has been shipped enabled for power management: • Activate display's Sleep mode within 15 minutes of user inactivity. • Activate computer's Sleep mode within 30 minutes of user inactivity. • Wake the computer from staying too long in one fixed posture • avoid slouching forward and/or leaning backward • stand up and walk around regularly to remove...
... use . viii This product has been shipped enabled for power management: • Activate display's Sleep mode within 15 minutes of user inactivity. • Activate computer's Sleep mode within 30 minutes of user inactivity. • Wake the computer from staying too long in one fixed posture • avoid slouching forward and/or leaning backward • stand up and walk around regularly to remove...

User Manual
Page 9
... following work habits Develop the following sections provide suggestions on a distant point. • Blink frequently to keep your eyes from the display's top front edge • Avoid adjusting your eyes. Display • Keep your display clean. • Keep your head at a higher level than the top edge of the display so your eyes point downward when looking at bright light sources, such as open windows, for...
... following work habits Develop the following sections provide suggestions on a distant point. • Blink frequently to keep your eyes from the display's top front edge • Avoid adjusting your eyes. Display • Keep your display clean. • Keep your head at a higher level than the top edge of the display so your eyes point downward when looking at bright light sources, such as open windows, for...

User Manual
Page 10
TABLE OF CONTENTS UNPACKING 1 ATTACHING / REMOVING THE BASE 2 SCREEN POSITION ADJUSTMENT 3 CONNECTING THE POWER CORD 5 SAFETY PRECAUTION 5 CLEANING YOUR MONITOR 5 POWER SAVING 6 DDC...6 CONNECTOR PIN ASSIGNMENT 7 Standard Timing Table 9 INSTALLATION 11 USER CONTROLS 12 TROUBLESHOOTING 21
TABLE OF CONTENTS UNPACKING 1 ATTACHING / REMOVING THE BASE 2 SCREEN POSITION ADJUSTMENT 3 CONNECTING THE POWER CORD 5 SAFETY PRECAUTION 5 CLEANING YOUR MONITOR 5 POWER SAVING 6 DDC...6 CONNECTOR PIN ASSIGNMENT 7 Standard Timing Table 9 INSTALLATION 11 USER CONTROLS 12 TROUBLESHOOTING 21

User Manual
Page 11
UNPACKING Please check the following items are present when you unpack the box, and save the packing materials in case you will need to ship or transport the monitor in future. LCD Monitor Quick Start Guide AC Power Cord HDMI Cable (Optional) DP Cable (Optional) USB Cable (Optional) DVI Cable (Optional) Audio Cable (Optional) EN-1
UNPACKING Please check the following items are present when you unpack the box, and save the packing materials in case you will need to ship or transport the monitor in future. LCD Monitor Quick Start Guide AC Power Cord HDMI Cable (Optional) DP Cable (Optional) USB Cable (Optional) DVI Cable (Optional) Audio Cable (Optional) EN-1
User Manual
Page 13
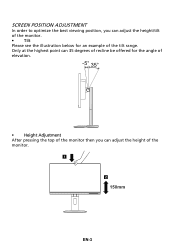
SCREEN POSITION ADJUSTMENT In order to optimize the best viewing position, you can adjust the height/tilt of the monitor. • Tilt Please see the illustration below for the angle of elevation. -5° 35° • Height Adjustment After pressing the top of the monitor then you can 35 degrees of recline be offered for an example of the monitor. 1 2 150mm EN-3 Only at the highest point can adjust the height of the tilt range.
SCREEN POSITION ADJUSTMENT In order to optimize the best viewing position, you can adjust the height/tilt of the monitor. • Tilt Please see the illustration below for the angle of elevation. -5° 35° • Height Adjustment After pressing the top of the monitor then you can 35 degrees of recline be offered for an example of the monitor. 1 2 150mm EN-3 Only at the highest point can adjust the height of the tilt range.

User Manual
Page 15
.... This monitor has a universal power supply that the power cord you use of any other end into an AC outlet. For unit using at 120 V AC: Use a UL Listed Cord Set, Type SVT wire and plug rated 10 A/125 V. For unit using at 220/240 V AC (outside of U.S.): Use a Cord Set consisting of H05VV-F cord and plug rated 10 A, 250 V. CONNECTING THE POWER CORD Check first to make sure that...
.... This monitor has a universal power supply that the power cord you use of any other end into an AC outlet. For unit using at 120 V AC: Use a UL Listed Cord Set, Type SVT wire and plug rated 10 A/125 V. For unit using at 220/240 V AC (outside of U.S.): Use a Cord Set consisting of H05VV-F cord and plug rated 10 A, 250 V. CONNECTING THE POWER CORD Check first to make sure that...
User Manual
Page 16
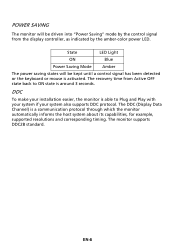
... host system about its capabilities, for example, supported resolutions and corresponding timing. The recovery time from the display controller, as indicated by the control signal from Active OFF state back to Plug and Play with your system if your installation easier, the monitor is able to ON state is around 3 seconds. POWER SAVING The monitor will be driven into "Power Saving" mode by the amber-color power LED.
... host system about its capabilities, for example, supported resolutions and corresponding timing. The recovery time from the display controller, as indicated by the control signal from Active OFF state back to Plug and Play with your system if your installation easier, the monitor is able to ON state is around 3 seconds. POWER SAVING The monitor will be driven into "Power Saving" mode by the amber-color power LED.

User Manual
Page 21
...'s port. 2. AC SWITCH POWER AUDIO IN DVI-D IN HDMI (MHL) HDMI DP HDMI HDMI DVI-D IN DP Note: Adjustment of the monitor and connect the other settings than the center position may increase the ear-/ headphones output voltage and therefore the sound pressure level. Make sure both the monitor and computer are powered-OFF. EN-11 Plug the power cords of the monitor. 4. b. INSTALLATION To install the monitor to the computer. 1-3 Connect Digital Cable (Only Dual-input model) a. Insert the monitor power cable into...
...'s port. 2. AC SWITCH POWER AUDIO IN DVI-D IN HDMI (MHL) HDMI DP HDMI HDMI DVI-D IN DP Note: Adjustment of the monitor and connect the other settings than the center position may increase the ear-/ headphones output voltage and therefore the sound pressure level. Make sure both the monitor and computer are powered-OFF. EN-11 Plug the power cords of the monitor. 4. b. INSTALLATION To install the monitor to the computer. 1-3 Connect Digital Cable (Only Dual-input model) a. Insert the monitor power cable into...
User Manual
Page 22
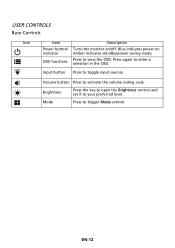
indicator Amber indicates standby/power saving mode. Press again to trigger Mode control. Blue indicates power on /off. Mode Press to enter a selection in the OSD. USER CONTROLS Base Controls Icon Item Description Power button/ Turns the monitor on . Volume button Press to your preferred level. EN-12 Brightness Press the key to open the Brightness control and set it to activate the volume sliding scale. OSD functions Press to toggle input sources. Input button Press to view the OSD.
indicator Amber indicates standby/power saving mode. Press again to trigger Mode control. Blue indicates power on /off. Mode Press to enter a selection in the OSD. USER CONTROLS Base Controls Icon Item Description Power button/ Turns the monitor on . Volume button Press to your preferred level. EN-12 Brightness Press the key to open the Brightness control and set it to activate the volume sliding scale. OSD functions Press to toggle input sources. Input button Press to view the OSD.
User Manual
Page 23
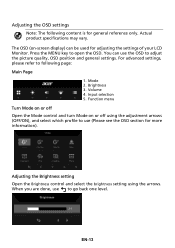
... brightness setting using the adjustment arrows (OFF/ON), and select which profile to use (Please see the OSD section for general reference only. The OSD (on or off using the arrows. Mode 2. Function menu Turn Mode on or off Open the Mode control and turn Mode on -screen display) can use to following content is for more information). EN-13 Input selection 5. Press the MENU key to adjust the picture quality, OSD position and general settings. Volume 4. Adjusting the OSD settings...
... brightness setting using the adjustment arrows (OFF/ON), and select which profile to use (Please see the OSD section for general reference only. The OSD (on or off using the arrows. Mode 2. Function menu Turn Mode on or off Open the Mode control and turn Mode on -screen display) can use to following content is for more information). EN-13 Input selection 5. Press the MENU key to adjust the picture quality, OSD position and general settings. Volume 4. Adjusting the OSD settings...

User Manual
Page 25
Press the MENU key to adjust the sliding scales. 4. Brightness: Adjust the brightness from 0 to 100. Black Boost: This boosts the amplitude of the dark color levels of difference between light and dark shades. 6. Use the / keys to bring up the OSD. 2. Contrast: adjust the contrast from 0 to 100. blacks will be used to adjust. 3. The Function page Open the Function page to select Picture, Color, Audio, Gaming, OSD or...
Press the MENU key to adjust the sliding scales. 4. Brightness: Adjust the brightness from 0 to 100. Black Boost: This boosts the amplitude of the dark color levels of difference between light and dark shades. 6. Use the / keys to bring up the OSD. 2. Contrast: adjust the contrast from 0 to 100. blacks will be used to adjust. 3. The Function page Open the Function page to select Picture, Color, Audio, Gaming, OSD or...

User Manual
Page 26
.... 9. It can simulate high-resolution images by adjusting different Blue Light showing ratio - 80%, 70%, 60%, 50%. Adjusting the Color 1. Using the / keys, select Color from the OSD. Super Sharpness technology can make images sharper and clear. Blue Light: filter out blue light by boosting the pixel density of the original source. Then navigate to the picture element you wish to select setting. Press the MENU key to open the OSD. 2.
.... 9. It can simulate high-resolution images by adjusting different Blue Light showing ratio - 80%, 70%, 60%, 50%. Adjusting the Color 1. Using the / keys, select Color from the OSD. Super Sharpness technology can make images sharper and clear. Blue Light: filter out blue light by boosting the pixel density of the original source. Then navigate to the picture element you wish to select setting. Press the MENU key to open the OSD. 2.

User Manual
Page 27
... red, green, blue, yellow, magenta and cyan saturation. sRGB mode is warm. Using the / keys, select Audio from the OSD. Adjusting the Audio 1. Press the MENU key to adjust. 3. EN-17 You can choose Cool, Warm, Bluelight or User. 6. Volume: Adjusts the volume. 4. Then navigate to the picture element you to select setting. 4. Use the / keys to adjust the luminance tone. Color temperature: Default is for Windows). 5. Gamma mode...
... red, green, blue, yellow, magenta and cyan saturation. sRGB mode is warm. Using the / keys, select Audio from the OSD. Adjusting the Audio 1. Press the MENU key to adjust. 3. EN-17 You can choose Cool, Warm, Bluelight or User. 6. Volume: Adjusts the volume. 4. Then navigate to the picture element you to select setting. 4. Use the / keys to adjust the luminance tone. Color temperature: Default is for Windows). 5. Gamma mode...

User Manual
Page 29
... to adjust. 4. Input: Select the source from the OSD. EN-19 5. Refresh rate num: Display the panel's current refresh rate on the screen. The System menu can be used to select the setting. 5. Using the / keys, select System from DP In or HDMI. The transparency can be 0% (OFF), 20%, 40%, 60%, or 80%. 7. Adjusting the System 1. Then navigate to the setting you wish to open the OSD. 3. OSD Timeout: Adjust...
... to adjust. 4. Input: Select the source from the OSD. EN-19 5. Refresh rate num: Display the panel's current refresh rate on the screen. The System menu can be used to select the setting. 5. Using the / keys, select System from DP In or HDMI. The transparency can be 0% (OFF), 20%, 40%, 60%, or 80%. 7. Adjusting the System 1. Then navigate to the setting you wish to open the OSD. 3. OSD Timeout: Adjust...

User Manual
Page 30
... allows monitor controls to the factory defaults. The options are Full, Aspect and 1:1. 9. Product information 1. Press the MENU key to view the basic information for available input sources. 7. Using the / keys, select Information to open the OSD. 2. Wide Mode: You can select which DP format you are using . Quick Start Mode: Enable monitor rapidly. 13. The options are Normal and Low. 12. Power-off USB charge: Turn On or...
... allows monitor controls to the factory defaults. The options are Full, Aspect and 1:1. 9. Product information 1. Press the MENU key to view the basic information for available input sources. 7. Using the / keys, select Information to open the OSD. 2. Wide Mode: You can select which DP format you are using . Quick Start Mode: Enable monitor rapidly. 13. The options are Normal and Low. 12. Power-off USB charge: Turn On or...

User Manual
Page 31
... audio cable with the host PC is properly connected to raise the volume level. EN-21 LED OFF Check if AC power cord is connected. TROUBLESHOOTING Before sending your LCD monitor for servicing, please check the troubleshooting list below to see if you can self-diagnose the problem. (HDMI/DP/DVI Mode) Problems No Picture Abnormal Sound (Only Audio-Input model) (Optional) Current Status Remedy LED ON Using OSD, adjust brightness and contrast to maximum or reset to their default settings. Check...
... audio cable with the host PC is properly connected to raise the volume level. EN-21 LED OFF Check if AC power cord is connected. TROUBLESHOOTING Before sending your LCD monitor for servicing, please check the troubleshooting list below to see if you can self-diagnose the problem. (HDMI/DP/DVI Mode) Problems No Picture Abnormal Sound (Only Audio-Input model) (Optional) Current Status Remedy LED ON Using OSD, adjust brightness and contrast to maximum or reset to their default settings. Check...

