
User Manual
Page 2
... purposes only and belong to the contents hereof and specifically disclaims the implied warranties of Acer Incorporated. Acer LCD Monitor User Guide Model number Serial number Date of purchase Place of such revisions or changes. ii Acer LCD Monitor User Guide Original Issue: 06/2018 Changes may be made periodically to your unit should include the serial number, model number and purchase information. No part of this publication may be reproduced, stored in...
... purposes only and belong to the contents hereof and specifically disclaims the implied warranties of Acer Incorporated. Acer LCD Monitor User Guide Model number Serial number Date of purchase Place of such revisions or changes. ii Acer LCD Monitor User Guide Original Issue: 06/2018 Changes may be made periodically to your unit should include the serial number, model number and purchase information. No part of this publication may be reproduced, stored in...

User Manual
Page 3
... by changing the image or turning off the power switch and then turn it on again to the nature of 0.01% or less such as a missing pixel or pixel lit all warnings and instructions marked on LCD monitors The following are normal with the LCD monitor and do not indicate a problem. • Due to make sure the flicker disappears. • You may flicker during initial use . • The LCD screen...
... by changing the image or turning off the power switch and then turn it on again to the nature of 0.01% or less such as a missing pixel or pixel lit all warnings and instructions marked on LCD monitors The following are normal with the LCD monitor and do not indicate a problem. • Due to make sure the flicker disappears. • You may flicker during initial use . • The LCD screen...
User Manual
Page 4
... volume. • Avoid turning up the volume to disconnect power from overheating. Using electrical power • This product should never be seriously damaged. • Slots and openings are not sure of the type of power available, consult your ears have adjusted. • Limit the amount of power indicated on the marking label. English Accessibility Be sure that the power outlet you plug the power cord...
... volume. • Avoid turning up the volume to disconnect power from overheating. Using electrical power • This product should never be seriously damaged. • Slots and openings are not sure of the type of power available, consult your ears have adjusted. • Limit the amount of power indicated on the marking label. English Accessibility Be sure that the power outlet you plug the power cord...
User Manual
Page 5
... power strips are used with this product. • Use the product only with the supplied power supply cord set , make sure that the new power cord meets the following the operating instructions v Refer all products plugged into a non-grounded power outlet. Do not insert the plug into the wall outlet does not exceed the fuse rating. • Do not overload a power outlet, strip or receptacle by other risks. Using a power...
... power strips are used with this product. • Use the product only with the supplied power supply cord set , make sure that the new power cord meets the following the operating instructions v Refer all products plugged into a non-grounded power outlet. Do not insert the plug into the wall outlet does not exceed the fuse rating. • Do not overload a power outlet, strip or receptacle by other risks. Using a power...
User Manual
Page 6
... Acer is strongly committed to turn off the device near depots, storage and distribution areas; For more information on boats, chemical transfer or storage facilities, vehicles using liquefied petroleum gas (such as propane or butane), and areas where the air contains chemicals or particles such as one of our other controls may contain small parts. English...
... Acer is strongly committed to turn off the device near depots, storage and distribution areas; For more information on boats, chemical transfer or storage facilities, vehicles using liquefied petroleum gas (such as propane or butane), and areas where the air contains chemicals or particles such as one of our other controls may contain small parts. English...

User Manual
Page 7
... and information for more comfortable computer use. Users are also at risk of physical injury. This product has been shipped enabled for power management: • Activate display's Sleep mode within 5 minutes of a computer. Long work periods, bad posture, poor work habits, stress, inadequate working in front of user inactivity. • Wake the monitor when it is produced with high-precision manufacturing...
... and information for more comfortable computer use. Users are also at risk of physical injury. This product has been shipped enabled for power management: • Activate display's Sleep mode within 5 minutes of a computer. Long work periods, bad posture, poor work habits, stress, inadequate working in front of user inactivity. • Wake the monitor when it is produced with high-precision manufacturing...

User Manual
Page 8
... the side faces the window or any light source • minimizing room light by looking at the middle of the display. • Adjust the display brightness and/or contrast to keep your eyes. English Taking care of your vision Long viewing hours, wearing incorrect glasses or contact lenses, glare, excessive room lighting, poorly focused screens, very small typefaces and low-contrast displays could stress your eyes...
... the side faces the window or any light source • minimizing room light by looking at the middle of the display. • Adjust the display brightness and/or contrast to keep your eyes. English Taking care of your vision Long viewing hours, wearing incorrect glasses or contact lenses, glare, excessive room lighting, poorly focused screens, very small typefaces and low-contrast displays could stress your eyes...

User Manual
Page 11
... your comfort zone vii Taking care of your vision viii Developing good work habits viii Declaration of Conformity ix Federal Communications Commission Declaration of Conformity x Unpacking 1 Connecting the adapter and AC Power cord 4 Power saving 4 Display Data Channel (DDC) 5 19-pin color display signal cable 5 20-pin color display signal cable 6 Standard timing table 7 Installation 8 User Controls 9 External controls 9 Using the Shortcut Menu 9 The Function page 11 Troubleshooting 15 HDMI/DP Mode (Optional) 15 xi
... your comfort zone vii Taking care of your vision viii Developing good work habits viii Declaration of Conformity ix Federal Communications Commission Declaration of Conformity x Unpacking 1 Connecting the adapter and AC Power cord 4 Power saving 4 Display Data Channel (DDC) 5 19-pin color display signal cable 5 20-pin color display signal cable 6 Standard timing table 7 Installation 8 User Controls 9 External controls 9 Using the Shortcut Menu 9 The Function page 11 Troubleshooting 15 HDMI/DP Mode (Optional) 15 xi

User Manual
Page 12
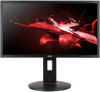
LCD monitor Quick start guide Audio Cable (Optional) DP Cable (Optional) LCD Monitor XF0 series-XF240Q USER GUIDE HDMI cable (Optional) AC Power cord 1 English Unpacking Please check that the following items are present when you unpack the box, and save the packing materials in case you need to ship or transport the monitor in the future.
LCD monitor Quick start guide Audio Cable (Optional) DP Cable (Optional) LCD Monitor XF0 series-XF240Q USER GUIDE HDMI cable (Optional) AC Power cord 1 English Unpacking Please check that the following items are present when you unpack the box, and save the packing materials in case you need to ship or transport the monitor in the future.

User Manual
Page 13
Only at the highest point can adjust the height of the monitor. 1 2 150mm • Tilt Please see the illustration below for the angle of the tilt range. English In oder to optimize the best viewing position, you can adjust the height/tilt of the monitor. • Height Adjustment After pressing the top of the monitor then you can 35 degrees of recline be offered for an example of elevation. 5o 35o 2
Only at the highest point can adjust the height of the monitor. 1 2 150mm • Tilt Please see the illustration below for the angle of the tilt range. English In oder to optimize the best viewing position, you can adjust the height/tilt of the monitor. • Height Adjustment After pressing the top of the monitor then you can 35 degrees of recline be offered for an example of elevation. 5o 35o 2

User Manual
Page 15
... units using 120 V AC: Use a UL-listed cord set, type SVT wire and plug rated 10 A/125 V. • For units using 220/240 V AC: Use a cord set consisting of the AC power cord to the Adapter, and plug the other end into "Power Saving" mode by the amber-color power LED. English Connecting the adapter and AC Power cord • Check first to ON state is around 3 seconds. 4 State ON Power Saving Mode LED Light Blue Amber The power saving states will be installed. The cord set...
... units using 120 V AC: Use a UL-listed cord set, type SVT wire and plug rated 10 A/125 V. • For units using 220/240 V AC: Use a cord set consisting of the AC power cord to the Adapter, and plug the other end into "Power Saving" mode by the amber-color power LED. English Connecting the adapter and AC Power cord • Check first to ON state is around 3 seconds. 4 State ON Power Saving Mode LED Light Blue Amber The power saving states will be installed. The cord set...

User Manual
Page 16
... 10 TMDS Clock+ 12 TMDS Clock14 Reserved (N.C. English Display Data Channel (DDC) To make installation easier, so long as your system supports the DDC protocol, the monitor is a communication protocol through which the monitor automatically informs the host system about its capabilities; The DDC is able to plug-and-play. The monitor supports the DDC2B standard. 19-pin color display signal cable PIN No.
... 10 TMDS Clock+ 12 TMDS Clock14 Reserved (N.C. English Display Data Channel (DDC) To make installation easier, so long as your system supports the DDC protocol, the monitor is a communication protocol through which the monitor automatically informs the host system about its capabilities; The DDC is able to plug-and-play. The monitor supports the DDC2B standard. 19-pin color display signal cable PIN No.

User Manual
Page 19
... audio output model. FreeSync: It can allow a FreeSync supported graphics source to dynamically adjust display refresh rate based on the computer with the audio cable. 4. Then tighten the thumbscrews on the computer. Connect the signal cable to a properly grounded AC outlet. Note: Audio output is only for power efficient, virtually stutter free and low-latency display update. 8 Please check user manual for more instruction. English Installation 1. Turn off your computer and unplug your computer's power cord. 2. Connect the power adapter and power cord...
... audio output model. FreeSync: It can allow a FreeSync supported graphics source to dynamically adjust display refresh rate based on the computer with the audio cable. 4. Then tighten the thumbscrews on the computer. Connect the signal cable to a properly grounded AC outlet. Note: Audio output is only for power efficient, virtually stutter free and low-latency display update. 8 Please check user manual for more instruction. English Installation 1. Turn off your computer and unplug your computer's power cord. 2. Connect the power adapter and power cord...
User Manual
Page 20
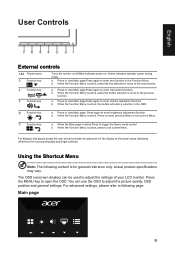
.... Actual product specifications may vary. You can be used to enter Volume adjustment function. Press to view Main page.Press again to adjust the settings of the display as the bezel cause disturbing reflections from surrounding light and bright surfaces. b. b. The OSD (onscreen display) can use the OSD to enter Input select function. Amber indicates standby/ power saving mode. Press to open the OSD. When the Function Menu is for general...
.... Actual product specifications may vary. You can be used to enter Volume adjustment function. Press to view Main page.Press again to adjust the settings of the display as the bezel cause disturbing reflections from surrounding light and bright surfaces. b. b. The OSD (onscreen display) can use the OSD to enter Input select function. Amber indicates standby/ power saving mode. Press to open the OSD. When the Function Menu is for general...
User Manual
Page 21
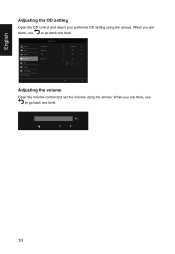
User Over Drive FreeSync VRB Aim point Extrama On Off Off Adjusting the volume Open the Volume control and set the Volume using the arrows. When you are done, use to ... English Adjusting the OD setting Open the OD control and select your preferred OD setting using the arrows. Mode - Picture Color Audio Gaming OSD System Information Save Setting to go back one level. When you are done, use to go back one level. 9 9 10
User Over Drive FreeSync VRB Aim point Extrama On Off Off Adjusting the volume Open the Volume control and set the Volume using the arrows. When you are done, use to ... English Adjusting the OD setting Open the OD control and select your preferred OD setting using the arrows. Mode - Picture Color Audio Gaming OSD System Information Save Setting to go back one level. When you are done, use to go back one level. 9 9 10
User Manual
Page 22
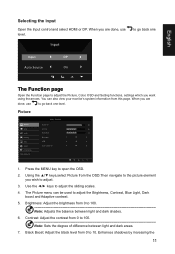
... Note: Adjusts the balance between light and dark areas. 7. Contrast: Adjust the contrast from this page. English Selecting the input Open the Input control and select HDMI or DP. The Picture menu can also view your monitor's system information from 0 to adjust the Brightness, Contrast, Blue Light, Dark boost and Adaptive contrast. 5. When you are done, use level. Enhances shadows by increasing the 11 When you are done, use to ... Picture Picture Color Audio Gaming OSD System Information Save Setting to...
... Note: Adjusts the balance between light and dark areas. 7. Contrast: Adjust the contrast from this page. English Selecting the input Open the Input control and select HDMI or DP. The Picture menu can also view your monitor's system information from 0 to adjust the Brightness, Contrast, Blue Light, Dark boost and Adaptive contrast. 5. When you are done, use level. Enhances shadows by increasing the 11 When you are done, use to ... Picture Picture Color Audio Gaming OSD System Information Save Setting to...
User Manual
Page 23
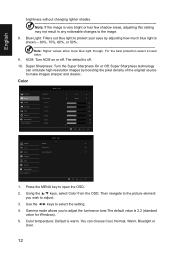
...-resolution images by adjusting how much blue light is warm. English brightness without changing lighter shades Note: If the image is off . ACM: Turn ACM on or off . 10. Mode - Move Mode - Using the ▲/▼ keys, select Color from the OSD. Save Settint to select the setting. 4. Gamma mode allows you wish to make images sharper and clearer.. User Gamma Color Temp. The default is very bright or has few shadow areas, adjusting this setting...
...-resolution images by adjusting how much blue light is warm. English brightness without changing lighter shades Note: If the image is off . ACM: Turn ACM on or off . 10. Mode - Move Mode - Using the ▲/▼ keys, select Color from the OSD. Save Settint to select the setting. 4. Gamma mode allows you wish to make images sharper and clearer.. User Gamma Color Temp. The default is very bright or has few shadow areas, adjusting this setting...
User Manual
Page 24
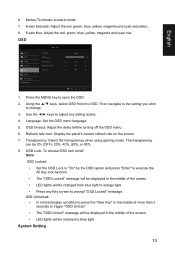
... red, green, blue, yellow, magenta and cyan hue. Transparency: Select the transparency when using gaming mode. OSD Lock: To choose OSD lock on the screen. 7. Then navigate to the setting you wish to ... Refresh rate num: Display the panel's current refresh rate on /off the OSD menu. 6. The transparency can be changed from the OSD. System Setting 13 Press the MENU key to adjust any Key screen to blue light. English 6. Mode - User Language OSD Timeout Transparency Refresh Rate Num OSD Lock English 120 Off Off Off Quick Start Mode...
... red, green, blue, yellow, magenta and cyan hue. Transparency: Select the transparency when using gaming mode. OSD Lock: To choose OSD lock on the screen. 7. Then navigate to the setting you wish to ... Refresh rate num: Display the panel's current refresh rate on /off the OSD menu. 6. The transparency can be changed from the OSD. System Setting 13 Press the MENU key to adjust any Key screen to blue light. English 6. Mode - User Language OSD Timeout Transparency Refresh Rate Num OSD Lock English 120 Off Off Off Quick Start Mode...
User Manual
Page 25
... Mode - Press the MENU key to select the setting. 5. Use the ◄/► keys to open the OSD. 3. Note: DDC/CI, short for Display Data Channel/Command Interface, which screen aspect you wish to select the input and other important settings. 2. Mode - User Picture Quick Start Mode Off Color Audio Gaming OSD System Information Save Setting to ... Using the ▲/▼ keys, select Setting from HDMI or DP. 6. Input: Select the source from the OSD. HDMI Black level setting. 10. Wide mode...
... Mode - Press the MENU key to select the setting. 5. Use the ◄/► keys to open the OSD. 3. Note: DDC/CI, short for Display Data Channel/Command Interface, which screen aspect you wish to select the input and other important settings. 2. Mode - User Picture Quick Start Mode Off Color Audio Gaming OSD System Information Save Setting to ... Using the ▲/▼ keys, select Setting from HDMI or DP. 6. Input: Select the source from the OSD. HDMI Black level setting. 10. Wide mode...
User Manual
Page 26
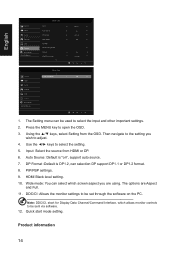
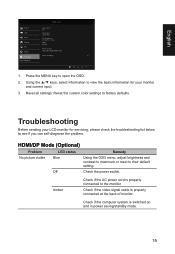
... switched on and in power saving/standby mode. 15 Using the ▲/▼ keys, select Information to view the basic information for servicing, please check the troubleshooting list below to the monitor. User Main Source DP Resolution 1920x1080 H/V Frequency H: 67KHz V: 60Hz Mode Normal Series Number MML 3451 80060290001 4212 Reset All Settings Quick Start Mode 1. Reset all settings: Reset the custom color settings to open the OSD. 2. Mode - Check if the video signal cable is properly connected at the back of monitor. Press the MENU key to factory defaults...
... switched on and in power saving/standby mode. 15 Using the ▲/▼ keys, select Information to view the basic information for servicing, please check the troubleshooting list below to the monitor. User Main Source DP Resolution 1920x1080 H/V Frequency H: 67KHz V: 60Hz Mode Normal Series Number MML 3451 80060290001 4212 Reset All Settings Quick Start Mode 1. Reset all settings: Reset the custom color settings to open the OSD. 2. Mode - Check if the video signal cable is properly connected at the back of monitor. Press the MENU key to factory defaults...


