
X173 LCD Service Guide
Page 4
...equipment and receiver. 3. Warning: To prevent fire or shock hazard, do not expose the monitor to correct such interference. You MUST use the list provided by your Acer office may have a DIFFERENT part number code to correct the interference by turning the equipment...competitiveness, your regional offices or the responsible personnel/channel to this generic service guide. These limits are present inside the monitor. This Service Guide provides you with all technical information relating to provide reasonable protection against harmful interference in a residential ...
...equipment and receiver. 3. Warning: To prevent fire or shock hazard, do not expose the monitor to correct such interference. You MUST use the list provided by your Acer office may have a DIFFERENT part number code to correct the interference by turning the equipment...competitiveness, your regional offices or the responsible personnel/channel to this generic service guide. These limits are present inside the monitor. This Service Guide provides you with all technical information relating to provide reasonable protection against harmful interference in a residential ...
X173 LCD Service Guide
Page 5
...your outlet does not accommodate the three-wire plug, have appropriate configured receptacles marked between 100 - 240V AC, Min. 5A. z The monitor is recovered slowly by the manufacturer and follow the kit instructions. opening or removing covers can result in the back and bottom of time. ...install the correct outlet, or use an adapter to qualified service personnel z To ensure satisfactory operation, use the monitor only with the monitor. This will protect the monitor from the type of power source indicated on again to the nature of the fluorescent light, the screen may ...
...your outlet does not accommodate the three-wire plug, have appropriate configured receptacles marked between 100 - 240V AC, Min. 5A. z The monitor is recovered slowly by the manufacturer and follow the kit instructions. opening or removing covers can result in the back and bottom of time. ...install the correct outlet, or use an adapter to qualified service personnel z To ensure satisfactory operation, use the monitor only with the monitor. This will protect the monitor from the type of power source indicated on again to the nature of the fluorescent light, the screen may ...
X173 LCD Service Guide
Page 6
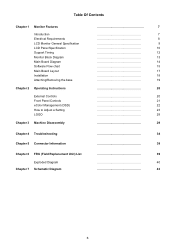
Table Of Contents Chapter 1 Monitor Features Introduction Electrical Requirements LCD Monitor General Specification LCD Panel Specification Support Timing Monitor Block Diagram Main Board Diagram Software Flow chart Main Board Layout Installation Attaching/Removing the base Chapter 2 Operating Instructions External Controls Front Panel Controls eColor ...
Table Of Contents Chapter 1 Monitor Features Introduction Electrical Requirements LCD Monitor General Specification LCD Panel Specification Support Timing Monitor Block Diagram Main Board Diagram Software Flow chart Main Board Layout Installation Attaching/Removing the base Chapter 2 Operating Instructions External Controls Front Panel Controls eColor ...
X173 LCD Service Guide
Page 7
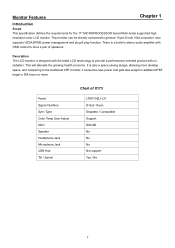
There is designed with the latest LCD technology to provide a performance oriented product with OSD control to drive a pair of X173 LTM170EU-L31 D-Sub 15-pin Separate / Compatible Support DDC2B No No No Not support Yes / No 7 This will alleviate the growing health concerns.... Signal Interface Sync Type Color Temp User Adjust DDC Speaker Headphone Jack Microphone Jack USB Hub Tilt / Swivel Chart of speakers. Description The LCD monitor is a build-in addition MTBF target is 50k hours or more desktop space, and comparing to general 15-pin D-sub VGA connector, also supports...
There is designed with the latest LCD technology to provide a performance oriented product with OSD control to drive a pair of X173 LTM170EU-L31 D-Sub 15-pin Separate / Compatible Support DDC2B No No No Not support Yes / No 7 This will alleviate the growing health concerns.... Signal Interface Sync Type Color Temp User Adjust DDC Speaker Headphone Jack Microphone Jack USB Hub Tilt / Swivel Chart of speakers. Description The LCD monitor is a build-in addition MTBF target is 50k hours or more desktop space, and comparing to general 15-pin D-sub VGA connector, also supports...

X173 LCD Service Guide
Page 9
... Humidity: 0% to 90% Dimension Leakage current 376(W)×381(H)×162(D) mm < 3.5mA Peak surge current < 55A peak at 240 VAC and cold starting 9 LCD Monitor General Specification Driving system TFT Color LCD Active Display Area 337.92(H) × 270.336mm(V) LCD Panel Pixel pitch 0.264mm(H) × 0.264mm(W) Viewable angle (H) 90...
... Humidity: 0% to 90% Dimension Leakage current 376(W)×381(H)×162(D) mm < 3.5mA Peak surge current < 55A peak at 240 VAC and cold starting 9 LCD Monitor General Specification Driving system TFT Color LCD Active Display Area 337.92(H) × 270.336mm(V) LCD Panel Pixel pitch 0.264mm(H) × 0.264mm(W) Viewable angle (H) 90...
X173 LCD Service Guide
Page 13
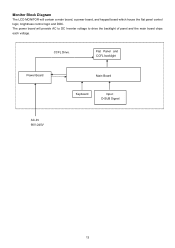
Flat Panel and CCFL backlight Power Board Main Board Keyboard Input : D-SUB Signal AC-IN 90V-240V 13 The power board will contain a main board, a power board, and keypad board which house the flat panel control logic, brightness control logic and DDC. CCFL Drive. Monitor Block Diagram The LCD MONITOR will provide AC to DC Inverter voltage to drive the backlight of panel and the main board chips each voltage.
Flat Panel and CCFL backlight Power Board Main Board Keyboard Input : D-SUB Signal AC-IN 90V-240V 13 The power board will contain a main board, a power board, and keypad board which house the flat panel control logic, brightness control logic and DDC. CCFL Drive. Monitor Block Diagram The LCD MONITOR will provide AC to DC Inverter voltage to drive the backlight of panel and the main board chips each voltage.

X173 LCD Service Guide
Page 20
... Switch Power LED Empowering / Exit Item 4. 5. 6. Description Auto Adjust botton/Exit < / > MENU/ENTER 20 The other control buttons are located at front panel of the monitor. By changing these settings, the picture can be adjusted to your personal preferences. • The power cord should be connected. • Connect the video cable...
... Switch Power LED Empowering / Exit Item 4. 5. 6. Description Auto Adjust botton/Exit < / > MENU/ENTER 20 The other control buttons are located at front panel of the monitor. By changing these settings, the picture can be adjusted to your personal preferences. • The power cord should be connected. • Connect the video cable...
X173 LCD Service Guide
Page 27
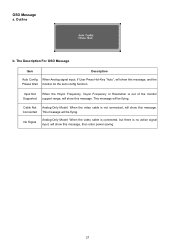
...no active signal input, will show this message. Outline b. Cable Not Analog-Only Model: When the video cable is out of the monitor support range, will show this message, then enter power saving. 27 Input Not Supported When the Hsync Frequency, Vsync Frequency or Resolution... is not connected, will show this message, and the Please Wait monitor do the auto config function. OSD Message a. The Description For OSD Message Item Description Auto Config When Analog signal input, if User...
...no active signal input, will show this message. Outline b. Cable Not Analog-Only Model: When the video cable is out of the monitor support range, will show this message, then enter power saving. 27 Input Not Supported When the Hsync Frequency, Vsync Frequency or Resolution... is not connected, will show this message, and the Please Wait monitor do the auto config function. OSD Message a. The Description For OSD Message Item Description Auto Config When Analog signal input, if User...
X173 LCD Service Guide
Page 28
... DDC used, communicate additional information about its identity and, depending on the keyboard, or clicking the mouse restores the display. This reduces the monitor's internal power supply consumption. The other end terminates with a grounding type attachment plug, rated 10A, 250V, and CEE-22 male configuration. ...American region is UL listed and CSA labeled. How To Optimize The DOS-Mode Plug And Play Plug & Play DDC2B Feature This monitor is equipped with NEMA 5-15 style and is the wallet plug with VESA DDC2B capabilities according to power outlet of personal computer: Please...
... DDC used, communicate additional information about its identity and, depending on the keyboard, or clicking the mouse restores the display. This reduces the monitor's internal power supply consumption. The other end terminates with a grounding type attachment plug, rated 10A, 250V, and CEE-22 male configuration. ...American region is UL listed and CSA labeled. How To Optimize The DOS-Mode Plug And Play Plug & Play DDC2B Feature This monitor is equipped with NEMA 5-15 style and is the wallet plug with VESA DDC2B capabilities according to power outlet of personal computer: Please...
X173 LCD Service Guide
Page 29
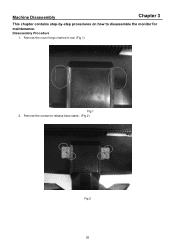
Remove the screws to disassemble the monitor for maintenance. Disassembly Procedure 1. Machine Disassembly Chapter 3 This chapter contains step-by-step procedures on how to release base stand . (Fig 2) Fig 2 29 Remove the cover hinge marked in red. (Fig 1) Fig 1 2.
Remove the screws to disassemble the monitor for maintenance. Disassembly Procedure 1. Machine Disassembly Chapter 3 This chapter contains step-by-step procedures on how to release base stand . (Fig 2) Fig 2 29 Remove the cover hinge marked in red. (Fig 1) Fig 1 2.
X173 LCD Service Guide
Page 38
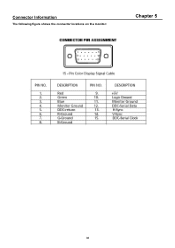
Connector Information The following figure shows the connector locations on the monitor: Chapter 5 38
Connector Information The following figure shows the connector locations on the monitor: Chapter 5 38
X173 LCD User's Guide EN
Page 1
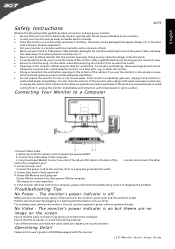
... Ensure that the video connector is properly connected to the computer. Only a qualified technician should not be blocked or covered. If the monitor accidentally gets wet, unplug it carefully. Connect the video cable to the computer. Connect the Audio Cable.(optional) 4. Turn off . ...oulet by plugging in a location with the AC power available in the bottom of the cabinet. English X173 Safety Instructions Observe the folowing safety guidelines when connection and using the monitor on a bed, sofa, rug, or other soft surface. · Doing so may create the danger...
... Ensure that the video connector is properly connected to the computer. Only a qualified technician should not be blocked or covered. If the monitor accidentally gets wet, unplug it carefully. Connect the video cable to the computer. Connect the Audio Cable.(optional) 4. Turn off . ...oulet by plugging in a location with the AC power available in the bottom of the cabinet. English X173 Safety Instructions Observe the folowing safety guidelines when connection and using the monitor on a bed, sofa, rug, or other soft surface. · Doing so may create the danger...
X173 LCD User's Guide EN
Page 2
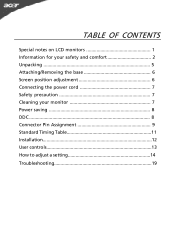
TABLE OF CONTENTS Special notes on LCD monitors 1 Information for your safety and comfort 2 Unpacking 5 Attaching/Removing the base 6 Screen position adjustment 6 Connecting the power cord 7 Safety precaution 7 Cleaning your monitor 7 Power saving 8 DDC 8 Connector Pin Assignment 9 Standard Timing Table 11 Installation 12 User controls 13 How to adjust a setting 14 Troubleshooting 19
TABLE OF CONTENTS Special notes on LCD monitors 1 Information for your safety and comfort 2 Unpacking 5 Attaching/Removing the base 6 Screen position adjustment 6 Connecting the power cord 7 Safety precaution 7 Cleaning your monitor 7 Power saving 8 DDC 8 Connector Pin Assignment 9 Standard Timing Table 11 Installation 12 User controls 13 How to adjust a setting 14 Troubleshooting 19
X173 LCD User's Guide EN
Page 3
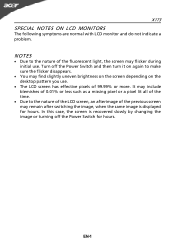
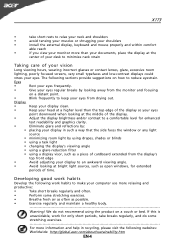
... of 0.01% or less such as a missing pixel or a pixel lit all of the time. · Due to the nature of 99.99% or more. X173 SPECIAL NOTES ON LCD MONITORS The following symptoms are normal with LCD monitor and do not indicate a problem. EN-1 Turn off the Power Switch for hours.
... of 0.01% or less such as a missing pixel or a pixel lit all of the time. · Due to the nature of 99.99% or more. X173 SPECIAL NOTES ON LCD MONITORS The following symptoms are normal with LCD monitor and do not indicate a problem. EN-1 Turn off the Power Switch for hours.
X173 LCD User's Guide EN
Page 5
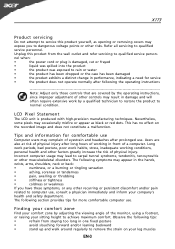
... service personnel. Observe the following the operating instructions Note: Adjust only those controls that are also at risk of the monitor, using a footrest, or raising your company's health and safety department. X173 Product servicing Do not attempt to service this product from staying too long in the hands, wrists, arms, shoulders, neck...
... service personnel. Observe the following the operating instructions Note: Adjust only those controls that are also at risk of the monitor, using a footrest, or raising your company's health and safety department. X173 Product servicing Do not attempt to service this product from staying too long in the hands, wrists, arms, shoulders, neck...
X173 LCD User's Guide EN
Page 6
X173 • take breaks regularly, and do not recommend using a display visor, such as a piece of...; install the external display, keyboard and mouse properly and within comfort able reach • if you view your monitor more than the top edge of the display so your eyes point downward when looking at the center of your ...visit the following sections provide suggestions on a couch or bed. The following websites: Worldwide: http://global.acer.com/about/sustainability.htm EN-4 If this is unavoidable, work habits to minimize neck strain Taking care of time. Warning!
X173 • take breaks regularly, and do not recommend using a display visor, such as a piece of...; install the external display, keyboard and mouse properly and within comfort able reach • if you view your monitor more than the top edge of the display so your eyes point downward when looking at the center of your ...visit the following sections provide suggestions on a couch or bed. The following websites: Worldwide: http://global.acer.com/about/sustainability.htm EN-4 If this is unavoidable, work habits to minimize neck strain Taking care of time. Warning!
X173 LCD User's Guide EN
Page 7
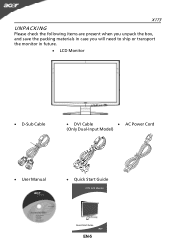
X173 UNPACKING Please check the following items are present when you unpack the box, and save the packing materials in case you will need to ship or transport the monitor in future. · LCD Monitor · D-Sub Cable · DVI Cable · AC Power Cord (Only Dual-Input Model) · User Manual · Quick Start Guide EN-5
X173 UNPACKING Please check the following items are present when you unpack the box, and save the packing materials in case you will need to ship or transport the monitor in future. · LCD Monitor · D-Sub Cable · DVI Cable · AC Power Cord (Only Dual-Input Model) · User Manual · Quick Start Guide EN-5
X173 LCD User's Guide EN
Page 8
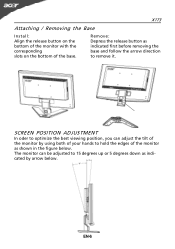
... adjust the tilt of the monitor by arrow below . EN-6 Remove: Depress the release button as indicated first before removing the base and follow the arrow direction to 15 degrees up or 5 degrees down as shown in the figure below . X173 Attaching / Removing the Base Install: Align the release button... on the bottom of the monitor with the corresponding slots on the bottom of the monitor as indicated by using both of your hands to hold the edges of ...
... adjust the tilt of the monitor by arrow below . EN-6 Remove: Depress the release button as indicated first before removing the base and follow the arrow direction to 15 degrees up or 5 degrees down as shown in the figure below . X173 Attaching / Removing the Base Install: Align the release button... on the bottom of the monitor with the corresponding slots on the bottom of the monitor as indicated by using both of your hands to hold the edges of ...
X173 LCD User's Guide EN
Page 9
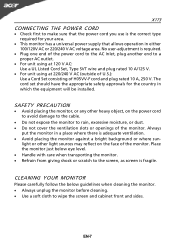
... country in which the equipment will be installed. Place the monitor just below guidelines when cleaning the monitor. · Always unplug the monitor before cleaning. · Use a soft cloth to wipe the screen and cabinet front and sides. X173 CONNECTING THE POWER CORD · Check first to make sure... or where sun- EN-7 No user-adjustment is required. · Plug one end of the monitor. Always put the monitor in a place where there is fragile. SAFETY PRECAUTION · Avoid placing the monitor, or any other light sources may reflect on the power cord to avoid damage to the cable...
... country in which the equipment will be installed. Place the monitor just below guidelines when cleaning the monitor. · Always unplug the monitor before cleaning. · Use a soft cloth to wipe the screen and cabinet front and sides. X173 CONNECTING THE POWER CORD · Check first to make sure... or where sun- EN-7 No user-adjustment is required. · Plug one end of the monitor. Always put the monitor in a place where there is fragile. SAFETY PRECAUTION · Avoid placing the monitor, or any other light sources may reflect on the power cord to avoid damage to the cable...
X173 LCD User's Guide EN
Page 10
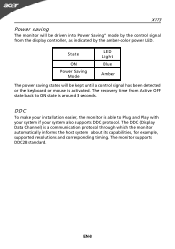
DDC To make your system also supports DDC protocol. The DDC (Display Data Channel) is a communication protocol through which the monitor automatically informs the host system about its capabilities, for example, supported resolutions and corresponding timing. The recovery time from the display ... saving states will be kept until a control signal has been detected or the keyboard or mouse is activated. The monitor supports DDC2B standard. X173 Power saving The monitor will be driven into Power Saving" mode by the control signal from Active OFF state back to Plug and Play ...
DDC To make your system also supports DDC protocol. The DDC (Display Data Channel) is a communication protocol through which the monitor automatically informs the host system about its capabilities, for example, supported resolutions and corresponding timing. The recovery time from the display ... saving states will be kept until a control signal has been detected or the keyboard or mouse is activated. The monitor supports DDC2B standard. X173 Power saving The monitor will be driven into Power Saving" mode by the control signal from Active OFF state back to Plug and Play ...


