
X173 LCD Service Guide
Page 4
... for whatever reason, a part number change is no guarantee that interference will not occur in a particular installation. However, there is made, it supports, please read the following measures: 1. It is connected. 4. For ACER-AUTHORIZED SERVICE PROVIDERS, your regional office may have a DIFFERENT part number code to those given in the FRU list of the user to order FRU parts for Acer's "global" product offering...
... for whatever reason, a part number change is no guarantee that interference will not occur in a particular installation. However, there is made, it supports, please read the following measures: 1. It is connected. 4. For ACER-AUTHORIZED SERVICE PROVIDERS, your regional office may have a DIFFERENT part number code to those given in the FRU list of the user to order FRU parts for Acer's "global" product offering...
X173 LCD Service Guide
Page 5
.... In this case, the screen is displayed for ventilation. z Unplug the unit during initial use. z Do not overload power strips and extension cords. Never spill liquids on the monitor cabinet. Notes z Due to make sure the flicker disappears. z Do not place the monitor on a wall or shelf, uses a mounting kit approved by changing the image or turning off the Power Switch and then turn it will not be...
.... In this case, the screen is displayed for ventilation. z Unplug the unit during initial use. z Do not overload power strips and extension cords. Never spill liquids on the monitor cabinet. Notes z Due to make sure the flicker disappears. z Do not place the monitor on a wall or shelf, uses a mounting kit approved by changing the image or turning off the Power Switch and then turn it will not be...
X173 LCD Service Guide
Page 6
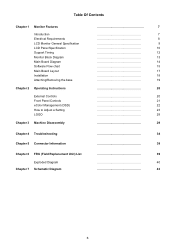
...Features Introduction Electrical Requirements LCD Monitor General Specification LCD Panel Specification Support Timing Monitor Block Diagram Main Board Diagram Software Flow chart Main Board Layout Installation Attaching/Removing the base Chapter 2 Operating Instructions External Controls Front Panel Controls eColor Management (OSD) How to Adjust a Setting LOGO Chapter 3 Machine Disassembly Chapter 4 Troubleshooting Chapter 5 Connector Information Chapter 6 FRU (Field Replacement Unit) List Exploded Diagram Chapter 7 Schematic Diagram 7 7 8 9 10 12 13 14...
...Features Introduction Electrical Requirements LCD Monitor General Specification LCD Panel Specification Support Timing Monitor Block Diagram Main Board Diagram Software Flow chart Main Board Layout Installation Attaching/Removing the base Chapter 2 Operating Instructions External Controls Front Panel Controls eColor Management (OSD) How to Adjust a Setting LOGO Chapter 3 Machine Disassembly Chapter 4 Troubleshooting Chapter 5 Connector Information Chapter 6 FRU (Field Replacement Unit) List Exploded Diagram Chapter 7 Schematic Diagram 7 7 8 9 10 12 13 14...
X173 LCD Service Guide
Page 7
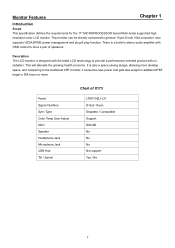
... Scope This specification defines the requirements for the 17" MICROPROCESSOR based Multi-mode supported high resolution color LCD monitor. This monitor can be directly connected to the traditional CRT monitor, it consumes less power and gets less weight in stereo audio amplifier with no radiation. It is designed with the latest LCD technology to provide a performance oriented product with OSD control to drive a pair of X173 LTM170EU-L31...
... Scope This specification defines the requirements for the 17" MICROPROCESSOR based Multi-mode supported high resolution color LCD monitor. This monitor can be directly connected to the traditional CRT monitor, it consumes less power and gets less weight in stereo audio amplifier with no radiation. It is designed with the latest LCD technology to provide a performance oriented product with OSD control to drive a pair of X173 LTM170EU-L31...

X173 LCD Service Guide
Page 9
Resolution 1280 × 1024 @75Hz EPA ENERGY STAR® ON Mode OFF Mode < 40W < 1W Input Connector D-Sub 15pin Input Video Signal Analog:0.7 Vpp (standard), Power Source 90~...starting 9 Dot Clock 140MHz Max. LCD Monitor General Specification Driving system TFT Color LCD Active Display Area 337.92(H) × 270.336mm(V) LCD Panel Pixel pitch 0.264mm(H) × 0.264mm(W) Viewable angle (H) 90°+/-20° and (V) 90°+/-20° Response time 5ms Separate Sync. H/V TTL Input H-Frequency 30kHz - 80kHz V-Frequency 55-75Hz Display Colors 16.7M Colors...
Resolution 1280 × 1024 @75Hz EPA ENERGY STAR® ON Mode OFF Mode < 40W < 1W Input Connector D-Sub 15pin Input Video Signal Analog:0.7 Vpp (standard), Power Source 90~...starting 9 Dot Clock 140MHz Max. LCD Monitor General Specification Driving system TFT Color LCD Active Display Area 337.92(H) × 270.336mm(V) LCD Panel Pixel pitch 0.264mm(H) × 0.264mm(W) Viewable angle (H) 90°+/-20° and (V) 90°+/-20° Response time 5ms Separate Sync. H/V TTL Input H-Frequency 30kHz - 80kHz V-Frequency 55-75Hz Display Colors 16.7M Colors...
X173 LCD Service Guide
Page 16
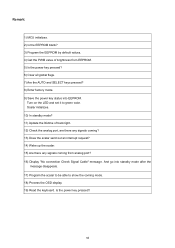
... there any signals coming from EEPROM. 5) Is the power key pressed? 6) Clear all global flags. 7) Are the AUTO and SELECT keys pressed? 8) Enter factory mode. 9) Save the power key status into standby mode after the message disappears. 17) Program the scalar to be able to green color. Scalar initializes. 10) In standby mode? 11) Update the lifetime of brightness from analog port? 16) Display "No connection Check Signal Cable" message.
... there any signals coming from EEPROM. 5) Is the power key pressed? 6) Clear all global flags. 7) Are the AUTO and SELECT keys pressed? 8) Enter factory mode. 9) Save the power key status into standby mode after the message disappears. 17) Program the scalar to be able to green color. Scalar initializes. 10) In standby mode? 11) Update the lifetime of brightness from analog port? 16) Display "No connection Check Signal Cable" message.

X173 LCD Service Guide
Page 20
... front panel of the monitor. External Controls Item 1. 2. 3. The power indicator will light up. Description Power Switch Power LED Empowering / Exit Item 4. 5. 6. By changing these settings, the picture can be adjusted to your personal preferences. • The power cord should be connected. • Connect the video cable from the monitor to the video card. • Press the power button to turn on or off. Operating Instructions Chapter 2 Press the power button to turn the monitor on the monitor position. Description Auto Adjust botton/Exit < / > MENU...
... front panel of the monitor. External Controls Item 1. 2. 3. The power indicator will light up. Description Power Switch Power LED Empowering / Exit Item 4. 5. 6. By changing these settings, the picture can be adjusted to your personal preferences. • The power cord should be connected. • Connect the video cable from the monitor to the video card. • Press the power button to turn on or off. Operating Instructions Chapter 2 Press the power button to turn the monitor on the monitor position. Description Auto Adjust botton/Exit < / > MENU...
X173 LCD Service Guide
Page 28
... a video input signal. After the video input signal is restored, full power is restored and the display is equipped with units intended for the power cord shall be non-functional if there is no video input signals this monitor to be 125 volts AC. Pressing a key on type connector body, rated 10A, 250V, having standard CEE-22 female configuration. Supplied with VESA DDC2B capabilities according to use a cord set by reducing power...
... a video input signal. After the video input signal is restored, full power is restored and the display is equipped with units intended for the power cord shall be non-functional if there is no video input signals this monitor to be 125 volts AC. Pressing a key on type connector body, rated 10A, 250V, having standard CEE-22 female configuration. Supplied with VESA DDC2B capabilities according to use a cord set by reducing power...

X173 LCD User's Guide EN
Page 1
...-Input Model) Connect one end of the 24-pin DVI cable to the back of the end to a properly grounded AC outlet. 3. Try another power cable on the screen. Turn off . Also, avoid using your monitor: · Be sure that your monitor is properly connected to perform this monitor LCD Monitor Quick Setup Guide Make sure the monitor power cable is off the monitor and check the video cable pins. No Video - You can clean the exterior of the monitor...
...-Input Model) Connect one end of the 24-pin DVI cable to the back of the end to a properly grounded AC outlet. 3. Try another power cable on the screen. Turn off . Also, avoid using your monitor: · Be sure that your monitor is properly connected to perform this monitor LCD Monitor Quick Setup Guide Make sure the monitor power cable is off the monitor and check the video cable pins. No Video - You can clean the exterior of the monitor...
X173 LCD User's Guide EN
Page 2
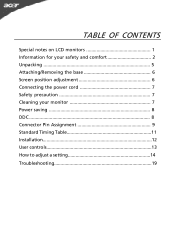
TABLE OF CONTENTS Special notes on LCD monitors 1 Information for your safety and comfort 2 Unpacking 5 Attaching/Removing the base 6 Screen position adjustment 6 Connecting the power cord 7 Safety precaution 7 Cleaning your monitor 7 Power saving 8 DDC 8 Connector Pin Assignment 9 Standard Timing Table 11 Installation 12 User controls 13 How to adjust a setting 14 Troubleshooting 19
TABLE OF CONTENTS Special notes on LCD monitors 1 Information for your safety and comfort 2 Unpacking 5 Attaching/Removing the base 6 Screen position adjustment 6 Connecting the power cord 7 Safety precaution 7 Cleaning your monitor 7 Power saving 8 DDC 8 Connector Pin Assignment 9 Standard Timing Table 11 Installation 12 User controls 13 How to adjust a setting 14 Troubleshooting 19
X173 LCD User's Guide EN
Page 4
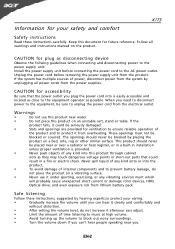
... afteryour ears adjust. • Limit the amount of time listening to music at high volume. • Avoid turning up the volume to unplug the power cord from the electrical outlet. Keep this product on the product. CAUTION for plug as disconnecting device Observe the follwing guidelines when connecting and disconnecting power to the power supply unit: Install the power supply unit before removing the power supply unit from...
... afteryour ears adjust. • Limit the amount of time listening to music at high volume. • Avoid turning up the volume to unplug the power cord from the electrical outlet. Keep this product on the product. CAUTION for plug as disconnecting device Observe the follwing guidelines when connecting and disconnecting power to the power supply unit: Install the power supply unit before removing the power supply unit from...
X173 LCD User's Guide EN
Page 5
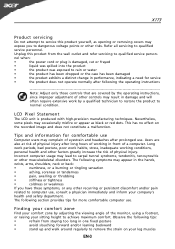
... product was exposed to remove the strain on the recorded image and does not constitute a malfunction. nel when: • the power cord or plug is produced with high-precision manufacturing techniques. Tips and information for comfortable use , consult a physician immediately and inform your leg muscles EN-3 Long work periods, bad posture, poor work by adjusting the viewing angle of physical...
... product was exposed to remove the strain on the recorded image and does not constitute a malfunction. nel when: • the power cord or plug is produced with high-precision manufacturing techniques. Tips and information for comfortable use , consult a physician immediately and inform your leg muscles EN-3 Long work periods, bad posture, poor work by adjusting the viewing angle of physical...
X173 LCD User's Guide EN
Page 7
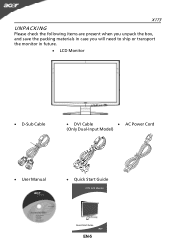
X173 UNPACKING Please check the following items are present when you unpack the box, and save the packing materials in case you will need to ship or transport the monitor in future. · LCD Monitor · D-Sub Cable · DVI Cable · AC Power Cord (Only Dual-Input Model) · User Manual · Quick Start Guide EN-5
X173 UNPACKING Please check the following items are present when you unpack the box, and save the packing materials in case you will need to ship or transport the monitor in future. · LCD Monitor · D-Sub Cable · DVI Cable · AC Power Cord (Only Dual-Input Model) · User Manual · Quick Start Guide EN-5
X173 LCD User's Guide EN
Page 9
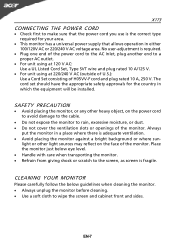
... (outside of U.S.): Use a Cord Set consisting of the monitor. EN-7 light or other heavy object, on the face of H05VV-F cord and plug rated 10 A, 250 V. The cord set should have the appropriate safety approvals for your area. · This monitor has a universal power supply that allows operation in which the equipment will be installed. X173 CONNECTING THE POWER CORD · Check first to the screen, as screen is fragile. SAFETY...
... (outside of U.S.): Use a Cord Set consisting of the monitor. EN-7 light or other heavy object, on the face of H05VV-F cord and plug rated 10 A, 250 V. The cord set should have the appropriate safety approvals for your area. · This monitor has a universal power supply that allows operation in which the equipment will be installed. X173 CONNECTING THE POWER CORD · Check first to the screen, as screen is fragile. SAFETY...
X173 LCD User's Guide EN
Page 10
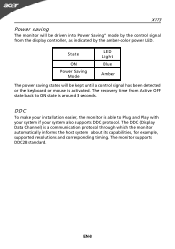
... from the display controller, as indicated by the control signal from Active OFF state back to Plug and Play with your system if your installation easier, the monitor is a communication protocol through which the monitor automatically informs the host system about its capabilities, for example, supported resolutions and corresponding timing. X173 Power saving The monitor will be driven into Power Saving" mode by the amber-color power LED. The monitor supports DDC2B...
... from the display controller, as indicated by the control signal from Active OFF state back to Plug and Play with your system if your installation easier, the monitor is a communication protocol through which the monitor automatically informs the host system about its capabilities, for example, supported resolutions and corresponding timing. X173 Power saving The monitor will be driven into Power Saving" mode by the amber-color power LED. The monitor supports DDC2B...
X173 LCD User's Guide EN
Page 17
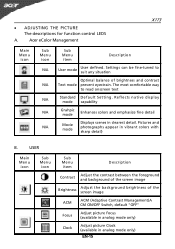
... function control LEDS A. Acer eColor Management X173 Main Menu icon Sub Menu icon N/A N/A N/A N/A N/A Sub Menu item Description User mode User defined. USER Main Menu icon Sub Menu icon Sub Menu item Description Contrast Adjust the contrast between the foreground and background of the screen image Brightness Adjust the background brightness of brightness and contrast Text mode prevent eyestrain. The most comfortable way to suit any situation Optimal balance of the screen image ACM ACM (Adaptive Contrast Management)A CM ON/OFF Switch, default...
... function control LEDS A. Acer eColor Management X173 Main Menu icon Sub Menu icon N/A N/A N/A N/A N/A Sub Menu item Description User mode User defined. USER Main Menu icon Sub Menu icon Sub Menu item Description Contrast Adjust the contrast between the foreground and background of the screen image Brightness Adjust the background brightness of brightness and contrast Text mode prevent eyestrain. The most comfortable way to suit any situation Optimal balance of the screen image ACM ACM (Adaptive Contrast Management)A CM ON/OFF Switch, default...
X173 LCD User's Guide EN
Page 19
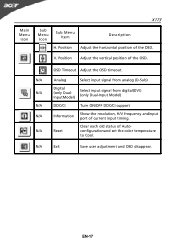
OSD Timeout Adjust the OSD timeout. N/A Exit Save user adjustment and OSD disappear. EN-17 N/A Analog Select input signal from analog (D-Sub) N/A Digital (only DualInputModel) Select input signal from digital(DVI) (only Dual-Input Model) N/A DDC/CI Turn ON/OFF DDC/CI support N/A Information Show the resolution, H/V frequency andinput port of the OSD. V. Position Adjust the vertical position of current input timing. Main Menu Icon X173 Sub Menu Icon Sub Menu Item H. N/A Reset Clear each old status of the OSD. Position Description Adjust the horizontal...
OSD Timeout Adjust the OSD timeout. N/A Exit Save user adjustment and OSD disappear. EN-17 N/A Analog Select input signal from analog (D-Sub) N/A Digital (only DualInputModel) Select input signal from digital(DVI) (only Dual-Input Model) N/A DDC/CI Turn ON/OFF DDC/CI support N/A Information Show the resolution, H/V frequency andinput port of the OSD. V. Position Adjust the vertical position of current input timing. Main Menu Icon X173 Sub Menu Icon Sub Menu Item H. N/A Reset Clear each old status of the OSD. Position Description Adjust the horizontal...
X173 LCD User's Guide EN
Page 21
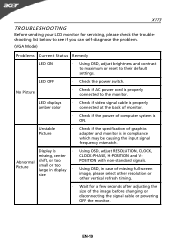
... the specification of graphics adapter and monitor is properly connected to their default settings. LED displays amber color · Check if video signal cable is properly connected at the back of monitor. · Check if the power of missing full-screen size image, please select other resolution or other vertical refresh timing. · Wait for servicing, please check the troubleshooting list below to see if you can self-diagnose the problem. (VGA Mode) Problems Current Status Remedy LED ON · Using OSD, adjust brightness and contrast...
... the specification of graphics adapter and monitor is properly connected to their default settings. LED displays amber color · Check if video signal cable is properly connected at the back of monitor. · Check if the power of missing full-screen size image, please select other resolution or other vertical refresh timing. · Wait for servicing, please check the troubleshooting list below to see if you can self-diagnose the problem. (VGA Mode) Problems Current Status Remedy LED ON · Using OSD, adjust brightness and contrast...
X173 LCD User's Guide EN
Page 22
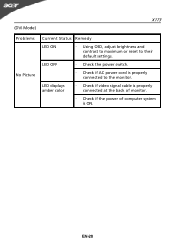
(DVI Mode) X173 Problems No Picture Current Status Remedy LED ON · Using OSD, adjust brightness and contrast to maximum or reset to the monitor. LED OFF · Check the power switch. · Check if AC power cord is ON. LED displays amber color · Check if video signal cable is properly connected at the back of monitor. · Check if the power of computer system is properly connected to their default settings. EN-20
(DVI Mode) X173 Problems No Picture Current Status Remedy LED ON · Using OSD, adjust brightness and contrast to maximum or reset to the monitor. LED OFF · Check the power switch. · Check if AC power cord is ON. LED displays amber color · Check if video signal cable is properly connected at the back of monitor. · Check if the power of computer system is properly connected to their default settings. EN-20
X173 LCD User's Guide EN
Page 26
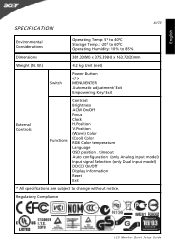
... Auto configuration (only Analog input model) Input signal Selection (only Dual input model) DDCCI On/Off Display information Reset Exit * All specifications are subject to 85% Dimensions 381.33(W) x 375.39(H) x 163.72(D)mm Weight (N. Regulatory Compliance LCD Monitor Quick Setup Guide W.) 4.2 kg Unit (net) Switch Power Button MENU/ENTER Automatic adjustment/ Exit Empowering Key/ Exit External Controls: Functions Contrast Brightness ACM On/Off Focus Clock H.Position V.Position (Warm) Color (Cool) Color RGB Color temperature Language OSD position . English X173 SPECIFICATION...
... Auto configuration (only Analog input model) Input signal Selection (only Dual input model) DDCCI On/Off Display information Reset Exit * All specifications are subject to 85% Dimensions 381.33(W) x 375.39(H) x 163.72(D)mm Weight (N. Regulatory Compliance LCD Monitor Quick Setup Guide W.) 4.2 kg Unit (net) Switch Power Button MENU/ENTER Automatic adjustment/ Exit Empowering Key/ Exit External Controls: Functions Contrast Brightness ACM On/Off Focus Clock H.Position V.Position (Warm) Color (Cool) Color RGB Color temperature Language OSD position . English X173 SPECIFICATION...

