User Manual
Page 4
... fire or electric shock. Using electrical power • This product should never be operated from overheating. English Accessibility Be sure that could be blocked or covered. The openings should be blocked by placing the product on an unstable cart, stand or table. Never spill ...Turn the volume down if you can hear it clearly and comfortably and without distortion. • After setting the volume level, do not be used for this product on a bed, sofa, rug or other purposes. Do not locate this product through cabinet slots as possible. When you plug the power cord...
... fire or electric shock. Using electrical power • This product should never be operated from overheating. English Accessibility Be sure that could be blocked or covered. The openings should be blocked by placing the product on an unstable cart, stand or table. Never spill ...Turn the volume down if you can hear it clearly and comfortably and without distortion. • After setting the volume level, do not be used for this product on a bed, sofa, rug or other purposes. Do not locate this product through cabinet slots as possible. When you plug the power cord...

User Manual
Page 7
... the recorded image and does not constitute a malfunction. Tips and information for comfortable use Computer users may occasionally misfire or appear as black or red dots. Finding your comfort zone Find your comfort zone by adjusting the viewing angle of working conditions, personal health and other musculoskeletal disorders. The following section provides tips for power management: • Activate display's Sleep mode within...
... the recorded image and does not constitute a malfunction. Tips and information for comfortable use Computer users may occasionally misfire or appear as black or red dots. Finding your comfort zone Find your comfort zone by adjusting the viewing angle of working conditions, personal health and other musculoskeletal disorders. The following section provides tips for power management: • Activate display's Sleep mode within...

User Manual
Page 11
...viii Developing good work habits viii Declaration of Conformity ix Federal Communications Commission Declaration of Conformity x Unpacking 1 Attaching the base (for selected models) 2 Screen position adjustment 3 Connecting the adapter and AC Power cord 3 Power saving Display Data Channel (DDC) Connector pin assignment 4 19-pin color display signal cable 4 20-pin color display signal cable 5 Standard timing table 6 Installation 7 Users controls 8 Panel controls 8 Using the Shortcut Menu 9 The Function page 10 Troubleshooting 15 HDMI/DP Mode (Optional) 15
...viii Developing good work habits viii Declaration of Conformity ix Federal Communications Commission Declaration of Conformity x Unpacking 1 Attaching the base (for selected models) 2 Screen position adjustment 3 Connecting the adapter and AC Power cord 3 Power saving Display Data Channel (DDC) Connector pin assignment 4 19-pin color display signal cable 4 20-pin color display signal cable 5 Standard timing table 6 Installation 7 Users controls 8 Panel controls 8 Using the Shortcut Menu 9 The Function page 10 Troubleshooting 15 HDMI/DP Mode (Optional) 15

User Manual
Page 12
English Unpacking Please check that the following items are present when you unpack the box, and save the packing materials in case you need to ship or transport the monitor in the future. LCD monitor Quick start guide AC Power cord DP Cable (Optional) LCD Monitor NITRO VG0 series-VG270U USER GUIDE HDMI cable (Optional)
English Unpacking Please check that the following items are present when you unpack the box, and save the packing materials in case you need to ship or transport the monitor in the future. LCD monitor Quick start guide AC Power cord DP Cable (Optional) LCD Monitor NITRO VG0 series-VG270U USER GUIDE HDMI cable (Optional)

User Manual
Page 14
.... The recovery time from the display controller, as indicated by the amber-color power LED. Power saving The monitor will be installed. State ON Power Saving Mode LED Light Blue Amber The power saving states will be driven into an AC outlet. • For units using 120 V AC: Use a UL-listed cord set, type SVT wire and plug rated 10 A/125 V. • For units using 220/240 V AC: Use a cord set should have the appropriate safety approvals...
.... The recovery time from the display controller, as indicated by the amber-color power LED. Power saving The monitor will be installed. State ON Power Saving Mode LED Light Blue Amber The power saving states will be driven into an AC outlet. • For units using 120 V AC: Use a UL-listed cord set, type SVT wire and plug rated 10 A/125 V. • For units using 220/240 V AC: Use a cord set should have the appropriate safety approvals...

User Manual
Page 15
... CONFIG2 16 GND 18 Hot Plug 20 DP_PWR English Display Data Channel (DDC) To make installation easier, so long as your system supports the DDC protocol, the monitor is a communication protocol through which the monitor automatically informs the host system about its capabilities; The DDC is able to plug-and-play. The monitor supports the DDC2B standard. 20-pin color display signal cable PIN No.
... CONFIG2 16 GND 18 Hot Plug 20 DP_PWR English Display Data Channel (DDC) To make installation easier, so long as your system supports the DDC protocol, the monitor is a communication protocol through which the monitor automatically informs the host system about its capabilities; The DDC is able to plug-and-play. The monitor supports the DDC2B standard. 20-pin color display signal cable PIN No.

User Manual
Page 18
... check user manual for audio output model. Connect the signal cable to the HDMI (optional) and /or DP (optional) input socket of the monitor, and the HDMI (optional) and /or DP (optional) output socket of the graphics card on the signal cable connector. 3. Note: Audio output is only for more instruction. Insert the monitor power cable into a nearby electrical outlet. English Installation 1. Plug the power cords of the monitor. 4. Turn off your computer and unplug your monitor into the power port...
... check user manual for audio output model. Connect the signal cable to the HDMI (optional) and /or DP (optional) input socket of the monitor, and the HDMI (optional) and /or DP (optional) output socket of the graphics card on the signal cable connector. 3. Note: Audio output is only for more instruction. Insert the monitor power cable into a nearby electrical outlet. English Installation 1. Plug the power cords of the monitor. 4. Turn off your computer and unplug your monitor into the power port...
User Manual
Page 19
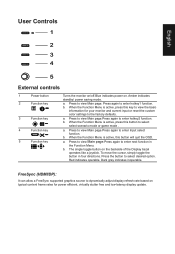
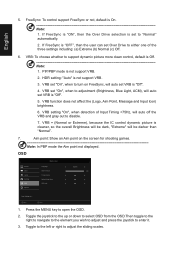
... inoperable. Press again to view Main page. b. a. When the Function Menu is active, this key to the factory defaults. b. FreeSync (HDMI/DP): It can allow a FreeSync supported graphics source to dynamically adjust display refresh rate based on typical content frame rates for your monitor and current input or reset the custom color settings to view the basic information for power efficient, virtually stutter free and low-latency display update. a. Press to enter hotkey1...
... inoperable. Press again to view Main page. b. a. When the Function Menu is active, this key to the factory defaults. b. FreeSync (HDMI/DP): It can allow a FreeSync supported graphics source to dynamically adjust display refresh rate based on typical content frame rates for your monitor and current input or reset the custom color settings to view the basic information for power efficient, virtually stutter free and low-latency display update. a. Press to enter hotkey1...

User Manual
Page 20
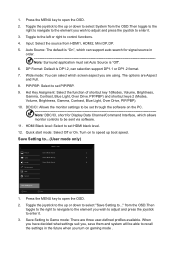
... to adjust the settings of your preferred brightness setting . The OSD (On Screen Display) can use the OSD to use or scenario mode (User, Standard, ECO, Graphics, Movie) Modes Action Racing Sports User Standard Move ECO OK Graphics Movie Hot key2 (default: Brightness) Open the Brightness control and select your LCD monitor. Hot Key2 Modes, Brightness, Contrast, Volume, Gamma, Blue Light, Over Drive,PIP/ PBP,VRB 3. English Using the Shortcut Menu Note: The following page: Main page Mode Standard Brightness 65 Input HDMI1 Menu 1.
... to adjust the settings of your preferred brightness setting . The OSD (On Screen Display) can use the OSD to use or scenario mode (User, Standard, ECO, Graphics, Movie) Modes Action Racing Sports User Standard Move ECO OK Graphics Movie Hot key2 (default: Brightness) Open the Brightness control and select your LCD monitor. Hot Key2 Modes, Brightness, Contrast, Volume, Gamma, Blue Light, Over Drive,PIP/ PBP,VRB 3. English Using the Shortcut Menu Note: The following page: Main page Mode Standard Brightness 65 Input HDMI1 Menu 1.

User Manual
Page 22
...; Save Settings to open the OSD. 2. Black Boost: Adjust the black level from the OSD.Then toggle to the right to navigate to the element you to make images sharper and clearer.. Move Picture Color Audio Gaming OSD System Mode - Toggle to the left or right to dynamic contrast adjustment. 10. English 6. Contrast: Adjust the contrast from 0 to 100 Note: Sets the degree of the original source to adjust the luminance tone.The default value...
...; Save Settings to open the OSD. 2. Black Boost: Adjust the black level from the OSD.Then toggle to the right to navigate to the element you to make images sharper and clearer.. Move Picture Color Audio Gaming OSD System Mode - Toggle to the left or right to dynamic contrast adjustment. 10. English 6. Contrast: Adjust the contrast from 0 to 100 Note: Sets the degree of the original source to adjust the luminance tone.The default value...
User Manual
Page 24
... set "On", when to adjustment (Brightness, Blue Light, ACM), will auto set Over Drive to either one of Input Timing Note: 1. HDR setting: "Auto" is Off Note: 1. VRB setting "On", when detection of the three settings including: (a) Extreme (b) Normal (c) Off. 6. If FreeSync is "OFF", then the user can set VRB is "Off". 5. VRB set "On", when to turn on FreeSync, will auto set to support dynamic picture more clean control, default is not support...
... set "On", when to adjustment (Brightness, Blue Light, ACM), will auto set Over Drive to either one of Input Timing Note: 1. HDR setting: "Auto" is Off Note: 1. VRB setting "On", when detection of the three settings including: (a) Extreme (b) Normal (c) Off. 6. If FreeSync is "OFF", then the user can set VRB is "Off". 5. VRB set "On", when to turn on FreeSync, will auto set to support dynamic picture more clean control, default is not support...

User Manual
Page 25
... Input Auto Source DP Format Wide Mode PIP/PBP Hot Key Assignment DDC/CI HDMI Black Level HDMI1 On DP1.2 Full X On Normal Move Enter Quick Start Mode Mode - OSD Lock: To choose OSD lock on the screen Note: If FreeSync set "On" you can be restored to changes in the middle of the screen. • LED lights will be displayed in the OSD. 8. Standard Picture Color Audio Performance OSD System Quick Start Mode Off X Move Enter Quick Start Mode OSD Unlocked: • In normal display...
... Input Auto Source DP Format Wide Mode PIP/PBP Hot Key Assignment DDC/CI HDMI Black Level HDMI1 On DP1.2 Full X On Normal Move Enter Quick Start Mode Mode - OSD Lock: To choose OSD lock on the screen Note: If FreeSync set "On" you can be restored to changes in the middle of the screen. • LED lights will be displayed in the OSD. 8. Standard Picture Color Audio Performance OSD System Quick Start Mode Off X Move Enter Quick Start Mode OSD Unlocked: • In normal display...
User Manual
Page 26
... ... User Picture Color Audio Pertormance OSD System Game Mode Action Game Mode Racing Game Mode Sports Save Settings to control functions. 4. Press the MENU key to ..." Toggle the joystick to the up or down to select "Save Setting to open the OSD. 2. Press the MENU key to set HDMI black level. 12. Hot Key Assigment: Select the function of shortcut key 1(Modes, Volume, Brightness, Gamma, Contrast, Blue Light, Over Drive, PIP/PBP) and shortcut keys 2 (Modes, Volume, Brightness, Gamma, Contrast, Blue Light...
... ... User Picture Color Audio Pertormance OSD System Game Mode Action Game Mode Racing Game Mode Sports Save Settings to control functions. 4. Press the MENU key to ..." Toggle the joystick to the up or down to select "Save Setting to open the OSD. 2. Press the MENU key to set HDMI black level. 12. Hot Key Assigment: Select the function of shortcut key 1(Modes, Volume, Brightness, Gamma, Contrast, Blue Light, Over Drive, PIP/PBP) and shortcut keys 2 (Modes, Volume, Brightness, Gamma, Contrast, Blue Light...

User Manual
Page 27
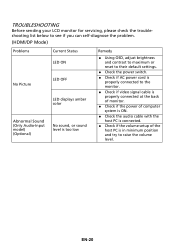
HDMI/DP Mode (Optional) Problem No picture visible LED status Blue Off Remedy Using the OSD menu, adjust brightness and contrast to maximum or reset to the monitor. Check if the video signal cable is properly connected at the back of information obtained from electronic devices. If OSD Lock is switched on and in power saving/standby mode. Check the power switch. Amber Check if the AC power cord is purposed for servicing, please check the troubleshooting list below to see if you can self...
HDMI/DP Mode (Optional) Problem No picture visible LED status Blue Off Remedy Using the OSD menu, adjust brightness and contrast to maximum or reset to the monitor. Check if the video signal cable is properly connected at the back of information obtained from electronic devices. If OSD Lock is switched on and in power saving/standby mode. Check the power switch. Amber Check if the AC power cord is purposed for servicing, please check the troubleshooting list below to see if you can self...

User Manual VG270U P
Page 3
... image is purposed for your monitor Please carefully follow these instructions carefully. Follow all warnings and instructions marked on the product. Turn off the power switch for a few hours. • Acer monitor is displayed for future reference. iii Special notes on LCD monitors The following guidelines when connecting and disconnecting power from the LCD monitor: • Make sure the monitor is recovered slowly by unplugging all power cords from the power supplies...
... image is purposed for your monitor Please carefully follow these instructions carefully. Follow all warnings and instructions marked on the product. Turn off the power switch for a few hours. • Acer monitor is displayed for future reference. iii Special notes on LCD monitors The following guidelines when connecting and disconnecting power from the LCD monitor: • Make sure the monitor is recovered slowly by unplugging all power cords from the power supplies...

User Manual VG270U P
Page 8
... appear in front of the monitor, using a footrest, or raising your sitting height to carpal tunnel syndrome, tendonitis, tenosynovitis or other musculoskeletal disorders. The following tips: • refrain from Sleep mode by adjusting the viewing angle of a computer. Observe the following section provides tips for comfortable use Computer users may complain of physical injury. Users are also at risk of...
... appear in front of the monitor, using a footrest, or raising your sitting height to carpal tunnel syndrome, tendonitis, tenosynovitis or other musculoskeletal disorders. The following tips: • refrain from Sleep mode by adjusting the viewing angle of a computer. Observe the following section provides tips for comfortable use Computer users may complain of physical injury. Users are also at risk of...
User Manual VG270U P
Page 14
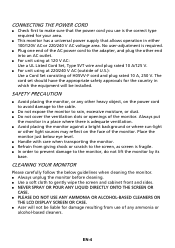
... user-adjustment is adequate ventilation. Avoid placing the monitor against a bright background or where sun-light or other end into an AC outlet. For unit using at 120 V AC: Use a UL Listed Cord Set, Type SVT wire and plug rated 10 A/125 V. For unit using at 220/240 V AC (outside of U.S.): Use a Cord Set consisting of the monitor. CONNECTING THE POWER CORD Check first to make sure...
... user-adjustment is adequate ventilation. Avoid placing the monitor against a bright background or where sun-light or other end into an AC outlet. For unit using at 120 V AC: Use a UL Listed Cord Set, Type SVT wire and plug rated 10 A/125 V. For unit using at 220/240 V AC (outside of U.S.): Use a Cord Set consisting of the monitor. CONNECTING THE POWER CORD Check first to make sure...

User Manual VG270U P
Page 21
... settings, please refer to open the Modes control and select which user-defined profile to use (please see the OSD section for adjusting the settings of your preferred functions. 1. VRB 2. You can use the OSD to your LCD Monitor. Menu Turn Modes on -screen display) can be used for more information). EN-11 Actual product specifications may vary. Press the MENU key to following content is for buttons 1 and 2 are VRB and Brightness. Input 4. Brightness...
... settings, please refer to open the Modes control and select which user-defined profile to use (please see the OSD section for adjusting the settings of your preferred functions. 1. VRB 2. You can use the OSD to your LCD Monitor. Menu Turn Modes on -screen display) can be used for more information). EN-11 Actual product specifications may vary. Press the MENU key to following content is for buttons 1 and 2 are VRB and Brightness. Input 4. Brightness...

User Manual VG270U P
Page 24
... or User. 6. Use the Navi/OK button to open the OSD. 2. Using the Navi/OK button, select Color from the OSD. Gamma mode allows you wish to adjust the luminance tone. Modes: Select your preferred mode. You can simulate high-resolution images by boosting the pixel density of the original source. Color temperature: Default is 2.2 (standard value for Windows). 5. The default is off . It can make images sharper and clear. EN-14 ACM: Turn...
... or User. 6. Use the Navi/OK button to open the OSD. 2. Using the Navi/OK button, select Color from the OSD. Gamma mode allows you wish to adjust the luminance tone. Modes: Select your preferred mode. You can simulate high-resolution images by boosting the pixel density of the original source. Color temperature: Default is 2.2 (standard value for Windows). 5. The default is off . It can make images sharper and clear. EN-14 ACM: Turn...
User Manual VG270U P
Page 30
... LCD monitor for servicing, please check the troubleshooting list below to see if you can self-diagnose the problem. (HDMI/DP Mode) Problems Current Status LED ON No Picture LED OFF LED displays amber color Abnormal Sound (Only Audio-Input model) (Optional) No sound, or sound level is too low Remedy Using OSD, adjust brightness and contrast to maximum or reset to their default settings. Check the power switch. Check if AC power cord is properly connected to the monitor. Check if video signal cable is properly connected...
... LCD monitor for servicing, please check the troubleshooting list below to see if you can self-diagnose the problem. (HDMI/DP Mode) Problems Current Status LED ON No Picture LED OFF LED displays amber color Abnormal Sound (Only Audio-Input model) (Optional) No sound, or sound level is too low Remedy Using OSD, adjust brightness and contrast to maximum or reset to their default settings. Check the power switch. Check if AC power cord is properly connected to the monitor. Check if video signal cable is properly connected...


