
User Manual
Page 2
... the model number, serial number, purchase date and place of this manual or supplementary documents and publications. All correspondence concerning your computer. Other companies' product names or trademarks are registered trademarks of such revisions or changes. Acer LCD Monitor User's Guide Model number Serial number Date of purchase Place of purchase Acer and the Acer logo are used herein for a particular purpose. Copyright © 2012. This company makes no...
... the model number, serial number, purchase date and place of this manual or supplementary documents and publications. All correspondence concerning your computer. Other companies' product names or trademarks are registered trademarks of such revisions or changes. Acer LCD Monitor User's Guide Model number Serial number Date of purchase Place of purchase Acer and the Acer logo are used herein for a particular purpose. Copyright © 2012. This company makes no...
User Manual
Page 3
... you use . Turn off the power switch for a few hours. Information for your monitor Please carefully follow these instructions carefully. Keep this case, the screen is displayed for hours. Follow all warnings and instructions marked on the product. iii Special notes on LCD monitors The following guidelines when connecting and disconnecting power from the LCD monitor: • Make sure the monitor is attached to its base before connecting the power cord to...
... you use . Turn off the power switch for a few hours. Information for your monitor Please carefully follow these instructions carefully. Keep this case, the screen is displayed for hours. Follow all warnings and instructions marked on the product. iii Special notes on LCD monitors The following guidelines when connecting and disconnecting power from the LCD monitor: • Make sure the monitor is attached to its base before connecting the power cord to...
User Manual
Page 4
... you plug the power cord into is easily accessible and located as close to the equipment operator as they may touch dangerous voltage points or short-out parts that the total The openings should be blocked by placing the product on an unstable cart, stand or table. When you need to disconnect power from the equipment, be blocked or covered.
... you plug the power cord into is easily accessible and located as close to the equipment operator as they may touch dangerous voltage points or short-out parts that the total The openings should be blocked by placing the product on an unstable cart, stand or table. When you need to disconnect power from the equipment, be blocked or covered.

User Manual
Page 5
... protection from the wall outlet and refer servicing to qualified service personnel when: • the power cord or plug is not properly grounded may expose you need for details. Make sure the power outlet is a safety feature. If power strips are used, the load should not exceed 80% of the power strip's input rating. • This product's power cord is equipped with the supplied power supply cord set , make sure that the...
... protection from the wall outlet and refer servicing to qualified service personnel when: • the power cord or plug is not properly grounded may expose you need for details. Make sure the power outlet is a safety feature. If power strips are used, the load should not exceed 80% of the power strip's input rating. • This product's power cord is equipped with the supplied power supply cord set , make sure that the...

User Manual
Page 6
... the best working procedures to turn off your vehicle engine. Additional safety information Your device and its enhancements may result in damage and will often require extensive work by the operating instructions, since improper adjustment of other products. vi Note: Adjust only those controls that are covered by a qualified technician to restore the product to environmental protection and views recycling...
... the best working procedures to turn off your vehicle engine. Additional safety information Your device and its enhancements may result in damage and will often require extensive work by the operating instructions, since improper adjustment of other products. vi Note: Adjust only those controls that are covered by a qualified technician to restore the product to environmental protection and views recycling...

User Manual
Page 8
...; refrain from Sleep mode by adjusting the viewing angle of the monitor, using a footrest, or raising your sitting height to achieve maximum comfort. The following symptoms may lead to carpal tunnel syndrome, tendonitis, tenosynovitis or other musculoskeletal disorders. Finding your comfort zone Find your comfort zone by pushing the power button. Incorrect computer usage may appear in one fixed posture...
...; refrain from Sleep mode by adjusting the viewing angle of the monitor, using a footrest, or raising your sitting height to achieve maximum comfort. The following symptoms may lead to carpal tunnel syndrome, tendonitis, tenosynovitis or other musculoskeletal disorders. Finding your comfort zone Find your comfort zone by pushing the power button. Incorrect computer usage may appear in one fixed posture...

User Manual
Page 9
.... • Blink frequently to reduce eyestrain. ix Taking care of your vision Long viewing hours, wearing incorrect glasses or contact lenses, glare, excessive room lighting, poorly focused screens, very small typefaces and low-contrast displays could stress your display in such a way that the side faces the window or any light source • minimizing room light by looking at bright light sources, such as...
.... • Blink frequently to reduce eyestrain. ix Taking care of your vision Long viewing hours, wearing incorrect glasses or contact lenses, glare, excessive room lighting, poorly focused screens, very small typefaces and low-contrast displays could stress your display in such a way that the side faces the window or any light source • minimizing room light by looking at bright light sources, such as...
User Manual
Page 10
... the OSD menu. Acer ENERGY STAR qualified products: • Produce less heat and reduce cooling loads, and warmer climates. • Automatically go into "display sleep" within 5 minutes of climate change. What is proud to http://www.energystar.gov. Environmental Protection Agency. marks Note: This product qualifies for ENERGY STAR in the factory default settings which can save you money by "Factory Reset...
... the OSD menu. Acer ENERGY STAR qualified products: • Produce less heat and reduce cooling loads, and warmer climates. • Automatically go into "display sleep" within 5 minutes of climate change. What is proud to http://www.energystar.gov. Environmental Protection Agency. marks Note: This product qualifies for ENERGY STAR in the factory default settings which can save you money by "Factory Reset...
User Manual
Page 13
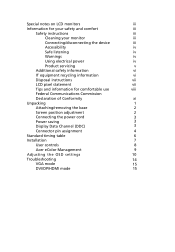
... servicing v Additional safety information vi IT equipment recycling information vi Disposal instructions vii LCD pixel statement vii Tips and information for comfortable use viii Federal Communications Commission Declaration of Conformity xi Unpacking 1 Attaching/removing the base 2 Screen position adjustment 2 Connecting the power cord 3 Power saving 3 Display Data Channel (DDC) 3 Connector pin assignment 4 Standard timing table 6 Installation 7 User controls 8 Acer eColor Management 9 Adjusting the OSD settings 10 Troubleshooting 14 VGA mode 15 DVI...
... servicing v Additional safety information vi IT equipment recycling information vi Disposal instructions vii LCD pixel statement vii Tips and information for comfortable use viii Federal Communications Commission Declaration of Conformity xi Unpacking 1 Attaching/removing the base 2 Screen position adjustment 2 Connecting the power cord 3 Power saving 3 Display Data Channel (DDC) 3 Connector pin assignment 4 Standard timing table 6 Installation 7 User controls 8 Acer eColor Management 9 Adjusting the OSD settings 10 Troubleshooting 14 VGA mode 15 DVI...

User Manual
Page 14
Unpacking Please check that the following items are present when you unpack the box, and save the packing materials in case you need to ship or transport the monitor in the future. LCD monitor Quick start guide *DP cable (Option) *D-sub cable (Option) *DVI cable (Option) *AC power cord *Audio Cable (Option) *HDMI Cable (Option) *Also the Replaceable parts required by the TCO Certified EN-1
Unpacking Please check that the following items are present when you unpack the box, and save the packing materials in case you need to ship or transport the monitor in the future. LCD monitor Quick start guide *DP cable (Option) *D-sub cable (Option) *DVI cable (Option) *AC power cord *Audio Cable (Option) *HDMI Cable (Option) *Also the Replaceable parts required by the TCO Certified EN-1

User Manual
Page 15
The monitor can adjust the monitor tilt by using both of your hands to hold the edges of the monitor as shown below. Screen position adjustment To optimize the viewing position, you can be adjusted to remove the base. Attaching the Base Note: Remove the monitor and monitor base from its packaging. use a cloth to avoid scratching the screen. ① ④② ③ Remove: Reverse the steps to 25 degrees up or 5 degrees down on a stable surface -- Carefully place the monitor face-down . 25 EN-2
The monitor can adjust the monitor tilt by using both of your hands to hold the edges of the monitor as shown below. Screen position adjustment To optimize the viewing position, you can be adjusted to remove the base. Attaching the Base Note: Remove the monitor and monitor base from its packaging. use a cloth to avoid scratching the screen. ① ④② ③ Remove: Reverse the steps to 25 degrees up or 5 degrees down on a stable surface -- Carefully place the monitor face-down . 25 EN-2
User Manual
Page 16
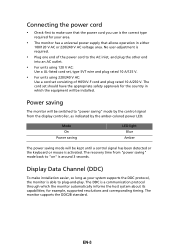
No user-adjustment is required. • Plug one end of H05VV-F cord and plug rated 10 A/250 V. Mode On Power saving LED light Blue Amber The power saving mode will be switched to "power saving" mode by the amber-colored power LED. The cord set consisting of the power cord to the AC inlet, and plug the other end into an AC outlet. • For units using 120 V AC: Use a UL-listed cord set, type SVT wire and plug rated 10 A/125 V. • For...
No user-adjustment is required. • Plug one end of H05VV-F cord and plug rated 10 A/250 V. Mode On Power saving LED light Blue Amber The power saving mode will be switched to "power saving" mode by the amber-colored power LED. The cord set consisting of the power cord to the AC inlet, and plug the other end into an AC outlet. • For units using 120 V AC: Use a UL-listed cord set, type SVT wire and plug rated 10 A/125 V. • For...

User Manual
Page 17
... (N.C. Connector pin assignment 1 5 6 10 11 15 15-pin color display signal cable PIN No. TMDS Data2 Shield 11. 3. TMDS Data0 Shield 17. 9. TMDS Data2- 12. 4. TMDS Data1 Shield 14. 6. Description 1 Red 2 Green 3 Blue 4 Monitor ground 5 DDC-return 6 R-ground 7 G-ground 8 B-ground PIN No. TMDS Data2+ 10. 2. Description 9 +5 V 10 Logic ground 11 Monitor ground 12 DDC-serial data 13 H-sync 14 V-sync 15 DDC-serial clock...
... (N.C. Connector pin assignment 1 5 6 10 11 15 15-pin color display signal cable PIN No. TMDS Data2 Shield 11. 3. TMDS Data0 Shield 17. 9. TMDS Data2- 12. 4. TMDS Data1 Shield 14. 6. Description 1 Red 2 Green 3 Blue 4 Monitor ground 5 DDC-return 6 R-ground 7 G-ground 8 B-ground PIN No. TMDS Data2+ 10. 2. Description 9 +5 V 10 Logic ground 11 Monitor ground 12 DDC-serial data 13 H-sync 14 V-sync 15 DDC-serial clock...

User Manual
Page 20
...-input models). (1) Make sure both the monitor and computer are switched off. (2) Connect one end of the 24-pin DVI cable to the back of replaceable parts, please refer to the above installation instructions. *Users may go to the local service network to the computer's port. b. This sequence is very important. 5 If the monitor does not function properly, please refer to the troubleshooting section to diagnose the problem. *POWER CORD specifications...
...-input models). (1) Make sure both the monitor and computer are switched off. (2) Connect one end of the 24-pin DVI cable to the back of replaceable parts, please refer to the above installation instructions. *Users may go to the local service network to the computer's port. b. This sequence is very important. 5 If the monitor does not function properly, please refer to the troubleshooting section to diagnose the problem. *POWER CORD specifications...
User Manual
Page 21
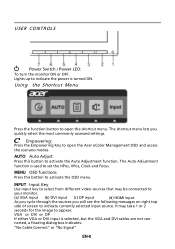
... Cable Connect" or "No Signal" EN-8 VGA or DVI or DP If either VGA or DVI input is turned ON. The shortcut menu lets you will see the following messages on right top side of screen to appear. Using the Shortcut Menu Press the function button to open the shortcut menu. Empowering: Press the Empowering Key to open the Acer eColor Management OSD and access the scenario modes. USER CONTROLS Power Switch / Power LED: To turn the monitor...
... Cable Connect" or "No Signal" EN-8 VGA or DVI or DP If either VGA or DVI input is turned ON. The shortcut menu lets you will see the following messages on right top side of screen to appear. Using the Shortcut Menu Press the function button to open the shortcut menu. Empowering: Press the Empowering Key to open the Acer eColor Management OSD and access the scenario modes. USER CONTROLS Power Switch / Power LED: To turn the monitor...
User Manual
Page 22
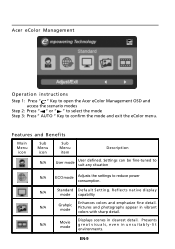
... mode Adjusts the settings to confirm the mode and exit the eColor menu. N/A Movie mode Displays scenes in unsuitably-lit environments. EN-9 N/A Standard D efau lt Settin g . Acer eColor Management Operation instructions Step 1: Press " " Key to open the Acer eColor Management OSD and access the scenario modes Step 2: Press " " or " " to select the mode Step 3: Press " AUTO " Key to reduce power consumption. Pictures and photographs appear in vibrant colors...
... mode Adjusts the settings to confirm the mode and exit the eColor menu. N/A Movie mode Displays scenes in unsuitably-lit environments. EN-9 N/A Standard D efau lt Settin g . Acer eColor Management Operation instructions Step 1: Press " " Key to open the Acer eColor Management OSD and access the scenario modes Step 2: Press " " or " " to select the mode Step 3: Press " AUTO " Key to reduce power consumption. Pictures and photographs appear in vibrant colors...

User Manual
Page 23
... MENU key to adjust the picture quality, OSD position and general settings. Actual product specifications may vary. You can use the OSD to open the OSD. For advanced settings, please refer to following content is for adjusting the settings of your LCD Monitor. EN-10 The OSD can be used to adjust the current Brightness, Contrast, Colour Temp, Auto Config and other image-related qualities. Then navigate to the picture element you wish to adjust. 3 Use...
... MENU key to adjust the picture quality, OSD position and general settings. Actual product specifications may vary. You can use the OSD to open the OSD. For advanced settings, please refer to following content is for adjusting the settings of your LCD Monitor. EN-10 The OSD can be used to adjust the current Brightness, Contrast, Colour Temp, Auto Config and other image-related qualities. Then navigate to the picture element you wish to adjust. 3 Use...
User Manual
Page 25
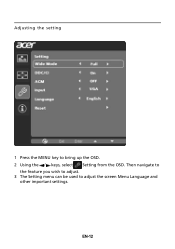
Adjusting the setting 1 Press the MENU key to adjust the screen Menu Language and other important settings. EN-12 Then navigate to the feature you wish to adjust. 3 The Setting menu can be used to bring up the OSD. 2 Using the / keys, select Setting from the OSD.
Adjusting the setting 1 Press the MENU key to adjust the screen Menu Language and other important settings. EN-12 Then navigate to the feature you wish to adjust. 3 The Setting menu can be used to bring up the OSD. 2 Using the / keys, select Setting from the OSD.
User Manual
Page 27
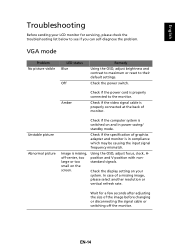
...-14 Check if the video signal cable is switched on and in compliance which may be causing the input signal frequency mismatch. Using the OSD, adjust focus, clock, Hposition and V-position with nonstandard signals. Unstable picture Abnormal picture Check if the computer system is properly connected at the back of a missing image, please select another resolution or vertical refresh rate. VGA mode Problem No picture visible LED status Blue Off Remedy Using the OSD, adjust brightness and contrast to maximum or reset to their default settings.
...-14 Check if the video signal cable is switched on and in compliance which may be causing the input signal frequency mismatch. Using the OSD, adjust focus, clock, Hposition and V-position with nonstandard signals. Unstable picture Abnormal picture Check if the computer system is properly connected at the back of a missing image, please select another resolution or vertical refresh rate. VGA mode Problem No picture visible LED status Blue Off Remedy Using the OSD, adjust brightness and contrast to maximum or reset to their default settings.
User Manual
Page 28
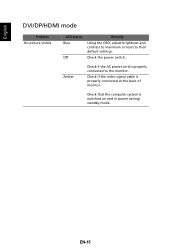
Check that the computer system is properly connected at the back of monitor. Check if the video signal cable is switched on and in power saving/ standby mode. Check the power switch. Amber Check if the AC power cord is properly connected to their default settings. EN-15 English DVI/DP/HDMI mode Problem No picture visible LED status Blue Off Remedy Using the OSD, adjust brightness and contrast to maximum or reset to the monitor.
Check that the computer system is properly connected at the back of monitor. Check if the video signal cable is switched on and in power saving/ standby mode. Check the power switch. Amber Check if the AC power cord is properly connected to their default settings. EN-15 English DVI/DP/HDMI mode Problem No picture visible LED status Blue Off Remedy Using the OSD, adjust brightness and contrast to maximum or reset to the monitor.


