
User Manual
Page 2
.... This company makes no representations or warranties, either expressed or implied, with respect to notify any means, electronically, mechanically, by photocopy, recording or otherwise, without obligation to the contents hereof and specifically disclaims the implied warranties of Acer Incorporated. All Rights Reserved. Acer LCD Monitor User Guide Model number Serial number Date of purchase Place of such revisions or changes. Such changes will be...
.... This company makes no representations or warranties, either expressed or implied, with respect to notify any means, electronically, mechanically, by photocopy, recording or otherwise, without obligation to the contents hereof and specifically disclaims the implied warranties of Acer Incorporated. All Rights Reserved. Acer LCD Monitor User Guide Model number Serial number Date of purchase Place of such revisions or changes. Such changes will be...

User Manual
Page 3
Turn off the power switch for future reference. Keep this case, the screen is displayed for your monitor Please carefully follow these instructions carefully. Special notes on LCD monitors The following are normal with the LCD monitor and do not indicate a problem. • Due to make sure the flicker disappears. • You may flicker during initial use . • The LCD screen has 99.99% or more effective pixels. In this document...
Turn off the power switch for future reference. Keep this case, the screen is displayed for your monitor Please carefully follow these instructions carefully. Special notes on LCD monitors The following are normal with the LCD monitor and do not indicate a problem. • Due to make sure the flicker disappears. • You may flicker during initial use . • The LCD screen has 99.99% or more effective pixels. In this document...
User Manual
Page 4
...; Turn the volume down if you can hear it clearly and comfortably and without distortion. • After setting the volume level, do not be operated from the electrical outlet. This product should be used for this monitor ,do not increase it after your dealer or local power company. • Do not allow anything to rest on the power cord.
...; Turn the volume down if you can hear it clearly and comfortably and without distortion. • After setting the volume level, do not be operated from the electrical outlet. This product should be used for this monitor ,do not increase it after your dealer or local power company. • Do not allow anything to rest on the power cord.
User Manual
Page 5
...; the product exhibits a distinct change in performance, indicating a need to replace the power cord set . Unplug this product yourself, as opening or removing covers may result in electric shock and/or injury. The plug only fits in a grounded power outlet. Also, make sure that the total rating of all servicing to qualified service personnel. Warning! Product servicing Do not attempt to service this product from unexpected noise...
...; the product exhibits a distinct change in performance, indicating a need to replace the power cord set . Unplug this product yourself, as opening or removing covers may result in electric shock and/or injury. The plug only fits in a grounded power outlet. Also, make sure that the total rating of all servicing to qualified service personnel. Warning! Product servicing Do not attempt to service this product from unexpected noise...

User Manual
Page 6
... of our other controls may contain small parts. IT Equipment Recycling Information Acer is strongly committed to this electronic device into the trash when discarding. Switch off the device near gas pumps at Acer are very conscious of the environmental effects of our business and strive to identify and provide the best working procedures to turn off your...
... of our other controls may contain small parts. IT Equipment Recycling Information Acer is strongly committed to this electronic device into the trash when discarding. Switch off the device near gas pumps at Acer are very conscious of the environmental effects of our business and strive to identify and provide the best working procedures to turn off your...

User Manual
Page 7
...the power button. Nevertheless, some pixels may appear in front of physical injury. Incorrect computer usage may complain of the monitor, using a footrest, or raising your sitting height to computer use, ...power management: • Activate display's Sleep mode within 15 minutes of user inactivity. • Activate computer's Sleep mode within 30 minutes of user inactivity. • Wake the computer from staying too long in one fixed posture • avoid slouching forward and/or leaning backward • stand up and walk around regularly to remove the strain on the recorded image...
...the power button. Nevertheless, some pixels may appear in front of physical injury. Incorrect computer usage may complain of the monitor, using a footrest, or raising your sitting height to computer use, ...power management: • Activate display's Sleep mode within 15 minutes of user inactivity. • Activate computer's Sleep mode within 30 minutes of user inactivity. • Wake the computer from staying too long in one fixed posture • avoid slouching forward and/or leaning backward • stand up and walk around regularly to remove the strain on the recorded image...

User Manual
Page 8
... window or any light source • minimizing room light by looking at the middle of the display. • Adjust the display brightness and/or contrast to a comfortable level for extended periods of your vision Long viewing hours, wearing incorrect glasses or contact lenses, glare, excessive room lighting, poorly focused screens, very small typefaces and low-contrast displays could stress your eyes regular breaks by using...
... window or any light source • minimizing room light by looking at the middle of the display. • Adjust the display brightness and/or contrast to a comfortable level for extended periods of your vision Long viewing hours, wearing incorrect glasses or contact lenses, glare, excessive room lighting, poorly focused screens, very small typefaces and low-contrast displays could stress your eyes regular breaks by using...
User Manual
Page 9
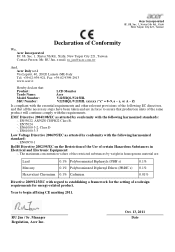
...are in Electrical and Electronic Equipment: -. Year to establishing a framework for the setting of ecodesign requirements for energy-related product. RU Jan / Sr. Manager Regulation, Acer Inc. EMC Directive 2004/108/EC as attested by conformity with the following ... Lepetit, 40, 20020 Lainate (MI) Italy Tel: +39-02-939-921, Fax: +39-02 9399-2913 www.acer.it Hereby declare that: Product: Trade Name: Model Number: SKU Number: LCD Monitor Acer V225HQL/V215HL V225HQL/V215HL xxxxxx ("x" = 0~9, a ~ z, or A ~ Z) Is compliant with the essential requirements and other relevant provisions...
...are in Electrical and Electronic Equipment: -. Year to establishing a framework for the setting of ecodesign requirements for energy-related product. RU Jan / Sr. Manager Regulation, Acer Inc. EMC Directive 2004/108/EC as attested by conformity with the following ... Lepetit, 40, 20020 Lainate (MI) Italy Tel: +39-02-939-921, Fax: +39-02 9399-2913 www.acer.it Hereby declare that: Product: Trade Name: Model Number: SKU Number: LCD Monitor Acer V225HQL/V215HL V225HQL/V215HL xxxxxx ("x" = 0~9, a ~ z, or A ~ Z) Is compliant with the essential requirements and other relevant provisions...

User Manual
Page 11
... Disposal instructions vi LCD pixel statement vii Tips and information for comfortable use vii Declaration of Conformity ix Federal Communications Commission Declaration of Conformity x Unpacking 1 Attaching the base (for selected models) 2 Screen position adjustment 3 Connecting the power cord 3 Power saving 3 Display Data Channel (DDC) 4 Connector pin assignment 4 15-pin color display signal cable 4 24-pin color display signal cable 5 19-pin color display signal cable 5 Standard timing table 6 Installation 7 Users controls 8 Front panel controls 8 Acer...
... Disposal instructions vi LCD pixel statement vii Tips and information for comfortable use vii Declaration of Conformity ix Federal Communications Commission Declaration of Conformity x Unpacking 1 Attaching the base (for selected models) 2 Screen position adjustment 3 Connecting the power cord 3 Power saving 3 Display Data Channel (DDC) 4 Connector pin assignment 4 15-pin color display signal cable 4 24-pin color display signal cable 5 19-pin color display signal cable 5 Standard timing table 6 Installation 7 Users controls 8 Front panel controls 8 Acer...

User Manual
Page 13
LCD monitor User guide Quick start guide LCD monitor D-sub cable HDMI cable (Optional) AC Power cord DVI cable (Optional) AC Adapter English 1 Unpacking Please check that the following items are present when you unpack the box, and save the packing materials in case you need to ship or transport the monitor in the future.
LCD monitor User guide Quick start guide LCD monitor D-sub cable HDMI cable (Optional) AC Power cord DVI cable (Optional) AC Adapter English 1 Unpacking Please check that the following items are present when you unpack the box, and save the packing materials in case you need to ship or transport the monitor in the future.

User Manual
Page 14
English 2 Attaching the base (for selected models) Note: Remove the monitor and monitor base from its packaging. Note: Take care when performing the installation to the base. 2 Ensure that the base is locked onto the monitor stand arm. Carefully place the monitor face-down on a stable surface -- use a cloth to avoid scratching the screen. 1 Attach the the monitor stand arm to avoid injuring yourself.
English 2 Attaching the base (for selected models) Note: Remove the monitor and monitor base from its packaging. Note: Take care when performing the installation to the base. 2 Ensure that the base is locked onto the monitor stand arm. Carefully place the monitor face-down on a stable surface -- use a cloth to avoid scratching the screen. 1 Attach the the monitor stand arm to avoid injuring yourself.
User Manual
Page 15
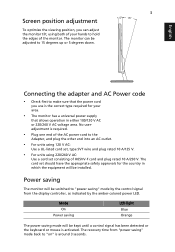
Power saving The monitor will be installed. The recovery time from "power saving" mode back to make sure that allows operation in which the equipment will be switched to "power saving" mode by the control signal from the display controller, as indicated by the amber-colored power LED. English Screen position adjustment 3 5 15 To optimize the viewing position, you use is the correct type required for your hands to the Adapter, and plug the other end into an AC outlet...
Power saving The monitor will be installed. The recovery time from "power saving" mode back to make sure that allows operation in which the equipment will be switched to "power saving" mode by the control signal from the display controller, as indicated by the amber-colored power LED. English Screen position adjustment 3 5 15 To optimize the viewing position, you use is the correct type required for your hands to the Adapter, and plug the other end into an AC outlet...
User Manual
Page 16
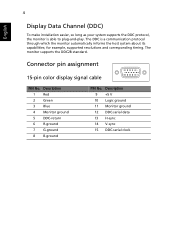
Connector pin assignment 15-pin color display signal cable 1 5 6 10 11 15 PIN No. Description 1 Red 2 Green 3 Blue 4 Monitor ground 5 DDC-return 6 R-ground 7 G-ground 8 B-ground PIN No. 4 English Display Data Channel (DDC) To make installation easier, so long as your system supports the DDC protocol, the monitor is a communication protocol through which the monitor automatically informs the host system about its capabilities; for example, supported resolutions and corresponding timing...
Connector pin assignment 15-pin color display signal cable 1 5 6 10 11 15 PIN No. Description 1 Red 2 Green 3 Blue 4 Monitor ground 5 DDC-return 6 R-ground 7 G-ground 8 B-ground PIN No. 4 English Display Data Channel (DDC) To make installation easier, so long as your system supports the DDC protocol, the monitor is a communication protocol through which the monitor automatically informs the host system about its capabilities; for example, supported resolutions and corresponding timing...

User Manual
Page 17
... (N.C. Description 13 NC 14 +5 V power 15 GND (return for +5 V hsync.vsync) 16 Hot-plug detection 17 TMDS data 0- 18 TMDS data 0+ 19 TMDS data 0/5 shield 20 NC 21 NC 22 TMDS clock shield 23 TMDS clock+ 24 DDC TMDS clock- 19-pin color display signal cable 1917151311 9 7 5 3 1 1816141210 8 6 4 2 PIN No. 5 24-pin color display signal cable English PIN No. Description 1 TMDS...
... (N.C. Description 13 NC 14 +5 V power 15 GND (return for +5 V hsync.vsync) 16 Hot-plug detection 17 TMDS data 0- 18 TMDS data 0+ 19 TMDS data 0/5 shield 20 NC 21 NC 22 TMDS clock shield 23 TMDS clock+ 24 DDC TMDS clock- 19-pin color display signal cable 1917151311 9 7 5 3 1 1816141210 8 6 4 2 PIN No. 5 24-pin color display signal cable English PIN No. Description 1 TMDS...
User Manual
Page 19
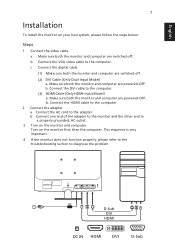
... adapter a Connect the AC cord to diagnose the problem DC D-Sub DVI HDMI D DC IN HDMI DVI 2 D-Sub Make sure both the monitor and computer are switched off . (2) DVI Cable (Only Dual-Input Model) a. This sequence is very important. 4 If the monitor does not function properly, please refer to the troubleshooting section to the adapter. Make sure both the monitor and computer are powered-OFF. Connect the DVI cable to a properly grounded, AC outlet. 3 Turn...
... adapter a Connect the AC cord to diagnose the problem DC D-Sub DVI HDMI D DC IN HDMI DVI 2 D-Sub Make sure both the monitor and computer are switched off . (2) DVI Cable (Only Dual-Input Model) a. This sequence is very important. 4 If the monitor does not function properly, please refer to the troubleshooting section to the adapter. Make sure both the monitor and computer are powered-OFF. Connect the DVI cable to a properly grounded, AC outlet. 3 Turn...
User Manual
Page 20
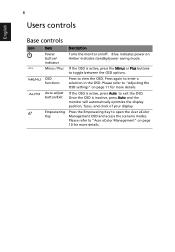
... buttons to view the OSD. Press again to open the Acer eColor Management OSD and access the scenario modes. Please refer to "Adjusting the OSD settings" on page 10 for more details. Please refer to exit the OSD. Blue indicates power on /off. Empowering Key Press the Empowering Key to enter a selection in the OSD. 8 Users controls English Base controls Icon Item Description Power button/ indicator Turns the monitor on . Auto adjust button/Exit If the OSD...
... buttons to view the OSD. Press again to open the Acer eColor Management OSD and access the scenario modes. Please refer to "Adjusting the OSD settings" on page 10 for more details. Please refer to exit the OSD. Blue indicates power on /off. Empowering Key Press the Empowering Key to enter a selection in the OSD. 8 Users controls English Base controls Icon Item Description Power button/ indicator Turns the monitor on . Auto adjust button/Exit If the OSD...

User Manual
Page 21
... Menu Menu icon icon item Description N/A User mode User defined. Settings can be fine-tuned to suit any situation N/A ECO mode Adjusts the settings to confirm the mode and run Auto Adjust. N/A Movie mode Displays scenes in unsuitably-lit environments. Reflects native display mode capability N/A Grahpic mode Enhances colors and emphasize fine detail. Presents great visuals, even in clearest detail. Pictures and photographs appear in vibrant colors with sharp detail. N/A Standard Default Setting...
... Menu Menu icon icon item Description N/A User mode User defined. Settings can be fine-tuned to suit any situation N/A ECO mode Adjusts the settings to confirm the mode and run Auto Adjust. N/A Movie mode Displays scenes in unsuitably-lit environments. Reflects native display mode capability N/A Grahpic mode Enhances colors and emphasize fine detail. Presents great visuals, even in clearest detail. Pictures and photographs appear in vibrant colors with sharp detail. N/A Standard Default Setting...

User Manual
Page 22
Actual product specifications may vary. The OSD can use the OSD to adjust the picture quality, OSD position and general settings. Press the Menu key to adjust the current Brightness, Contrast, Colour Temp, Auto Config and other image-related qualities. English 10 Adjusting the OSD settings Note: The following page: Adjusting the picture quality 1 Press the Menu key to bring up the OSD. 2 Using the / keys, select Picture from the OSD. You can be used for general reference...
Actual product specifications may vary. The OSD can use the OSD to adjust the picture quality, OSD position and general settings. Press the Menu key to adjust the current Brightness, Contrast, Colour Temp, Auto Config and other image-related qualities. English 10 Adjusting the OSD settings Note: The following page: Adjusting the picture quality 1 Press the Menu key to bring up the OSD. 2 Using the / keys, select Picture from the OSD. You can be used for general reference...

User Manual
Page 26
...mode. Using the OSD, adjust focus, clock, Hposition and V-position with nonstandard signals. 14 English Troubleshooting Before sending your system. VGA mode Problem No picture visible LED status Blue Off Remedy Using the OSD, adjust brightness and contrast to maximum or reset to the monitor. Check if the specification of graphics adapter and monitor is properly connected at the back of monitor. Check the display setting on your LCD monitor for a few seconds after adjusting the size of a missing image, please select another resolution or vertical refresh rate. Check the power...
...mode. Using the OSD, adjust focus, clock, Hposition and V-position with nonstandard signals. 14 English Troubleshooting Before sending your system. VGA mode Problem No picture visible LED status Blue Off Remedy Using the OSD, adjust brightness and contrast to maximum or reset to the monitor. Check if the specification of graphics adapter and monitor is properly connected at the back of monitor. Check the display setting on your LCD monitor for a few seconds after adjusting the size of a missing image, please select another resolution or vertical refresh rate. Check the power...
User Manual
Page 27
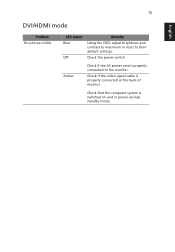
Check the power switch. Check that the computer system is properly connected at the back of monitor. Check if the video signal cable is switched on and in power saving/ standby mode. Amber Check if the AC power cord is properly connected to their default settings. 15 English DVI/HDMI mode Problem No picture visible LED status Blue Off Remedy Using the OSD, adjust brightness and contrast to maximum or reset to the monitor.
Check the power switch. Check that the computer system is properly connected at the back of monitor. Check if the video signal cable is switched on and in power saving/ standby mode. Amber Check if the AC power cord is properly connected to their default settings. 15 English DVI/HDMI mode Problem No picture visible LED status Blue Off Remedy Using the OSD, adjust brightness and contrast to maximum or reset to the monitor.

