
TravelMate 4020 Service Guide
Page 51
... screw driver T Tweezers NOTE: The screws for maintenance and troubleshooting. During the disassembly process, group the screws with the corresponding components to avoid mismatch when putting back the components. To disassemble the computer, you remove the stripe cover, please be careful not to scrape the... cover. Chapter 3 Machine Disassembly and Replacement This chapter contains step-by-step procedures on how to disassemble the notebook computer for the different ...
... screw driver T Tweezers NOTE: The screws for maintenance and troubleshooting. During the disassembly process, group the screws with the corresponding components to avoid mismatch when putting back the components. To disassemble the computer, you remove the stripe cover, please be careful not to scrape the... cover. Chapter 3 Machine Disassembly and Replacement This chapter contains step-by-step procedures on how to disassemble the notebook computer for the different ...
TravelMate 4020 Service Guide
Page 52
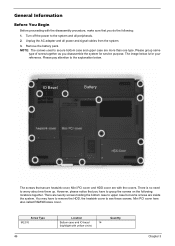
The image below . There is for service purpose. Remove the battery pack. Please group same type of screw together as you disassemble the system for your reference. There are twenty screws holding the bottom case to secure bottom case and upper case are more than... the heatsink cover to the system and all power and signal cables from the system. 3. General Information Before You Begin Before proceeding with the disassembly procedure, make sure that you do the following locations together. Unplug the AC adapter and all peripherals. 2. You may have to the explanation ...
The image below . There is for service purpose. Remove the battery pack. Please group same type of screw together as you disassemble the system for your reference. There are twenty screws holding the bottom case to secure bottom case and upper case are more than... the heatsink cover to the system and all power and signal cables from the system. 3. General Information Before You Begin Before proceeding with the disassembly procedure, make sure that you do the following locations together. Unplug the AC adapter and all peripherals. 2. You may have to the explanation ...
TravelMate 4020 Service Guide
Page 54
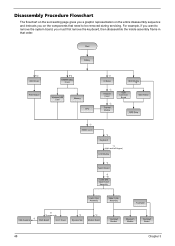
... Case Assembly *3 VGA Heatsink *2 *2 screw nuts Main Board 3-in that need to remove the system board, you on the entire disassembly sequence and instructs you must first remove the keyboard, then disassemble the inside assembly frame in -1 Cover *4 Speaker Set *2 Modem Board Upper Case Assembly Touchpad Touchpad Bracket Bluetooth Module Touchpad Board...
... Case Assembly *3 VGA Heatsink *2 *2 screw nuts Main Board 3-in that need to remove the system board, you on the entire disassembly sequence and instructs you must first remove the keyboard, then disassemble the inside assembly frame in -1 Cover *4 Speaker Set *2 Modem Board Upper Case Assembly Touchpad Touchpad Bracket Bluetooth Module Touchpad Board...
TravelMate 4020 Service Guide
Page 56
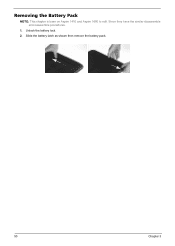
Removing the Battery Pack NOTE: This chapter is base on Aspire 1410 and Aspire 1680 to edit. Unlock the battery lock. 2. Since they have the similar disassemble and reassemble procedures. 1. Slide the battery latch as shown then remove the battery pack. 50 Chapter 3
Removing the Battery Pack NOTE: This chapter is base on Aspire 1410 and Aspire 1680 to edit. Unlock the battery lock. 2. Since they have the similar disassemble and reassemble procedures. 1. Slide the battery latch as shown then remove the battery pack. 50 Chapter 3

TravelMate 4020 Service Guide
Page 61
Remove the switch board. 3. Disconnect the bluetooth cable. 5. Remove the five screws that secure the upper case. 6. Chapter 3 55 Detach the upper case assembly and place it next to the lower case assembly. 8. Remove the eighteen screws on the bottom as shown. 7. Disconnect the microphone cable then remove the upper case assembly. Disconnect the touchpad FFC from the main board. 4. Disassembling the Main Unit Separate the Main Unit Into the Upper and the Lower Case Assembly 1. Remove the two screws holding the switch board. 2.
Remove the switch board. 3. Disconnect the bluetooth cable. 5. Remove the five screws that secure the upper case. 6. Chapter 3 55 Detach the upper case assembly and place it next to the lower case assembly. 8. Remove the eighteen screws on the bottom as shown. 7. Disconnect the microphone cable then remove the upper case assembly. Disconnect the touchpad FFC from the main board. 4. Disassembling the Main Unit Separate the Main Unit Into the Upper and the Lower Case Assembly 1. Remove the two screws holding the switch board. 2.

TravelMate 4020 Service Guide
Page 62
... remove it. 56 Chapter 3 Disconnect the touchpad board to main board FFC from the touchpad board. 4. Remove the two screws that secure the touchpad board. 5. Disassembling the Upper Case Assembly 1. Disconnect the touchpad board to touchpad FFC. 2. Detach the touchpad bracket from the upper case. 11. Disconnect the touchpad board to...
... remove it. 56 Chapter 3 Disconnect the touchpad board to main board FFC from the touchpad board. 4. Remove the two screws that secure the touchpad board. 5. Disassembling the Upper Case Assembly 1. Disconnect the touchpad board to touchpad FFC. 2. Detach the touchpad bracket from the upper case. 11. Disconnect the touchpad board to...

TravelMate 4020 Service Guide
Page 63
Remove the modem board from the main board as shown. 8. Remove the VGA heatsink from the lower case. 5. Chapter 3 57 Disassembling the Lower Case Assembly 1. Remove the two screws holding the modem board. 4. Remove the two screws that secure the speaker set on one cover from ...
Remove the modem board from the main board as shown. 8. Remove the VGA heatsink from the lower case. 5. Chapter 3 57 Disassembling the Lower Case Assembly 1. Remove the two screws holding the modem board. 4. Remove the two screws that secure the speaker set on one cover from ...

TravelMate 4020 Service Guide
Page 65
Remove another two screws that tighten the left hinge. 7. Remove another screw holding the right hinge. 6. Disassembling the LCD Module 1. Chapter 3 59 Remove the four screw caps as shown. 2. Then detach the LCD bezel from the LCD cover carefully. . 10. Remove the ...
Remove another two screws that tighten the left hinge. 7. Remove another screw holding the right hinge. 6. Disassembling the LCD Module 1. Chapter 3 59 Remove the four screw caps as shown. 2. Then detach the LCD bezel from the LCD cover carefully. . 10. Remove the ...

TravelMate 4020 Service Guide
Page 67
Disassembling the External Modules Disassembling the HDD Module 1. Remove the two screws holding the HDD bracket on one side. 2. Remove the four screws as shown. 4. Push the ODD holder as the picture shows. 2. Disconnect the ODD connector board then remove it. Chapter 3 61 Remove another two screws holding the HDD bracket on the other side. 3. Remove the two screws that secure the optical disc drive and the ODD holder. 3. Detach the ODD holder. 5. Then take the hard disc drive out from the HDD bracket. Disassembling the Optical Drive Module 1.
Disassembling the External Modules Disassembling the HDD Module 1. Remove the two screws holding the HDD bracket on one side. 2. Remove the four screws as shown. 4. Push the ODD holder as the picture shows. 2. Disconnect the ODD connector board then remove it. Chapter 3 61 Remove another two screws holding the HDD bracket on the other side. 3. Remove the two screws that secure the optical disc drive and the ODD holder. 3. Detach the ODD holder. 5. Then take the hard disc drive out from the HDD bracket. Disassembling the Optical Drive Module 1.
TravelMate 4020 User's Guide
Page 57
...adapter only when the wall socket is properly grounded. 15 Use only the proper type of them away from the wall outlet before serving or disassembling this equipment. 17 Avoid using a telephone (other than a cordless type) during an electrical storm. VARO! VARNING: LASERSTRÅLNING N&#...FFNET NICHT DEM STRAHLL AUSSETZEN PRODUCTO LÁSER DE LA CLASE I ADVERTENCIA: RADIACIÓN LÁSER INVISIBLE AL SER ABIERTO. Do not disassemble or dispose of power supply cord set (provided in performance, indicating a need for this computer is a laser product. English English 49 ...
...adapter only when the wall socket is properly grounded. 15 Use only the proper type of them away from the wall outlet before serving or disassembling this equipment. 17 Avoid using a telephone (other than a cordless type) during an electrical storm. VARO! VARNING: LASERSTRÅLNING N&#...FFNET NICHT DEM STRAHLL AUSSETZEN PRODUCTO LÁSER DE LA CLASE I ADVERTENCIA: RADIACIÓN LÁSER INVISIBLE AL SER ABIERTO. Do not disassemble or dispose of power supply cord set (provided in performance, indicating a need for this computer is a laser product. English English 49 ...

TravelMate 4020 User's Guide
Page 58
patents and other limited viewing uses only unless otherwise authorized by U.S. Reverse engineering or disassembly is for products with such devices. This has no effect on configurations, this copyright protection technology must be authorized by Macrovision, and is protected by ...
patents and other limited viewing uses only unless otherwise authorized by U.S. Reverse engineering or disassembly is for products with such devices. This has no effect on configurations, this copyright protection technology must be authorized by Macrovision, and is protected by ...


