TravelMate 4010 Service Guide
Page 7
... Panel 12 Bottom Panel 13 Indicators 14 Using the Keyboard 15 Lock Keys and embedded Numeric Keypad 15 Windows Keys 16 Hot Keys 17 Special Key 19 Launch Keys 20 Touchpad 22 Touchpad Basics 22 Hardware Specifications and Configurations 24 Chapter 2 System Utilities 35 BIOS Setup Utility 35 Navigating the BIOS Utility 36 Information 37 Main 38 Advanced 40 Security 42 Boot 46 Exit 47 BIOS Flash Utility 48 Cear BIOS Password SOP 48 Cear HDD Password SOP 48 Chapter 3 Machine Disassembly and Replacement...
... Panel 12 Bottom Panel 13 Indicators 14 Using the Keyboard 15 Lock Keys and embedded Numeric Keypad 15 Windows Keys 16 Hot Keys 17 Special Key 19 Launch Keys 20 Touchpad 22 Touchpad Basics 22 Hardware Specifications and Configurations 24 Chapter 2 System Utilities 35 BIOS Setup Utility 35 Navigating the BIOS Utility 36 Information 37 Main 38 Advanced 40 Security 42 Boot 46 Exit 47 BIOS Flash Utility 48 Cear BIOS Password SOP 48 Cear HDD Password SOP 48 Chapter 3 Machine Disassembly and Replacement...
TravelMate 4010 Service Guide
Page 9
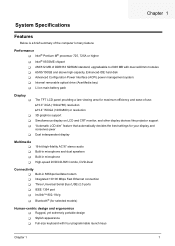
... fax/data modem T Integrated 10/100 Mbps Fast Ethernet connection T Three Universal Serial Bus (USB) 2.0 ports T IEEE 1394 port T InvilinkTM 802.11b/g T Bluetooth® (for selected models) Human-centric design and ergonomics T Rugged, yet extremely portable design T Stylish appearance T Full-size keyboard with dual soDimm modules T 60/80/100GB and above high-capacity, Enhanced-IDE hard disk T Advanced Configuration Power Interface (ACPI) power management system.
... fax/data modem T Integrated 10/100 Mbps Fast Ethernet connection T Three Universal Serial Bus (USB) 2.0 ports T IEEE 1394 port T InvilinkTM 802.11b/g T Bluetooth® (for selected models) Human-centric design and ergonomics T Rugged, yet extremely portable design T Stylish appearance T Full-size keyboard with dual soDimm modules T 60/80/100GB and above high-capacity, Enhanced-IDE hard disk T Advanced Configuration Power Interface (ACPI) power management system.

TravelMate 4010 Service Guide
Page 29
Description Bluetooth® communications Default application Lights to indicate the status of wireless LAN (optional) communications. Wireless communications Lights to indicate the status of Wireless and Bluetooth®. However, the Wireless and Bluetooth keys cannot be set by users. Even when the cover is closed, you can easily access the features of Bluetooth (optional) communications. In addition, there are two launch keys at the front panel. Chapter 1 21
Description Bluetooth® communications Default application Lights to indicate the status of wireless LAN (optional) communications. Wireless communications Lights to indicate the status of Wireless and Bluetooth®. However, the Wireless and Bluetooth keys cannot be set by users. Even when the cover is closed, you can easily access the features of Bluetooth (optional) communications. In addition, there are two launch keys at the front panel. Chapter 1 21
TravelMate 4010 Service Guide
Page 32
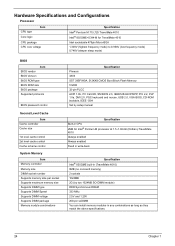
... control System Memory Item Memory controller Memory size DIMM socket number Supports memory size per socket Supports maximum memory size Supports DIMM type Supports DIMM Speed Supports DIMM voltage Supports DIMM package Memory module combinations Specification Phneoix 3A03 SST 39SF040A, 512KX8 CMOS Boot Block Flash Memory 512KB 32-pin PLCC ACPI 1.0b, PC Card 95, SM BIOS 2.3, IEEE1284-ECP/EPP, PCI 2.2, PnP 1.0a, DMI 2.0, PS/2 keyboard and mouse, USB 2.0, VGA BIOS, CD-ROM bootable, IEEE 1394 Set by setup manual Specification Built-in CPU...
... control System Memory Item Memory controller Memory size DIMM socket number Supports memory size per socket Supports maximum memory size Supports DIMM type Supports DIMM Speed Supports DIMM voltage Supports DIMM package Memory module combinations Specification Phneoix 3A03 SST 39SF040A, 512KX8 CMOS Boot Block Flash Memory 512KB 32-pin PLCC ACPI 1.0b, PC Card 95, SM BIOS 2.3, IEEE1284-ECP/EPP, PCI 2.2, PnP 1.0a, DMI 2.0, PS/2 keyboard and mouse, USB 2.0, VGA BIOS, CD-ROM bootable, IEEE 1394 Set by setup manual Specification Built-in CPU...
TravelMate 4010 Service Guide
Page 47
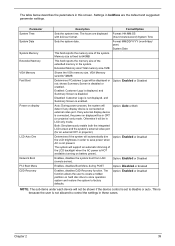
... Time System Date System Memory Extended Memory VGA Memory Fast Boot Power on battery power). If any display device is set to factory defaults. Option: Enabled or Disabled NOTE: The sub-items under each device will automatically dim the LCD brightness in CRT (or projector) only mode. Option: Disabled or Enabled Enables, disables D2D Recovery function. Disabled: Customer Logo is not displayed, and Summary Screen is NOT available (running on display LCD Auto Dim Network Boot F12 Boot Menu D2D Recovery Description Format/Option Sets the system time. The...
... Time System Date System Memory Extended Memory VGA Memory Fast Boot Power on battery power). If any display device is set to factory defaults. Option: Enabled or Disabled NOTE: The sub-items under each device will automatically dim the LCD brightness in CRT (or projector) only mode. Option: Disabled or Enabled Enables, disables D2D Recovery function. Disabled: Customer Logo is not displayed, and Summary Screen is NOT available (running on display LCD Auto Dim Network Boot F12 Boot Menu D2D Recovery Description Format/Option Sets the system time. The...

TravelMate 4010 Service Guide
Page 50
... turning it back on Boot Clear Clear Clear 43883445 [Enter] [Enter] [Enter] [Disabled] Item Specific Help When shown as [Locked], the hard drive password currently can not be changed or disabled. F1 Help Esc Exit ↑ ↓ Select Item ← → Select Menu F5/F6 Change Values Enter Select 4 Sub-Menu F9 Setup Defaults F10 Save and Exit 42 Chapter 2 PhoenixBIOS Setup Utility Info. Main Advanced Security Boot Exit Supervisor Password Is: User Password Is: Primary HardDisk Security: HDD...
... turning it back on Boot Clear Clear Clear 43883445 [Enter] [Enter] [Enter] [Disabled] Item Specific Help When shown as [Locked], the hard drive password currently can not be changed or disabled. F1 Help Esc Exit ↑ ↓ Select Item ← → Select Menu F5/F6 Change Values Enter Select 4 Sub-Menu F9 Setup Defaults F10 Save and Exit 42 Chapter 2 PhoenixBIOS Setup Utility Info. Main Advanced Security Boot Exit Supervisor Password Is: User Password Is: Primary HardDisk Security: HDD...

TravelMate 4010 Service Guide
Page 51
... Set Clear or Set Disabled or Enabled Disabled or Enabled NOTE: When you have to return your notebook computer to your dealer to enter setup. Shows the setting of parameters. When set the supervisor password. The following sub-options are the default and suggested parameter settings. Type a password in the "Confirm New Password" field. Defines whether a password is set and password on Boot Description Shows the setting of parameters. Use the w andy keys to set , this password protects the BIOS Setup Utility...
... Set Clear or Set Disabled or Enabled Disabled or Enabled NOTE: When you have to return your notebook computer to your dealer to enter setup. Shows the setting of parameters. When set the supervisor password. The following sub-options are the default and suggested parameter settings. Type a password in the "Confirm New Password" field. Defines whether a password is set and password on Boot Description Shows the setting of parameters. Use the w andy keys to set , this password protects the BIOS Setup Utility...

TravelMate 4010 Service Guide
Page 52
... typing anything in the Enter New Password field. Type a password in the Enter New Password and Confirm New Password fields. After setting the password, the computer sets the User Password parameter to "Clear". 4. If desired, you can enable the Password on boot parameter. 5. The computer then sets the Supervisor Password parameter to "Set". 4. Use the w and y keys to "Set". 5. When you have changed the settings, press u to save the changes and exit the BIOS Setup Utility. Press e. Changing a Password 1. The Set Password box appears: 2. Removing a Password...
... typing anything in the Enter New Password field. Type a password in the Enter New Password and Confirm New Password fields. After setting the password, the computer sets the User Password parameter to "Clear". 4. If desired, you can enable the Password on boot parameter. 5. The computer then sets the Supervisor Password parameter to "Set". 4. Use the w and y keys to "Set". 5. When you have changed the settings, press u to save the changes and exit the BIOS Setup Utility. Press e. Changing a Password 1. The Set Password box appears: 2. Removing a Password...

TravelMate 4010 Service Guide
Page 54
... Change Values Enter Select 4 Sub-Menu F9 Setup Defaults F10 Save and Exit 46 Chapter 2 PhoenixBIOS Setup Utility Main Advanced Security Boot Exit CD-ROM/DVD Drive Floppy Devices +Hard Drive Network Boot Item Specific Help + and - Boot order is top-down . Boot This menu allows the user to decide the order of boot devices to expand/collapses. Info. Use to load the operating system. Use and to move highlighted item up and down using only the top device in module...
... Change Values Enter Select 4 Sub-Menu F9 Setup Defaults F10 Save and Exit 46 Chapter 2 PhoenixBIOS Setup Utility Main Advanced Security Boot Exit CD-ROM/DVD Drive Floppy Devices +Hard Drive Network Boot Item Specific Help + and - Boot order is top-down . Boot This menu allows the user to decide the order of boot devices to expand/collapses. Info. Use to load the operating system. Use and to move highlighted item up and down using only the top device in module...

TravelMate 4010 Service Guide
Page 55
... Setup and save your changes to CMOS. Chapter 2 47 Exit The Exit screen contains parameters that help safeguard and protect your computer from CMOS for all SETUP items. Save Setup Data to CMOS. Main Advanced Security Boot Exit Exit Saving Changes Exit Dicarding Changes Load Setup Defaults Discard Changes Save Changes Item Specific Help Exit System Setup and save your changes to CMOS. Load previous values from unauthorized use. PhoenixBIOS Setup Utility...
... Setup and save your changes to CMOS. Chapter 2 47 Exit The Exit screen contains parameters that help safeguard and protect your computer from CMOS for all SETUP items. Save Setup Data to CMOS. Main Advanced Security Boot Exit Exit Saving Changes Exit Dicarding Changes Load Setup Defaults Discard Changes Save Changes Item Specific Help Exit System Setup and save your changes to CMOS. Load previous values from unauthorized use. PhoenixBIOS Setup Utility...
TravelMate 4010 Service Guide
Page 62
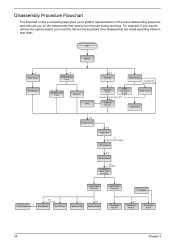
Start Battery *2 HDD Cover HDD Module *2 RAM/Wireless Cover Wireless LAN Card Memory CPU E*2 IO Bezel *2 Heatsink Cover ODD Module *2 back side *4 left/right side ODD Connector Board ODD Holder special screw for thermal*3 Ex1 Thermal Module ODD Drive E*3 Middle Cover B*2 Keyboard *4 (right and left hinges) LCD Module B*2 Switch Board B*5 E*16+B*2 Lower and Upper Case Assembly Lower Case Assembly *3 VGA Heatsink E*2 *2 screw nuts Main Board 3-in that need to be removed during servicing. For example, if you want to remove the...
Start Battery *2 HDD Cover HDD Module *2 RAM/Wireless Cover Wireless LAN Card Memory CPU E*2 IO Bezel *2 Heatsink Cover ODD Module *2 back side *4 left/right side ODD Connector Board ODD Holder special screw for thermal*3 Ex1 Thermal Module ODD Drive E*3 Middle Cover B*2 Keyboard *4 (right and left hinges) LCD Module B*2 Switch Board B*5 E*16+B*2 Lower and Upper Case Assembly Lower Case Assembly *3 VGA Heatsink E*2 *2 screw nuts Main Board 3-in that need to be removed during servicing. For example, if you want to remove the...

TravelMate 4010 Service Guide
Page 85
... devices Initialize all video adapters in system QuietBoot start (optional) Shadow video BIOS ROM Display BIOS copyright notice Display CPU type and speed Initialize EISA board Test keyboard Set key click if enabled Test for unexpected interrupts Initialize POST display service Display prompt "Press F2 to enter SETUP" Disable CPU cache Test RAM between 512 and 640 KB Test extended memory Test extended memory address lines Jump to User Patch1 Configure advanced cache registers Initialize Multi Processor APIC Enable external and CPU caches Setup...
... devices Initialize all video adapters in system QuietBoot start (optional) Shadow video BIOS ROM Display BIOS copyright notice Display CPU type and speed Initialize EISA board Test keyboard Set key click if enabled Test for unexpected interrupts Initialize POST display service Display prompt "Press F2 to enter SETUP" Disable CPU cache Test RAM between 512 and 640 KB Test extended memory Test extended memory address lines Jump to User Patch1 Configure advanced cache registers Initialize Multi Processor APIC Enable external and CPU caches Setup...

TravelMate 4010 Service Guide
Page 86
... Enter SETUP Clear Boot flag Check for option ROMs. One long, two short beeps on checksum failure. Check for SMART drive (optional) Shadow option ROMs Set up Power Management Initialize security engine (optional) Enable hardware interrupts Determine number of ATA and SCSI drives Set time of ATA drives (optional) Initialize hard-disk controllers Initialize local-bus hard-disk controllers Jump to boot with INT 19 Initialize POST Error Manager (PEM) Initialize error logging Initialize error display function Initialize system error handler PnPnd dual CMOS (optional) Initialize notebook...
... Enter SETUP Clear Boot flag Check for option ROMs. One long, two short beeps on checksum failure. Check for SMART drive (optional) Shadow option ROMs Set up Power Management Initialize security engine (optional) Enable hardware interrupts Determine number of ATA and SCSI drives Set time of ATA drives (optional) Initialize hard-disk controllers Initialize local-bus hard-disk controllers Jump to boot with INT 19 Initialize POST Error Manager (PEM) Initialize error logging Initialize error display function Initialize system error handler PnPnd dual CMOS (optional) Initialize notebook...
TravelMate 4010 Service Guide
Page 88
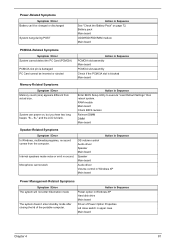
... Power-Related Symptoms Symptom / Error Power shuts down during operation The system cannot power-on , but system Main board runs correctly HDD/CD-ROM active indicators cannot work HDD/CD-ROM drive Device driver Main board Action in the HDD. See "Power System Check" on page 71. Battery pack Power adapter CPU Main board In Windows XP operating system, hold and press the power switch for more than 4 seconds. LCD cable LCD inverter LCD Main board Enter BIOS Utility to running "Load Default Settings" then reboot the system. Main board...
... Power-Related Symptoms Symptom / Error Power shuts down during operation The system cannot power-on , but system Main board runs correctly HDD/CD-ROM active indicators cannot work HDD/CD-ROM drive Device driver Main board Action in the HDD. See "Power System Check" on page 71. Battery pack Power adapter CPU Main board In Windows XP operating system, hold and press the power switch for more than 4 seconds. LCD cable LCD inverter LCD Main board Enter BIOS Utility to running "Load Default Settings" then reboot the system. Main board...
TravelMate 4010 Service Guide
Page 89
... computer. Microphone cannot work Action in Sequence OS volume control Audio driver Speaker Main board Speaker Main board Audio driver Volume control in Windows XP Main board Power Management-Related Symptoms Symptom / Error The system will not enter hibernation mode The system doesn't enter standby mode after closing the lid of Power Option Properties Lid close switch in upper case Main board Chapter 4 81 Action in Sequence Enter BIOS Setup Utility to execute "Load Default Settings" then reboot system. RAM module Main board Check BIOS revision...
... computer. Microphone cannot work Action in Sequence OS volume control Audio driver Speaker Main board Speaker Main board Audio driver Volume control in Windows XP Main board Power Management-Related Symptoms Symptom / Error The system will not enter hibernation mode The system doesn't enter standby mode after closing the lid of Power Option Properties Lid close switch in upper case Main board Chapter 4 81 Action in Sequence Enter BIOS Setup Utility to execute "Load Default Settings" then reboot system. RAM module Main board Check BIOS revision...

TravelMate 4010 Service Guide
Page 90
... keys) does not work correctly Print problems. Parallel port device problems Action in Sequence Enter BIOS Setup Utility to execute "Load Setup defaults", then reboot system. Connect AC adapter then check if the system resumes from hibernation/ standby mode. Main board Peripheral-Related Symptoms Symptom / Error System configuration does not match the installed devices. Battery pack Main board System hangs intermittently. Run printer self-test. Hard disk drive Main board The system doesn't resume from standby mode LCD cover switch after opening...
... keys) does not work correctly Print problems. Parallel port device problems Action in Sequence Enter BIOS Setup Utility to execute "Load Setup defaults", then reboot system. Connect AC adapter then check if the system resumes from hibernation/ standby mode. Main board Peripheral-Related Symptoms Symptom / Error System configuration does not match the installed devices. Battery pack Main board System hangs intermittently. Run printer self-test. Hard disk drive Main board The system doesn't resume from standby mode LCD cover switch after opening...

TravelMate 4010 Service Guide
Page 92
... an intermittent problem, do with a hardware defect, such as: cosmic radiation, electrostatic discharge, or software errors. Intermittent Problems Intermittent system hang problems can be considered only when a recurring problem exists. FRU replacement should be caused by a variety of reasons that have nothing to verify that there are no error is detected, do not replace any error is detected, replace the FRU. Rerun...
... an intermittent problem, do with a hardware defect, such as: cosmic radiation, electrostatic discharge, or software errors. Intermittent Problems Intermittent system hang problems can be considered only when a recurring problem exists. FRU replacement should be caused by a variety of reasons that have nothing to verify that there are no error is detected, do not replace any error is detected, replace the FRU. Rerun...

TravelMate 4010 User's Guide
Page 3
... instructions on the screen to be more on your notebook. Basic care and tips for using your computer Turning your notebook. It is not installed on how your computer can help you use Adobe Acrobat Reader, access the Help and Support menu. If Adobe Acrobat Reader is available in Portable Document Format (PDF) and comes preloaded on your computer on AcerSystem User's Guide will run the Acrobat Reader setup...
... instructions on the screen to be more on your notebook. Basic care and tips for using your computer Turning your notebook. It is not installed on how your computer can help you use Adobe Acrobat Reader, access the Help and Support menu. If Adobe Acrobat Reader is available in Portable Document Format (PDF) and comes preloaded on your computer on AcerSystem User's Guide will run the Acrobat Reader setup...

TravelMate 4010 User's Guide
Page 31
... the appropriate resolution. Press any key to turn the display back on the Settings tab to an external monitor. Connect the AC adapter to recharge the battery pack. • Make sure that may be set to power the computer. English 23 Frequently asked questions The following is not full-screen. Right-click on . Image is a list of your Windows desktop and select Properties to restart...
... the appropriate resolution. Press any key to turn the display back on the Settings tab to an external monitor. Connect the AC adapter to recharge the battery pack. • Make sure that may be set to power the computer. English 23 Frequently asked questions The following is not full-screen. Right-click on . Image is a list of your Windows desktop and select Properties to restart...

TravelMate 4010 User's Guide
Page 35
... and latch the display. If you are using one to place it in Sleep mode by pressing + . then press and release the power button. Disconnecting from the desktop Follow these steps to disconnect your computer from external accessories: 1 Save any open files. 2 Remove any media, floppy disks or compact disks from the AC adapter. 6 Disconnect the keyboard, pointing device, printer, external monitor and other external devices. 7 Disconnect the Kensington...
... and latch the display. If you are using one to place it in Sleep mode by pressing + . then press and release the power button. Disconnecting from the desktop Follow these steps to disconnect your computer from external accessories: 1 Save any open files. 2 Remove any media, floppy disks or compact disks from the AC adapter. 6 Disconnect the keyboard, pointing device, printer, external monitor and other external devices. 7 Disconnect the Kensington...


