User Manual
Page 4
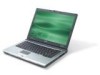
... thank you get started with setting up your computer. poster helps you for making the TravelMate series of guides: First off To turn the power off, do any of the following: • Use the Windows shutdown command Click on Start, Turn Off Computer, then click on AcerSystem User's Guide. Follow the instructions on the computer, simply press and release the power button below the LCD screen beside the Easy...
... thank you get started with setting up your computer. poster helps you for making the TravelMate series of guides: First off To turn the power off, do any of the following: • Use the Windows shutdown command Click on Start, Turn Off Computer, then click on AcerSystem User's Guide. Follow the instructions on the computer, simply press and release the power button below the LCD screen beside the Easy...
User Manual
Page 8
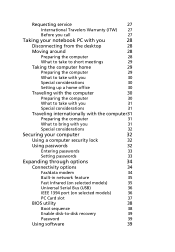
Requesting service 27 International Travelers Warranty (ITW) 27 Before you call 27 Taking your notebook PC with you 28 Disconnecting from the desktop ...Using a computer security lock 32 Using passwords 32 Entering passwords 33 Setting passwords 33 Expanding through options 34 Connectivity options 34 Fax/data modem 34 Built-in network feature 35 Fast Infrared (on selected models) 35 Universal Serial Bus (USB) 36 IEEE 1394 port (on selected models) 36 PC Card slot 37 BIOS utility 38 Boot sequence 38 Enable disk-to-disk recovery 39 Password 39 Using software...
Requesting service 27 International Travelers Warranty (ITW) 27 Before you call 27 Taking your notebook PC with you 28 Disconnecting from the desktop ...Using a computer security lock 32 Using passwords 32 Entering passwords 33 Setting passwords 33 Expanding through options 34 Connectivity options 34 Fax/data modem 34 Built-in network feature 35 Fast Infrared (on selected models) 35 Universal Serial Bus (USB) 36 IEEE 1394 port (on selected models) 36 PC Card slot 37 BIOS utility 38 Boot sequence 38 Enable disk-to-disk recovery 39 Password 39 Using software...

User Manual
Page 11
... Comfortable support area for TravelMate 3210/3220/3230). 5 Wireless Press to enable/disable Bluetooth communication function. the center button serves as a 4-way and right) scroll button. 8 Touchpad Touch-sensitive pointing device which functions like the left and (left, center right mouse buttons; Indicates the status of wireless button/indicator LAN communication. 6 Power indicator Lights when the computer is on and off to show the status of button/indicator Bluetooth communications (option only available for your hands when you use the...
... Comfortable support area for TravelMate 3210/3220/3230). 5 Wireless Press to enable/disable Bluetooth communication function. the center button serves as a 4-way and right) scroll button. 8 Touchpad Touch-sensitive pointing device which functions like the left and (left, center right mouse buttons; Indicates the status of wireless button/indicator LAN communication. 6 Power indicator Lights when the computer is on and off to show the status of button/indicator Bluetooth communications (option only available for your hands when you use the...

User Manual
Page 12
...7 Battery indicator Description Lights when the battery is being charged. Left view # Icon 1 2 3 4 5 6 7 8 9 10 Item Description External display port Connects to USB 2.0 devices (e.g., USB mouse, USB camera). Two USB 2.0 ports Connect to a display device (e.g., external monitor, LCD projector). IEEE 1394 port Connects to a phone line. Modem jack (RJ-11) Connects to IEEE 1394 devices. (on selected models) PC Card slot Accepts one card can operate at any given time. Ejects the PC Card from the slot. Note: Only one Type II PC Card. 5-in-1 card reader Infrared port...
...7 Battery indicator Description Lights when the battery is being charged. Left view # Icon 1 2 3 4 5 6 7 8 9 10 Item Description External display port Connects to USB 2.0 devices (e.g., USB mouse, USB camera). Two USB 2.0 ports Connect to a display device (e.g., external monitor, LCD projector). IEEE 1394 port Connects to a phone line. Modem jack (RJ-11) Connects to IEEE 1394 devices. (on selected models) PC Card slot Accepts one card can operate at any given time. Ejects the PC Card from the slot. Note: Only one Type II PC Card. 5-in-1 card reader Infrared port...
User Manual
Page 17
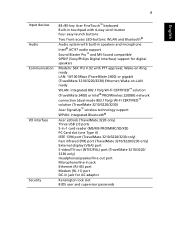
...® PRO/Wireless 2200BG network connection (dual-mode 802.11b/g) Wi-Fi CERTIFIED™ solution (TravelMate 3210/3220/3230) Acer SignalUp™ wireless technology support WPAN: integrated Bluetooth® Acer ezDock (TravelMate 3220 only) Three USB 2.0 ports 5-in-1 card reader (MS/MS-PRO/MMC/SD/XD) PC Card slot (one Type II) IEEE 1394 port (TravelMate 3210/3220/3230 only) Fast infrared (FIR) port (TravelMate 3210/3220/3230 only) External display (VGA) port S-video/TV-out (NTSC/PAL) port (TravelMate 3210/3220/ 3230 only...
...® PRO/Wireless 2200BG network connection (dual-mode 802.11b/g) Wi-Fi CERTIFIED™ solution (TravelMate 3210/3220/3230) Acer SignalUp™ wireless technology support WPAN: integrated Bluetooth® Acer ezDock (TravelMate 3220 only) Three USB 2.0 ports 5-in-1 card reader (MS/MS-PRO/MMC/SD/XD) PC Card slot (one Type II) IEEE 1394 port (TravelMate 3210/3220/3230 only) Fast infrared (FIR) port (TravelMate 3210/3220/3230 only) External display (VGA) port S-video/TV-out (NTSC/PAL) port (TravelMate 3210/3220/ 3230 only...

User Manual
Page 19
... AC mode. Media activity Indicates when the hard disk or optical drive is on the front panel. Bluetooth Indicates the status of wireless LAN communication. The power, battery, and wireless communication status indicators are visible even when the LCD display is activated. Icon Function Caps Lock Num Lock Description Lights up when the computer is active. Charging: The light shows amber when the battery is being charged. 1. Wireless LAN Indicates the status of Bluetooth communication. Battery Lights up when Num Lock is activated. English 10 Indicators The...
... AC mode. Media activity Indicates when the hard disk or optical drive is on the front panel. Bluetooth Indicates the status of wireless LAN communication. The power, battery, and wireless communication status indicators are visible even when the LCD display is activated. Icon Function Caps Lock Num Lock Description Lights up when the computer is active. Charging: The light shows amber when the battery is being charged. 1. Wireless LAN Indicates the status of Bluetooth communication. Battery Lights up when Num Lock is activated. English 10 Indicators The...

User Manual
Page 23
... 12 function keys. When Scroll Lock is on, all alphabetic characters typed are not printed on Hold while using cursor-control keys. Cursor-control keys on the keys. Lock keys and embedded numeric keypad The keyboard has three lock keys which you can toggle on and off Number keys on embedded keypad Type numbers in a letters on , the screen moves one line up or down when you need to connect an external keypad. Use this mode...
... 12 function keys. When Scroll Lock is on, all alphabetic characters typed are not printed on Hold while using cursor-control keys. Cursor-control keys on the keys. Lock keys and embedded numeric keypad The keyboard has three lock keys which you can toggle on and off Number keys on embedded keypad Type numbers in a letters on , the screen moves one line up or down when you need to connect an external keypad. Use this mode...
User Manual
Page 24
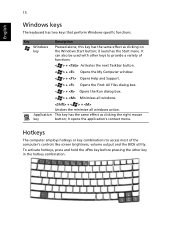
... hotkeys or key combinations to provide a variety of the computer's controls like screen brightness, volume output and the BIOS utility. This key has the same effect as clicking on the Windows Start button; It can also be used with other key in the hotkey combination. To activate hotkeys, press and hold the key before pressing the other keys to access most of functions: < > + Activates the next Taskbar button. < > + Opens the My Computer window. < > + Opens Help and Support. < > + Opens...
... hotkeys or key combinations to provide a variety of the computer's controls like screen brightness, volume output and the BIOS utility. This key has the same effect as clicking on the Windows Start button; It can also be used with other key in the hotkey combination. To activate hotkeys, press and hold the key before pressing the other keys to access most of functions: < > + Activates the next Taskbar button. < > + Opens the My Computer window. < > + Opens Help and Support. < > + Opens...
User Manual
Page 25
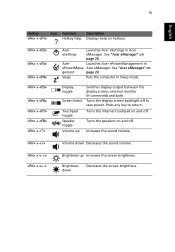
... in ePowerMana- Display toggle Screen blank Switches display output between the display screen, external monitor (if connected) and both. Touchpad toggle Turns the internal touchpad on gement page 20. Turns the display screen backlight off to return. Volume up Increases the screen brightness. Press any key to save power. Brightness down Decreases the sound volume. + + Brightness up Increases the sound volume. + Volume down Decreases the screen brightness. 16 English Hotkey Icon Function Description + Hotkey help Displays help on and...
... in ePowerMana- Display toggle Screen blank Switches display output between the display screen, external monitor (if connected) and both. Touchpad toggle Turns the internal touchpad on gement page 20. Turns the display screen backlight off to return. Volume up Increases the screen brightness. Press any key to save power. Brightness down Decreases the sound volume. + + Brightness up Increases the sound volume. + Volume down Decreases the screen brightness. 16 English Hotkey Icon Function Description + Hotkey help Displays help on and...

User Manual
Page 30
.... Acer GridVista is a handy utility that the second monitor is simple to complete the process. To access this monitor. English 21 Note: When recovering your system using a CD or Acer eRecovery, detach all peripherals, including your notebook, first ensure that offers four pre-defined display settings so you can view multiple windows on the same screen. To enable the dual monitor feature of the four display settings indicated...
.... Acer GridVista is a handy utility that the second monitor is simple to complete the process. To access this monitor. English 21 Note: When recovering your system using a CD or Acer eRecovery, detach all peripherals, including your notebook, first ensure that offers four pre-defined display settings so you can view multiple windows on the same screen. To enable the dual monitor feature of the four display settings indicated...

User Manual
Page 33
...) disk in Sleep mode. Check the following: • If you set to make sure that the resolution is not full-screen. Nothing appears on the screen. Image is set to the appropriate resolution. Press the display toggle hotkey + to toggle the display back to the computer. • If the Sleep indicator is lit, the computer is in the external USB floppy drive? Press + (increase) to adjust the brightness...
...) disk in Sleep mode. Check the following: • If you set to make sure that the resolution is not full-screen. Nothing appears on the screen. Image is set to the appropriate resolution. Press the display toggle hotkey + to toggle the display back to the computer. • If the Sleep indicator is lit, the computer is in the external USB floppy drive? Press + (increase) to adjust the brightness...
User Manual
Page 34
... as the internal keyboard cable may be loose. Try attaching an external keyboard to access the BIOS utility and verify that the infrared port is enabled. • Make sure both devices (for file transfers) or you have the appropriate drivers (for more detail. • If headphones, earphones or external speakers are facing each other (+/- 15 degrees) a maximum of the two devices are connected to a power outlet and...
... as the internal keyboard cable may be loose. Try attaching an external keyboard to access the BIOS utility and verify that the infrared port is enabled. • Make sure both devices (for file transfers) or you have the appropriate drivers (for more detail. • If headphones, earphones or external speakers are facing each other (+/- 15 degrees) a maximum of the two devices are connected to a power outlet and...
User Manual
Page 35
... a restore operation, please check the BIOS settings. 1 Check to see if Acer disk-to the Windows manual. Note: To activate the BIOS setup utility, press during POST. I want to set up all data files before using this option. The system will be erased.) It is important to back up your location: 1 Click on Start, Settings, Control Panel. 2 Double-click on Modems. 3 Click on the printer. Refer to -disk recovery is enabled or not. 2 Make...
... a restore operation, please check the BIOS settings. 1 Check to see if Acer disk-to the Windows manual. Note: To activate the BIOS setup utility, press during POST. I want to set up all data files before using this option. The system will be erased.) It is important to back up your location: 1 Click on Start, Settings, Control Panel. 2 Double-click on Modems. 3 Click on the printer. Refer to -disk recovery is enabled or not. 2 Make...

User Manual
Page 37
... can now safely take the computer anywhere you go within short distances, for example, from your computer from external accessories: 1 Save any open files. 2 Remove any media, floppy disks or compact disks from the drive(s). 3 Shut down the computer: Click on Start, Turn Off Computer, then click on Turn Off (Windows XP). Then close and latch the display cover to place it in Sleep mode by...
... can now safely take the computer anywhere you go within short distances, for example, from your computer from external accessories: 1 Save any open files. 2 Remove any media, floppy disks or compact disks from the drive(s). 3 Shut down the computer: Click on Start, Turn Off Computer, then click on Turn Off (Windows XP). Then close and latch the display cover to place it in Sleep mode by...

User Manual
Page 42
... the User Password is enabled, a prompt appears at boot-up. • Type the Supervisor Password and press to use of the display screen. • When the Supervisor Password is set passwords using the BIOS utility. English 33 • Password on the computer again, and try again. Entering passwords When a password is set, a password prompt appears in touch with password checkpoints on boot parameter is set and the password on boot-up . • Type the User Password and press to access the BIOS utility...
... the User Password is enabled, a prompt appears at boot-up. • Type the Supervisor Password and press to use of the display screen. • When the Supervisor Password is set passwords using the BIOS utility. English 33 • Password on the computer again, and try again. Entering passwords When a password is set, a password prompt appears in touch with password checkpoints on boot parameter is set and the password on boot-up . • Type the User Password and press to access the BIOS utility...

User Manual
Page 43
... V.92 56 Kbps fax/data modem. English 34 Expanding through options Your notebook PC offers you are working. Warning: Please make sure that the cable you use the fax/data modem port, connect a phone cable from the modem port to your computer as you to connect peripheral devices to a telephone jack. For instructions on how to connect different external devices to the computer, read the following section.
... V.92 56 Kbps fax/data modem. English 34 Expanding through options Your notebook PC offers you are working. Warning: Please make sure that the cable you use the fax/data modem port, connect a phone cable from the modem port to your computer as you to connect peripheral devices to a telephone jack. For instructions on how to connect different external devices to the computer, read the following section.

User Manual
Page 47
... configuration problems, you do not need to run it with the screw. 5 Reinstall the battery pack, and reconnect the AC adaptor. 6 Turn on the computer. Boot sequence To set the boot sequence in the BIOS utility, activate the BIOS utility, then select Boot from the memory cover; English 38 Installing memory Follow these steps to access its base. 2 Remove the screws from the categories listed at the top of the screen. Then turn...
... configuration problems, you do not need to run it with the screw. 5 Reinstall the battery pack, and reconnect the AC adaptor. 6 Turn on the computer. Boot sequence To set the boot sequence in the BIOS utility, activate the BIOS utility, then select Boot from the memory cover; English 38 Installing memory Follow these steps to access its base. 2 Remove the screws from the categories listed at the top of the screen. Then turn...

User Manual
Page 48
... screen. Refer to Enabled. DVD disks are divided into 6 regions. You can play DVD movies on boot: and use the and keys to set . Password To set a password on boot, activate the BIOS utility, then select Security from the categories listed at the bottom of times the region code has been set this feature. Find Password on your computer. 1 Eject the DVD tray and insert a DVD movie disk; Once your hard disk does not reset the number...
... screen. Refer to Enabled. DVD disks are divided into 6 regions. You can play DVD movies on boot: and use the and keys to set . Password To set a password on boot, activate the BIOS utility, then select Security from the categories listed at the bottom of times the region code has been set this feature. Find Password on your computer. 1 Eject the DVD tray and insert a DVD movie disk; Once your hard disk does not reset the number...

User Manual
Page 49
... a power management scheme that monitors system activity. English 40 Note: To change the region code, insert a DVD movie of the following devices: keyboard, mouse, floppy drive, hard disk, peripherals connected to the serial and parallel ports, and video memory. Please refer to the online help for maximum power conservation and maximum performance at the same time. If no activity is detected for your computer. System activity refers to conserve energy. Windows handles...
... a power management scheme that monitors system activity. English 40 Note: To change the region code, insert a DVD movie of the following devices: keyboard, mouse, floppy drive, hard disk, peripherals connected to the serial and parallel ports, and video memory. Please refer to the online help for maximum power conservation and maximum performance at the same time. If no activity is detected for your computer. System activity refers to conserve energy. Windows handles...

User Manual
Page 52
... open the Acer eRecovery utility. 3 Enter the password to restore the factory default image under DOS mode. The default password is six zeros. 4 In the Acer eRecovery window, select Recovery settings and click Next. 5 In the Recovery settings window, select Password: Change Acer eRecovery password and click Next. 6 Follow the instructions on screen to re-install. Note: If the system crashes, and will not boot to Windows, you can be changed by the user. English 43 6 Select the desired driver...
... open the Acer eRecovery utility. 3 Enter the password to restore the factory default image under DOS mode. The default password is six zeros. 4 In the Acer eRecovery window, select Recovery settings and click Next. 5 In the Recovery settings window, select Password: Change Acer eRecovery password and click Next. 6 Follow the instructions on screen to re-install. Note: If the system crashes, and will not boot to Windows, you can be changed by the user. English 43 6 Select the desired driver...


