
User Guide
Page 3
... Maintenance xix Chapter 1 Getting Familiar with your Computer 1 Features 3 Display 5 Indicators 7 Keyboard 9 Special Keys 9 Touchpad 13 Touchpad Basics 13 Storage 15 Using the CD-ROM Drive 15 Using the Floppy Drive 16 Installing the Weight-Saver Module 18 Ports 20 Left Ports 20 Rear Ports 22 Right Ports 23 Audio 28 Adjusting the Volume 28 Securing your Computer 29 Security Notch 29 Passwords 29 Chapter 2 Operating on Battery Power 31 Battery Pack 33 Battery Pack Characteristics 33 Using a Battery...
... Maintenance xix Chapter 1 Getting Familiar with your Computer 1 Features 3 Display 5 Indicators 7 Keyboard 9 Special Keys 9 Touchpad 13 Touchpad Basics 13 Storage 15 Using the CD-ROM Drive 15 Using the Floppy Drive 16 Installing the Weight-Saver Module 18 Ports 20 Left Ports 20 Rear Ports 22 Right Ports 23 Audio 28 Adjusting the Volume 28 Securing your Computer 29 Security Notch 29 Passwords 29 Chapter 2 Operating on Battery Power 31 Battery Pack 33 Battery Pack Characteristics 33 Using a Battery...
User Guide
Page 10
... the operating instructions are covered by the operating instructions since improper adjustment of any kind on the product. 10. e. Batteries may present a risk of used batteries promptly. 14. Keep them in damage and will often require extensive work by Acer's internal test labs and NSTL using Unplug this product yourself, as opening or removing covers may expose you to dangerous voltage points or other controls may touch dangerous...
... the operating instructions are covered by the operating instructions since improper adjustment of any kind on the product. 10. e. Batteries may present a risk of used batteries promptly. 14. Keep them in damage and will often require extensive work by Acer's internal test labs and NSTL using Unplug this product yourself, as opening or removing covers may expose you to dangerous voltage points or other controls may touch dangerous...
User Guide
Page 17
Follow the instructions on the screen to complete the installation. ❑ To access the online user's guide: Click on Start, Programs, TravelMate Online, then click on Install Adobe Acrobat Reader. The online help describe notebook operation as well. Getting Online If you with hypertext and hypergraphics. To provide you are connected to navigate the online user's guide, access the Help menu. Clear illustrations help is easy to navigate with...
Follow the instructions on the screen to complete the installation. ❑ To access the online user's guide: Click on Start, Programs, TravelMate Online, then click on Install Adobe Acrobat Reader. The online help describe notebook operation as well. Getting Online If you with hypertext and hypergraphics. To provide you are connected to navigate the online user's guide, access the Help menu. Clear illustrations help is easy to navigate with...
User Guide
Page 25
... conserves power. This computer supports simultaneous LCD and CRT display. Simultaneous display allows you can connect an external monitor or other output display devices such as LCD projection panels for largeaudience presentations. Simultaneous Display If you prefer, you to control the presentation from your computer and at the same time face your display and at 800x600 Super Video Graphics Array (SVGA) resolution. Power Management The power management system incorporates an "LCD brightness control...
... conserves power. This computer supports simultaneous LCD and CRT display. Simultaneous display allows you can connect an external monitor or other output display devices such as LCD projection panels for largeaudience presentations. Simultaneous Display If you prefer, you to control the presentation from your computer and at the same time face your display and at 800x600 Super Video Graphics Array (SVGA) resolution. Power Management The power management system incorporates an "LCD brightness control...
User Guide
Page 29
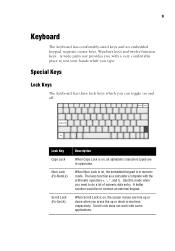
... arrow keys respectively. Scroll Lock does not work with the arithmetic operators +, -, *, and /). A wide palm rest provides you with a very comfortable place to rest your hands while you need to connect an external keypad. Lock Key Caps Lock Num Lock (Fn-NumLk) Scroll Lock (Fn-ScrLk) Description When Caps Lock is in uppercase. 9 Keyboard The keyboard has comfortably-sized keys and an embedded keypad, separate cursor keys, Windows keys and twelve function keys.
... arrow keys respectively. Scroll Lock does not work with the arithmetic operators +, -, *, and /). A wide palm rest provides you with a very comfortable place to rest your hands while you need to connect an external keypad. Lock Key Caps Lock Num Lock (Fn-NumLk) Scroll Lock (Fn-ScrLk) Description When Caps Lock is in uppercase. 9 Keyboard The keyboard has comfortably-sized keys and an embedded keypad, separate cursor keys, Windows keys and twelve function keys.
User Guide
Page 32
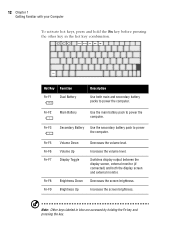
... the screen brightness. Fn-F2 Main Battery Use the main battery pack to power the computer. Switches display output between the display screen, external monitor (if connected) and both main and secondary battery packs to power the computer. Increases the volume level. Decreases the screen brightness. Note: Other keys labeled in the hot key combination. Fn-F3 Secondary Battery Use the secondary battery pack to power the computer. Hot Key Function Fn-F1 Dual Battery Description Use both the display screen and external monitor.
... the screen brightness. Fn-F2 Main Battery Use the main battery pack to power the computer. Switches display output between the display screen, external monitor (if connected) and both main and secondary battery packs to power the computer. Increases the volume level. Decreases the screen brightness. Note: Other keys labeled in the hot key combination. Fn-F3 Secondary Battery Use the secondary battery pack to power the computer. Hot Key Function Fn-F1 Dual Battery Description Use both the display screen and external monitor.

User Guide
Page 49
Insert the lock into the notch and turn the key to the BIOS Setup Utility and the computer. Once set, you connect a Kensington-compatible key-based computer security lock. Wrap a computer security lock cable around an immovable object such as a table or locked drawer handle. Passwords Two password types protect your Computer Security features include hardware and software locks - Security Notch A security notch located on the right of protection for your...
Insert the lock into the notch and turn the key to the BIOS Setup Utility and the computer. Once set, you connect a Kensington-compatible key-based computer security lock. Wrap a computer security lock cable around an immovable object such as a table or locked drawer handle. Passwords Two password types protect your Computer Security features include hardware and software locks - Security Notch A security notch located on the right of protection for your...
User Guide
Page 50
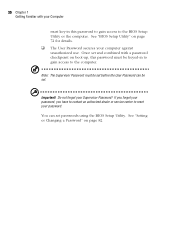
... be set passwords using the BIOS Setup Utility. Important! See "Setting or Changing a Password" on page 82. Do not forget your computer against unauthorized use. Once set and combined with your Computer must key-in to gain access to reset your password. See "BIOS Setup Utility" on page 72 for details. ❑ The User Password secures your Supervisor Password! If you forget your password, you have to contact an authorized dealer or service...
... be set passwords using the BIOS Setup Utility. Important! See "Setting or Changing a Password" on page 82. Do not forget your computer against unauthorized use. Once set and combined with your Computer must key-in to gain access to reset your password. See "BIOS Setup Utility" on page 72 for details. ❑ The User Password secures your Supervisor Password! If you forget your password, you have to contact an authorized dealer or service...
User Guide
Page 54
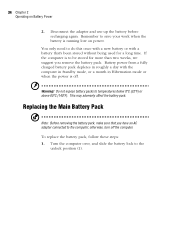
... 2 Operating on power. This may adversely affect the battery pack. Remember to the computer; Disconnect the adapter and use up the battery before recharging again. Warning! Replacing the Main Battery Pack Note: Before removing the battery pack, make sure that 's been stored without being used for more than two weeks, we suggest you have an AC adapter connected to save your work when the battery is...
... 2 Operating on power. This may adversely affect the battery pack. Remember to the computer; Disconnect the adapter and use up the battery before recharging again. Warning! Replacing the Main Battery Pack Note: Before removing the battery pack, make sure that 's been stored without being used for more than two weeks, we suggest you have an AC adapter connected to save your work when the battery is...
User Guide
Page 61
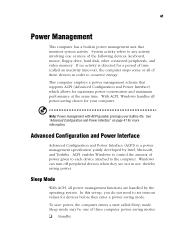
... order to any activity involving one of the following devices: keyboard, mouse, floppy drive, hard disk, other connected peripherals, and video memory. Sleep mode may be one or more information. 41 Power Management This computer has a built-in use, thereby saving power. Advanced Configuration and Power Interface Advanced Configuration and Power Interface (ACPI) is detected for maximum power conservation and maximum performance at the same time. Windows can turn off peripheral devices when they enter a power saving mode...
... order to any activity involving one of the following devices: keyboard, mouse, floppy drive, hard disk, other connected peripherals, and video memory. Sleep mode may be one or more information. 41 Power Management This computer has a built-in use, thereby saving power. Advanced Configuration and Power Interface Advanced Configuration and Power Interface (ACPI) is detected for maximum power conservation and maximum performance at the same time. Windows can turn off peripheral devices when they enter a power saving mode...
User Guide
Page 63
... a key or move the touchpad or external mouse. Do not change any system activity ❑ If a battery low condition occurs To exit Hibernation mode, press the power switch. The computer has a unique "LCD brightness control" powersaving feature. Warning! Here are three ways to save power. See "PHDISK" on page 70. When the computer is set and matched. If these devices are not actively using your computer and re-adjusts...
... a key or move the touchpad or external mouse. Do not change any system activity ❑ If a battery low condition occurs To exit Hibernation mode, press the power switch. The computer has a unique "LCD brightness control" powersaving feature. Warning! Here are three ways to save power. See "PHDISK" on page 70. When the computer is set and matched. If these devices are not actively using your computer and re-adjusts...

User Guide
Page 67
Follow these steps: 1. Flip open the external display port cover and connect the external monitor cable to a power outlet. 3. Connect the AC adapter to the computer, and plug the power cord to the external display port (1). Read the monitor manual for steps on a larger display, you can connect an external monitor to install the driver software and operating instructions. Remove the battery pack. 4. Save your work, if necessary. 2. 47 External Monitor To show graphical effects on how to the computer.
Follow these steps: 1. Flip open the external display port cover and connect the external monitor cable to a power outlet. 3. Connect the AC adapter to the computer, and plug the power cord to the external display port (1). Read the monitor manual for steps on a larger display, you can connect an external monitor to install the driver software and operating instructions. Remove the battery pack. 4. Save your work, if necessary. 2. 47 External Monitor To show graphical effects on how to the computer.
User Guide
Page 68
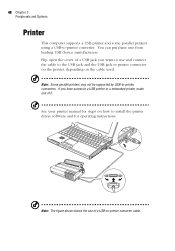
Flip open the cover of a USB jack you have access to a USB printer or a networked printer, make use of a USB-to install the printer driver software and for steps on the cable used. Note: The figure above shows the use and connect the cable to the USB jack and the USB jack or printer connector on the printer, depending on how to -printer converter cable. Note: Some parallel printers may not be supported by USB-to...
Flip open the cover of a USB jack you have access to a USB printer or a networked printer, make use of a USB-to install the printer driver software and for steps on the cable used. Note: The figure above shows the use and connect the cable to the USB jack and the USB jack or printer connector on the printer, depending on how to -printer converter cable. Note: Some parallel printers may not be supported by USB-to...
User Guide
Page 90
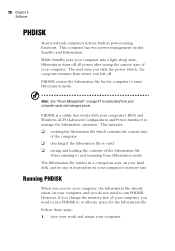
... the hibernation file when entering to run PHDISK to understand how your computer's memory size. Follow these steps: 1. 70 Chapter 5 Software PHDISK Most notebook computers feature built-in a contiguous area on your hard disk, and its size is dependent on your computer's BIOS and Windows ACPI (Advanced Configuration and Power Interface) to enter Hibernation mode. This computer has two power management modes, Standby and Hibernation.
... the hibernation file when entering to run PHDISK to understand how your computer's memory size. Follow these steps: 1. 70 Chapter 5 Software PHDISK Most notebook computers feature built-in a contiguous area on your hard disk, and its size is dependent on your computer's BIOS and Windows ACPI (Advanced Configuration and Power Interface) to enter Hibernation mode. This computer has two power management modes, Standby and Hibernation.
User Guide
Page 109
... the Power indicator: ❑ If it may be low and unable to power the computer. Slide and release the power switch quickly to recharge the battery pack. Nothing appears on battery power, it is not lit, no power is in Standby mode. Easy answers and solutions are running on the screen. s Make sure the AC adapter is plugged in the floppy drive? Insert the startup disk you...
... the Power indicator: ❑ If it may be low and unable to power the computer. Slide and release the power switch quickly to recharge the battery pack. Nothing appears on battery power, it is not lit, no power is in Standby mode. Easy answers and solutions are running on the screen. s Make sure the AC adapter is plugged in the floppy drive? Insert the startup disk you...
User Guide
Page 110
... are not full-screen on the computer or on your dealer or an authorized service center as the internal keyboard cable may be muted. I prefer using an external keyboard and mouse, but both have PS/2 90 Chapter 6 Troubleshooting ❑ The brightness level might be set to an external monitor. Make sure the resolution is set to the appropriate resolution. Check the following: ❑ The volume may be...
... are not full-screen on the computer or on your dealer or an authorized service center as the internal keyboard cable may be muted. I prefer using an external keyboard and mouse, but both have PS/2 90 Chapter 6 Troubleshooting ❑ The brightness level might be set to an external monitor. Make sure the resolution is set to the appropriate resolution. Check the following: ❑ The volume may be...
User Guide
Page 111
... "PS/2 Y-Bridge Cable" on your location: 1. The printer does not work. Click on Start, Settings, Control Panel. 1. I want to connect a parallel printer, you have access to use of the free disk space on page 54 for details. If you need to a USB printer or a networked printer, make use a PS/2 Y-bridge connector. To properly use the internal modem. Click on Dialing Properties and begin setting up my location to -printer cable converter. 91...
... "PS/2 Y-Bridge Cable" on your location: 1. The printer does not work. Click on Start, Settings, Control Panel. 1. I want to connect a parallel printer, you have access to use of the free disk space on page 54 for details. If you need to a USB printer or a networked printer, make use a PS/2 Y-bridge connector. To properly use the internal modem. Click on Dialing Properties and begin setting up my location to -printer cable converter. 91...
User Guide
Page 125
...-menu 77 Security menu 81 starting 72 System Information sub-menu 75 boot display device setting in BIOS Setup Utility 80 boot drive sequence setting in BIOS Setup Utility 84 brightness decrease 12 hot keys 12 increase 12 C caps lock 9 on xv connections AC adapter xv 105 A AC adapter caring for xix cleaning xx connecting xiv disconnecting 59 display 5 features 3 indicators 7 keyboards 9 moving around 60 on indicator 8 performance 3 power management 41 security 29 setting up a home office 62 taking home 61 traveling internationally...
...-menu 77 Security menu 81 starting 72 System Information sub-menu 75 boot display device setting in BIOS Setup Utility 80 boot drive sequence setting in BIOS Setup Utility 84 brightness decrease 12 hot keys 12 increase 12 C caps lock 9 on xv connections AC adapter xv 105 A AC adapter caring for xix cleaning xx connecting xiv disconnecting 59 display 5 features 3 indicators 7 keyboards 9 moving around 60 on indicator 8 performance 3 power management 41 security 29 setting up a home office 62 taking home 61 traveling internationally...

User Guide
Page 126
... 89 H hard disk 15 power management 44 hard disk access on indicator 7 numeric keypad embedded 10 num lock 10 O online services 93 options cables 54 106 audio 51 computer xiv keyboard, external 50 keypad, external 50 monitor 47 mouse 49 mouse, PS/2 49 printer 48 PS/2 y-bridge cable 54 USB 53 D date setting in Setup Utility 74 diskette ejecting 18 diskette drive 15 display 5 computer 5 hot keys 12 LCD brightness control feature 43 opening and closing 6 performance 5 power management 5, 43 simultaneous 5 troubleshooting 89, 90 E error messages...
... 89 H hard disk 15 power management 44 hard disk access on indicator 7 numeric keypad embedded 10 num lock 10 O online services 93 options cables 54 106 audio 51 computer xiv keyboard, external 50 keypad, external 50 monitor 47 mouse 49 mouse, PS/2 49 printer 48 PS/2 y-bridge cable 54 USB 53 D date setting in Setup Utility 74 diskette ejecting 18 diskette drive 15 display 5 computer 5 hot keys 12 LCD brightness control feature 43 opening and closing 6 performance 5 power management 5, 43 simultaneous 5 troubleshooting 89, 90 E error messages...
User Guide
Page 127
memory upgrade 55 PC Cards 52 spare AC adapter 54 spare battery 54 P password 29 changing in Setup Utility 82 removing in Setup Utility 83 setting in Setup Utility 82 types 29 PC Card 24 ejecting 25 inserting 24 PHDISK 70 troubleshooting 91 ports 20 left 20 rear 22 right 23 power turning on xv power management 41 ACPI 41 power management modes display standby mode 43 hard disk standby mode 44 Hibernation mode 42-43 sleep mode (ACPI) 41 Standby mode 42 printer connecting 48 troubleshooting 91...
memory upgrade 55 PC Cards 52 spare AC adapter 54 spare battery 54 P password 29 changing in Setup Utility 82 removing in Setup Utility 83 setting in Setup Utility 82 types 29 PC Card 24 ejecting 25 inserting 24 PHDISK 70 troubleshooting 91 ports 20 left 20 rear 22 right 23 power turning on xv power management 41 ACPI 41 power management modes display standby mode 43 hard disk standby mode 44 Hibernation mode 42-43 sleep mode (ACPI) 41 Standby mode 42 printer connecting 48 troubleshooting 91...


