TravelMate 3040 Service Guide
Page 8
... upper and lower case 68 Removing the Bluetooth module 68 Removing the MDC module 68 Removing the audio module 69 Removing the mainboard from lower case 69 LCD module disassembly 71 HDD Disassembly and Reassembly 73 Chapter 4 Troubleshooting 75 System Check Procedures 76 External Diskette Drive Check 76 External CD-ROM Drive Check 76 Keyboard or Auxiliary Input Device Check 76 Memory check 76 Power System Check 77 Touchpad check 78 Power-On Self-Test (POST...
... upper and lower case 68 Removing the Bluetooth module 68 Removing the MDC module 68 Removing the audio module 69 Removing the mainboard from lower case 69 LCD module disassembly 71 HDD Disassembly and Reassembly 73 Chapter 4 Troubleshooting 75 System Check Procedures 76 External Diskette Drive Check 76 External CD-ROM Drive Check 76 Keyboard or Auxiliary Input Device Check 76 Memory check 76 Power System Check 77 Touchpad check 78 Power-On Self-Test (POST...

TravelMate 3040 Service Guide
Page 24
FnF-nFFnn-- See "Acer Empowering Technology" Sleep Puts the computer in Acer Empowering Technology. Display toggle Switches display output between the display screen, external monitor(if connected)and both . Fn- "AcSeere "eAMceraEnmapogweerrin"g on page 24 Technology" Acer ePower Management Launches the Acer ePower Management in S"leAecpemrode eManager" on the display device that describes the definition and functionality of the unit hot keys. Press any key to return Touchpad toggle Turns the internal touchpad on and off...
FnF-nFFnn-- See "Acer Empowering Technology" Sleep Puts the computer in Acer Empowering Technology. Display toggle Switches display output between the display screen, external monitor(if connected)and both . Fn- "AcSeere "eAMceraEnmapogweerrin"g on page 24 Technology" Acer ePower Management Launches the Acer ePower Management in S"leAecpemrode eManager" on the display device that describes the definition and functionality of the unit hot keys. Press any key to return Touchpad toggle Turns the internal touchpad on and off...

TravelMate 3040 Service Guide
Page 26
... "Password Setup" to three of your new Acer notebook. Acer ePower Management Acer ePower Management features a straightforward user interface. T Acer eRecovery Management backs up to external storage media. Right-click on /off: Wireless LAN, Bluetooth, CardBus, FireWire (1394), Wired LAN and Optical Device if supported. You can adjust CPU speed, LCD brightness and other settings, or click on the appropriate utility and select the Help or Tutorial function. AC Mode (Adapter mode) The default setting is for slected models) limits access to location-based networks intelligently...
... "Password Setup" to three of your new Acer notebook. Acer ePower Management Acer ePower Management features a straightforward user interface. T Acer eRecovery Management backs up to external storage media. Right-click on /off: Wireless LAN, Bluetooth, CardBus, FireWire (1394), Wired LAN and Optical Device if supported. You can adjust CPU speed, LCD brightness and other settings, or click on the appropriate utility and select the Help or Tutorial function. AC Mode (Adapter mode) The default setting is for slected models) limits access to location-based networks intelligently...
TravelMate 3040 Service Guide
Page 32
The Acer eRecovery Management utility occupies space in a hidden partition on D:\ drive. T Image/data backup: T Back up to HDD (set recovery point). Acer eRecovery Management provides you with the need for recovery disks provided by the manufacturer. T Recovery of applications and drivers. User-created backups are stored on your system's HDD. T Recover from a hidden partition (factory defaults). To ensure the best results when recovering your system using a CD or Acer eRecovery Management, detach all peripherals (except the external Acer ODD, if...
The Acer eRecovery Management utility occupies space in a hidden partition on D:\ drive. T Image/data backup: T Back up to HDD (set recovery point). Acer eRecovery Management provides you with the need for recovery disks provided by the manufacturer. T Recovery of applications and drivers. User-created backups are stored on your system's HDD. T Recover from a hidden partition (factory defaults). To ensure the best results when recovering your system using a CD or Acer eRecovery Management, detach all peripherals (except the external Acer ODD, if...
TravelMate 3040 Service Guide
Page 41
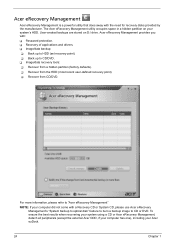
... Bus Power Management Interface Specification, USB Specification 1.1/2.0, IEEE 1394 1.0, USB/1394 CD-ROM Boot Up support, PC Card Standard 1995 (PCMCIA 3.0 Compliant Device), IrDA 1.0, Intel AC97 CNR Specification, WfM 2.0, PXE 2.1, Boot Integrity Service Application Program Interface (BIS) 1.0, PC99a and Mobile PC2001 Compliant Set by setup manual System Memory Item Memory controller Memory size DIMM socket number Supports memory size per slot Supports maximum memory size Supports DIMM type Supports DIMM Speed Supports DIMM voltage Memory module combinations . Wireless LAN Card Type Mode...
... Bus Power Management Interface Specification, USB Specification 1.1/2.0, IEEE 1394 1.0, USB/1394 CD-ROM Boot Up support, PC Card Standard 1995 (PCMCIA 3.0 Compliant Device), IrDA 1.0, Intel AC97 CNR Specification, WfM 2.0, PXE 2.1, Boot Integrity Service Application Program Interface (BIS) 1.0, PC99a and Mobile PC2001 Compliant Set by setup manual System Memory Item Memory controller Memory size DIMM socket number Supports memory size per slot Supports maximum memory size Supports DIMM type Supports DIMM Speed Supports DIMM voltage Memory module combinations . Wireless LAN Card Type Mode...
TravelMate 3040 Service Guide
Page 58
... change the value of the user password. The user can enter Setup menu only and does not have right to set the user or the supervisor password: 1. Defines whether a password is required or not while the events defined in this screen. Type a password in the "Confirm New Password" field. Press e. Parameter User Password is Supervisor Password is set, this password protects the BIOS Setup Utility from unauthorized access. Shows the setting of parameters. Option Clear or Set Clear or Set Disabled or Enabled...
... change the value of the user password. The user can enter Setup menu only and does not have right to set the user or the supervisor password: 1. Defines whether a password is required or not while the events defined in this screen. Type a password in the "Confirm New Password" field. Press e. Parameter User Password is Supervisor Password is set, this password protects the BIOS Setup Utility from unauthorized access. Shows the setting of parameters. Option Clear or Set Clear or Set Disabled or Enabled...
TravelMate 3040 Service Guide
Page 59
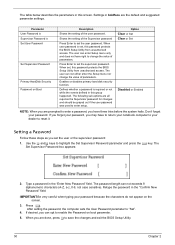
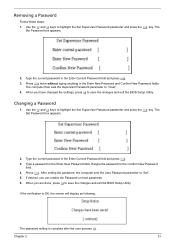
... the e key. When you are done, press u to save the changes and exit the BIOS Setup Utility. The password setting is OK, the screen will display as following. Removing a Password Follow these steps: 1. Changing a Password 1. When you have changed the settings, press u to save the changes and exit the BIOS Setup Utility. The Set Password box appears: 2. Type the current password in the Confirm New Password field. 4. Press e twice without typing anything in the Enter Current Password field...
... the e key. When you are done, press u to save the changes and exit the BIOS Setup Utility. The password setting is OK, the screen will display as following. Removing a Password Follow these steps: 1. Changing a Password 1. When you have changed the settings, press u to save the changes and exit the BIOS Setup Utility. The Set Password box appears: 2. Type the current password in the Confirm New Password field. 4. Press e twice without typing anything in the Enter Current Password field...
TravelMate 3040 Service Guide
Page 62
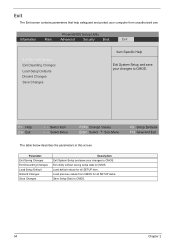
... Change Values Enter Select 4 Sub-Menu F9 Setup Defaults F10 Save and Exit The table below describes the parameters in this screen. Load default values for all SETUP item. Parameter Exit Saving Changes Exit Discarding Changes Load Setup Default Discard Changes Save Changes Description Exit System Setup and save your changes to CMOS. 54 Chapter 2 PhoenixBIOS Setup Utility Information Main Advanced Security Boot Exit Exit Saving Changes Exit Disarding Changes Load Setup Defaults Discard Changes...
... Change Values Enter Select 4 Sub-Menu F9 Setup Defaults F10 Save and Exit The table below describes the parameters in this screen. Load default values for all SETUP item. Parameter Exit Saving Changes Exit Discarding Changes Load Setup Default Discard Changes Save Changes Description Exit System Setup and save your changes to CMOS. 54 Chapter 2 PhoenixBIOS Setup Utility Information Main Advanced Security Boot Exit Exit Saving Changes Exit Disarding Changes Load Setup Defaults Discard Changes...
TravelMate 3040 Service Guide
Page 64
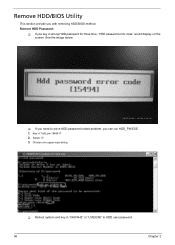
T If you need to HDD user password. 56 Chapter 2 Select "2" 3. Key in wrong HDD password for three time, "HDD password error code" would display on the screen. See the image below. Choose one upper-case string T Reboot system and key in "0KJFN42" or "UVEIQ96" to solve HDD password locked problem, you key in "hdd_pw 15494 0" 2. Remove HDD/BIOS Utility This section provide you with removing HDD/BIOS method: Remove HDD Password: T If you can run HDD_PW.EXE 1.
T If you need to HDD user password. 56 Chapter 2 Select "2" 3. Key in wrong HDD password for three time, "HDD password error code" would display on the screen. See the image below. Choose one upper-case string T Reboot system and key in "0KJFN42" or "UVEIQ96" to solve HDD password locked problem, you key in "hdd_pw 15494 0" 2. Remove HDD/BIOS Utility This section provide you with removing HDD/BIOS method: Remove HDD Password: T If you can run HDD_PW.EXE 1.
TravelMate 3040 Service Guide
Page 91
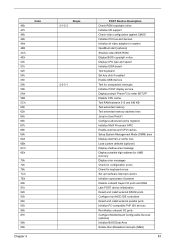
... all video adapters in system QuietBoot start (optional) Shadow video BIOS ROM Display BIOS copyright notice Display CPU type and speed Initialize EISA board Test keyboard Set key click if enabled Enable USB devices Test for unexpected interrupts Initialize POST display service Display prompt "Press F2 to enter SETUP" Disable CPU cache Test RAM between 512 and 640 KB Test extended memory Test extended memory address lines Jump to User Patch1 Configure advanced cache registers Initialize Multi Processor APIC Enable external and CPU caches Setup System Management Mode...
... all video adapters in system QuietBoot start (optional) Shadow video BIOS ROM Display BIOS copyright notice Display CPU type and speed Initialize EISA board Test keyboard Set key click if enabled Enable USB devices Test for unexpected interrupts Initialize POST display service Display prompt "Press F2 to enter SETUP" Disable CPU cache Test RAM between 512 and 640 KB Test extended memory Test extended memory address lines Jump to User Patch1 Configure advanced cache registers Initialize Multi Processor APIC Enable external and CPU caches Setup System Management Mode...
TravelMate 3040 Service Guide
Page 92
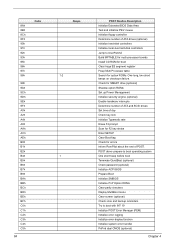
... ATA drives (optional) Initialize hard-disk controllers Initialize local-bus hard-disk controllers Jump to boot with INT 19 Initialize POST Error Manager (PEM) Initialize error logging Initialize error display function Initialize system error handler PnPnd dual CMOS (optional) Chapter 4 Check for SMART drive (optional) Shadow option ROMs Set up Power Management Initialize security engine (optional) Enable hardware interrupts Determine number of ATA and SCSI drives Set time of day Check key lock Initialize Typematic rate Erase F2 prompt Scan for F2 key stroke Enter SETUP Clear Boot...
... ATA drives (optional) Initialize hard-disk controllers Initialize local-bus hard-disk controllers Jump to boot with INT 19 Initialize POST Error Manager (PEM) Initialize error logging Initialize error display function Initialize system error handler PnPnd dual CMOS (optional) Chapter 4 Check for SMART drive (optional) Shadow option ROMs Set up Power Management Initialize security engine (optional) Enable hardware interrupts Determine number of ATA and SCSI drives Set time of day Check key lock Initialize Typematic rate Erase F2 prompt Scan for F2 key stroke Enter SETUP Clear Boot...
TravelMate 3040 Service Guide
Page 93
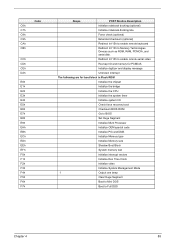
... recovery boot Checksum BIOS ROM Go to BIOS Set Huge Segment Initialize Multi Processor Initialize OEM special code Initialize PIC and DMA Initialize Memory type Initialize Memory size Shadow Boot Block System memory test Initialize interrupt vectors Initialize Run Time Clock Initialize video Initialize System Management Mode 1 Output one beep Clear Huge Segment Boot to Mini DOS Boot to enable remote serial video Re-map I/O and memory for PCMCIA Initialize digitizer and display...
... recovery boot Checksum BIOS ROM Go to BIOS Set Huge Segment Initialize Multi Processor Initialize OEM special code Initialize PIC and DMA Initialize Memory type Initialize Memory size Shadow Boot Block System memory test Initialize interrupt vectors Initialize Run Time Clock Initialize video Initialize System Management Mode 1 Output one beep Clear Huge Segment Boot to Mini DOS Boot to enable remote serial video Re-map I/O and memory for PCMCIA Initialize digitizer and display...
TravelMate 3040 Service Guide
Page 94
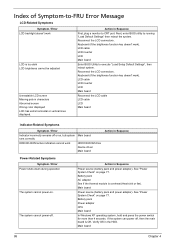
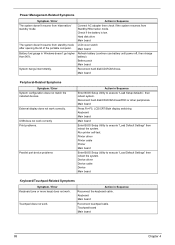
... LCD connectors. Keyboard (if the brightness function key doesn't work HDD/CD-ROM drive Device driver Main board Action in Sequence First, plug a monitor to execute "Load Setup Default Settings", then reboot system. If the system can power off or on . Action in Sequence Power-Related Symptoms Symptom / Error Power shuts down during operation The system cannot power-on , but system Main board runs correctly HDD/CD-ROM active indicators cannot work ). Reconnect the LCD connectors. LCD cable LCD inverter LCD Main board Enter BIOS Utility to CRT port...
... LCD connectors. Keyboard (if the brightness function key doesn't work HDD/CD-ROM drive Device driver Main board Action in Sequence First, plug a monitor to execute "Load Setup Default Settings", then reboot system. If the system can power off or on . Action in Sequence Power-Related Symptoms Symptom / Error Power shuts down during operation The system cannot power-on , but system Main board runs correctly HDD/CD-ROM active indicators cannot work ). Reconnect the LCD connectors. LCD cable LCD inverter LCD Main board Enter BIOS Utility to CRT port...

TravelMate 3040 Service Guide
Page 95
... sound. Microphone cannot work Action in Sequence OS volume control Audio driver Speaker Main board Speaker Main board Audio driver Volume control in Sequence Enter BIOS Setup Utility to execute "Load Default Settings" then reboot system. PC Card cannot be charged or discharged System hang during POST Action in Sequence See "Check the Battery Pack" on , but you hear two long beeps: "B--, B--" and the LCD is blank. Action in Windows XP Main board Power Management-Related Symptoms Symptom / Error...
... sound. Microphone cannot work Action in Sequence OS volume control Audio driver Speaker Main board Speaker Main board Audio driver Volume control in Sequence Enter BIOS Setup Utility to execute "Load Default Settings" then reboot system. PC Card cannot be charged or discharged System hang during POST Action in Sequence See "Check the Battery Pack" on , but you hear two long beeps: "B--, B--" and the LCD is blank. Action in Windows XP Main board Power Management-Related Symptoms Symptom / Error...
TravelMate 3040 Service Guide
Page 96
... Fn+F5, LCD/CRT/Both display switching Keyboard Main board Main board Enter BIOS Setup Utility to execute "Load Default Settings" then reboot the system. Check if the battery is low. Reconnect hard disk/CD-ROM drives. Main board Peripheral-Related Symptoms Symptom / Error System configuration does not match the installed devices. Printer driver Printer cable Printer Main board Enter BIOS Setup Utility to execute "Load Default Settings" then reboot the system. Refresh battery (continue use battery until power off, then charge battery). Touchpad does not work . Connect AC adapter then...
... Fn+F5, LCD/CRT/Both display switching Keyboard Main board Main board Enter BIOS Setup Utility to execute "Load Default Settings" then reboot the system. Check if the battery is low. Reconnect hard disk/CD-ROM drives. Main board Peripheral-Related Symptoms Symptom / Error System configuration does not match the installed devices. Printer driver Printer cable Printer Main board Enter BIOS Setup Utility to execute "Load Default Settings" then reboot the system. Refresh battery (continue use battery until power off, then charge battery). Touchpad does not work . Connect AC adapter then...

TravelMate 3040 Service Guide
Page 98
... to do with a hardware defect, such as: cosmic radiation, electrostatic discharge, or software errors. FRU replacement should be caused by a variety of reasons that there are no error is detected, replace the FRU. If any error is detected, do the following: 1. When analyzing an intermittent problem, do not replace any FRU. 3. Intermittent Problems Intermittent system hang problems can be considered only...
... to do with a hardware defect, such as: cosmic radiation, electrostatic discharge, or software errors. FRU replacement should be caused by a variety of reasons that there are no error is detected, replace the FRU. If any error is detected, do the following: 1. When analyzing an intermittent problem, do not replace any FRU. 3. Intermittent Problems Intermittent system hang problems can be considered only...
TravelMate 3040 User's Guide EN
Page 12
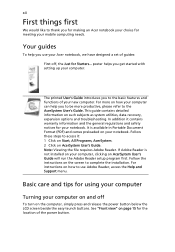
... Portable Document Format (PDF) and comes preloaded on your computer, clicking on the computer, simply press and release the power button below the LCD screen beside the easy-launch buttons. Basic care and tips for using your computer Turning your computer can help you use Adobe Reader, access the Help and Support menu. Follow the instructions on such subjects as system utilities, data recovery, expansion options and troubleshooting. For...
... Portable Document Format (PDF) and comes preloaded on your computer, clicking on the computer, simply press and release the power button below the LCD screen beside the easy-launch buttons. Basic care and tips for using your computer Turning your computer can help you use Adobe Reader, access the Help and Support menu. Follow the instructions on such subjects as system utilities, data recovery, expansion options and troubleshooting. For...
TravelMate 3040 User's Guide EN
Page 17
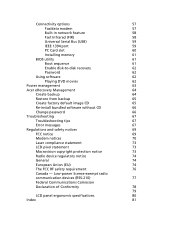
... Connectivity options 57 Fax/data modem 57 Built-in network feature 58 Fast Infrared (FIR) 58 Universal Serial Bus (USB) 59 IEEE 1394 port 59 PC Card slot 60 Installing memory 61 BIOS utility 61 Boot sequence 61 Enable disk-to-disk recovery 62 Password 62 Using software 62 Playing DVD movies 62 Power management 63 Acer eRecovery Management 64 Create backup 64 Restore from backup 65 Create factory default image CD 65 Re-install bundled software without CD 66 Change password 66 Troubleshooting 67 Troubleshooting tips 67 Error...
... Connectivity options 57 Fax/data modem 57 Built-in network feature 58 Fast Infrared (FIR) 58 Universal Serial Bus (USB) 59 IEEE 1394 port 59 PC Card slot 60 Installing memory 61 BIOS utility 61 Boot sequence 61 Enable disk-to-disk recovery 62 Password 62 Using software 62 Playing DVD movies 62 Power management 63 Acer eRecovery Management 64 Create backup 64 Restore from backup 65 Create factory default image CD 65 Re-install bundled software without CD 66 Change password 66 Troubleshooting 67 Troubleshooting tips 67 Error...
TravelMate 3040 User's Guide EN
Page 38
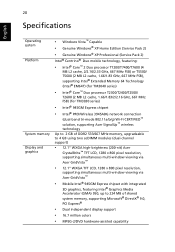
...; Intel® PRO/Wireless 3945ABG network connection (dual-band tri-mode 802.11a/b/g) Wi-Fi CERTIFIED™ solution, supporting Acer SignalUp™ wireless technology Up to 2 GB of DDR2 533/667 MHz memory, upgradeable to 4 GB using two soDIMM modules (dual-channel support) • 12.1" WXGA high-brightness (200-nit) Acer CrystalBrite™ TFT LCD, 1280 x 800 pixel resolution, supporting simultaneous multi-window viewing via Acer GridVista™ •...
...; Intel® PRO/Wireless 3945ABG network connection (dual-band tri-mode 802.11a/b/g) Wi-Fi CERTIFIED™ solution, supporting Acer SignalUp™ wireless technology Up to 2 GB of DDR2 533/667 MHz memory, upgradeable to 4 GB using two soDIMM modules (dual-channel support) • 12.1" WXGA high-brightness (200-nit) Acer CrystalBrite™ TFT LCD, 1280 x 800 pixel resolution, supporting simultaneous multi-window viewing via Acer GridVista™ •...
TravelMate 3040 User's Guide EN
Page 65
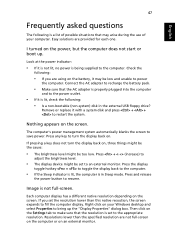
... the Settings tab to make sure that the resolution is a list of possible situations that the AC adapter is properly plugged into the computer and to fill the computer display. Check the following : • Is a non-bootable (non-system) disk in Sleep mode. Remove or replace it is not lit, no power is in the external USB floppy drive? Right-click on an external monitor. Easy...
... the Settings tab to make sure that the resolution is a list of possible situations that the AC adapter is properly plugged into the computer and to fill the computer display. Check the following : • Is a non-bootable (non-system) disk in Sleep mode. Remove or replace it is not lit, no power is in the external USB floppy drive? Right-click on an external monitor. Easy...


