
TravelMate 210 Service Guide
Page 23
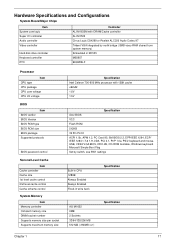
... CPU core voltage CPU I/O voltage BIOS Item BIOS vendor BIOS Version BIOS ROM type BIOS ROM size BIOS package Supported protocols BIOS password control Second Level Cache Item Cache controller Cache size 1st level cache control 2nd level cache control Cache scheme control System Memory Item ... socket number Supports memory size per socket Supports maximum memory size Specification Intel Celeron 700-900 MHz processor with 128K cache uBGA2 1.6V 1.5V Specification Acer BIOS V3.3 Flash ROM 512KB 32 Pin PLCC ACPI 1.0b, APM 1.2, PC Card 95, SM BIOS 2.3, EPP/IEEE 1284, ECP/ IEEE 1284 1.7 & 1.9,...
... CPU core voltage CPU I/O voltage BIOS Item BIOS vendor BIOS Version BIOS ROM type BIOS ROM size BIOS package Supported protocols BIOS password control Second Level Cache Item Cache controller Cache size 1st level cache control 2nd level cache control Cache scheme control System Memory Item ... socket number Supports memory size per socket Supports maximum memory size Specification Intel Celeron 700-900 MHz processor with 128K cache uBGA2 1.6V 1.5V Specification Acer BIOS V3.3 Flash ROM 512KB 32 Pin PLCC ACPI 1.0b, APM 1.2, PC Card 95, SM BIOS 2.3, EPP/IEEE 1284, ECP/ IEEE 1284 1.7 & 1.9,...

TravelMate 210 Service Guide
Page 40
...cursor up to eight characters (A-Z, a-z, 0-9). Type a password. After setting the password, the computer automatically sets the chosen password parameter to set a password. See the following section for instructions on how to highlight a Password parameter (Setup, Power-on or Hard Disk) and ...contains parameters that help safeguard and protect your password because the characters do not appear on the screen. 3. Parameter Setup Password Power-on Password Hard Disk Password Description Options When set a password. Press Enter. The password may consist of up /down keys to ...
...cursor up to eight characters (A-Z, a-z, 0-9). Type a password. After setting the password, the computer automatically sets the chosen password parameter to set a password. See the following section for instructions on how to highlight a Password parameter (Setup, Power-on or Hard Disk) and ...contains parameters that help safeguard and protect your password because the characters do not appear on the screen. 3. Parameter Setup Password Power-on Password Hard Disk Password Description Options When set a password. Press Enter. The password may consist of up /down keys to ...

TravelMate 210 Service Guide
Page 41
...of protection for each character you must key-in the password boxes. Hard Disk Password protects your data by preventing unauthorized access to set a password, except type nothing in this password with password checkpoints on Password (a symbol appears for maximum security. ! Try again ...Enter. 3. Setting these passwords creates several different levels of this password to gain access to the BIOS Utility. ! Once set a password. When a password is set , the following symbol appears. When the Setup Password is set , a password prompt appears on Password is set , the ...
...of protection for each character you must key-in the password boxes. Hard Disk Password protects your data by preventing unauthorized access to set a password, except type nothing in this password with password checkpoints on Password (a symbol appears for maximum security. ! Try again ...Enter. 3. Setting these passwords creates several different levels of this password to gain access to the BIOS Utility. ! Once set a password. When a password is set , the following symbol appears. When the Setup Password is set , a password prompt appears on Password is set , the ...

TravelMate 210 Service Guide
Page 96
SW-4/5 Acer Hitachi OEM2 OEM3 OFF ON OFF ON SW-6: Check Password SW-6 = ON, Enable SW-6 = OFF, Disable SW-7: Boot Block Boot SW-7 = OFF, Disable SW-7 = On, Enable SW-4 OFF OFF ON ON SW-5 90 Chapter 5
SW-4/5 Acer Hitachi OEM2 OEM3 OFF ON OFF ON SW-6: Check Password SW-6 = ON, Enable SW-6 = OFF, Disable SW-7: Boot Block Boot SW-7 = OFF, Disable SW-7 = On, Enable SW-4 OFF OFF ON ON SW-5 90 Chapter 5

TravelMate 210 Service Guide
Page 115
... support services we have included an Acrobat File to us. An overview of all models ! Acer Branch Offices and Regional Business Units may access our website. and password. Spare parts lists ! Basic repair guidelines ! Appendix C 109 Appendix C Online Support Information This... section describes online technical support services available to help you repair your Acer Systems. If you are a distributor, dealer...
... support services we have included an Acrobat File to us. An overview of all models ! Acer Branch Offices and Regional Business Units may access our website. and password. Spare parts lists ! Basic repair guidelines ! Appendix C 109 Appendix C Online Support Information This... section describes online technical support services available to help you repair your Acer Systems. If you are a distributor, dealer...
TravelMate 210 Service Guide
Page 118
... on indicator 10 O Online Support Information 109 P Panel 5 Bottom 9 Rear 8 right 8 Parallel Port 22 parallel port setting in BIOS Utility 33 Password Setting Hard Disk Password 35 Power-On Password 35 Setup Password 35 PC Card 10, 23 PCMCIA 23 Power Management 26 Power management 2 Power System Check 75 Battery Pack 76 Power Adapter...
... on indicator 10 O Online Support Information 109 P Panel 5 Bottom 9 Rear 8 right 8 Parallel Port 22 parallel port setting in BIOS Utility 33 Password Setting Hard Disk Password 35 Power-On Password 35 Setup Password 35 PC Card 10, 23 PCMCIA 23 Power Management 26 Power management 2 Power System Check 75 Battery Pack 76 Power Adapter...

TravelMate 210 User's Guide
Page 7
...disk 20 AcerMedia drive 20 Using software 21 Audio 22 Adjusting the volume 22 Power management 23 Moving around with your TravelMate 24 Disconnecting from the desktop 24 Moving around 24 Taking the computer home 25 Traveling with the computer 27 Traveling ...internationally with the computer 27 Securing your computer 29 Using a computer security lock 29 Using passwords 29 2 Customizing my computer 33 Expanding through options 35 AcerMedia bay modules 35 Connectivity options 35 Upgrade options 38 Using ...
...disk 20 AcerMedia drive 20 Using software 21 Audio 22 Adjusting the volume 22 Power management 23 Moving around with your TravelMate 24 Disconnecting from the desktop 24 Moving around 24 Taking the computer home 25 Traveling with the computer 27 Traveling ...internationally with the computer 27 Securing your computer 29 Using a computer security lock 29 Using passwords 29 2 Customizing my computer 33 Expanding through options 35 AcerMedia bay modules 35 Connectivity options 35 Upgrade options 38 Using ...

TravelMate 210 User's Guide
Page 37
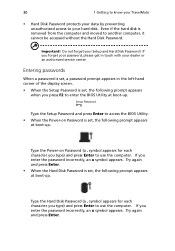
...take care of your computer. Wrap a computer security lock cable around an immovable object such as a table or locked drawer handle. Setting these passwords creates several different levels of . Learn how to the BIOS Utility. See "BIOS Utility" on page 42 and your online guide for maximum ... into the notch and turn the key to the BIOS Utility. Once set, you must key-in this password with password checkpoints on Password secures your computer against unauthorized use of this password to gain access to protect and take care of protection for your computer and data: • Setup...
...take care of your computer. Wrap a computer security lock cable around an immovable object such as a table or locked drawer handle. Setting these passwords creates several different levels of . Learn how to the BIOS Utility. See "BIOS Utility" on page 42 and your online guide for maximum ... into the notch and turn the key to the BIOS Utility. Once set, you must key-in this password with password checkpoints on Password secures your computer against unauthorized use of this password to gain access to protect and take care of protection for your computer and data: • Setup...
TravelMate 210 User's Guide
Page 38
...to another computer, it cannot be accessed without the Hard Disk Password. If you type) and press Enter to enter the BIOS Utility at boot-up . 30 1 Getting to know your TravelMate • Hard Disk Password protects your data by preventing unauthorized access to access the BIOS... Utility. • When the Power-on Password (a . Type the Setup Password and press Enter to your Setup and Hard Disk Password! Try again and press Enter. &#...
...to another computer, it cannot be accessed without the Hard Disk Password. If you type) and press Enter to enter the BIOS Utility at boot-up . 30 1 Getting to know your TravelMate • Hard Disk Password protects your data by preventing unauthorized access to access the BIOS... Utility. • When the Power-on Password (a . Type the Setup Password and press Enter to your Setup and Hard Disk Password! Try again and press Enter. &#...

TravelMate 210 User's Guide
Page 39
... you are presented with a correct entry symbol. Slide and hold the power switch for more details. Setting passwords You can set passwords using: • Notebook Manager • BIOS Utility See your dealer or an authorized service center. If you fail to shut down the computer. You ...have three chances to enter the Hard Disk Password, please contact your online guide for four seconds to enter the password correctly after three tries, the following message or symbol appears. Then turn on the computer again, and try again...
... you are presented with a correct entry symbol. Slide and hold the power switch for more details. Setting passwords You can set passwords using: • Notebook Manager • BIOS Utility See your dealer or an authorized service center. If you fail to shut down the computer. You ...have three chances to enter the Hard Disk Password, please contact your online guide for four seconds to enter the password correctly after three tries, the following message or symbol appears. Then turn on the computer again, and try again...

TravelMate 210 User's Guide
Page 49
... the four launch keys located above the keyboard. You can access the Launch Manager by clicking on Start, Programs, and then Launch Manager to set passwords, the startup sequence of the launch keys. It also shows current hardware configurations. The Windows-based Notebook Manager allows you to start the Notebook Manager...
... the four launch keys located above the keyboard. You can access the Launch Manager by clicking on Start, Programs, and then Launch Manager to set passwords, the startup sequence of the launch keys. It also shows current hardware configurations. The Windows-based Notebook Manager allows you to start the Notebook Manager...


