

Quick Start Guide
Page 1
...provided for ventilation. This sequence is properly connected to the computer. Turn off . Power-ON Monitor and Computer Power-ON the monitor first, then power-ON the computer. If the monitor still does not function properly, please refer to the troubleshooting section to a Computer DC VGA 2...service center. Do not allow anything to hold the plug, not the cable, when disconnecting the monitor from an electrical outlet. · Openings in your location. · Locate your monitor does not operate normally-in a working electrical device such as a lamp. Only a qualified ...
...provided for ventilation. This sequence is properly connected to the computer. Turn off . Power-ON Monitor and Computer Power-ON the monitor first, then power-ON the computer. If the monitor still does not function properly, please refer to the troubleshooting section to a Computer DC VGA 2...service center. Do not allow anything to hold the plug, not the cable, when disconnecting the monitor from an electrical outlet. · Openings in your location. · Locate your monitor does not operate normally-in a working electrical device such as a lamp. Only a qualified ...
Quick Start Guide
Page 2
...expressly approved by the manufacturer could void the user authority, which is in interference to maintain compliance with regard to operate this LCD monitor is granted by one or more of the following two conditions: (1) this device may cause undesired operation. Notice: Canadian users This... 2006/95/EC, and RoHS Directive 2002/95/EC and Directive 2009/125/EC with EMC regulations. CE declaration of conformity Hereby, Acer Inc., declares that this product. able protection against harmful interference in a particular installa- tion. Operation with non-certified peripherals is no...
...expressly approved by the manufacturer could void the user authority, which is in interference to maintain compliance with regard to operate this LCD monitor is granted by one or more of the following two conditions: (1) this device may cause undesired operation. Notice: Canadian users This... 2006/95/EC, and RoHS Directive 2002/95/EC and Directive 2009/125/EC with EMC regulations. CE declaration of conformity Hereby, Acer Inc., declares that this product. able protection against harmful interference in a particular installa- tion. Operation with non-certified peripherals is no...
Quick Start Guide
Page 3
... drop off your waste equipment for the recycling of with your house hold waste disposal service or the shop where you purchased the product. LCD Monitor Quick Setup Guide The separate collection and recycling of your waste equipment at the time of disposal will help to conserve natural resources and ensure...
... drop off your waste equipment for the recycling of with your house hold waste disposal service or the shop where you purchased the product. LCD Monitor Quick Setup Guide The separate collection and recycling of your waste equipment at the time of disposal will help to conserve natural resources and ensure...

User Manual
Page 1
TABLE OF CONTENTS Special notes on LCD monitors 1 Information for your safety and comfort 2 Unpacking 5 Attaching/Removing the base 6 Screen position adjustment 6 Connecting the power cord 7 Safety precaution 7 Cleaning your monitor 7 Power saving 8 DDC 8 Connector Pin Assignment 9 Standard Timing Table 11 Installation 12 User controls 13 Troubleshooting 19
TABLE OF CONTENTS Special notes on LCD monitors 1 Information for your safety and comfort 2 Unpacking 5 Attaching/Removing the base 6 Screen position adjustment 6 Connecting the power cord 7 Safety precaution 7 Cleaning your monitor 7 Power saving 8 DDC 8 Connector Pin Assignment 9 Standard Timing Table 11 Installation 12 User controls 13 Troubleshooting 19
User Manual
Page 2
... use . In this case, the screen is displayed for hours. EN-1 Turn off the Power Switch for hours. SPECIAL NOTES ON LCD MONITORS The following symptoms are normal with LCD monitor and do not indicate a problem. NOTES · Due to the nature of the previous screen may flicker during initial use . ·...
... use . In this case, the screen is displayed for hours. EN-1 Turn off the Power Switch for hours. SPECIAL NOTES ON LCD MONITORS The following symptoms are normal with LCD monitor and do not indicate a problem. NOTES · Due to the nature of the previous screen may flicker during initial use . ·...
User Manual
Page 4
... carpal tunnel syndrome, tendonitis, tenosynovitis or other risks. Nevertheless, some pixels may occasionally misfire or appear as opening or removing covers may complain of the monitor, using a footrest, or raising your comfort zone by a qualified technician to restore the product to computer use . Unplug this product yourself, as black or red...
... carpal tunnel syndrome, tendonitis, tenosynovitis or other risks. Nevertheless, some pixels may occasionally misfire or appear as opening or removing covers may complain of the monitor, using a footrest, or raising your comfort zone by a qualified technician to restore the product to computer use . Unplug this product yourself, as black or red...

User Manual
Page 5
...good work habits Develop the following work for extended periods of time. The following websites: Worldwide: http://www.acer-group.com/public/Sustainability/sustainability01.htm http://www.acer-group.com/public/Sustainability/sustainability04.htm EN-4 Display • Keep your display clean. • Keep your ... as a piece of cardboard extended from the display's top front edge • Avoid adjusting your display to keep your eyes from the monitor and focusing on a couch or bed. We do some stretching exercises. • Breathe fresh air as often as possible. • ...
...good work habits Develop the following work for extended periods of time. The following websites: Worldwide: http://www.acer-group.com/public/Sustainability/sustainability01.htm http://www.acer-group.com/public/Sustainability/sustainability04.htm EN-4 Display • Keep your display clean. • Keep your ... as a piece of cardboard extended from the display's top front edge • Avoid adjusting your display to keep your eyes from the monitor and focusing on a couch or bed. We do some stretching exercises. • Breathe fresh air as often as possible. • ...
User Manual
Page 6
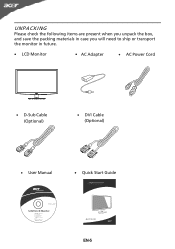
UNPACKING Please check the following items are present when you unpack the box, and save the packing materials in case you will need to ship or transport the monitor in future. · LCD Monitor · AC Adapter · AC Power Cord · D-Sub Cable (Optional) · DVI Cable (Optional) · User Manual · Quick Start Guide S232HL LCD monitor P/N:MU.LQY00.001 $'0 2010 EN-5
UNPACKING Please check the following items are present when you unpack the box, and save the packing materials in case you will need to ship or transport the monitor in future. · LCD Monitor · AC Adapter · AC Power Cord · D-Sub Cable (Optional) · DVI Cable (Optional) · User Manual · Quick Start Guide S232HL LCD monitor P/N:MU.LQY00.001 $'0 2010 EN-5
User Manual
Page 7
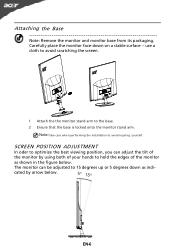
...its packaging. Note:Take care when performing the installation to 15 degrees up or 5 degrees down on a stable surface -- The monitor can adjust the tilt of the monitor by arrow below . SCREEN POSITION ADJUSTMENT In oder to optimize the best viewing position, you can be adjusted to avoid injuring yourself.... cated by using both of the monitor as indi- use a cloth to avoid scratching the screen. 1 Attach the the monitor stand arm to hold the edges of your hands to the base. 2 Ensure that the base is ...
...its packaging. Note:Take care when performing the installation to 15 degrees up or 5 degrees down on a stable surface -- The monitor can adjust the tilt of the monitor by arrow below . SCREEN POSITION ADJUSTMENT In oder to optimize the best viewing position, you can be adjusted to avoid injuring yourself.... cated by using both of the monitor as indi- use a cloth to avoid scratching the screen. 1 Attach the the monitor stand arm to hold the edges of your hands to the base. 2 Ensure that the base is ...
User Manual
Page 8
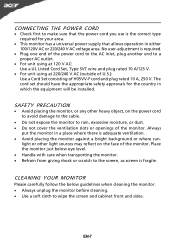
... shock or scratch to rain, excessive moisture, or dust. · Do not cover the ventilation slots or openings of the monitor. EN-7 Always put the monitor in a place where there is the correct type required for the country in which the equipment will be installed. No user-adjustment... end of H05VV-F cord and plug rated 10 A, 250 V. light or other heavy object, on the face of the monitor. Place the monitor just below guidelines when cleaning the monitor. · Always unplug the monitor before cleaning. · Use a soft cloth to a proper AC outlet. · For unit using at 120 V ...
... shock or scratch to rain, excessive moisture, or dust. · Do not cover the ventilation slots or openings of the monitor. EN-7 Always put the monitor in a place where there is the correct type required for the country in which the equipment will be installed. No user-adjustment... end of H05VV-F cord and plug rated 10 A, 250 V. light or other heavy object, on the face of the monitor. Place the monitor just below guidelines when cleaning the monitor. · Always unplug the monitor before cleaning. · Use a soft cloth to a proper AC outlet. · For unit using at 120 V ...
User Manual
Page 9
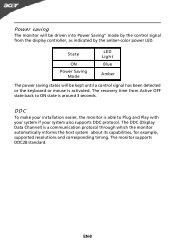
The DDC (Display Data Channel) is able to ON state is activated. EN-8 The monitor supports DDC2B standard. DDC To make your installation easier, the monitor is a communication protocol through which the monitor automatically informs the host system about its capabilities, for example, supported resolutions and corresponding timing. The recovery time from the...The power saving states will be kept until a control signal has been detected or the keyboard or mouse is around 3 seconds. Power saving The monitor will be driven into Power Saving" mode by the amber-color power LED.
The DDC (Display Data Channel) is able to ON state is activated. EN-8 The monitor supports DDC2B standard. DDC To make your installation easier, the monitor is a communication protocol through which the monitor automatically informs the host system about its capabilities, for example, supported resolutions and corresponding timing. The recovery time from the...The power saving states will be kept until a control signal has been detected or the keyboard or mouse is around 3 seconds. Power saving The monitor will be driven into Power Saving" mode by the amber-color power LED.

User Manual
Page 10
...+ TMDS Data 0/5 Shield NC NC TMDS Clock Shield TMDS Clock+ DDC TMDS Clock- TMDS Data2- 13. 2. DDC Clock 18. 7. DESCRIPTION Red Green Blue Monitor Ground DDC-return R-Ground G-Ground B-Ground PIN NO. 9. 10. 11. 12. 13. 14. 15. NC 20. 9. TMDS Data 1/3 Shield 23. ...14. 3. TMDS Data 2/4 Shield 15. 4. CONNECTOR PIN ASSIGNMENT 15-Pin Color Display Signal Cable PIN NO. 1. 2. 3. 4. 5. 6. 7. 8. DESCRIPTION +5V Logic Ground Monitor Ground DDC-Serial Data H-Sync V-Sync DDC-Serial Clock 24-Pin Color Display Signal Cable* PIN Meaning PIN 1. TMDS Data1+ 22. 11.
...+ TMDS Data 0/5 Shield NC NC TMDS Clock Shield TMDS Clock+ DDC TMDS Clock- TMDS Data2- 13. 2. DDC Clock 18. 7. DESCRIPTION Red Green Blue Monitor Ground DDC-return R-Ground G-Ground B-Ground PIN NO. 9. 10. 11. 12. 13. 14. 15. NC 20. 9. TMDS Data 1/3 Shield 23. ...14. 3. TMDS Data 2/4 Shield 15. 4. CONNECTOR PIN ASSIGNMENT 15-Pin Color Display Signal Cable PIN NO. 1. 2. 3. 4. 5. 6. 7. 8. DESCRIPTION +5V Logic Ground Monitor Ground DDC-Serial Data H-Sync V-Sync DDC-Serial Clock 24-Pin Color Display Signal Cable* PIN Meaning PIN 1. TMDS Data1+ 22. 11.

User Manual
Page 13
...the HDMI cable to the adapter. b Connect one end of the 24-pin DVI cable to the back of the adapter to the monitor and the other end to your host system, please follow the steps as given below: Steps 1. 1-1 Connect Video Cable a. Connect the... VGA video cable to a properly grounded, AC outlet . 3. INSTALLATION To install the monitor to the computer's port. 1-3 HDMI Cable (Only HDMI-Input Model) a. Make sure both the monitor and computer are powered-OFF. Mnnaekcet stuhreedbiogtithatlhceabmleo(noitnolyr afonrddcuoaml-pinupteurt amreodpeolws).ered-OFF. Connect one end of...
...the HDMI cable to the adapter. b Connect one end of the 24-pin DVI cable to the back of the adapter to the monitor and the other end to your host system, please follow the steps as given below: Steps 1. 1-1 Connect Video Cable a. Connect the... VGA video cable to a properly grounded, AC outlet . 3. INSTALLATION To install the monitor to the computer's port. 1-3 HDMI Cable (Only HDMI-Input Model) a. Make sure both the monitor and computer are powered-OFF. Mnnaekcet stuhreedbiogtithatlhceabmleo(noitnolyr afonrddcuoaml-pinupteurt amreodpeolws).ered-OFF. Connect one end of...
User Manual
Page 14
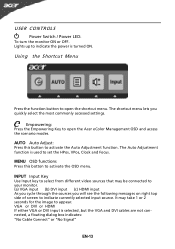
.... The shortcut menu lets you will see the following messages on right top side of screen to open the Acer eColor Management OSD and access the scenario modes. Lights up to your monitor. (a) VGA input (b) DVI input (c) HDMI input As you cycle through the sources you quickly select the most commonly accessed... to set the HPos, VPos, Clock and Focus. The Auto Adjustment function is used to appear. USER CONTROLS Power Switch / Power LED: To turn the monitor ON or OFF.
.... The shortcut menu lets you will see the following messages on right top side of screen to open the Acer eColor Management OSD and access the scenario modes. Lights up to your monitor. (a) VGA input (b) DVI input (c) HDMI input As you cycle through the sources you quickly select the most commonly accessed... to set the HPos, VPos, Clock and Focus. The Auto Adjustment function is used to appear. USER CONTROLS Power Switch / Power LED: To turn the monitor ON or OFF.
User Manual
Page 16
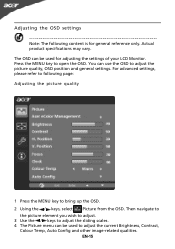
..., Auto Config and other image-related qualities. EN-15 For advanced settings, please refer to following content is for adjusting the settings of your LCD Monitor. Adjusting the OSD settings Note: The following page: Adjusting the picture quality 1 Press the MENU key to bring up the OSD. 2 Using the / keys, select...
..., Auto Config and other image-related qualities. EN-15 For advanced settings, please refer to following content is for adjusting the settings of your LCD Monitor. Adjusting the OSD settings Note: The following page: Adjusting the picture quality 1 Press the MENU key to bring up the OSD. 2 Using the / keys, select...
User Manual
Page 19
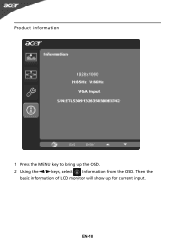
Product information 1 Press the MENU key to bring up for current input. Then the basic information of LCD monitor will show up the OSD. 2 Using the / keys, select Information from the OSD. EN-18
Product information 1 Press the MENU key to bring up for current input. Then the basic information of LCD monitor will show up the OSD. 2 Using the / keys, select Information from the OSD. EN-18

User Manual
Page 20
...to their default settings. LED OFF · Check the power switch. Unstable Picture · Check if the specification of graphics adapter and monitor is in case of missing full-screen size image, please select other resolution or other vertical refresh timing. · Wait for servicing, ... Mode) Problems Current Status Remedy LED ON · Using OSD, adjust brightness and contrast to maximum or reset to the monitor. TROUBLESHOOTING Before sending your LCD monitor for a few seconds after adjusting the size of computer system is ON. No Picture · Check if AC power cord...
...to their default settings. LED OFF · Check the power switch. Unstable Picture · Check if the specification of graphics adapter and monitor is in case of missing full-screen size image, please select other resolution or other vertical refresh timing. · Wait for servicing, ... Mode) Problems Current Status Remedy LED ON · Using OSD, adjust brightness and contrast to maximum or reset to the monitor. TROUBLESHOOTING Before sending your LCD monitor for a few seconds after adjusting the size of computer system is ON. No Picture · Check if AC power cord...
User Manual
Page 21
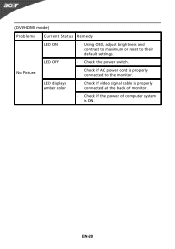
LED OFF · Check the power switch. LED displays amber color · Check if video signal cable is properly connected at the back of monitor. · Check if the power of computer system is properly connected to their default settings. EN-20 (DVI/HDMI mode) Problems Current Status Remedy LED ON · Using OSD, adjust brightness and contrast to maximum or reset to the monitor. No Picture · Check if AC power cord is ON.
LED OFF · Check the power switch. LED displays amber color · Check if video signal cable is properly connected at the back of monitor. · Check if the power of computer system is properly connected to their default settings. EN-20 (DVI/HDMI mode) Problems Current Status Remedy LED ON · Using OSD, adjust brightness and contrast to maximum or reset to the monitor. No Picture · Check if AC power cord is ON.
User Manual
Page 22
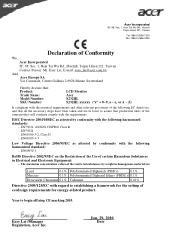
...requirements for energy-related product. EN61000-3-3 Low Voltage Directive 2006/95/EC as attested by conformity with the requirements. EN61000-3-2, Class D -. Acer Incorporated 8F, 88, Sec. 1, Hsin Tai Wu Rd., Hsichih Taipei Hsien 221, Taiwan Tel : 886-2-2696-1234 Fax : 886... SA Via Cantonale, Centro Galleria 2 6928 Manno Switzerland Hereby declare that: Product: Trade Name: Model Number: SKU Number: LCD Monitor Acer S232HL S232HL xxxxxx ("x" = 0~9, a ~ z, or A ~ Z) Is compliant with the essential requirements and other relevant provisions of the following harmonized standard: ...
...requirements for energy-related product. EN61000-3-3 Low Voltage Directive 2006/95/EC as attested by conformity with the requirements. EN61000-3-2, Class D -. Acer Incorporated 8F, 88, Sec. 1, Hsin Tai Wu Rd., Hsichih Taipei Hsien 221, Taiwan Tel : 886-2-2696-1234 Fax : 886... SA Via Cantonale, Centro Galleria 2 6928 Manno Switzerland Hereby declare that: Product: Trade Name: Model Number: SKU Number: LCD Monitor Acer S232HL S232HL xxxxxx ("x" = 0~9, a ~ z, or A ~ Z) Is compliant with the essential requirements and other relevant provisions of the following harmonized standard: ...

User Manual
Page 23
... interference received, including interference that may not cause harmful interference, and (2) this declaration: Product: LCD Monitor Model Number: S232HL SKU Number: S232HL xxxxxx ("x" = 0~9, a ~ z, A ~ Z or Blank) Name of Responsible Party: Acer America Corporation Address of the FCC Rules. A. Contact Person: Acer Representative Phone No.: 254-298-4000 Fax No.: 254-298-4147 San Jose, CA 95110...
... interference received, including interference that may not cause harmful interference, and (2) this declaration: Product: LCD Monitor Model Number: S232HL SKU Number: S232HL xxxxxx ("x" = 0~9, a ~ z, A ~ Z or Blank) Name of Responsible Party: Acer America Corporation Address of the FCC Rules. A. Contact Person: Acer Representative Phone No.: 254-298-4000 Fax No.: 254-298-4147 San Jose, CA 95110...


