
Quick Start Guide
Page 1
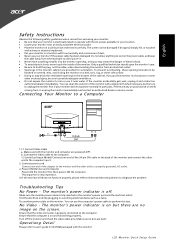
...-in a working electrical device such as a lamp. Connecting Your Monitor to perform this monitor LCD Monitor Quick Setup Guide The monitor's power indicator is very important. 4. You can clean the exterior of the cabinet. Ensure that the video connector is properly connected to hold ...refer to the troubleshooting section to unplug the monitor first. No Video - Turn off . Operationg Detail Please refer to operate with the AC power available in your location. · Locate your monitor near water. To prevent overheating, these openings should open the monitor's case. · ...
...-in a working electrical device such as a lamp. Connecting Your Monitor to perform this monitor LCD Monitor Quick Setup Guide The monitor's power indicator is very important. 4. You can clean the exterior of the cabinet. Ensure that the video connector is properly connected to hold ...refer to the troubleshooting section to unplug the monitor first. No Video - Turn off . Operationg Detail Please refer to operate with the AC power available in your location. · Locate your monitor near water. To prevent overheating, these openings should open the monitor's case. · ...
User Manual
Page 1
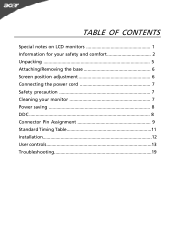
TABLE OF CONTENTS Special notes on LCD monitors 1 Information for your safety and comfort 2 Unpacking 5 Attaching/Removing the base 6 Screen position adjustment 6 Connecting the power cord 7 Safety precaution 7 Cleaning your monitor 7 Power saving 8 DDC 8 Connector Pin Assignment 9 Standard Timing Table 11 Installation 12 User controls 13 Troubleshooting 19
TABLE OF CONTENTS Special notes on LCD monitors 1 Information for your safety and comfort 2 Unpacking 5 Attaching/Removing the base 6 Screen position adjustment 6 Connecting the power cord 7 Safety precaution 7 Cleaning your monitor 7 Power saving 8 DDC 8 Connector Pin Assignment 9 Standard Timing Table 11 Installation 12 User controls 13 Troubleshooting 19
User Manual
Page 2
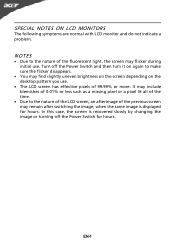
... flicker disappears. · You may remain after switching the image, when the same image is recovered slowly by changing the image or turning off the Power Switch for hours. It may include blemishes of 0.01% or less such as a missing pixel or a pixel lit all of the time. · Due to...
... flicker disappears. · You may remain after switching the image, when the same image is recovered slowly by changing the image or turning off the Power Switch for hours. It may include blemishes of 0.01% or less such as a missing pixel or a pixel lit all of the time. · Due to...

User Manual
Page 3
... product and to block out noisy surroundings. • Turn the volume down if you can't hear people speaking near you plug the power cord into the product. • To avoid damage of internal components and to prevent battery leakage, do not increase it afteryour ears ... result in installation unless proper ventilation is easily accessible and located as they may touch dangerous voltage points or short-out parts that the power outlet you . Information for future reference. Follow these instructions carefully. Keep this product near or over a radiator or heat register, or...
... product and to block out noisy surroundings. • Turn the volume down if you can't hear people speaking near you plug the power cord into the product. • To avoid damage of internal components and to prevent battery leakage, do not increase it afteryour ears ... result in installation unless proper ventilation is easily accessible and located as they may touch dangerous voltage points or short-out parts that the power outlet you . Information for future reference. Follow these instructions carefully. Keep this product near or over a radiator or heat register, or...
User Manual
Page 4
... have these symptoms, or any other musculoskeletal disorders. Users are covered by a qualified technician to restore the product to normal condition. nel when: • the power cord or plug is produced with high-precision manufacturing techniques. Incorrect computer usage may complain of the monitor, using a footrest, or raising your company's health...
... have these symptoms, or any other musculoskeletal disorders. Users are covered by a qualified technician to restore the product to normal condition. nel when: • the power cord or plug is produced with high-precision manufacturing techniques. Incorrect computer usage may complain of the monitor, using a footrest, or raising your company's health...

User Manual
Page 6
UNPACKING Please check the following items are present when you unpack the box, and save the packing materials in case you will need to ship or transport the monitor in future. · LCD Monitor · AC Adapter · AC Power Cord · D-Sub Cable (Optional) · DVI Cable (Optional) · User Manual · Quick Start Guide S2 2HL LCD monitor P/N:MU.LR400.001 $'0 2010 EN-5
UNPACKING Please check the following items are present when you unpack the box, and save the packing materials in case you will need to ship or transport the monitor in future. · LCD Monitor · AC Adapter · AC Power Cord · D-Sub Cable (Optional) · DVI Cable (Optional) · User Manual · Quick Start Guide S2 2HL LCD monitor P/N:MU.LR400.001 $'0 2010 EN-5
User Manual
Page 8
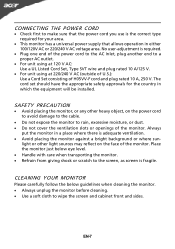
...or 220/240 V AC voltage area. The cord set should have the appropriate safety approvals for your area. · This monitor has a universal power supply that allows operation in which the equipment will be installed. SAFETY PRECAUTION · Avoid placing the monitor, or any other light sources may ...reflect on the power cord to avoid damage to the cable. · Do not expose the monitor to the screen, as screen is adequate ventilation. · Avoid...
...or 220/240 V AC voltage area. The cord set should have the appropriate safety approvals for your area. · This monitor has a universal power supply that allows operation in which the equipment will be installed. SAFETY PRECAUTION · Avoid placing the monitor, or any other light sources may ...reflect on the power cord to avoid damage to the cable. · Do not expose the monitor to the screen, as screen is adequate ventilation. · Avoid...
User Manual
Page 9
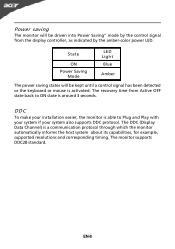
... DDC protocol. The monitor supports DDC2B standard. The DDC (Display Data Channel) is able to ON state is activated. State ON Power Saving Mode LED Light Blue Amber The power saving states will be kept until a control signal has been detected or the keyboard or mouse is around 3 seconds. EN-8 The..., the monitor is a communication protocol through which the monitor automatically informs the host system about its capabilities, for example, supported resolutions and corresponding timing. Power saving The monitor will be driven into Power Saving" mode by the amber-color...
... DDC protocol. The monitor supports DDC2B standard. The DDC (Display Data Channel) is able to ON state is activated. State ON Power Saving Mode LED Light Blue Amber The power saving states will be kept until a control signal has been detected or the keyboard or mouse is around 3 seconds. EN-8 The..., the monitor is a communication protocol through which the monitor automatically informs the host system about its capabilities, for example, supported resolutions and corresponding timing. Power saving The monitor will be driven into Power Saving" mode by the amber-color...

User Manual
Page 11
24-Pin Color Display Signal Cable* PIN Meaning PIN Meaning 1. TMDS Data2- 13. NC 16. DDC Clock 18. NC 20. TMDS Data 2/4 Shield 15. NC 17. TMDS Data 0/5 Shield 8. NC 10. TMDS Data 1/3 Shield 23. TMDS Data0+ 7. TMDS Data1+ 22. TMDS Data1- 21. DDC TMDS Clock- * only for certain models EN-10 TMDS Data2+ 14. +5V Power 3. Hot Plug Detect 5. NC 2. Logic Ground 4. TMDS Data0- 6. DDC Data 19. NC 9. TMDS Clock Shield 11. TMDS Clock+ 12. NC 24.
24-Pin Color Display Signal Cable* PIN Meaning PIN Meaning 1. TMDS Data2- 13. NC 16. DDC Clock 18. NC 20. TMDS Data 2/4 Shield 15. NC 17. TMDS Data 0/5 Shield 8. NC 10. TMDS Data 1/3 Shield 23. TMDS Data0+ 7. TMDS Data1+ 22. TMDS Data1- 21. DDC TMDS Clock- * only for certain models EN-10 TMDS Data2+ 14. +5V Power 3. Hot Plug Detect 5. NC 2. Logic Ground 4. TMDS Data0- 6. DDC Data 19. NC 9. TMDS Clock Shield 11. TMDS Clock+ 12. NC 24.
User Manual
Page 13
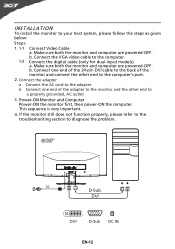
Make sure both the monitor and computer are powered-OFF. b. INSTALLATION To install the monitor to the computer. b. Connect the VGA video cable to your host system, please follow the steps as given below: ... section to the adapter. Cao. Mnnaekcet stuhreedbiogtithatlhceabmleo(noitnolyr afonrddcuoaml-pinupteurt amreodpeolws).ered-OFF. Connect the adapter a Connect the AC cord to diagnose the problem. Power-ON Monitor and Computer Power-ON the monitor first, then power-ON the computer. This sequence is very important. 4. DC D-Sub DVI DVI D-Sub DC IN EN-12
Make sure both the monitor and computer are powered-OFF. b. INSTALLATION To install the monitor to the computer. b. Connect the VGA video cable to your host system, please follow the steps as given below: ... section to the adapter. Cao. Mnnaekcet stuhreedbiogtithatlhceabmleo(noitnolyr afonrddcuoaml-pinupteurt amreodpeolws).ered-OFF. Connect the adapter a Connect the AC cord to diagnose the problem. Power-ON Monitor and Computer Power-ON the monitor first, then power-ON the computer. This sequence is very important. 4. DC D-Sub DVI DVI D-Sub DC IN EN-12
User Manual
Page 14
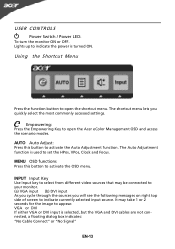
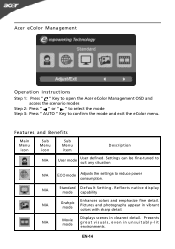
... the HPos, VPos, Clock and Focus. Using the Shortcut Menu Press the function button to open the Acer eColor Management OSD and access the scenario modes. The Auto Adjustment function is used to indicate the power is selected ,but the VGA and DVI cables are not connected, a floating dialog box indicates: "No... indicate currently selected input source. The shortcut menu lets you will see the following messages on right top side of screen to appear. USER CONTROLS Power Switch / Power LED: To turn the monitor ON or OFF.
... the HPos, VPos, Clock and Focus. Using the Shortcut Menu Press the function button to open the Acer eColor Management OSD and access the scenario modes. The Auto Adjustment function is used to indicate the power is selected ,but the VGA and DVI cables are not connected, a floating dialog box indicates: "No... indicate currently selected input source. The shortcut menu lets you will see the following messages on right top side of screen to appear. USER CONTROLS Power Switch / Power LED: To turn the monitor ON or OFF.
User Manual
Page 15
... icon Sub Menu icon Sub Menu item Description N/A User mode User defined. N/A Movie mode Displays scenes in unsuitably-lit environments. Acer eColor Management Operation instructions Step 1: Press " " Key to open the Acer eColor Management OSD and access the scenario modes Step 2: Press " " or " " to select the mode Step 3: Press " AUTO " Key to...
... icon Sub Menu icon Sub Menu item Description N/A User mode User defined. N/A Movie mode Displays scenes in unsuitably-lit environments. Acer eColor Management Operation instructions Step 1: Press " " Key to open the Acer eColor Management OSD and access the scenario modes Step 2: Press " " or " " to select the mode Step 3: Press " AUTO " Key to...
User Manual
Page 20
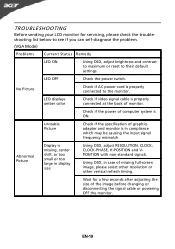
No Picture · Check if AC power cord is in case of missing full-screen size image, please select other resolution or other vertical refresh ... LED displays amber color · Check if video signal cable is properly connected at the back of monitor. · Check if the power of computer system is · Using OSD, adjust RESOLUTION, CLOCK, missing, center CLOCK-PHASE, H-POSITION and V- EN-19 Abnormal Picture ... a few seconds after adjusting the size of the image before changing or disconnecting the signal cable or powering OFF the monitor. LED OFF · Check the...
No Picture · Check if AC power cord is in case of missing full-screen size image, please select other resolution or other vertical refresh ... LED displays amber color · Check if video signal cable is properly connected at the back of monitor. · Check if the power of computer system is · Using OSD, adjust RESOLUTION, CLOCK, missing, center CLOCK-PHASE, H-POSITION and V- EN-19 Abnormal Picture ... a few seconds after adjusting the size of the image before changing or disconnecting the signal cable or powering OFF the monitor. LED OFF · Check the...
User Manual
Page 21
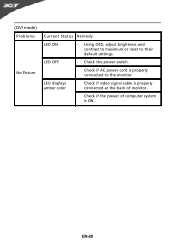
EN-20 LED displays amber color · Check if video signal cable is properly connected at the back of monitor. · Check if the power of computer system is properly connected to their default settings. (DVI mode) Problems No Picture Current Status Remedy LED ON · Using OSD, adjust brightness and contrast to maximum or reset to the monitor. LED OFF · Check the power switch. · Check if AC power cord is ON.
EN-20 LED displays amber color · Check if video signal cable is properly connected at the back of monitor. · Check if the power of computer system is properly connected to their default settings. (DVI mode) Problems No Picture Current Status Remedy LED ON · Using OSD, adjust brightness and contrast to maximum or reset to the monitor. LED OFF · Check the power switch. · Check if AC power cord is ON.


