
User Manual non-type c
Page 7
... your leg muscles vii Long work periods, bad posture, poor work habits, stress, inadequate working in front of the monitor, using a footrest, or raising your sitting height to computer use . Finding your comfort zone Find your comfort zone by adjusting the viewing angle of a computer. This product has been shipped enabled for power management: • Activate display's Sleep mode within 5 minutes of physical...
... your leg muscles vii Long work periods, bad posture, poor work habits, stress, inadequate working in front of the monitor, using a footrest, or raising your sitting height to computer use . Finding your comfort zone Find your comfort zone by adjusting the viewing angle of a computer. This product has been shipped enabled for power management: • Activate display's Sleep mode within 5 minutes of physical...
User Manual non-type c
Page 11
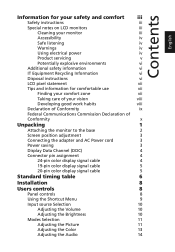
... 1 Attaching the monitor to the base 2 Screen position adjustment 3 Connecting the adapter and AC Power cord 3 Power saving 3 Display Data Channel (DDC) 4 Connector pin assignment 4 24-pin color display signal cable 4 19-pin color display signal cable 5 20-pin color display signal cable 5 Standard timing table 6 Installation 8 Users controls 8 Panel controls 8 Using the Shortcut Menu 9 Input source Selection 10 Adjusting the Volume 10 Adjusting the Brightness 10 Modes Selection 11 Adjusting the Picture 11 Adjusting the Color 13 Adjusting the Audio 14
... 1 Attaching the monitor to the base 2 Screen position adjustment 3 Connecting the adapter and AC Power cord 3 Power saving 3 Display Data Channel (DDC) 4 Connector pin assignment 4 24-pin color display signal cable 4 19-pin color display signal cable 5 20-pin color display signal cable 5 Standard timing table 6 Installation 8 Users controls 8 Panel controls 8 Using the Shortcut Menu 9 Input source Selection 10 Adjusting the Volume 10 Adjusting the Brightness 10 Modes Selection 11 Adjusting the Picture 11 Adjusting the Color 13 Adjusting the Audio 14
User Manual non-type c
Page 15
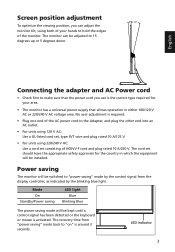
... "power saving" mode by the blinking blue light. Mode On Standby/Power saving LED light Blue Blinking Blue The power saving mode will be adjusted to make sure that allows operation in which the equipment will be kept until a control signal has been detected or the keyboard or mouse is activated. LED indicator 3 Screen position adjustment To optimize the viewing position, you use is around 3 seconds. Power saving The monitor will be installed. No user-adjustment is required. • Plug one end of the AC power cord to...
... "power saving" mode by the blinking blue light. Mode On Standby/Power saving LED light Blue Blinking Blue The power saving mode will be adjusted to make sure that allows operation in which the equipment will be kept until a control signal has been detected or the keyboard or mouse is activated. LED indicator 3 Screen position adjustment To optimize the viewing position, you use is around 3 seconds. Power saving The monitor will be installed. No user-adjustment is required. • Plug one end of the AC power cord to...
User Manual non-type c
Page 16
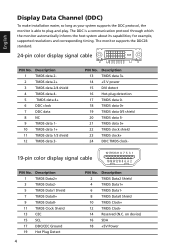
English Display Data Channel (DDC) To make installation easier, so long as your system supports the DDC protocol, the monitor is a communication protocol through which the monitor automatically informs the host system about its capabilities; Description 1 TMDS data 2- 2 TMDS data 2+ 3 TMDS data 2/4 ...CEC Ground 19 Hot Plug Detect 4 PIN No. PIN No. on device) 16 SDA 18 +5V Power for example, supported resolutions and corresponding timing. The monitor supports the DDC2B standard. 24-pin color display signal cable PIN No. The DDC is able to plug-and-play. Description ...
English Display Data Channel (DDC) To make installation easier, so long as your system supports the DDC protocol, the monitor is a communication protocol through which the monitor automatically informs the host system about its capabilities; Description 1 TMDS data 2- 2 TMDS data 2+ 3 TMDS data 2/4 ...CEC Ground 19 Hot Plug Detect 4 PIN No. PIN No. on device) 16 SDA 18 +5V Power for example, supported resolutions and corresponding timing. The monitor supports the DDC2B standard. 24-pin color display signal cable PIN No. The DDC is able to plug-and-play. Description ...
User Manual non-type c
Page 19
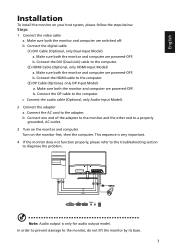
... HDMI cable to the computer. (2) HDMI Cable (Optional, only HDMI-Input Model) a. Connect the DVI (Dual Link) cable to the computer. (3) DP Cable (Optional, only DP-Input Model) a. b. b. c Connect the audio cable (Optional, only Audio-input Model). 2 Connect the adapter a Connect the AC cord to the monitor, do not lift the monitor by its base. 7 In order to prevent damage to the adapter. b. Make sure both the monitor and computer are powered-OFF. Connect the DP cable to a properly grounded, AC outlet. 3 Turn...
... HDMI cable to the computer. (2) HDMI Cable (Optional, only HDMI-Input Model) a. Connect the DVI (Dual Link) cable to the computer. (3) DP Cable (Optional, only DP-Input Model) a. b. b. c Connect the audio cable (Optional, only Audio-input Model). 2 Connect the adapter a Connect the AC cord to the monitor, do not lift the monitor by its base. 7 In order to prevent damage to the adapter. b. Make sure both the monitor and computer are powered-OFF. Connect the DP cable to a properly grounded, AC outlet. 3 Turn...

User Manual non-type c
Page 20
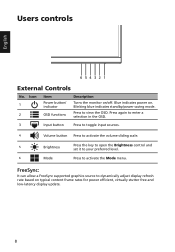
... key to open the Brightness control and set it to your preferred level. 6 Mode Press to dynamically adjust display refresh rate based on typical content frame rates for power efficient, virtually stutter free and low-latency display update. 8 Blue indicates power on /off. FreeSync: It can allow a FreeSync supported graphics source to activate the Mode menu. Press to view the OSD. Users controls English 654321 External Controls No. Icon 1 2 Item Power button/ indicator OSD functions Description Turns the monitor on . Blinking blue indicates standby/power saving mode.
... key to open the Brightness control and set it to your preferred level. 6 Mode Press to dynamically adjust display refresh rate based on typical content frame rates for power efficient, virtually stutter free and low-latency display update. 8 Blue indicates power on /off. FreeSync: It can allow a FreeSync supported graphics source to activate the Mode menu. Press to view the OSD. Users controls English 654321 External Controls No. Icon 1 2 Item Power button/ indicator OSD functions Description Turns the monitor on . Blinking blue indicates standby/power saving mode.

User Manual non-type c
Page 21
... LCD monitor. The OSD (on-screen display) can assign another function from "System -> Hot Key Assignment". Press button to activate the OSD menu. Press the MENU key to open the OSD. Actual product specifications may be used to adjust the settings of the function buttons (Modes, Brightness, Volume, Input or Menu) to open the shortcut menu. You can switch input source, or to adjust the picture quality, OSD position and general settings. The shortcut menu lets you quickly select the most commonly accessed settings. User...
... LCD monitor. The OSD (on-screen display) can assign another function from "System -> Hot Key Assignment". Press button to activate the OSD menu. Press the MENU key to open the OSD. Actual product specifications may be used to adjust the settings of the function buttons (Modes, Brightness, Volume, Input or Menu) to open the shortcut menu. You can switch input source, or to adjust the picture quality, OSD position and general settings. The shortcut menu lets you quickly select the most commonly accessed settings. User...

User Manual non-type c
Page 27
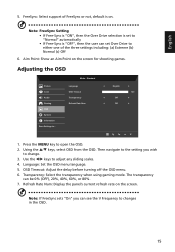
... V Frequency to ... Aim Point: Show an Aim Point on the screen. Use the / keys to open the OSD. 2. Standard Language OSD Timeout Transparency Refresh Rate Num Engilsh 120 Off Off 1. Transparency: Select the transparency when using gaming mode. Language: Set the OSD menu language. 5. Mode - Using the / keys, select OSD from the OSD. Adjusting the OSD Picture Color Audio Gaming OSD System Information Save Settings to changes in the OSD. 15 FreeSync: Select support of the three settings...
... V Frequency to ... Aim Point: Show an Aim Point on the screen. Use the / keys to open the OSD. 2. Standard Language OSD Timeout Transparency Refresh Rate Num Engilsh 120 Off Off 1. Transparency: Select the transparency when using gaming mode. Language: Set the OSD menu language. 5. Mode - Using the / keys, select OSD from the OSD. Adjusting the OSD Picture Color Audio Gaming OSD System Information Save Settings to changes in the OSD. 15 FreeSync: Select support of the three settings...
User Manual non-type c
Page 28
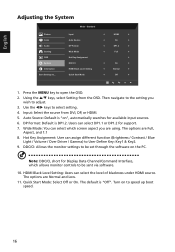
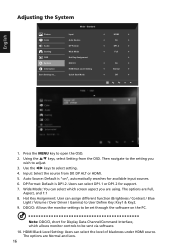
... level of blackness under HDMI source. The default is "Off". HDMI Black Level Setting: Users can select DP1.1 or DP1.2 for available input sources. 6. DDC/CI: Allows the monitor settings to speed up boot speed. 16 Mode - The options are Full, Aspect, and 1:1 8. English Adjusting the System Picture Color Audio Gaming OSD System Information Save Settings to User Define Key: Key1 & Key2. 9. Standard Input Auto Source DP Format Wide Mode Hot Key Assignment DDC/CI HDMI Black Level Setting Quick Start Mode HDMI On...
... level of blackness under HDMI source. The default is "Off". HDMI Black Level Setting: Users can select DP1.1 or DP1.2 for available input sources. 6. DDC/CI: Allows the monitor settings to speed up boot speed. 16 Mode - The options are Full, Aspect, and 1:1 8. English Adjusting the System Picture Color Audio Gaming OSD System Information Save Settings to User Define Key: Key1 & Key2. 9. Standard Input Auto Source DP Format Wide Mode Hot Key Assignment DDC/CI HDMI Black Level Setting Quick Start Mode HDMI On...
User Manual non-type c
Page 29
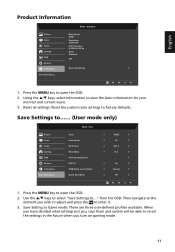
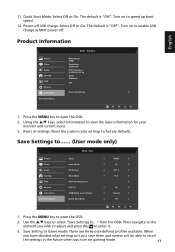
...it. 3. Press the MENU key to the element you turn on gaming mode. 17 from the OSD. Mode - English Product Information Picture Color Audio Gaming OSD System Information Save Settings to factory defaults. Then navigate to open the OSD. 2. Mode - Reset all settings: Reset the custom color settings to ... User Input Auto Source DP Format Wide Mode Hot Key Assignment DDC/CI HDMI Black Level Setting Quick Start Mode HDMI On DP1.2 Full On Normal Off 1. Standard Main Source HDMI Resolution 1920x1080 H/V Frequency H 66KHz V 60 Hz Mode Standard S/N Reset All Settings 1.
...it. 3. Press the MENU key to the element you turn on gaming mode. 17 from the OSD. Mode - English Product Information Picture Color Audio Gaming OSD System Information Save Settings to factory defaults. Then navigate to open the OSD. 2. Mode - Reset all settings: Reset the custom color settings to ... User Input Auto Source DP Format Wide Mode Hot Key Assignment DDC/CI HDMI Black Level Setting Quick Start Mode HDMI On DP1.2 Full On Normal Off 1. Standard Main Source HDMI Resolution 1920x1080 H/V Frequency H 66KHz V 60 Hz Mode Standard S/N Reset All Settings 1.

User Manual non-type c
Page 30
English Troubleshooting Before sending your LCD monitor for servicing, please check the troubleshooting list below to their default settings. Check if the video signal cable is properly connected to the monitor. Check the power switch. DVI/HDMI/DP Mode (Optional) Problem No picture visible LED status Blue Off Blinking Blue Remedy Using the OSD menu, adjust brightness and contrast to maximum or reset to see if you can self-diagnose the problem. Check if the AC power cord is properly connected at the back of monitor. Check if the computer system is...
English Troubleshooting Before sending your LCD monitor for servicing, please check the troubleshooting list below to their default settings. Check if the video signal cable is properly connected to the monitor. Check the power switch. DVI/HDMI/DP Mode (Optional) Problem No picture visible LED status Blue Off Blinking Blue Remedy Using the OSD menu, adjust brightness and contrast to maximum or reset to see if you can self-diagnose the problem. Check if the AC power cord is properly connected at the back of monitor. Check if the computer system is...

User Manual type c
Page 7
... safety department. Tips and information for more comfortable computer use , consult a physician immediately and inform your comfort zone by adjusting the viewing angle of working conditions, personal health and other musculoskeletal disorders. Incorrect computer usage may occasionally misfire or appear as black or red dots. English LCD pixel statement The LCD unit is in the hands, wrists, arms, shoulders, neck...
... safety department. Tips and information for more comfortable computer use , consult a physician immediately and inform your comfort zone by adjusting the viewing angle of working conditions, personal health and other musculoskeletal disorders. Incorrect computer usage may occasionally misfire or appear as black or red dots. English LCD pixel statement The LCD unit is in the hands, wrists, arms, shoulders, neck...

User Manual type c
Page 11
... monitor to the base 2 Screen position adjustment 3 Connecting the adapter and AC Power cord 3 Power saving 3 Display Data Channel (DDC) 4 24-pin color display signal cable 4 19-pin color display signal cable 5 20-pin color display signal cable 5 Standard timing table 6 Installation 7 Users controls 8 External Controls 8 Using the Shortcut Menu 9 Input Source Selection 10 Adjusting the Volume 10 Adjusting the Brightness 10 Modes Selection 11 Adjusting the Picture 11 Adjusting the Color 13 Adjusting the Audio 14 Adjusting the Gaming 14 Adjusting the OSD...
... monitor to the base 2 Screen position adjustment 3 Connecting the adapter and AC Power cord 3 Power saving 3 Display Data Channel (DDC) 4 24-pin color display signal cable 4 19-pin color display signal cable 5 20-pin color display signal cable 5 Standard timing table 6 Installation 7 Users controls 8 External Controls 8 Using the Shortcut Menu 9 Input Source Selection 10 Adjusting the Volume 10 Adjusting the Brightness 10 Modes Selection 11 Adjusting the Picture 11 Adjusting the Color 13 Adjusting the Audio 14 Adjusting the Gaming 14 Adjusting the OSD...

User Manual type c
Page 15
... equipment will be installed. Power saving The monitor will be switched to "power saving" mode by the control signal from "power saving" mode back to "on" is activated. LED indicator 3 No user-adjustment is required. • Plug one end of the AC power cord to the Adapter, and plug the other end into an AC outlet. • For units using 120 V AC: Use a UL-listed cord set consisting of the monitor. Screen position adjustment To optimize the viewing position, you use is the...
... equipment will be installed. Power saving The monitor will be switched to "power saving" mode by the control signal from "power saving" mode back to "on" is activated. LED indicator 3 No user-adjustment is required. • Plug one end of the AC power cord to the Adapter, and plug the other end into an AC outlet. • For units using 120 V AC: Use a UL-listed cord set consisting of the monitor. Screen position adjustment To optimize the viewing position, you use is the...
User Manual type c
Page 20
... rates for power efficient, virtually stutter free and low-latency display update. 8 Blinking blue indicates standby/power saving mode. FreeSync: It can allow a FreeSync supported graphics source to view the OSD. Users controls English 654321 External Controls No. Icon 1 2 Item Power button/ indicator OSD functions Description Turns the monitor on . Blue indicates power on /off. Press again to enter a selection in the OSD. 3 Input button Press to toggle input sources. 4 Volume button Press to activate the volume sliding scale. 5 Brightness Press the key to open...
... rates for power efficient, virtually stutter free and low-latency display update. 8 Blinking blue indicates standby/power saving mode. FreeSync: It can allow a FreeSync supported graphics source to view the OSD. Users controls English 654321 External Controls No. Icon 1 2 Item Power button/ indicator OSD functions Description Turns the monitor on . Blue indicates power on /off. Press again to enter a selection in the OSD. 3 Input button Press to toggle input sources. 4 Volume button Press to activate the volume sliding scale. 5 Brightness Press the key to open...

User Manual type c
Page 21
...settings of the function buttons (Modes, Brightness, Volume, Input or Menu) to display the input source Menu. Press button to activate the OSD menu. Icon Item Menu Description Press the Menu button to enter brightness adjustment function. Press the MENU key to trigger the Game mode control. 9 The shortcut menu lets you quickly select the most commonly accessed settings. User can switch input source, or to adjust the picture quality, OSD position and general settings. Press button to open the shortcut menu. Users can be connected to your LCD monitor. Press button...
...settings of the function buttons (Modes, Brightness, Volume, Input or Menu) to display the input source Menu. Press button to activate the OSD menu. Icon Item Menu Description Press the Menu button to enter brightness adjustment function. Press the MENU key to trigger the Game mode control. 9 The shortcut menu lets you quickly select the most commonly accessed settings. User can switch input source, or to adjust the picture quality, OSD position and general settings. Press button to open the shortcut menu. Users can be connected to your LCD monitor. Press button...
User Manual type c
Page 27
... user can set Over Drive to change. 3. Press the MENU key to adjust any sliding scales. 4. Then navigate to ... Use the / keys to open the OSD. 2. Refresh Rate Num: Display the panel's current refresh rate on the screen for shooting games. Mode - English 5. Adjusting the OSD Picture Color Audio Gaming OSD System Information Save Settings to the setting you can be 0% (OFF), 20%, 40%, 60%, or 80%. 7. Language: Set the OSD menu language. 5. OSD Timeout: Adjust the delay before turning off the OSD menu...
... user can set Over Drive to change. 3. Press the MENU key to adjust any sliding scales. 4. Then navigate to ... Use the / keys to open the OSD. 2. Refresh Rate Num: Display the panel's current refresh rate on the screen for shooting games. Mode - English 5. Adjusting the OSD Picture Color Audio Gaming OSD System Information Save Settings to the setting you can be 0% (OFF), 20%, 40%, 60%, or 80%. 7. Language: Set the OSD menu language. 5. OSD Timeout: Adjust the delay before turning off the OSD menu...
User Manual type c
Page 28
... the OSD. Wide Mode: You can assign different function (Brightness / Contrast / Blue Light / Volume / Over Driver / Gamma) to be set through the software on ", automatically searches for support. 7. The options are Normal and Low. 16 Press the MENU key to select setting. 4. DDC/CI: Allows the monitor settings to ... Auto Source: Default is DP1.2. Using the / keys, select Setting from DP, DP ALT or HDMI. 5. English Adjusting the System Picture Color Audio Gaming OSD System Information Save Settings...
... the OSD. Wide Mode: You can assign different function (Brightness / Contrast / Blue Light / Volume / Over Driver / Gamma) to be set through the software on ", automatically searches for support. 7. The options are Normal and Low. 16 Press the MENU key to select setting. 4. DDC/CI: Allows the monitor settings to ... Auto Source: Default is DP1.2. Using the / keys, select Setting from DP, DP ALT or HDMI. 5. English Adjusting the System Picture Color Audio Gaming OSD System Information Save Settings...
User Manual type c
Page 29
... Information to factory defaults. from the OSD. Turn on to open the OSD. 2. Press the MENU key to speed up boot speed. 12. Reset all settings: Reset the custom color settings to view the basic information for your monitor and current input. 3. User Input Auto Source DP Format Wide Mode Hot Key Assignment DDC/CI HDMI Black Level Setting Quick Start Mode HDMI On DP1.2 Full On Normal Off 1. Standard Main Source HDMI Resolution 1920x1080 H/V Frequency H 66KHz V 60 Hz Mode Standard S/N Reset All Settings 1. Quick Start Mode: Select...
... Information to factory defaults. from the OSD. Turn on to open the OSD. 2. Press the MENU key to speed up boot speed. 12. Reset all settings: Reset the custom color settings to view the basic information for your monitor and current input. 3. User Input Auto Source DP Format Wide Mode Hot Key Assignment DDC/CI HDMI Black Level Setting Quick Start Mode HDMI On DP1.2 Full On Normal Off 1. Standard Main Source HDMI Resolution 1920x1080 H/V Frequency H 66KHz V 60 Hz Mode Standard S/N Reset All Settings 1. Quick Start Mode: Select...

User Manual type c
Page 30
HDMI/DP ALT/DP Mode (Optional) Problem No picture visible LED status Blue Off Blinking Blue Remedy Using the OSD menu, adjust brightness and contrast to maximum or reset to see if you can self-diagnose the problem. Check if the video signal cable is properly connected to the monitor. English Troubleshooting Before sending your LCD monitor for servicing, please check the troubleshooting list below to their default settings. Check if the AC power cord is properly connected at the back of monitor. Check the power switch. Check if the computer...
HDMI/DP ALT/DP Mode (Optional) Problem No picture visible LED status Blue Off Blinking Blue Remedy Using the OSD menu, adjust brightness and contrast to maximum or reset to see if you can self-diagnose the problem. Check if the video signal cable is properly connected to the monitor. English Troubleshooting Before sending your LCD monitor for servicing, please check the troubleshooting list below to their default settings. Check if the AC power cord is properly connected at the back of monitor. Check the power switch. Check if the computer...

