
Safety Guide
Page 3
... instructions 10 Product servicing 10 Cleaning and servicing 10 Battery and adapter information 11 Accessing the power 11 Disconnecting the power source 11 Using electrical power 11 Guidelines for safe battery usage 13 Internal battery 15 Warnings and regulatory information 16 Optical drives 16 Telephone line safety 17 Emergency calls 17 Medical devices 17 Vehicles 18 Potentially explosive environments........ 18 Disposal instructions 19 ENERGY STAR 19 Wireless adapter regulatory...
... instructions 10 Product servicing 10 Cleaning and servicing 10 Battery and adapter information 11 Accessing the power 11 Disconnecting the power source 11 Using electrical power 11 Guidelines for safe battery usage 13 Internal battery 15 Warnings and regulatory information 16 Optical drives 16 Telephone line safety 17 Emergency calls 17 Medical devices 17 Vehicles 18 Potentially explosive environments........ 18 Disposal instructions 19 ENERGY STAR 19 Wireless adapter regulatory...

Safety Guide
Page 6
...; Install the external display, keyboard and mouse properly and within comfortable reach. • If you view your monitor more than the top edge of the display. • Adjust the display brightness and/or contrast to reduce eyestrain. Tips and information for enhanced text readability and graphics clarity. • Eliminate glare and reflections by using drapes, shades or blinds, • using a task light...
...; Install the external display, keyboard and mouse properly and within comfortable reach. • If you view your monitor more than the top edge of the display. • Adjust the display brightness and/or contrast to reduce eyestrain. Tips and information for enhanced text readability and graphics clarity. • Eliminate glare and reflections by using drapes, shades or blinds, • using a task light...
Safety Guide
Page 9
... sustained contact with your computer in to AC power. Basic care and tips for ventilation to ensure reliable operation of any kind into the product. • To avoid damage of the base will probably cause a short-circuit or damage rotor devices, HDD, optical drive, and even exposure risk from overheating. The openings should never be blocked or covered.
... sustained contact with your computer in to AC power. Basic care and tips for ventilation to ensure reliable operation of any kind into the product. • To avoid damage of the base will probably cause a short-circuit or damage rotor devices, HDD, optical drive, and even exposure risk from overheating. The openings should never be blocked or covered.

Safety Guide
Page 10
10 - Refer all servicing to qualified service personnel when: • The power cord or plug is turned on. Cleaning and servicing When cleaning the computer, follow these steps: 1. Turn off or in sleep mode. Do not put a computer in a carrying case, make sure that are covered by the operating instructions, since improper adjustment of other risks. Note Adjust only those controls that it is damaged, cut...
10 - Refer all servicing to qualified service personnel when: • The power cord or plug is turned on. Cleaning and servicing When cleaning the computer, follow these steps: 1. Turn off or in sleep mode. Do not put a computer in a carrying case, make sure that are covered by the operating instructions, since improper adjustment of other risks. Note Adjust only those controls that it is damaged, cut...
Safety Guide
Page 11
... accessible and located as possible. Disconnect the AC adapter. 3. Using electrical power • Do not connect the adapter to unplug from the type of static electricity from finger or other electrostatic conductors can seriously damage a battery, or other device. • When unplugging the power cord, do not pull on the cord itself but pull on the plug. • This product should be operated...
... accessible and located as possible. Disconnect the AC adapter. 3. Using electrical power • Do not connect the adapter to unplug from the type of static electricity from finger or other electrostatic conductors can seriously damage a battery, or other device. • When unplugging the power cord, do not pull on the cord itself but pull on the plug. • This product should be operated...
Safety Guide
Page 14
... not disassemble or dispose of batteries in a pressurized container, and do not expose it to purchase a new battery. Do not replace the battery with any parts other than normal, check an authorized reseller to temperatures over 50 °C (122 °F). This notebook uses a Lithium-based battery. Do not use it will must be replaced by yourself. • Device with removable battery: The battery should only...
... not disassemble or dispose of batteries in a pressurized container, and do not expose it to purchase a new battery. Do not replace the battery with any parts other than normal, check an authorized reseller to temperatures over 50 °C (122 °F). This notebook uses a Lithium-based battery. Do not use it will must be replaced by yourself. • Device with removable battery: The battery should only...
Safety Guide
Page 15
... try to www.acer.com for its intended purpose. A device with a hot or cold battery may be done by following the instruction included in summer or winter. authorized repair facility. • Recharge the battery by an Acer- Wireless devices may not work temporarily, even when the battery is especially limited in your computer - 15 Use the battery only for battery shipping documents. Basic care...
... try to www.acer.com for its intended purpose. A device with a hot or cold battery may be done by following the instruction included in summer or winter. authorized repair facility. • Recharge the battery by an Acer- Wireless devices may not work temporarily, even when the battery is especially limited in your computer - 15 Use the battery only for battery shipping documents. Basic care...

Safety Guide
Page 18
... been added. Using your device while flying in your vehicle or any area with great force. Switch off your device when in any equipment that air bags inflate with a potentially explosive atmosphere and obey all wireless equipment in aircraft is mounted and operating properly. Sparks in an explosive environment unless the transmitter has been modified to turn off...
... been added. Using your device while flying in your vehicle or any area with great force. Switch off your device when in any equipment that air bags inflate with a potentially explosive atmosphere and obey all wireless equipment in aircraft is mounted and operating properly. Sparks in an explosive environment unless the transmitter has been modified to turn off...
Safety Guide
Page 20
... wireless or radio transmitting devices when using your computer. To successfully transmit data files or messages, this section may cause interference or danger. Parts of inactivity respectively (Refer to the settings in this device requires a good quality connection to your laptop under the following conditions. 20 - Warnings and regulatory information Note Information in Power Management). • Wake the computer from sleep mode...
... wireless or radio transmitting devices when using your computer. To successfully transmit data files or messages, this section may cause interference or danger. Parts of inactivity respectively (Refer to the settings in this device requires a good quality connection to your laptop under the following conditions. 20 - Warnings and regulatory information Note Information in Power Management). • Wake the computer from sleep mode...
Safety Guide
Page 22
...channel mobile satellite systems. High power radars are provided for U.S operation according to Part 15.407 of wireless adapters in hospitals is governed by the Federal Aviation Administration (FAA). • The use due to its operation in hazardous locations is limited by the constraints posed...5.725 GHz frequency ranges. No configuration controls are allocated as primary users of the body, especially the face or eyes, while transmitting. • Do not operate the radio or attempt to device supporting IEEE 802.11a/ac wireless adapters. FCC radio frequency interference requirements ...
...channel mobile satellite systems. High power radars are provided for U.S operation according to Part 15.407 of wireless adapters in hospitals is governed by the Federal Aviation Administration (FAA). • The use due to its operation in hazardous locations is limited by the constraints posed...5.725 GHz frequency ranges. No configuration controls are allocated as primary users of the body, especially the face or eyes, while transmitting. • Do not operate the radio or attempt to device supporting IEEE 802.11a/ac wireless adapters. FCC radio frequency interference requirements ...
Safety Guide
Page 23
... is built into the computer. This wireless adapter generates, uses, and can be used in accordance with Part 15 of at www.fcc.gov/oet/ea/ by turning the equipment off and on the device. Nevertheless, the adapter should keep a distance of the FCC Rules. This device complies with the instructions, the wireless adapter may cause undesired operation. • 15.21 You are...
... is built into the computer. This wireless adapter generates, uses, and can be used in accordance with Part 15 of at www.fcc.gov/oet/ea/ by turning the equipment off and on the device. Nevertheless, the adapter should keep a distance of the FCC Rules. This device complies with the instructions, the wireless adapter may cause undesired operation. • 15.21 You are...

Safety Guide
Page 24
... interference, and (2) this device must not be installed and operated with any other antenna or transmitter. 2. Cet appareil se conforme à RSS247 de Canada d'Industrie. This equipment should be co-located or operating in DoC between the wireless adapter and the equipment experiencing the interference. • Connect the computer with RSS247 of the device. Canada - This device complies with FCC...
... interference, and (2) this device must not be installed and operated with any other antenna or transmitter. 2. Cet appareil se conforme à RSS247 de Canada d'Industrie. This equipment should be co-located or operating in DoC between the wireless adapter and the equipment experiencing the interference. • Connect the computer with RSS247 of the device. Canada - This device complies with FCC...

User Manual
Page 3
... precautions 5 Required tools 5 Pre-installation instructions 6 Post-installation instructions 6 System Upgrade 7 Removing the left side system cover....7 Installing the left side system cover......8 Hard drives 9 Removing the 3.5-inch hard drives .......9 Installing the 3.5-inch hard drives .......12 Memory 14 Memory configuration guidelines .......14 Removing a memory module 15 Installing a memory module 16 Graphic board 17 Removing the Graphic board 17 Installing the Graphic board 20 M.2 SSD module 22 Removing the M.2 SSD module............22 Installing the M.2 SSD module 25...
... precautions 5 Required tools 5 Pre-installation instructions 6 Post-installation instructions 6 System Upgrade 7 Removing the left side system cover....7 Installing the left side system cover......8 Hard drives 9 Removing the 3.5-inch hard drives .......9 Installing the 3.5-inch hard drives .......12 Memory 14 Memory configuration guidelines .......14 Removing a memory module 15 Installing a memory module 16 Graphic board 17 Removing the Graphic board 17 Installing the Graphic board 20 M.2 SSD module 22 Removing the M.2 SSD module............22 Installing the M.2 SSD module 25...
User Manual
Page 6
... system covers. 6 - Upgrading your computer. Warning Not turning off the power to the instructions on Removing the rear system cover on page 7 and Removing the left side system cover on page 10 and Installing the rear system cover on your Computer Pre-installation instructions Always observe the following sections for specific instructions on a flat, steady surface. 6. See to it that the components are a qualified service technician. Connect the necessary cables. 5.
... system covers. 6 - Upgrading your computer. Warning Not turning off the power to the instructions on Removing the rear system cover on page 7 and Removing the left side system cover on page 10 and Installing the rear system cover on your Computer Pre-installation instructions Always observe the following sections for specific instructions on a flat, steady surface. 6. See to it that the components are a qualified service technician. Connect the necessary cables. 5.
User Manual
Page 7
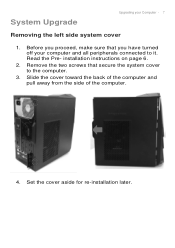
System Upgrade Upgrading your computer and all peripherals connected to the computer. 3. Set the cover aside for re-installation later. Read the Pre- Before you have turned off your Computer - 7 Removing the left side system cover 1. Remove the two screws that you proceed, make sure that secure the system cover to it. Slide the cover toward the back of the computer and pull away from the side of the computer. 4. installation instructions on page 6. 2.
System Upgrade Upgrading your computer and all peripherals connected to the computer. 3. Set the cover aside for re-installation later. Read the Pre- Before you have turned off your Computer - 7 Removing the left side system cover 1. Remove the two screws that you proceed, make sure that secure the system cover to it. Slide the cover toward the back of the computer and pull away from the side of the computer. 4. installation instructions on page 6. 2.

User Manual
Page 10
Disconnect the power and data cables from the side of computer (1) (2). 2 1 2 4. 10 - Upgrading your Computer 3. Rotating the HDD bracket and pull away from the hard drives.
Disconnect the power and data cables from the side of computer (1) (2). 2 1 2 4. 10 - Upgrading your Computer 3. Rotating the HDD bracket and pull away from the hard drives.

User Manual
Page 12
12 - Insert the new hard drive into the bracket and secure the new hard drive with four screws. 3. Remove the new hard drive from their packaging. 2. Connect the power and data cables to the hard drive. Upgrading your Computer Installing the 3.5-inch hard drives 1.
12 - Insert the new hard drive into the bracket and secure the new hard drive with four screws. 3. Remove the new hard drive from their packaging. 2. Connect the power and data cables to the hard drive. Upgrading your Computer Installing the 3.5-inch hard drives 1.

User Manual
Page 15
Perform Pre-installation instructions on both sides of the DIMM slot outward to release the memory module (1). 3. Press outward the holding clips on page 6. 2. Repeat steps 5~6 to remove it from the DIMM slot (2). 2 1 4. Upgrading your Computer - 15 Removing a memory module 1. Gently pull the memory module upward to remove the other memory modules.
Perform Pre-installation instructions on both sides of the DIMM slot outward to release the memory module (1). 3. Press outward the holding clips on page 6. 2. Repeat steps 5~6 to remove it from the DIMM slot (2). 2 1 4. Upgrading your Computer - 15 Removing a memory module 1. Gently pull the memory module upward to remove the other memory modules.
User Manual
Page 17
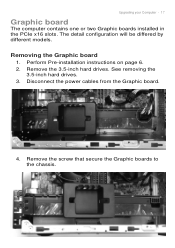
Remove the 3.5-inch hard drives. Disconnect the power cables from the Graphic board. 4. Upgrading your Computer - 17 Graphic board The computer contains one or two Graphic boards installed in the PCIe x16 slots. See removing the 3.5-inch hard drives. 3. Remove the screw that secure the Graphic boards to the chassis. Perform Pre-installation instructions on page 6. 2. The detail configuration will be differed by different models. Removing the Graphic board 1.
Remove the 3.5-inch hard drives. Disconnect the power cables from the Graphic board. 4. Upgrading your Computer - 17 Graphic board The computer contains one or two Graphic boards installed in the PCIe x16 slots. See removing the 3.5-inch hard drives. 3. Remove the screw that secure the Graphic boards to the chassis. Perform Pre-installation instructions on page 6. 2. The detail configuration will be differed by different models. Removing the Graphic board 1.
User Manual
Page 30
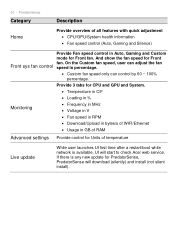
... RAM Advanced settings Provide control for Units of all features with quick adjustment CPU/GPU/System health information Fan speed control (Auto, Gaming and Silence) Provide Fan speed control in percentage. Custom fan speed only can control by 60 ~ 100% percentage. PredatorSense Category Description Home Provide overview of temperature Live update While user launches UI first time after a restart/boot while network is any new update...
... RAM Advanced settings Provide control for Units of all features with quick adjustment CPU/GPU/System health information Fan speed control (Auto, Gaming and Silence) Provide Fan speed control in percentage. Custom fan speed only can control by 60 ~ 100% percentage. PredatorSense Category Description Home Provide overview of temperature Live update While user launches UI first time after a restart/boot while network is any new update...


