

User Manual
Page 1
TABLE OF CONTENTS Special notes on LCD monitors 1 Information for your safety and comfort 2 Unpacking 5 Attaching/Removing the base 6 Screen position adjustment 6 Connecting the power cord 7 Safety precaution 7 Cleaning your monitor 7 Power saving 8 DDC 8 Connector Pin Assignment 9 Standard Timing Table 11 Installation 12 User controls 13 Troubleshooting 19
TABLE OF CONTENTS Special notes on LCD monitors 1 Information for your safety and comfort 2 Unpacking 5 Attaching/Removing the base 6 Screen position adjustment 6 Connecting the power cord 7 Safety precaution 7 Cleaning your monitor 7 Power saving 8 DDC 8 Connector Pin Assignment 9 Standard Timing Table 11 Installation 12 User controls 13 Troubleshooting 19

User Manual
Page 2
... the desktop pattern you use. • The LCD screen has effective pixels of the previous screen may flicker during initial use. SPECIAL NOTES ON LCD MONITORS The following symptoms are normal with LCD...
... the desktop pattern you use. • The LCD screen has effective pixels of the previous screen may flicker during initial use. SPECIAL NOTES ON LCD MONITORS The following symptoms are normal with LCD...

User Manual
Page 4
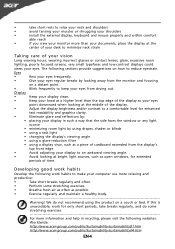
Long work periods, bad posture, poor work by adjusting the viewing angle of the monitor, using a footrest, or raising your leg muscles EN-3 LCD Pixel Statement The LCD unit is damaged, cut or frayed • liquid was spilled into the ...
Long work periods, bad posture, poor work by adjusting the viewing angle of the monitor, using a footrest, or raising your leg muscles EN-3 LCD Pixel Statement The LCD unit is damaged, cut or frayed • liquid was spilled into the ...
User Manual
Page 5
... product on how to make your display in recycling, please visit the following websites: Worldwide: http://www.acer-group.com/public/Sustainability/sustainability01.htm http://www.acer-group.com/public/Sustainability/sustainability04.htm EN-4 If this is unavoidable, work for extended periods of cardboard extended...shoulders • install the external display, keyboard and mouse properly and within comfort able reach • if you view your monitor more than the top edge of the display so your eyes point downward when looking at the center of your desk to ...
... product on how to make your display in recycling, please visit the following websites: Worldwide: http://www.acer-group.com/public/Sustainability/sustainability01.htm http://www.acer-group.com/public/Sustainability/sustainability04.htm EN-4 If this is unavoidable, work for extended periods of cardboard extended...shoulders • install the external display, keyboard and mouse properly and within comfort able reach • if you view your monitor more than the top edge of the display so your eyes point downward when looking at the center of your desk to ...

User Manual
Page 6
UNPACKING Please check the following items are present when you unpack the box, and save the packing materials in case you will need to ship or transport the monitor in future. • LCD Monitor • AC Power Cord • D-Sub Cable (Optional) • DVI Cable (Optional) • DP Cable (Opti onal) • Audio Cable (Optional) • User Manual • Quick Start Guide EN-5
UNPACKING Please check the following items are present when you unpack the box, and save the packing materials in case you will need to ship or transport the monitor in future. • LCD Monitor • AC Power Cord • D-Sub Cable (Optional) • DVI Cable (Optional) • DP Cable (Opti onal) • Audio Cable (Optional) • User Manual • Quick Start Guide EN-5
User Manual
Page 7
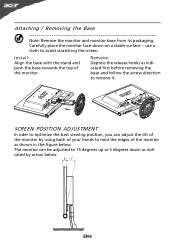
...EN-6 Remove: Depress the release hooks as shown in the figure below . Carefully place the monitor face-down as indicated by using both of your hands to hold the edges of the monitor as indicated first before removing the base and follow the arrow direction to avoid scratching the ...Align the base with the stand and push the base towards the top of the monitor by arrow below . The monitor can adjust the tilt of the monitor. Attaching / Removing the Base Note: Remove the monitor and monitor base from its packaging. SCREEN POSITION ADJUSTMENT In oder to optimize the best viewing ...
...EN-6 Remove: Depress the release hooks as shown in the figure below . Carefully place the monitor face-down as indicated by using both of your hands to hold the edges of the monitor as indicated first before removing the base and follow the arrow direction to avoid scratching the ...Align the base with the stand and push the base towards the top of the monitor by arrow below . The monitor can adjust the tilt of the monitor. Attaching / Removing the Base Note: Remove the monitor and monitor base from its packaging. SCREEN POSITION ADJUSTMENT In oder to optimize the best viewing ...

User Manual
Page 8
...H05VV-F cord and plug rated 10 A, 250 V. EN-7 light or other heavy object, on the face of the monitor. Place the monitor just below guidelines when cleaning the monitor. • Always unplug the monitor before cleaning. • Use a soft cloth to wipe the screen and cabinet front and sides. No user-adjustment... is the correct type required for the country in which the equipment will be installed. SAFETY PRECAUTION • Avoid placing the monitor, or any other light sources may reflect on the power cord to avoid damage to the cable. • Do not expose the...
...H05VV-F cord and plug rated 10 A, 250 V. EN-7 light or other heavy object, on the face of the monitor. Place the monitor just below guidelines when cleaning the monitor. • Always unplug the monitor before cleaning. • Use a soft cloth to wipe the screen and cabinet front and sides. No user-adjustment... is the correct type required for the country in which the equipment will be installed. SAFETY PRECAUTION • Avoid placing the monitor, or any other light sources may reflect on the power cord to avoid damage to the cable. • Do not expose the...

User Manual
Page 9
... Active OFF state back to Plug and Play with your system if your installation easier, the monitor is able to ON state is a communication protocol through which the monitor automatically informs the host system about its capabilities, for example, supported resolutions and corresponding timing. The... DDC (Display Data Channel) is around 3 seconds. The monitor supports DDC2B standard. EN-8 Power saving The monitor will be driven into Power Saving" mode by the amber-color power LED. DDC To make your system also ...
... Active OFF state back to Plug and Play with your system if your installation easier, the monitor is able to ON state is a communication protocol through which the monitor automatically informs the host system about its capabilities, for example, supported resolutions and corresponding timing. The... DDC (Display Data Channel) is around 3 seconds. The monitor supports DDC2B standard. EN-8 Power saving The monitor will be driven into Power Saving" mode by the amber-color power LED. DDC To make your system also ...

User Manual
Page 10
DESCRIPTION Red Green Blue Monitor Ground DDC-return R-Ground G-Ground B-Ground PIN NO. 9. 10. 11. 12. 13. 14. 15. CONNECTOR PIN ASSIGNMENT 15-Pin Color Display Signal Cable PIN NO. 1. 2. 3. 4. 5. 6. 7. 8. DESCRIPTION +5V Logic Ground Monitor Ground DDC-Serial Data H-Sync V-Sync DDC-Serial Clock EN-9
DESCRIPTION Red Green Blue Monitor Ground DDC-return R-Ground G-Ground B-Ground PIN NO. 9. 10. 11. 12. 13. 14. 15. CONNECTOR PIN ASSIGNMENT 15-Pin Color Display Signal Cable PIN NO. 1. 2. 3. 4. 5. 6. 7. 8. DESCRIPTION +5V Logic Ground Monitor Ground DDC-Serial Data H-Sync V-Sync DDC-Serial Clock EN-9

User Manual
Page 13
... steps as given below: Steps 1. 1-1 Connect Video Cable a. This sequence is very important. 5. b. Mak e sure both the monitor and computer are powered-OFF. INSTALLATION To install the monitor to the computer. 2. Make sure both th e mon itor and computer are powered-OFF. b. Connect power cord Connect the power cord... video cable to the computer's port. 1-3 Connect DP or HDMI Ca ble (O nly DP or HDMI-Input M odel) a. Make sure both the monitor and computer are pow ered -OFF. Connect the Audio Cable(Only Audio-Input Model)(Optional) 3. Connect one end of the 24-pin DVI cable to...
... steps as given below: Steps 1. 1-1 Connect Video Cable a. This sequence is very important. 5. b. Mak e sure both the monitor and computer are powered-OFF. INSTALLATION To install the monitor to the computer. 2. Make sure both th e mon itor and computer are powered-OFF. b. Connect power cord Connect the power cord... video cable to the computer's port. 1-3 Connect DP or HDMI Ca ble (O nly DP or HDMI-Input M odel) a. Make sure both the monitor and computer are pow ered -OFF. Connect the Audio Cable(Only Audio-Input Model)(Optional) 3. Connect one end of the 24-pin DVI cable to...

User Manual
Page 14
... the sources you quickly select the most commonly accessed settings. USER CONTROLS Power Switch / Power LED: To turn the monitor ON or OFF. It may be connected to activate the OSD menu. AUTO Auto Adjust: Press this botton to your... monitor. (a) VG A inp ut (b) DV I or DP/HDMI If either VGA or DVI input is selected ,but the VGA and...Press the function button to indicate the power is used to ap pear. Lights up to open the Acer eColor Management OSD and access the scenario modes.
... the sources you quickly select the most commonly accessed settings. USER CONTROLS Power Switch / Power LED: To turn the monitor ON or OFF. It may be connected to activate the OSD menu. AUTO Auto Adjust: Press this botton to your... monitor. (a) VG A inp ut (b) DV I or DP/HDMI If either VGA or DVI input is selected ,but the VGA and...Press the function button to indicate the power is used to ap pear. Lights up to open the Acer eColor Management OSD and access the scenario modes.

User Manual
Page 16
.... You can use the OSD to open the OSD. For advanced settings, please refer to following content is for adjusting the settings of your LCD Monitor. Adjusting the OSD settings Note: The following page: Adjusting the picture quality 1 Press the MENU key to bring up the OSD. 2 Using the / keys, select...
.... You can use the OSD to open the OSD. For advanced settings, please refer to following content is for adjusting the settings of your LCD Monitor. Adjusting the OSD settings Note: The following page: Adjusting the picture quality 1 Press the MENU key to bring up the OSD. 2 Using the / keys, select...

User Manual
Page 19
Then the basic information of LCD monitor will show up the OSD. 2 Using the / keys, select Information from the OSD. Product information 1 Press the MENU key to bring up for current input. EN-18
Then the basic information of LCD monitor will show up the OSD. 2 Using the / keys, select Information from the OSD. Product information 1 Press the MENU key to bring up for current input. EN-18

User Manual
Page 20
... minimum position and try to their default settings. LED displays amber color · Check if video signal cable is properly connected at the back of monitor. · Check if the power of computer system is · Using OSD, adjust RESOLUTION, CLOCK, missing, center CLOCK-PHASE, H-POSITION and V- ...) No sound, or sound level is in compliance which may be causing the input signal frequency mismatch. TROUBLESHOOTING Before sending your LCD monitor for a few seconds after adjusting the size of the image before changing or disconnecting the signal cable or powering OFF the...
... minimum position and try to their default settings. LED displays amber color · Check if video signal cable is properly connected at the back of monitor. · Check if the power of computer system is · Using OSD, adjust RESOLUTION, CLOCK, missing, center CLOCK-PHASE, H-POSITION and V- ...) No sound, or sound level is in compliance which may be causing the input signal frequency mismatch. TROUBLESHOOTING Before sending your LCD monitor for a few seconds after adjusting the size of the image before changing or disconnecting the signal cable or powering OFF the...

User Manual
Page 21
... Status Remedy LED ON · Using OSD, adjust brightness and contrast to maximum or reset to the monitor. LED displays amber color · Check if video signal cable is properly connected at the back of monitor. · Check if the power of the host PC is in minimum position and try to...
... Status Remedy LED ON · Using OSD, adjust brightness and contrast to maximum or reset to the monitor. LED displays amber color · Check if video signal cable is properly connected at the back of monitor. · Check if the power of the host PC is in minimum position and try to...

User Manual
Page 22
... SA Via Cantonale, Centro Galleria 2 6928 Manno Switzerland Hereby declare that: Product: Trade Name: Model Number: SKU Number: LCD Monitor Acer P216HV;P226HQV P216HV;P226HQVxxxxxx("x" = 0~9, a ~ z, or A ~ Z) Is compliant with the essential requirements and other relevant provisions of the following EC directives,... EN61000-3-3 Low Voltage Directive 2006/95/EC as attested by conformity with the following harmonized standards: -. Easy Lai /Manager Regulation, Acer Inc. EN55024 -. EMC Directive 2004/108/EC as attested by weight in Electrical and Electronic Equipment: -.
... SA Via Cantonale, Centro Galleria 2 6928 Manno Switzerland Hereby declare that: Product: Trade Name: Model Number: SKU Number: LCD Monitor Acer P216HV;P226HQV P216HV;P226HQVxxxxxx("x" = 0~9, a ~ z, or A ~ Z) Is compliant with the essential requirements and other relevant provisions of the following EC directives,... EN61000-3-3 Low Voltage Directive 2006/95/EC as attested by conformity with the following harmonized standards: -. Easy Lai /Manager Regulation, Acer Inc. EN55024 -. EMC Directive 2004/108/EC as attested by weight in Electrical and Electronic Equipment: -.

User Manual
Page 23
... conditions: (1) this device may not cause harmful interference, and (2) this declaration: Product: LCD Monitor Trade Name: Acer Model Number: P216HV;P226HQV SKU Number: P216HV;P226HQVxxxxxx ("x" = 0~9, a ~ z, A ~ Z or Blank) Name of Responsible Party: Acer America Corporation Address of the FCC Rules. Contact Person: Acer Representative Phone No.: 254-298-4000 Fax No.: 254-298-4147 San Jose...
... conditions: (1) this device may not cause harmful interference, and (2) this declaration: Product: LCD Monitor Trade Name: Acer Model Number: P216HV;P226HQV SKU Number: P216HV;P226HQVxxxxxx ("x" = 0~9, a ~ z, A ~ Z or Blank) Name of Responsible Party: Acer America Corporation Address of the FCC Rules. Contact Person: Acer Representative Phone No.: 254-298-4000 Fax No.: 254-298-4147 San Jose...


