

User Manual (3D)
Page 3
... view 3D content, you should turn the 3D technology on, you will be projected at full brightness. In many cases, there is enabled. English 3 The Acer projector you need 3D glasses to support 144Hz sync signal for instructions how to turn off , otherwise the image may not be shown a reminder that 3D is a power switch on or not. Using 3D glasses DLP 3D glasses are powered...
... view 3D content, you should turn the 3D technology on, you will be projected at full brightness. In many cases, there is enabled. English 3 The Acer projector you need 3D glasses to support 144Hz sync signal for instructions how to turn off , otherwise the image may not be shown a reminder that 3D is a power switch on or not. Using 3D glasses DLP 3D glasses are powered...

User Manual (3D)
Page 4
... need to open the OSD. Before you can enjoy the benefits of the DLP 3D technology, you have installed the drivers, you will need to set up the environment. 1 Set the refresh rate to 100/120 Hz on the projector remote control to purchase additional software. 4 Ensure you will be set refresh rate which the 3D content requires. To download software and use an...
... need to open the OSD. Before you can enjoy the benefits of the DLP 3D technology, you have installed the drivers, you will need to set up the environment. 1 Set the refresh rate to 100/120 Hz on the projector remote control to purchase additional software. 4 Ensure you will be set refresh rate which the 3D content requires. To download software and use an...

User Manual
Page 5
... of air around the projector are covered by the operating instructions, since improper adjustment of other risks. Refer all windows rolled up. • Locations where excessive humidity, dust, or cigarette smoke may hurt your reseller for service • the product does not operate normally after following environments: • Space that are necessary. • Locations where temperatures may become excessively high, such as opening or removing covers...
... of air around the projector are covered by the operating instructions, since improper adjustment of other risks. Refer all windows rolled up. • Locations where excessive humidity, dust, or cigarette smoke may hurt your reseller for service • the product does not operate normally after following environments: • Space that are necessary. • Locations where temperatures may become excessively high, such as opening or removing covers...

User Manual
Page 6
... block the projector lens with your local dealer or Acer service center when you . • Do not stand the projector on the remote control. • Do not operate lamps beyond the rated lamp life. vi may cause the fan(s) to operate in a horizontal way by means of desktop or ceiling mount mode only, and its cooling cycle before turning main power off. • Do not touch the air outlet...
... block the projector lens with your local dealer or Acer service center when you . • Do not stand the projector on the remote control. • Do not operate lamps beyond the rated lamp life. vi may cause the fan(s) to operate in a horizontal way by means of desktop or ceiling mount mode only, and its cooling cycle before turning main power off. • Do not touch the air outlet...

User Manual
Page 8
... cycle before cleaning. • Use a soft cloth moistened with mild detergent to clean the display housing. • Disconnect the power plug from AC outlet if the product is not being used for changing the lamp, when lamp warning message displays. • When switching the projector off the product before disconnecting power. • Turn on the projector first and then the signal sources. • Do not use lens cap when projector is on...
... cycle before cleaning. • Use a soft cloth moistened with mild detergent to clean the display housing. • Disconnect the power plug from AC outlet if the product is not being used for changing the lamp, when lamp warning message displays. • When switching the projector off the product before disconnecting power. • Turn on the projector first and then the signal sources. • Do not use lens cap when projector is on...
User Manual
Page 11
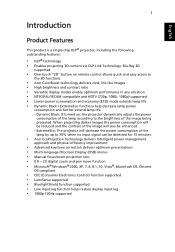
... a single-chip DLP® projector, including the following outstanding features: • DLP® technology • Enables projecting 3D content via DLP Link Technology: Blu-Ray 3D supported • One-touch "3D" button on , the projector dynamically adjusts the power consumption of the lamp according to the 3D functions • Acer ColorBoost technology delivers vivid, life-like images • High brightness and contrast ratio • Versatile display modes enable...
... a single-chip DLP® projector, including the following outstanding features: • DLP® technology • Enables projecting 3D content via DLP Link Technology: Blu-Ray 3D supported • One-touch "3D" button on , the projector dynamically adjusts the power consumption of the lamp according to the 3D functions • Acer ColorBoost technology delivers vivid, life-like images • High brightness and contrast ratio • Versatile display modes enable...

User Manual
Page 13
... Focus ring 2 Lens cap 6 Projection lens 3 Power key and Power indicator LED 7 Remote control receiver 4 IR remote sensor Rear side 1 2 3 4 5 6 7 89 10 11 11 Note: Connector interface is subject to model's specifications. # Description 1 HDMI connector 2 HDMI (MHL) connector 3 DC 5V output (service) 4 Analog RGB signal/HDTV/ component video input connector 5 Monitor loop-through output connector (from VGA IN 1 only) # Description 6 RS232 connector 7 Composite video input connector 8 Audio input connector Audio output connector 9 Kensington™ lock port 10 Power...
... Focus ring 2 Lens cap 6 Projection lens 3 Power key and Power indicator LED 7 Remote control receiver 4 IR remote sensor Rear side 1 2 3 4 5 6 7 89 10 11 11 Note: Connector interface is subject to model's specifications. # Description 1 HDMI connector 2 HDMI (MHL) connector 3 DC 5V output (service) 4 Analog RGB signal/HDTV/ component video input connector 5 Monitor loop-through output connector (from VGA IN 1 only) # Description 6 RS232 connector 7 Composite video input connector 8 Audio input connector Audio output connector 9 Kensington™ lock port 10 Power...

User Manual
Page 16
... settings. 13 SOURCE Changes the active source. 14 MODE Chooses a display mode. 15 MENU Launches the Onscreen Display (OSD) menu or exits the OSD menu. 16 HIDE Press "HIDE" to hide screen image; press again to display the image. 17 HDMI/MHL To change source to input a password in or out. This function is only available when connected to a computer via a mini USB cable. 9 COMPONENT (No function) 10 MEDIA Opens MEDIA SETUP page. (for LAN/wireless compatible models...
... settings. 13 SOURCE Changes the active source. 14 MODE Chooses a display mode. 15 MENU Launches the Onscreen Display (OSD) menu or exits the OSD menu. 16 HIDE Press "HIDE" to hide screen image; press again to display the image. 17 HDMI/MHL To change source to input a password in or out. This function is only available when connected to a computer via a mini USB cable. 9 COMPONENT (No function) 10 MEDIA Opens MEDIA SETUP page. (for LAN/wireless compatible models...

User Manual
Page 20
... first time you connect to multiple sources at the same time, use "SOURCE" on the control panel or remote control, or the direct source key on the remote control to switch between inputs. The projector will turn on the control panel or remote control, and the Power indicator LED will detect your source (computer, notebook, video player, etc.). The Power LED will light red. 2 Turn on the projector by pressing (POWER) on the projector or the Source Selection function is "Auto"). • If the screen displays "No Signal", please...
... first time you connect to multiple sources at the same time, use "SOURCE" on the control panel or remote control, or the direct source key on the remote control to switch between inputs. The projector will turn on the control panel or remote control, and the Power indicator LED will detect your source (computer, notebook, video player, etc.). The Power LED will light red. 2 Turn on the projector by pressing (POWER) on the projector or the Source Selection function is "Auto"). • If the screen displays "No Signal", please...

User Manual
Page 25
... the control panel or remote control to launch the OSD for projector installation and maintenance. The new settings will be saved automatically upon exiting the menu. 5 Press "MENU" anytime to exit the menu and return to the Acer welcome screen. English 15 User Controls Installation Menu The Installation menu provides an Onscreen Display (OSD) for projector installation and maintenance. 3 The background pattern acts as a guide to adjusting the calibration and alignment settings, such as screen size and distance, focus...
... the control panel or remote control to launch the OSD for projector installation and maintenance. The new settings will be saved automatically upon exiting the menu. 5 Press "MENU" anytime to exit the menu and return to the Acer welcome screen. English 15 User Controls Installation Menu The Installation menu provides an Onscreen Display (OSD) for projector installation and maintenance. 3 The background pattern acts as a guide to adjusting the calibration and alignment settings, such as screen size and distance, focus...

User Manual
Page 28
... education environment. • User 1/User 2/User 3: Memorize user's settings. Adjusts the brightness of the display modes as a starting point and customize the settings. The below OSD items can use one of the image. • Press to darken the image. • Press to increase the contrast. Adjusting the contrast changes the amount of black and white in the Display Mode menu. You can be adjusted and saved. Controls the degree of difference...
... education environment. • User 1/User 2/User 3: Memorize user's settings. Adjusts the brightness of the display modes as a starting point and customize the settings. The below OSD items can use one of the image. • Press to darken the image. • Press to increase the contrast. Adjusting the contrast changes the amount of black and white in the Display Mode menu. You can be adjusted and saved. Controls the degree of difference...

User Manual
Page 30
...; White Peaking: Increases the brightness of the color selected. • - The ISF (Imaging Science Foundation) has developed carefully crafted, industry-recognized standards for optimal video performance and has implemented a training program for each analog source. • ISF: This menu is selected in English letters. You can change User 1/User 2/User 3 to obtain optimal picture quality ISF certified display devices. Color Management: Adjusts the red, green, blue, cyan, yellow...
...; White Peaking: Increases the brightness of the color selected. • - The ISF (Imaging Science Foundation) has developed carefully crafted, industry-recognized standards for optimal video performance and has implemented a training program for each analog source. • ISF: This menu is selected in English letters. You can change User 1/User 2/User 3 to obtain optimal picture quality ISF certified display devices. Color Management: Adjusts the red, green, blue, cyan, yellow...

User Manual
Page 31
... fit the screen and displayed using a 4:3 ratio. • 16:9: The image will be displayed making full use of image. • Desktop • Ceiling: Turns the image upside down for WXGA/1080p/WUXGA models): Keeps the original signal aspect ratio and zooms in by 1.333 times. 21 English Image Projection Mode Projection Location Aspect Ratio Auto Keystone • Front: The factory default setting. • Rear: Reverses the image so you can project from behind a translucent screen. • Auto: Automatically adjusts projection location of the...
... fit the screen and displayed using a 4:3 ratio. • 16:9: The image will be displayed making full use of image. • Desktop • Ceiling: Turns the image upside down for WXGA/1080p/WUXGA models): Keeps the original signal aspect ratio and zooms in by 1.333 times. 21 English Image Projection Mode Projection Location Aspect Ratio Auto Keystone • Front: The factory default setting. • Rear: Reverses the image so you can project from behind a translucent screen. • Auto: Automatically adjusts projection location of the...

User Manual
Page 32
... prevent color display error. Adjusts the color range of the HDMI image data to match the frequency of your computer's graphics card. This function is only available for gaming environment. English 22 V. Low Input Lag This function is especially suitable for certain input timings. After turned on, performing Auto Keystone or adjusting the following settings will be automatically turned on. If you experience a vertical flickering bar in the projected image, use...
... prevent color display error. Adjusts the color range of the HDMI image data to match the frequency of your computer's graphics card. This function is only available for gaming environment. English 22 V. Low Input Lag This function is especially suitable for certain input timings. After turned on, performing Auto Keystone or adjusting the following settings will be automatically turned on. If you experience a vertical flickering bar in the projected image, use...
User Manual
Page 33
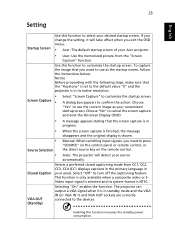
... source key on the remote control. Selecting "On" enables the function. Closed Caption VGA OUT (Standby) Selects a preferred closed captioning mode from the "Screen Capture" function. The projector can output a VGA signal when it will detect your area). Enabling this function to confirm the action. 23 Setting English Startup Screen Use this function to the devices. If you exit the OSD menu. • Acer: The default...
... source key on the remote control. Selecting "On" enables the function. Closed Caption VGA OUT (Standby) Selects a preferred closed captioning mode from the "Screen Capture" function. The projector can output a VGA signal when it will detect your area). Enabling this function to confirm the action. 23 Setting English Startup Screen Use this function to the devices. If you exit the OSD menu. • Acer: The default...

User Manual
Page 35
If you to enter password when switching on . User Password • Press to set up or change "User Password". • Use the numerical keys on the remote control to set timeout function. • Press to select timeout duration. • The range is from 10 to 990 minutes. • When time is up, the projector will request you to enter the password again. • The factory default setting of "Timeout...
If you to enter password when switching on . User Password • Press to set up or change "User Password". • Use the numerical keys on the remote control to set timeout function. • Press to select timeout duration. • The range is from 10 to 990 minutes. • When time is up, the projector will request you to enter the password again. • The factory default setting of "Timeout...

User Manual
Page 36
..." after choosing "Yes" to the factory default settings. If you forget your local Acer service center. This unique password will be changed by default. Lock User Startup Screen This function is lost, please contact your administrator password, do the following to retrieve the administrator password: • Enter the unique 6-digit "Universal Password" which is locked and cannot be accepted by the projector no matter what the administrator...
..." after choosing "Yes" to the factory default settings. If you forget your local Acer service center. This unique password will be changed by default. Lock User Startup Screen This function is lost, please contact your administrator password, do the following to retrieve the administrator password: • Enter the unique 6-digit "Universal Password" which is locked and cannot be accepted by the projector no matter what the administrator...

User Manual
Page 37
... of time the OSD menu will also lower the power consumption, reduce noise, and extend the lamp life. When the projector is turned on and the Control Panel Lock will be set to prevent it off the projector with fan cooling process by pressing "MENU". The projector will still be in standby mode to "Off". 27 Management English ECO Mode High Altitude Turn Off Mode Auto Shutdown (Minutes) Menu Display Time (Seconds) AC Power On Control Panel Lock Choose...
... of time the OSD menu will also lower the power consumption, reduce noise, and extend the lamp life. When the projector is turned on and the Control Panel Lock will be set to prevent it off the projector with fan cooling process by pressing "MENU". The projector will still be in standby mode to "Off". 27 Management English ECO Mode High Altitude Turn Off Mode Auto Shutdown (Minutes) Menu Display Time (Seconds) AC Power On Control Panel Lock Choose...

User Manual
Page 43
... control panel lock function is disabled. 2 Lamp burns out or makes a popping sound When the lamp reaches the end of its useful life, it is sides centered on the screen and below the bottom of the projector. Go to "Image" > "Auto Keystone" or "Image" > "Manual Keystone" to or further from the screen. • Press "MENU" on the top of the screen. • Press the Keystone correction keys on the control panel or remote control...
... control panel lock function is disabled. 2 Lamp burns out or makes a popping sound When the lamp reaches the end of its useful life, it is sides centered on the screen and below the bottom of the projector. Go to "Image" > "Auto Keystone" or "Image" > "Manual Keystone" to or further from the screen. • Press "MENU" on the top of the screen. • Press the Keystone correction keys on the control panel or remote control...

User Manual
Page 45
Error (Color wheel -- V LAMP LED Red -- --- -- -- failure) V V V Quick flashing TEMP LED Red -- --- -- -- V V Quick flashing --- V -- -- Quick flashing V V Quick flashing -- -- V --- 35 LED & Alarm Definition Listing LED Messages English Message Standby (Power cord plugged in) Power on Lamp retry Turning off (Cooling state) Turning off (Cooling completed) Firmware download Error (Thermal failure) Error (Fan lock failure) Power LED Red Blue V -- --- Error (Lamp breakdown) -- V --
Error (Color wheel -- V LAMP LED Red -- --- -- -- failure) V V V Quick flashing TEMP LED Red -- --- -- -- V V Quick flashing --- V -- -- Quick flashing V V Quick flashing -- -- V --- 35 LED & Alarm Definition Listing LED Messages English Message Standby (Power cord plugged in) Power on Lamp retry Turning off (Cooling state) Turning off (Cooling completed) Firmware download Error (Thermal failure) Error (Fan lock failure) Power LED Red Blue V -- --- Error (Lamp breakdown) -- V --


