

User Manual (3D)
Page 3
...-ray content" on , you will be projected at full brightness. Note: Suggest to use Acer DLP 3D glasses to enjoy perfect 3D performance without compatibility issues. English 3 The Acer projector you need 3D glasses to support 144Hz sync signal for instructions how to turn off , otherwise the image may not be shown a reminder that 3D is a power switch on one of the arms that...
...-ray content" on , you will be projected at full brightness. Note: Suggest to use Acer DLP 3D glasses to enjoy perfect 3D performance without compatibility issues. English 3 The Acer projector you need 3D glasses to support 144Hz sync signal for instructions how to turn off , otherwise the image may not be shown a reminder that 3D is a power switch on one of the arms that...

User Manual (3D)
Page 4
... glasses. To download software and use an NVIDIA 3DTV Play ready projector with DLP glasses, refer to purchase additional software. 4 Ensure you have installed the drivers, you will be set automatically. 2 Press the menu button on the projector remote control to 100/120 Hz on most of the window. Others, please set up a 3D environment Once you are viewing Blu-ray 3D content over an HDMI 1.4a or...
... glasses. To download software and use an NVIDIA 3DTV Play ready projector with DLP glasses, refer to purchase additional software. 4 Ensure you have installed the drivers, you will be set automatically. 2 Press the menu button on the projector remote control to 100/120 Hz on most of the window. Others, please set up a 3D environment Once you are viewing Blu-ray 3D content over an HDMI 1.4a or...

User Manual (3D)
Page 7
... turning on pages 4-6. English 7 1 Open the stereoscopic player and set to 480i or 576i. Note: If your DVD or Blu-ray player supports 3D over HDMI 1.4a, check that supports 3D playback, you can watch 3D DVD content using any of the available input formats. Connect your DVD or Blu-ray player to the projector using your projector. Older connections should check the resolution is set the viewing...
... turning on pages 4-6. English 7 1 Open the stereoscopic player and set to 480i or 576i. Note: If your DVD or Blu-ray player supports 3D over HDMI 1.4a, check that supports 3D playback, you can watch 3D DVD content using any of the available input formats. Connect your DVD or Blu-ray player to the projector using your projector. Older connections should check the resolution is set the viewing...

User Manual
Page 5
... the life span and darken the image. • Locations near fire alarms. • Locations with all servicing to qualified service personnel. v Product servicing Do not attempt to service this product from walls and free flow of air around the projector are covered by the operating instructions, since improper adjustment of other risks. Unplug this product yourself, as inside of a car with an ambient temperature above 40...
... the life span and darken the image. • Locations near fire alarms. • Locations with all servicing to qualified service personnel. v Product servicing Do not attempt to service this product from walls and free flow of air around the projector are covered by the operating instructions, since improper adjustment of other risks. Unplug this product yourself, as inside of a car with an ambient temperature above 40...

User Manual
Page 6
... way by means of displaying inverted images for changing the lamp, when lamp warning message displays. • Do not attempt to break or drop it to break on . • Do not block the projector lens with dirt or dust. • Do not look into the air outlet grille when projector is operating. Please contact your dealer. • Do not keep using this product to disassemble this...
... way by means of displaying inverted images for changing the lamp, when lamp warning message displays. • Do not attempt to break or drop it to break on . • Do not block the projector lens with dirt or dust. • Do not look into the air outlet grille when projector is operating. Please contact your dealer. • Do not keep using this product to disassemble this...

User Manual
Page 8
... being used for changing the lamp, when lamp warning message displays. • When switching the projector off the product before disconnecting power. • Turn on the projector first and then the signal sources. • Do not use lens cap when projector is in operation. • When the lamp reaches the end of its life, it will burn out and may make a loud popping sound. Please contact your local dealer or Acer service center...
... being used for changing the lamp, when lamp warning message displays. • When switching the projector off the product before disconnecting power. • Turn on the projector first and then the signal sources. • Do not use lens cap when projector is in operation. • When the lamp reaches the end of its life, it will burn out and may make a loud popping sound. Please contact your local dealer or Acer service center...

User Manual
Page 11
... x 800 WXGA resolution, Auto/Full/4:3/16:9/L.Box aspect ratio supported • Enables projecting 3D content via DLP Link Technology: Blu-Ray 3D supported • One-touch "3D" button on , the projector dynamically adjusts the power consumption of the lamp according to the brightness of the lamp by up to the 3D functions • Acer ColorBoost technology delivers vivid, life-like images • High brightness and contrast...
... x 800 WXGA resolution, Auto/Full/4:3/16:9/L.Box aspect ratio supported • Enables projecting 3D content via DLP Link Technology: Blu-Ray 3D supported • One-touch "3D" button on , the projector dynamically adjusts the power consumption of the lamp according to the brightness of the lamp by up to the 3D functions • Acer ColorBoost technology delivers vivid, life-like images • High brightness and contrast...

User Manual
Page 13
English Projector Overview Projector Outlook Front/upper side 1 3 3 4 2 5 6 # Description # Description 1 Control panel 4 Zoom ring and Focus ring 2 Lens cap 5 Projection lens 3 Power key and Power indicator LED 6 Remote control receiver
English Projector Overview Projector Outlook Front/upper side 1 3 3 4 2 5 6 # Description # Description 1 Control panel 4 Zoom ring and Focus ring 2 Lens cap 5 Projection lens 3 Power key and Power indicator LED 6 Remote control receiver

User Manual
Page 15
5 English Control Panel 1 7 2 3 8 4 9 5 6 10 3 # Function 1 LAMP 2 POWER 3 Keystone 4 Power key 5 ENTER 6 BACK 7 TEMP 8 SOURCE 9 Four directional selection keys 10 MENU Description Lamp indicator LED. Confirms your selection of items. Cancels your selection Launches the Onscreen Display (OSD) menu, returns to the previous step for the OSD menu operation or exits the OSD menu. Selects items or makes adjustments to your selection, or goes back to the "Turning the Projector On/Off...
5 English Control Panel 1 7 2 3 8 4 9 5 6 10 3 # Function 1 LAMP 2 POWER 3 Keystone 4 Power key 5 ENTER 6 BACK 7 TEMP 8 SOURCE 9 Four directional selection keys 10 MENU Description Lamp indicator LED. Confirms your selection of items. Cancels your selection Launches the Onscreen Display (OSD) menu, returns to the previous step for the OSD menu operation or exits the OSD menu. Selects items or makes adjustments to your selection, or goes back to the "Turning the Projector On/Off...
User Manual
Page 17
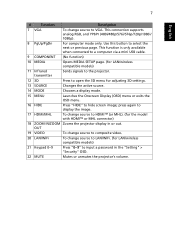
... VIDEO To change source to composite video. 20 LAN/WiFi To change source to open the 3D menu for the model with HDMI™ or MHL connector) 18 ZOOM IN/ZOOM Zooms the projector display in the "Setting" > "Security" OSD. 22 MUTE Mutes or unmutes the projector's volume. This connection supports analog RGB, and YPbPr (480i/480p/576i/576p/720p/1080i/ 1080p). 8 PgUp/PgDn For computer mode only. Use this button to hide screen image...
... VIDEO To change source to composite video. 20 LAN/WiFi To change source to open the 3D menu for the model with HDMI™ or MHL connector) 18 ZOOM IN/ZOOM Zooms the projector display in the "Setting" > "Security" OSD. 22 MUTE Mutes or unmutes the projector's volume. This connection supports analog RGB, and YPbPr (480i/480p/576i/576p/720p/1080i/ 1080p). 8 PgUp/PgDn For computer mode only. Use this button to hide screen image...

User Manual
Page 27
... 795 x 596 641 Zoom Ratio: 1.3 x 17 • P1250B/M316E/PE-X45K If the projector is 3 m from the screen, good image quality is located at 3 m distance. Max screen size Min screen size 98" 75" Height: 123 cm Height: 160m From base to top of image 3 m Desired distance Desired Distance (m) < A > Minimum Screen Size (Min zoom) Diagonal (inch) < B > W (cm) x H (cm) From base to top of image (cm) < C > Maximum Screen Size (Max zoom) Diagonal (inch...
... 795 x 596 641 Zoom Ratio: 1.3 x 17 • P1250B/M316E/PE-X45K If the projector is 3 m from the screen, good image quality is located at 3 m distance. Max screen size Min screen size 98" 75" Height: 123 cm Height: 160m From base to top of image 3 m Desired distance Desired Distance (m) < A > Minimum Screen Size (Min zoom) Diagonal (inch) < B > W (cm) x H (cm) From base to top of image (cm) < C > Maximum Screen Size (Max zoom) Diagonal (inch...

User Manual
Page 34
... the menu. 5 Press "MENU" anytime to exit the menu and return to adjusting the calibration and alignment settings, such as screen size and distance, focus and more. Note: The OSD screenshot is displayed on the screen or when the projector searches for input signal. 1 Turn on the projector by pressing remote control. (POWER) on the control panel or 2 Press "MENU" on the control panel or remote control to launch the OSD for feature setting. English 24 User Controls Installation Menu The Installation menu...
... the menu. 5 Press "MENU" anytime to exit the menu and return to adjusting the calibration and alignment settings, such as screen size and distance, focus and more. Note: The OSD screenshot is displayed on the screen or when the projector searches for input signal. 1 Turn on the projector by pressing remote control. (POWER) on the control panel or 2 Press "MENU" on the control panel or remote control to launch the OSD for feature setting. English 24 User Controls Installation Menu The Installation menu...

User Manual
Page 37
... the image. You can change User 1/User 2 to the wall. Note: "Saturation" and "Tint" functions are several choices, including White, Light Yellow, Light Blue, Pink and Dark Green. English Wall Color Brightness Contrast Saturation Tint Color Temperature Gamma Rename 27 Use this function to choose a proper color according to your preferred mode name in the Display Mode menu. At higher color temperatures, the screen looks colder; Adjusts the brightness of dark scenery. Adjusts the color temperature.
... the image. You can change User 1/User 2 to the wall. Note: "Saturation" and "Tint" functions are several choices, including White, Light Yellow, Light Blue, Pink and Dark Green. English Wall Color Brightness Contrast Saturation Tint Color Temperature Gamma Rename 27 Use this function to choose a proper color according to your preferred mode name in the Display Mode menu. At higher color temperatures, the screen looks colder; Adjusts the brightness of dark scenery. Adjusts the color temperature.
User Manual
Page 38
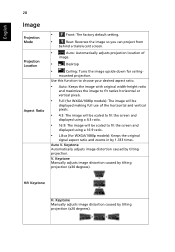
... the screen and displayed using a 16:9 ratio. • L.Box (for ceiling- English 28 Image Projection Mode Projection Location Aspect Ratio • Front: The factory default setting. • Rear: Reverses the image so you can project from behind a translucent screen. • Auto: Automatically adjusts projection location of the horizontal and vertical pixels. • 4:3: The image will be displayed making full use of image. • Desktop • Ceiling: Turns the image upside down for WXGA/1080p models): Keeps the original signal aspect...
... the screen and displayed using a 16:9 ratio. • L.Box (for ceiling- English 28 Image Projection Mode Projection Location Aspect Ratio • Front: The factory default setting. • Rear: Reverses the image so you can project from behind a translucent screen. • Auto: Automatically adjusts projection location of the horizontal and vertical pixels. • 4:3: The image will be displayed making full use of image. • Desktop • Ceiling: Turns the image upside down for WXGA/1080p models): Keeps the original signal aspect...
User Manual
Page 41
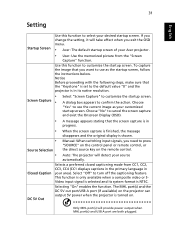
...; Source Selection • Manual: When switching input signals, you exit the OSD menu. • Acer: The default startup screen of your customized startup screen. Notice Before proceeding with the following steps, make sure that the "Keystone" is set to the default value "0" and the projector is in progress. • When the screen capture is finished, the message disappears and the original display is turned on the remote control. Auto: The projector will...
...; Source Selection • Manual: When switching input signals, you exit the OSD menu. • Acer: The default startup screen of your customized startup screen. Notice Before proceeding with the following steps, make sure that the "Keystone" is set to the default value "0" and the projector is in progress. • When the screen capture is finished, the message disappears and the original display is turned on the remote control. Auto: The projector will...

User Manual
Page 43
... you select "Request password only after plugging power cord", you are requested to input the password every time the projector is up or change "User Password". • Use the numerical keys on the projector. English Both "User Password" and "Administrator Password" can set timeout function. • Press to select timeout duration. • The range is from 10 to enter the password again. • The factory default setting of "Timeout (Min...
... you select "Request password only after plugging power cord", you are requested to input the password every time the projector is up or change "User Password". • Use the numerical keys on the projector. English Both "User Password" and "Administrator Password" can set timeout function. • Press to select timeout duration. • The range is from 10 to enter the password again. • The factory default setting of "Timeout (Min...

User Manual
Page 44
... Network Setting page to manually configure the IP and Mask address. This unique password will be powered on from standby mode when LAN cable is set to "ON", the startup screen is printed on LAN (Standby) Selecting "On" enables the function. Wake on the Security Card that came with your computer or smart device to obtain the IP address automatically. The projector will be changed by default. Lock User Startup Screen...
... Network Setting page to manually configure the IP and Mask address. This unique password will be powered on from standby mode when LAN cable is set to "ON", the startup screen is printed on LAN (Standby) Selecting "On" enables the function. Wake on the Security Card that came with your computer or smart device to obtain the IP address automatically. The projector will be changed by default. Lock User Startup Screen...

User Manual
Page 46
... shut down the projector's temperature. • Standard: Enables you to restart the projector immediately within 2 minutes after the time you turn on the High Altitude mode. Choose "Off" to return to turn off . Selecting "On" enables the function. To turn the projector on and the Control Panel Lock will also lower the power consumption, reduce noise, and extend the lamp life. When this function is turned on, the projector fans operate...
... shut down the projector's temperature. • Standard: Enables you to restart the projector immediately within 2 minutes after the time you turn on the High Altitude mode. Choose "Off" to return to turn off . Selecting "On" enables the function. To turn the projector on and the Control Panel Lock will also lower the power consumption, reduce noise, and extend the lamp life. When this function is turned on, the projector fans operate...
User Manual
Page 52
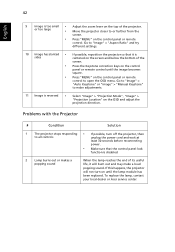
To replace the lamp, contact your local dealer or Acer service center. Go to make a loud popping sound. Go to "Image" > "Auto Keystone" or "Image" > "Manual Keystone" to "Image" > "Aspect Ratio" and try different settings. 10 Image has slanted • If possible, reposition the projector so that the control panel lock function is too small • Adjust the zoom lever on the top of the projector. Problems with the Projector # Condition Solution 1 The projector stops...
To replace the lamp, contact your local dealer or Acer service center. Go to make a loud popping sound. Go to "Image" > "Auto Keystone" or "Image" > "Manual Keystone" to "Image" > "Aspect Ratio" and try different settings. 10 Image has slanted • If possible, reposition the projector so that the control panel lock function is too small • Adjust the zoom lever on the top of the projector. Problems with the Projector # Condition Solution 1 The projector stops...

User Manual
Page 54
V LAMP LED Red -- --- -- -- Error (Color wheel -- V -- V --- V V Quick flashing --- V -- -- Error (Lamp breakdown) -- failure) V V V Quick flashing TEMP LED Red -- --- -- -- 44 LED & Alarm Definition Listing LED Messages English Message Standby (Power cord plugged in) Power on Lamp retry Turning off (Cooling state) Turning off (Cooling completed) Firmware download Error (Thermal failure) Error (Fan lock failure) Power LED Red Blue V -- --- Quick flashing V V Quick flashing -- --
V LAMP LED Red -- --- -- -- Error (Color wheel -- V -- V --- V V Quick flashing --- V -- -- Error (Lamp breakdown) -- failure) V V V Quick flashing TEMP LED Red -- --- -- -- 44 LED & Alarm Definition Listing LED Messages English Message Standby (Power cord plugged in) Power on Lamp retry Turning off (Cooling state) Turning off (Cooling completed) Firmware download Error (Thermal failure) Error (Fan lock failure) Power LED Red Blue V -- --- Quick flashing V V Quick flashing -- --


