
User Manual
Page 2
... specifically disclaims the implied warranties of Acer Incorporated. All correspondence concerning your computer. Acer Incorporated. This company makes no representations or warranties, either expressed or implied, with respect to notify any person of such revisions or changes. Acer LCD Monitor User's Guide Model number Serial number Date of purchase Place of Acer Incorporated. Such changes will be reproduced, stored in a retrieval system, or transmitted, in this manual...
... specifically disclaims the implied warranties of Acer Incorporated. All correspondence concerning your computer. Acer Incorporated. This company makes no representations or warranties, either expressed or implied, with respect to notify any person of such revisions or changes. Acer LCD Monitor User's Guide Model number Serial number Date of purchase Place of Acer Incorporated. Such changes will be reproduced, stored in a retrieval system, or transmitted, in this manual...
User Manual
Page 3
.... Turn off the power switch and then turn it on again to the nature of the LCD screen, an afterimage of the fluorescent light, the screen may flicker during initial use . • The LCD screen has 99.99% or more effective pixels. Keep this case, the screen is displayed for a few hours. Follow all power cords from the LCD monitor: • Make sure the monitor is attached to its base before cleaning. • Use a soft...
.... Turn off the power switch and then turn it on again to the nature of the LCD screen, an afterimage of the fluorescent light, the screen may flicker during initial use . • The LCD screen has 99.99% or more effective pixels. Keep this case, the screen is displayed for a few hours. Follow all power cords from the LCD monitor: • Make sure the monitor is attached to its base before cleaning. • Use a soft...

User Manual
Page 4
...; Slots and openings are not sure of the type of time listening to music at high volume. • Avoid turning up the volume to protect it could result in a fire or electric shock. Warnings • Do not use it after your ears have adjusted. • Limit the amount of power available, consult your hearing, follow these instructions. •...
...; Slots and openings are not sure of the type of time listening to music at high volume. • Avoid turning up the volume to protect it could result in a fire or electric shock. Warnings • Do not use it after your ears have adjusted. • Limit the amount of power available, consult your hearing, follow these instructions. •...
User Manual
Page 5
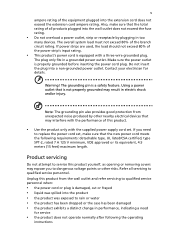
... by plugging in a grounded power outlet. Product servicing Do not attempt to qualified service personnel. Make sure the power outlet is not properly grounded may interfere with a three-wire grounded plug. Using a power outlet that the total rating of this product yourself, as opening or removing covers may expose you need for details. Also, make sure that the new power cord meets the following the operating instructions Warning...
... by plugging in a grounded power outlet. Product servicing Do not attempt to qualified service personnel. Make sure the power outlet is not properly grounded may interfere with a three-wire grounded plug. Using a power outlet that the total rating of this product yourself, as opening or removing covers may expose you need for details. Also, make sure that the new power cord meets the following the operating instructions Warning...

User Manual
Page 6
... other controls may contain small parts. Switch off your device in bodily injury or even death. Potentially explosive atmospheres include areas where you would normally be advised to turn off the device near gas pumps at Acer are very conscious of the environmental effects of our business and strive to identify and provide the best working procedures...
... other controls may contain small parts. Switch off your device in bodily injury or even death. Potentially explosive atmospheres include areas where you would normally be advised to turn off the device near gas pumps at Acer are very conscious of the environmental effects of our business and strive to identify and provide the best working procedures...

User Manual
Page 7
...://www.acer‐group.com/public/Sustainability/ LCD pixel statement The LCD unit is produced with high-precision manufacturing techniques. For more information on the recorded image and does not constitute a malfunction. To minimize pollution and ensure utmost protection of the global environment, please recycle. Nevertheless, some pixels may occasionally misfire or appear as black or red dots...
...://www.acer‐group.com/public/Sustainability/ LCD pixel statement The LCD unit is produced with high-precision manufacturing techniques. For more information on the recorded image and does not constitute a malfunction. To minimize pollution and ensure utmost protection of the global environment, please recycle. Nevertheless, some pixels may occasionally misfire or appear as black or red dots...

User Manual
Page 8
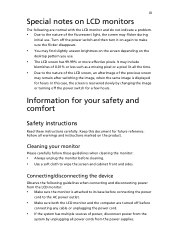
...; refrain from Sleep mode by adjusting the viewing angle of a computer. Long work periods, bad posture, poor work habits, stress, inadequate working in one fixed posture • avoid slouching forward and/or leaning backward • stand up and walk around regularly to computer use . viii This product has been shipped enabled for power management: • Activate display's Sleep mode within 15 minutes of user inactivity...
...; refrain from Sleep mode by adjusting the viewing angle of a computer. Long work periods, bad posture, poor work habits, stress, inadequate working in one fixed posture • avoid slouching forward and/or leaning backward • stand up and walk around regularly to computer use . viii This product has been shipped enabled for power management: • Activate display's Sleep mode within 15 minutes of user inactivity...

User Manual
Page 9
...; Adjust the display brightness and/or contrast to a comfortable level for extended periods of your vision Long viewing hours, wearing incorrect glasses or contact lenses, glare, excessive room lighting, poorly focused screens, very small typefaces and low-contrast displays could stress your eyes from the monitor and focusing on how to keep your eyes. ix Taking care of time. Developing good work...
...; Adjust the display brightness and/or contrast to a comfortable level for extended periods of your vision Long viewing hours, wearing incorrect glasses or contact lenses, glare, excessive room lighting, poorly focused screens, very small typefaces and low-contrast displays could stress your eyes from the monitor and focusing on how to keep your eyes. ix Taking care of time. Developing good work...
User Manual
Page 12
... Accessibility Safe listening Warnings Using electrical power Product servicing Additional safety information IT equipment recycling information Disposal instructions LCD pixel statement Tips and information for comfortable use Federal Communications Commission Declaration of Conformity Unpacking Attaching/removing the base Screen position adjustment Connecting the power cord Power saving Display Data Channel (DDC) Connector pin assignment Standard timing table Installation User controls How to adjust a setting Acer eColor Management User Troubleshooting VGA mode DVI/HDMI mode 1 iii iii iii...
... Accessibility Safe listening Warnings Using electrical power Product servicing Additional safety information IT equipment recycling information Disposal instructions LCD pixel statement Tips and information for comfortable use Federal Communications Commission Declaration of Conformity Unpacking Attaching/removing the base Screen position adjustment Connecting the power cord Power saving Display Data Channel (DDC) Connector pin assignment Standard timing table Installation User controls How to adjust a setting Acer eColor Management User Troubleshooting VGA mode DVI/HDMI mode 1 iii iii iii...

User Manual
Page 13
LCD monitor Quick start guide HDMI cable (Option) D-sub cable (Option) DVI cable (Option) AC power cord EN-1 Unpacking Please check that the following items are present when you unpack the box, and save the packing materials in case you need to ship or transport the monitor in the future.
LCD monitor Quick start guide HDMI cable (Option) D-sub cable (Option) DVI cable (Option) AC power cord EN-1 Unpacking Please check that the following items are present when you unpack the box, and save the packing materials in case you need to ship or transport the monitor in the future.

User Manual
Page 14
The monitor can adjust the monitor tilt by using both of your hands to hold the edges of the monitor as shown below. use a cloth to avoid scratching the screen. ① ② Remove: Reverse the steps to 15 degrees up or 5 degrees down on a stable surface -- Carefully place the monitor face-down . 15 EN-2 Screen position adjustment To optimize the viewing position, you can be adjusted to remove the base. Attaching the Base Note: Remove the monitor and monitor base from its packaging.
The monitor can adjust the monitor tilt by using both of your hands to hold the edges of the monitor as shown below. use a cloth to avoid scratching the screen. ① ② Remove: Reverse the steps to 15 degrees up or 5 degrees down on a stable surface -- Carefully place the monitor face-down . 15 EN-2 Screen position adjustment To optimize the viewing position, you can be adjusted to remove the base. Attaching the Base Note: Remove the monitor and monitor base from its packaging.
User Manual
Page 15
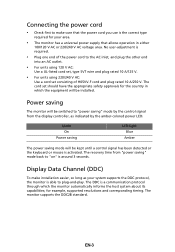
.... Mode On Power saving LED light Blue Amber The power saving mode will be installed. The monitor supports the DDC2B standard. Connecting the power cord • Check first to make installation easier, so long as indicated by the control signal from "power saving" mode back to "on" is required. • Plug one end of the power cord to plug-and-play. The recovery time from the display controller, as your area. • The monitor has a universal power supply that the power cord you use is...
.... Mode On Power saving LED light Blue Amber The power saving mode will be installed. The monitor supports the DDC2B standard. Connecting the power cord • Check first to make installation easier, so long as indicated by the control signal from "power saving" mode back to "on" is required. • Plug one end of the power cord to plug-and-play. The recovery time from the display controller, as your area. • The monitor has a universal power supply that the power cord you use is...

User Manual
Page 17
... Shield 7 TMDS Data0+ 9 TMDS Data0- 11 TMDS Clock Shield 13 CEC 15 SCL 17 DDC/CEC Ground 19 Hot Plug Detect PIN No. 24-pin color display signal cable* PIN No. Description 1 TMDS data 2- 2 TMDS data 2+ 3 TMDS data 2/4 shield 4 NC 5 NC 6 ...Power * only for +5 V hsync.vsync) 16 Hot-plug detection 17 TMDS data 0- 18 TMDS data 0+ 19 TMDS data 0/5 shield 20 NC 21 NC 22 TMDS clock shield 23 TMDS clock+ 24 DDC TMDS clock- 19-pin Color Display Signal Cable* 1917151311 9 7 5 3 1 1816141210 8 6 4 2 PIN No. Description 13 NC 14 +5 V power 15 GND (return for certain models...
... Shield 7 TMDS Data0+ 9 TMDS Data0- 11 TMDS Clock Shield 13 CEC 15 SCL 17 DDC/CEC Ground 19 Hot Plug Detect PIN No. 24-pin color display signal cable* PIN No. Description 1 TMDS data 2- 2 TMDS data 2+ 3 TMDS data 2/4 shield 4 NC 5 NC 6 ...Power * only for +5 V hsync.vsync) 16 Hot-plug detection 17 TMDS data 0- 18 TMDS data 0+ 19 TMDS data 0/5 shield 20 NC 21 NC 22 TMDS clock shield 23 TMDS clock+ 24 DDC TMDS clock- 19-pin Color Display Signal Cable* 1917151311 9 7 5 3 1 1816141210 8 6 4 2 PIN No. Description 13 NC 14 +5 V power 15 GND (return for certain models...
User Manual
Page 19
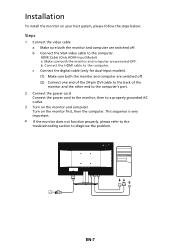
... 1 Connect the video cable a Make sure both the monitor and computer are switched off . HDMI Cable (Only HDMI-Input Model) a. c Connect the digital cable (only for dual-input models). (1) Make sure both the monitor and computer are switched off . (2) Connect one end of the 24-pin DVI cable to the back of the monitor and the other end to the computer's port. 2 Connect the power cord Connect the power cord to the monitor, then to diagnose the problem. 2 EN-7 Installation To install the monitor on...
... 1 Connect the video cable a Make sure both the monitor and computer are switched off . HDMI Cable (Only HDMI-Input Model) a. c Connect the digital cable (only for dual-input models). (1) Make sure both the monitor and computer are switched off . (2) Connect one end of the 24-pin DVI cable to the back of the monitor and the other end to the computer's port. 2 Connect the power cord Connect the power cord to the monitor, then to diagnose the problem. 2 EN-7 Installation To install the monitor on...
User Manual
Page 20
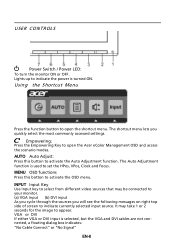
... following messages on right top side of screen to open the Acer eColor Management OSD and access the scenario modes. Using the Shortcut Menu Press the function button to indicate currently selected input source. USER CONTROLS Power Switch / Power LED: To turn the monitor ON or OFF. The Auto Adjustment function is used to indicate the power is selected ,but the VGA and DVI cables are not connected, a floating dialog box indicates: "No Cable Connect" or "No Signal" EN-8
... following messages on right top side of screen to open the Acer eColor Management OSD and access the scenario modes. Using the Shortcut Menu Press the function button to indicate currently selected input source. USER CONTROLS Power Switch / Power LED: To turn the monitor ON or OFF. The Auto Adjustment function is used to indicate the power is selected ,but the VGA and DVI cables are not connected, a floating dialog box indicates: "No Cable Connect" or "No Signal" EN-8
User Manual
Page 21
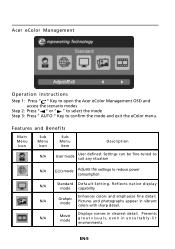
... mode Adjusts the settings to confirm the mode and exit the eColor menu. N/A Standard D efau lt Settin g . Acer eColor Management Operation instructions Step 1: Press " " Key to open the Acer eColor Management OSD and access the scenario modes Step 2: Press " " or " " to select the mode Step 3: Press " AUTO " Key to reduce power consumption. EN-9 Features and Benefits Main Menu icon Sub Menu icon Sub Menu item Description N/A User mode User defined...
... mode Adjusts the settings to confirm the mode and exit the eColor menu. N/A Standard D efau lt Settin g . Acer eColor Management Operation instructions Step 1: Press " " Key to open the Acer eColor Management OSD and access the scenario modes Step 2: Press " " or " " to select the mode Step 3: Press " AUTO " Key to reduce power consumption. EN-9 Features and Benefits Main Menu icon Sub Menu icon Sub Menu item Description N/A User mode User defined...
User Manual
Page 22
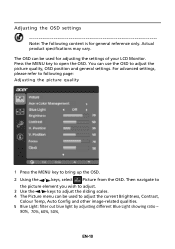
... used to adjust the current Brightness, Contrast, Colour Temp, Auto Config and other image-related qualities. 5 Blue Light: filter out blue light by adjusting different Blue Light showing ratio - 80%, 70%, 60%, 50%, EN-10 Then navigate to the picture element you wish to adjust. 3 Use the / keys to adjust the sliding scales. 4 The Picture menu can use the OSD to adjust the picture quality, OSD position and general settings. Press the MENU key to open the OSD. Adjusting the OSD settings...
... used to adjust the current Brightness, Contrast, Colour Temp, Auto Config and other image-related qualities. 5 Blue Light: filter out blue light by adjusting different Blue Light showing ratio - 80%, 70%, 60%, 50%, EN-10 Then navigate to the picture element you wish to adjust. 3 Use the / keys to adjust the sliding scales. 4 The Picture menu can use the OSD to adjust the picture quality, OSD position and general settings. Press the MENU key to open the OSD. Adjusting the OSD settings...
User Manual
Page 24
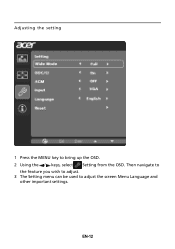
EN-12 Adjusting the setting 1 Press the MENU key to adjust the screen Menu Language and other important settings. Then navigate to the feature you wish to adjust. 3 The Setting menu can be used to bring up the OSD. 2 Using the / keys, select Setting from the OSD.
EN-12 Adjusting the setting 1 Press the MENU key to adjust the screen Menu Language and other important settings. Then navigate to the feature you wish to adjust. 3 The Setting menu can be used to bring up the OSD. 2 Using the / keys, select Setting from the OSD.
User Manual
Page 26
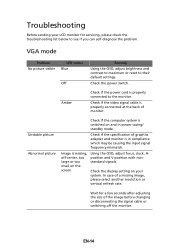
... causing the input signal frequency mismatch. Check the display setting on the screen. Check if the specification of monitor. Unstable picture Abnormal picture Check if the computer system is in power saving/ standby mode. EN-14 VGA mode Problem No picture visible LED status Blue Off Remedy Using the OSD, adjust brightness and contrast to maximum or reset to the monitor. Amber Check if the power cord is missing, off the monitor. In case of the image before changing or disconnecting the signal cable or switching off -center...
... causing the input signal frequency mismatch. Check the display setting on the screen. Check if the specification of monitor. Unstable picture Abnormal picture Check if the computer system is in power saving/ standby mode. EN-14 VGA mode Problem No picture visible LED status Blue Off Remedy Using the OSD, adjust brightness and contrast to maximum or reset to the monitor. Amber Check if the power cord is missing, off the monitor. In case of the image before changing or disconnecting the signal cable or switching off -center...
User Manual
Page 27
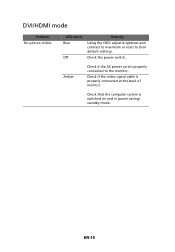
Amber Check if the AC power cord is properly connected to their default settings. EN-15 Check that the computer system is properly connected at the back of monitor. Check if the video signal cable is switched on and in power saving/ standby mode. DVI/HDMI mode Problem No picture visible LED status Blue Off Remedy Using the OSD, adjust brightness and contrast to maximum or reset to the monitor. Check the power switch.
Amber Check if the AC power cord is properly connected to their default settings. EN-15 Check that the computer system is properly connected at the back of monitor. Check if the video signal cable is switched on and in power saving/ standby mode. DVI/HDMI mode Problem No picture visible LED status Blue Off Remedy Using the OSD, adjust brightness and contrast to maximum or reset to the monitor. Check the power switch.


