
User Manual
Page 3
... power supplies. Connecting/disconnecting the device Observe the following are turned off before connecting the power cord to the AC power outlet. • Make sure both the LCD monitor and the computer are normal with the LCD monitor and do not indicate a problem. • Due to the nature of the LCD screen, an afterimage of power, disconnect power from the system by changing the image or turning off the power switch and then turn...
... power supplies. Connecting/disconnecting the device Observe the following are turned off before connecting the power cord to the AC power outlet. • Make sure both the LCD monitor and the computer are normal with the LCD monitor and do not indicate a problem. • Due to the nature of the LCD screen, an afterimage of power, disconnect power from the system by changing the image or turning off the power switch and then turn...

User Manual
Page 4
...instructions. • Gradually increase the volume until you can hear it clearly and comfortably and without distortion. • After setting the volume level, do not place the product on the power cord. Never spill liquid of any vibrating environment which will walk on an unstable cart, stand...power outlet you plug the power cord into is easily accessible and located as close to the equipment operator as they may touch dangerous voltage points or short-out parts that the total Do not locate this product near you. Warnings • Do not use it could result in installation...
...instructions. • Gradually increase the volume until you can hear it clearly and comfortably and without distortion. • After setting the volume level, do not place the product on the power cord. Never spill liquid of any vibrating environment which will walk on an unstable cart, stand...power outlet you plug the power cord into is easily accessible and located as close to the equipment operator as they may touch dangerous voltage points or short-out parts that the total Do not locate this product near you. Warnings • Do not use it could result in installation...

User Manual
Page 5
... • the product was exposed to qualified service personnel when: • the power cord or plug is equipped with the supplied power supply cord set , make sure that the new power cord meets the following the operating instructions Warning! v ampere rating of the branch circuit rating. The overall system load must not exceed 80% of the equipment plugged into the wall outlet does not exceed the fuse...
... • the product was exposed to qualified service personnel when: • the power cord or plug is equipped with the supplied power supply cord set , make sure that the new power cord meets the following the operating instructions Warning! v ampere rating of the branch circuit rating. The overall system load must not exceed 80% of the equipment plugged into the wall outlet does not exceed the fuse...

User Manual
Page 6
... areas where you would normally be advised to turn off the device near gas pumps at Acer are very conscious of the environmental effects of our business and strive to identify and provide the best working procedures to reduce the environmental impact of radio equipment... and obey all signs and instructions. IT Equipment Recycling Information Acer is strongly committed to environmental protection and views recycling, in the form of salvaging and disposal of used equipment, as grain, dust or metal powders. vi Note: Adjust only those controls that are covered by a qualified technician to...
... areas where you would normally be advised to turn off the device near gas pumps at Acer are very conscious of the environmental effects of our business and strive to identify and provide the best working procedures to reduce the environmental impact of radio equipment... and obey all signs and instructions. IT Equipment Recycling Information Acer is strongly committed to environmental protection and views recycling, in the form of salvaging and disposal of used equipment, as grain, dust or metal powders. vi Note: Adjust only those controls that are covered by a qualified technician to...

User Manual
Page 8
... tips for power management: • Activate display's Sleep mode within 15 minutes of user inactivity. • Activate computer's Sleep mode within 30 minutes of user inactivity. Incorrect computer usage may lead to remove the strain on your leg muscles Users are also at risk of physical injury after prolonged use , consult a physician immediately and inform your comfort zone by adjusting the viewing angle...
... tips for power management: • Activate display's Sleep mode within 15 minutes of user inactivity. • Activate computer's Sleep mode within 30 minutes of user inactivity. Incorrect computer usage may lead to remove the strain on your leg muscles Users are also at risk of physical injury after prolonged use , consult a physician immediately and inform your comfort zone by adjusting the viewing angle...

User Manual
Page 10
TABLE OF CONTENTS UNPACKING 1 ATTACHING / REMOVING THE BASE 2 SCREEN POSITION ADJUSTMENT 4 CONNECTING THE POWER CORD 5 SAFETY PRECAUTION 5 CLEANING YOUR MONITOR 5 POWER SAVING 6 DDC...6 CONNECTOR PIN ASSIGNMENT 7 Standard Timing Table 8 INSTALLATION 9 USER CONTROLS 10 TROUBLESHOOTING 21
TABLE OF CONTENTS UNPACKING 1 ATTACHING / REMOVING THE BASE 2 SCREEN POSITION ADJUSTMENT 4 CONNECTING THE POWER CORD 5 SAFETY PRECAUTION 5 CLEANING YOUR MONITOR 5 POWER SAVING 6 DDC...6 CONNECTOR PIN ASSIGNMENT 7 Standard Timing Table 8 INSTALLATION 9 USER CONTROLS 10 TROUBLESHOOTING 21

User Manual
Page 11
UNPACKING Please check the following items are present when you unpack the box, and save the packing materials in case you will need to ship or transport the monitor in future. LCD Monitor Quick Start Guide AC Power Cord D-Sub Cable (Optional) HDMI Cable (Optional) Audio Cable (Optional) EN-1
UNPACKING Please check the following items are present when you unpack the box, and save the packing materials in case you will need to ship or transport the monitor in future. LCD Monitor Quick Start Guide AC Power Cord D-Sub Cable (Optional) HDMI Cable (Optional) Audio Cable (Optional) EN-1
User Manual
Page 15
... alcohol-based cleaners. Always put the monitor in building installation shall provide the circuit breaker rated 120/240 V, 20 A (maximum). EN-5 CONNECTING THE POWER CORD Check first to make sure that allows operation in either 100/120V AC or 220/240 V AC voltage area. No user-adjustment is adequate ventilation. Avoid placing the monitor against a bright background or where sun-light or...
... alcohol-based cleaners. Always put the monitor in building installation shall provide the circuit breaker rated 120/240 V, 20 A (maximum). EN-5 CONNECTING THE POWER CORD Check first to make sure that allows operation in either 100/120V AC or 220/240 V AC voltage area. No user-adjustment is adequate ventilation. Avoid placing the monitor against a bright background or where sun-light or...

User Manual
Page 16
... recovery time from the display controller, as indicated by the amber-color power LED. POWER SAVING The monitor will be driven into "Power Saving" mode by the control signal from Active OFF state back to Plug and Play with your system if your installation easier, the monitor is a communication protocol through which the monitor automatically informs the host system about its capabilities, for example, supported resolutions and corresponding timing.
... recovery time from the display controller, as indicated by the amber-color power LED. POWER SAVING The monitor will be driven into "Power Saving" mode by the control signal from Active OFF state back to Plug and Play with your system if your installation easier, the monitor is a communication protocol through which the monitor automatically informs the host system about its capabilities, for example, supported resolutions and corresponding timing.

User Manual
Page 20
USER CONTROLS Base Controls 1 2 3 4 1 No. EN-10 Press it as directional key to enter a selection. Amber indicates standby/power saving mode. 2 Hotkey 1, 2 buttons Press to activate user defined hotkey function. 3 Input button Press to toggle input sources. 4 Navi/OK button Press to activate the OSD menu, then use it again to highlight the desired function. Blue indicates power on /off. Item Description 1 Power button/indicator Turns the monitor on .
USER CONTROLS Base Controls 1 2 3 4 1 No. EN-10 Press it as directional key to enter a selection. Amber indicates standby/power saving mode. 2 Hotkey 1, 2 buttons Press to activate user defined hotkey function. 3 Input button Press to toggle input sources. 4 Navi/OK button Press to activate the OSD menu, then use it again to highlight the desired function. Blue indicates power on /off. Item Description 1 Power button/indicator Turns the monitor on .

User Manual
Page 21
.... Brightness 3. Input 4. EN-11 Actual product specifications may vary. Press the MENU button to open the Modes control and select which user-defined profile to adjust the picture quality, OSD position and general settings. You can use the OSD to use (please see The Function page section for more information). Modes 2. You can be used for adjusting the settings of your preferred functions. 1. Adjusting the OSD settings Note: The following page: Main Page The default...
.... Brightness 3. Input 4. EN-11 Actual product specifications may vary. Press the MENU button to open the Modes control and select which user-defined profile to adjust the picture quality, OSD position and general settings. You can use the OSD to use (please see The Function page section for more information). Modes 2. You can be used for adjusting the settings of your preferred functions. 1. Adjusting the OSD settings Note: The following page: Main Page The default...
User Manual
Page 24
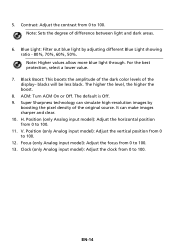
... Sharpness technology can make images sharper and clear. 10. Position (only Analog input model): Adjust the vertical position from 0 to 100. Note: Sets the degree of the display- For the best protection, select a lower value. 7. It can simulate high-resolution images by adjusting different Blue Light showing ratio - 80%, 70%, 60%, 50%. Contrast: Adjust the contrast from 0 to 100. 13. Black Boost: This boosts the amplitude of the dark color levels of...
... Sharpness technology can make images sharper and clear. 10. Position (only Analog input model): Adjust the vertical position from 0 to 100. Note: Sets the degree of the display- For the best protection, select a lower value. 7. It can simulate high-resolution images by adjusting different Blue Light showing ratio - 80%, 70%, 60%, 50%. Contrast: Adjust the contrast from 0 to 100. 13. Black Boost: This boosts the amplitude of the dark color levels of...
User Manual
Page 27
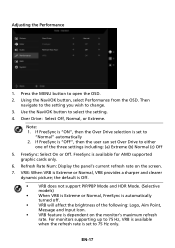
... AMD supported graphic cards only. 6. EN-17 Adjusting the Performance 1. Refresh Rate Num: Display the panel's current refresh rate on the monitor's maximum refresh rate. Then navigate to the setting you wish to open the OSD. 2. the default is Off. • VRB does not support PIP/PBP Mode and HDR Mode. (Selective models) • When VRB is Extreme or Normal, FreeSync is automatically turned off. • VRB will affect the brightness of...
... AMD supported graphic cards only. 6. EN-17 Adjusting the Performance 1. Refresh Rate Num: Display the panel's current refresh rate on the monitor's maximum refresh rate. Then navigate to the setting you wish to open the OSD. 2. the default is Off. • VRB does not support PIP/PBP Mode and HDR Mode. (Selective models) • When VRB is Extreme or Normal, FreeSync is automatically turned off. • VRB will affect the brightness of...
User Manual
Page 31
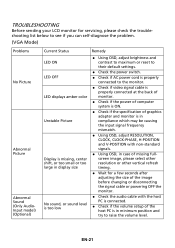
... problem. (VGA Mode) Problems No Picture Abnormal Picture Abnormal Sound (Only AudioInput model) (Optional) Current Status LED ON LED OFF LED displays amber color Unstable Picture Display is missing, center shift, or too small or too large in display size No sound, or sound level is too low Remedy Using OSD, adjust brightness and contrast to maximum or reset to their default settings. Check the power switch. Check if AC power cord is properly connected to the monitor. Check if video signal cable is properly connected...
... problem. (VGA Mode) Problems No Picture Abnormal Picture Abnormal Sound (Only AudioInput model) (Optional) Current Status LED ON LED OFF LED displays amber color Unstable Picture Display is missing, center shift, or too small or too large in display size No sound, or sound level is too low Remedy Using OSD, adjust brightness and contrast to maximum or reset to their default settings. Check the power switch. Check if AC power cord is properly connected to the monitor. Check if video signal cable is properly connected...
User Manual
Page 32
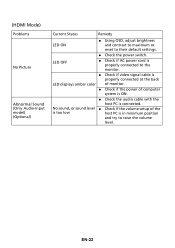
... audio cable with the host PC is in minimum position and try to their default settings. Check the power switch. (HDMI Mode) Problems No Picture Abnormal Sound (Only Audio-Input model) (Optional) Current Status Remedy LED ON Using OSD, adjust brightness and contrast to maximum or reset to raise the volume level. EN-22 LED OFF Check if AC power cord is properly connected to the monitor. Check if video signal cable is properly connected at the back LED displays amber color of monitor. Check...
... audio cable with the host PC is in minimum position and try to their default settings. Check the power switch. (HDMI Mode) Problems No Picture Abnormal Sound (Only Audio-Input model) (Optional) Current Status Remedy LED ON Using OSD, adjust brightness and contrast to maximum or reset to raise the volume level. EN-22 LED OFF Check if AC power cord is properly connected to the monitor. Check if video signal cable is properly connected at the back LED displays amber color of monitor. Check...
Quick Start Guide
Page 3
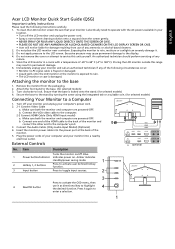
...'s port. 3. Insert the monitor power cable into a nearby electrical outlet. Do not remove the cover or attempt to service this range may cause permanent damage to highlight the desired function. To clean the LCD monitor screen: Be sure that the base is locked onto the stand. (for damage resulting from the packaging. 2. Amber indicates standby/power saving mode. 1 2 Hotkey 1, 2 buttons Press to activate user defined hotkey function. 3 Input button Press to toggle input sources...
...'s port. 3. Insert the monitor power cable into a nearby electrical outlet. Do not remove the cover or attempt to service this range may cause permanent damage to highlight the desired function. To clean the LCD monitor screen: Be sure that the base is locked onto the stand. (for damage resulting from the packaging. 2. Amber indicates standby/power saving mode. 1 2 Hotkey 1, 2 buttons Press to activate user defined hotkey function. 3 Input button Press to toggle input sources...
Quick Start Guide
Page 4
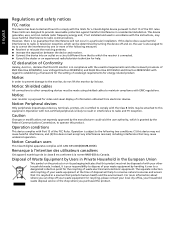
...; Increase the separation between the device and receiver. Connect the device into an outlet on a circuit different from electronic devices. Operation is in interference to radio and TV reception. Notice: Acer monitor is recycled in a particular installation. Notice: Canadian users This Class B digital apparatus complies with Part 15 of the FCC Rules. The separate collection and...
...; Increase the separation between the device and receiver. Connect the device into an outlet on a circuit different from electronic devices. Operation is in interference to radio and TV reception. Notice: Acer monitor is recycled in a particular installation. Notice: Canadian users This Class B digital apparatus complies with Part 15 of the FCC Rules. The separate collection and...
Quick Start Guide
Page 5
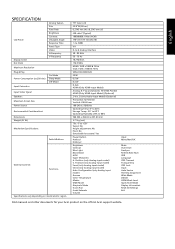
...axis Saturate Volume Input Menu/Navi/OK Mute Over Drive FreeSync Refresh Rate Num VRB Language OSD Timeout Transparency OSD Lock Input Auto Source Hot Key Assignment Wide Mode DDC/CI HDMI Black Level Quick Start Mode Display information Reset All Settings Exit Find manuals and other documents for your Acer product on model and/or region. W.) Mechanism Specifications Switch/Buttons External Controls Functions Specifications vary depending on the official Acer support website. English SPECIFICATION LCD Panel Display Colors Dot Clock Maximum Resolution Plug & Play Power Consumption (at...
...axis Saturate Volume Input Menu/Navi/OK Mute Over Drive FreeSync Refresh Rate Num VRB Language OSD Timeout Transparency OSD Lock Input Auto Source Hot Key Assignment Wide Mode DDC/CI HDMI Black Level Quick Start Mode Display information Reset All Settings Exit Find manuals and other documents for your Acer product on model and/or region. W.) Mechanism Specifications Switch/Buttons External Controls Functions Specifications vary depending on the official Acer support website. English SPECIFICATION LCD Panel Display Colors Dot Clock Maximum Resolution Plug & Play Power Consumption (at...

Lifecycle Extension Guide
Page 3
... Repairability: Proper service and repair is recommended that service engineers should have repairing knowledge, experience, as well as appropriate product training per new model before removing the AC power cord. ! The service providers recommended by vender should be connect to screw and unscrew screws. ! To ensure using a proper screwdriver, follow the torque and force listed in assembly and disassembly procedures to an authorized power cord, and turn off the master power switch...
... Repairability: Proper service and repair is recommended that service engineers should have repairing knowledge, experience, as well as appropriate product training per new model before removing the AC power cord. ! The service providers recommended by vender should be connect to screw and unscrew screws. ! To ensure using a proper screwdriver, follow the torque and force listed in assembly and disassembly procedures to an authorized power cord, and turn off the master power switch...

Lifecycle Extension Guide
Page 18
... replace it Plug the cable then turn on power No Does cable plugs in No Connector? No Replace interface BD Yes Is LVDS cable connect OK? No Check Power Board DC-DC circuit and regulator Yes Is Power LED light Green or Amber? ACER-K242HYLH 18 6. No Yes Replace Panel Plug LVDS cable again or replace it ( Y1 ) Yes Is Interface BD normal? Troubleshooting 6.1 No Display or display is unstable on analog or digital port: No picture or picture unstable on analog port and digital port Power...
... replace it Plug the cable then turn on power No Does cable plugs in No Connector? No Replace interface BD Yes Is LVDS cable connect OK? No Check Power Board DC-DC circuit and regulator Yes Is Power LED light Green or Amber? ACER-K242HYLH 18 6. No Yes Replace Panel Plug LVDS cable again or replace it ( Y1 ) Yes Is Interface BD normal? Troubleshooting 6.1 No Display or display is unstable on analog or digital port: No picture or picture unstable on analog port and digital port Power...


