User Guide
Page 3
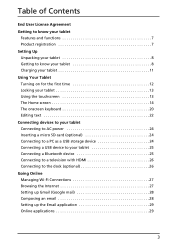
... time 12 Locking your tablet 13 Using the touchscreen 13 The Home screen 14 The onscreen keyboard 20 Editing text 22 Connecting devices to your tablet Connecting to AC power 24 Inserting a micro SD card (optional 24 Connecting to a PC as a USB storage device 24 Connecting a USB device to your tablet 25 Connecting a Bluetooth device 25 Connecting to a television with HDMI 26 Connecting to the dock (optional 26 Going Online Managing Wi-Fi Connections 27 Browsing the Internet 27 Setting up Gmail (Google...
... time 12 Locking your tablet 13 Using the touchscreen 13 The Home screen 14 The onscreen keyboard 20 Editing text 22 Connecting devices to your tablet Connecting to AC power 24 Inserting a micro SD card (optional 24 Connecting to a PC as a USB storage device 24 Connecting a USB device to your tablet 25 Connecting a Bluetooth device 25 Connecting to a television with HDMI 26 Connecting to the dock (optional 26 Going Online Managing Wi-Fi Connections 27 Browsing the Internet 27 Setting up Gmail (Google...
User Guide
Page 4
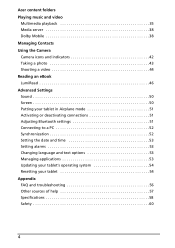
... Contacts Using the Camera Camera icons and indicators 42 Taking a photo 43 Shooting a video 44 Reading an eBook LumiRead 46 Advanced Settings Sound 50 Screen 50 Putting your tablet in Airplane mode 51 Activating or deactivating connections 51 Adjusting Bluetooth settings 51 Connecting to a PC 52 Synchronization 52 Setting the date and time 53 Setting alarms 53 Changing language and text options 53 Managing applications 53 Updating your tablet's operating system 54 Resetting your tablet...
... Contacts Using the Camera Camera icons and indicators 42 Taking a photo 43 Shooting a video 44 Reading an eBook LumiRead 46 Advanced Settings Sound 50 Screen 50 Putting your tablet in Airplane mode 51 Activating or deactivating connections 51 Adjusting Bluetooth settings 51 Connecting to a PC 52 Synchronization 52 Setting the date and time 53 Setting alarms 53 Changing language and text options 53 Managing applications 53 Updating your tablet's operating system 54 Resetting your tablet...

User Guide
Page 5
... for any Software for each device on a single designated device. Under this Agreement to such software that enable the use prohibited by U.S. Transfer your device. OWNERSHIP AND COPYRIGHT Title, ownership rights and intellectual property rights in the content accessed through the Software is licensed, not sold. Make one hardcopy of the Software. Rent or lease the Software to remove any third parties. 8. SUPPORT SERVICES Acer is...
... for any Software for each device on a single designated device. Under this Agreement to such software that enable the use prohibited by U.S. Transfer your device. OWNERSHIP AND COPYRIGHT Title, ownership rights and intellectual property rights in the content accessed through the Software is licensed, not sold. Make one hardcopy of the Software. Rent or lease the Software to remove any third parties. 8. SUPPORT SERVICES Acer is...

User Guide
Page 6
...USE THE SOFTWARE, THE PROVISION OF OR FAILURE TO PROVIDE SUPPORT SERVICES, OR OTHERWISE UNDER OR IN CONNECTION WITH ANY PROVISION OF THIS AGREEMENT, EVEN IN THE EVENT OF THE FAULT, TORT (INCLUDING NEGLIGENCE), STRICT LIABILITY, BREACH OF CONTRACT OR BREACH OF WARRANTY OF ACER OR ITS SUPPLIERS OR LICENSORS, AND EVEN IF ACER... data are provided by Acer's licensors or suppliers hereunder ("Third Party Services"). Cease all prior agreements, communications, proposals and representations between you will remain in any manner that could damage, disable, overburden, or impair the services ...
...USE THE SOFTWARE, THE PROVISION OF OR FAILURE TO PROVIDE SUPPORT SERVICES, OR OTHERWISE UNDER OR IN CONNECTION WITH ANY PROVISION OF THIS AGREEMENT, EVEN IN THE EVENT OF THE FAULT, TORT (INCLUDING NEGLIGENCE), STRICT LIABILITY, BREACH OF CONTRACT OR BREACH OF WARRANTY OF ACER OR ITS SUPPLIERS OR LICENSORS, AND EVEN IF ACER... data are provided by Acer's licensors or suppliers hereunder ("Third Party Services"). Cease all prior agreements, communications, proposals and representations between you will remain in any manner that could damage, disable, overburden, or impair the services ...

User Guide
Page 8
... dealer immediately: • Acer ICONIA TAB • Quick Guide • USB cable • AC adapter • Warranty card Getting to know your tablet Your new tablet comes packed in a protective box. Carefully unpack the box and remove the contents. Item 1 Touchscreen 2 Front-facing camera 3 Light sensor Description 10.1-inch, 1280 x 800 pixel capacitive touchscreen. Detects ambient light and automatically adjusts the screen brightness. 8 Setting Up Unpacking your tablet Front view 2 1 3 No.
... dealer immediately: • Acer ICONIA TAB • Quick Guide • USB cable • AC adapter • Warranty card Getting to know your tablet Your new tablet comes packed in a protective box. Carefully unpack the box and remove the contents. Item 1 Touchscreen 2 Front-facing camera 3 Light sensor Description 10.1-inch, 1280 x 800 pixel capacitive touchscreen. Detects ambient light and automatically adjusts the screen brightness. 8 Setting Up Unpacking your tablet Front view 2 1 3 No.
User Guide
Page 10
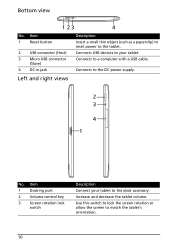
...the tablet's orientation. 10 Use this switch to lock the screen rotation or allow the screen to a computer with a USB cable. Connects to the tablet. Item 1 Reset button 2 USB connector (Host) 3 Micro USB connector (Slave) 4 DC-in jack Description Insert a small thin object (such as a paperclip) to reset power to the DC power supply. Left and right views 2 3 4 1 No. Bottom view 1 23 4 No. Increase and decrease the tablet volume. Item 1 Docking port 2 Volume control key 3 Screen rotation lock switch Description Connect your tablet to your tablet. Connects USB devices...
...the tablet's orientation. 10 Use this switch to lock the screen rotation or allow the screen to a computer with a USB cable. Connects to the tablet. Item 1 Reset button 2 USB connector (Host) 3 Micro USB connector (Slave) 4 DC-in jack Description Insert a small thin object (such as a paperclip) to reset power to the DC power supply. Left and right views 2 3 4 1 No. Bottom view 1 23 4 No. Increase and decrease the tablet volume. Item 1 Docking port 2 Volume control key 3 Screen rotation lock switch Description Connect your tablet to your tablet. Connects USB devices...

User Guide
Page 12
... first time To turn on your tablet. During the start , tap to use Gmail, Google Talk, Google Calendar, and other Google Apps; If you have Internet access, or do not want to back up process, you must sign into your Google account during setup. You will then be used to download applications from another device with a Google account. If you can use your contact list, email, calendar and other Google services on your tablet...
... first time To turn on your tablet. During the start , tap to use Gmail, Google Talk, Google Calendar, and other Google Apps; If you have Internet access, or do not want to back up process, you must sign into your Google account during setup. You will then be used to download applications from another device with a Google account. If you can use your contact list, email, calendar and other Google services on your tablet...

User Guide
Page 13
... the screen. Using the touchscreen Your tablet uses a touchscreen for a while, briefly press the power button to any services. This saves power and ensures your tablet does not unintentionally use your tablet for selecting items and entering information. To change the delay, tap Apps > Settings > Screen > Timeout. For additional security, you forget an unlock pattern or PIN, please refer to access the tablet, such as an unlock pattern (a set a code or number that must be tapped in sleep mode...
... the screen. Using the touchscreen Your tablet uses a touchscreen for a while, briefly press the power button to any services. This saves power and ensures your tablet does not unintentionally use your tablet for selecting items and entering information. To change the delay, tap Apps > Settings > Screen > Timeout. For additional security, you forget an unlock pattern or PIN, please refer to access the tablet, such as an unlock pattern (a set a code or number that must be tapped in sleep mode...

User Guide
Page 18
Notification icons Icon Description Icon Alarm is set New Gmail message New Google Talk message Upcoming event Song is playing SD card or USB storage is full Tablet is connected to PC via USB Application update available System update available Virtual private network (VPN) status Description Speaker is silenced Tablet microphone is off GPS is on Receiving location data from GPS More status notifications Syncing data Sync is on Problem with sign-in or sync Uploading data Downloading data Download finished 18
Notification icons Icon Description Icon Alarm is set New Gmail message New Google Talk message Upcoming event Song is playing SD card or USB storage is full Tablet is connected to PC via USB Application update available System update available Virtual private network (VPN) status Description Speaker is silenced Tablet microphone is off GPS is on Receiving location data from GPS More status notifications Syncing data Sync is on Problem with sign-in or sync Uploading data Downloading data Download finished 18
User Guide
Page 19
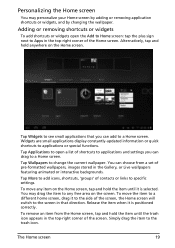
... your Home screen by adding or removing application shortcuts or widgets, and by changing the wallpaper. Tap More to specific settings. Adding or removing shortcuts or widgets To add shortcuts or widgets open a list of the Home screen. Tap Applications to a Home screen. To move any free area on the Home screen. Release the item when it to applications or special functions. To remove an item from a set of...
... your Home screen by adding or removing application shortcuts or widgets, and by changing the wallpaper. Tap More to specific settings. Adding or removing shortcuts or widgets To add shortcuts or widgets open a list of the Home screen. Tap Applications to a Home screen. To move any free area on the Home screen. Release the item when it to applications or special functions. To remove an item from a set of...
User Guide
Page 21
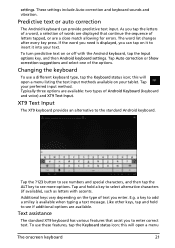
settings. These settings include Auto-correction and keyboard sounds and vibration. this will open a menu The onscreen keyboard 21 XT9 Text Input The XT9 keyboard provides an alternative to select alternative characters (if available), such as letters with the Android keyboard, tap the Input options key, and then Android keyboard settings. Tap and hold to insert it to see if additional options are available: two types of text you...
settings. These settings include Auto-correction and keyboard sounds and vibration. this will open a menu The onscreen keyboard 21 XT9 Text Input The XT9 keyboard provides an alternative to select alternative characters (if available), such as letters with the Android keyboard, tap the Input options key, and then Android keyboard settings. Tap and hold to insert it to see if additional options are available: two types of text you...
User Guide
Page 24
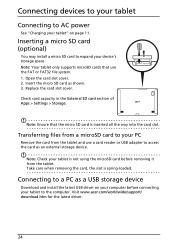
Open the card slot cover. 2. Check card capacity in the External SD card section of Apps > Settings > Storage. Note: Ensure that use a card reader or USB adapter to the computer. Insert the micro SD card as a USB storage device Download and install the latest USB driver on page 11. Note: Check your tablet is not using the microSD card before connecting your tablet to access the card as an external storage device. Connecting to your PC Remove the card from the tablet. Note: Your tablet only supports microSD cards that...
Open the card slot cover. 2. Check card capacity in the External SD card section of Apps > Settings > Storage. Note: Ensure that use a card reader or USB adapter to the computer. Insert the micro SD card as a USB storage device Download and install the latest USB driver on page 11. Note: Check your tablet is not using the microSD card before connecting your tablet to access the card as an external storage device. Connecting to your PC Remove the card from the tablet. Note: Your tablet only supports microSD cards that...
User Guide
Page 25
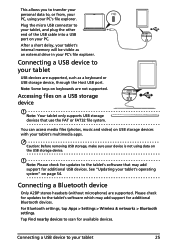
...your tablet USB devices are supported. For Bluetooth settings, tap Apps > Settings > Wireless & networks > Bluetooth settings. You can access media files (photos, music and video) on USB storage devices with your tablet 25 Connecting a USB device to your tablet's multimedia apps. Plug the micro USB connector to your tablet, and plug the other end of the USB cable into a USB port on your PC's file explorer. Connecting a USB device to your PC's file explorer. Connecting a Bluetooth device Only A2DP stereo headsets (without microphone) are supported, such as an external drive...
...your tablet USB devices are supported. For Bluetooth settings, tap Apps > Settings > Wireless & networks > Bluetooth settings. You can access media files (photos, music and video) on USB storage devices with your tablet 25 Connecting a USB device to your tablet's multimedia apps. Plug the micro USB connector to your tablet, and plug the other end of the USB cable into a USB port on your PC's file explorer. Connecting a USB device to your PC's file explorer. Connecting a Bluetooth device Only A2DP stereo headsets (without microphone) are supported, such as an external drive...
User Guide
Page 26
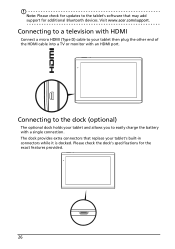
... a single connection. Please check the dock's specifications for additional Bluetooth devices. Visit www.acer.com/support. Note: Please check for updates to the tablet's software that replace your tablet's built-in connectors while it is docked. The dock provides extra connectors that may add support for the exact features provided. 26 Connecting to a television with HDMI Connect a micro HDMI (Type D) cable to your tablet and allows you to easily charge the battery with an HDMI port.
... a single connection. Please check the dock's specifications for additional Bluetooth devices. Visit www.acer.com/support. Note: Please check for updates to the tablet's software that replace your tablet's built-in connectors while it is docked. The dock provides extra connectors that may add support for the exact features provided. 26 Connecting to a television with HDMI Connect a micro HDMI (Type D) cable to your tablet and allows you to easily charge the battery with an HDMI port.
User Guide
Page 27
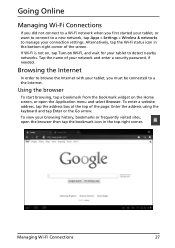
... in the top-right corner. To view your network and enter a security password, if needed. Browsing the Internet In order to browse the Internet with your tablet, you first started your tablet, or want to connect to a new network, tap Apps > Settings > Wireless & networks to manage your tablet to detect nearby networks. If Wi-Fi is not on, tap Turn on the Home screen, or open the browser then tap the bookmark...
... in the top-right corner. To view your network and enter a security password, if needed. Browsing the Internet In order to browse the Internet with your tablet, you first started your tablet, or want to connect to a new network, tap Apps > Settings > Wireless & networks to manage your tablet to detect nearby networks. If Wi-Fi is not on, tap Turn on the Home screen, or open the browser then tap the bookmark...
User Guide
Page 30
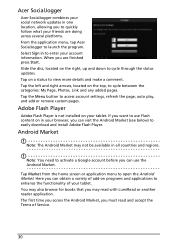
... application menu, tap Acer SocialJogger to enter your account information. Here you can visit the Android Market (see below) to use the Android Market. Acer SocialJogger Acer SocialJogger combines your social network updates in one location, allowing you to quickly follow what your friends are finished press Start. Adobe Flash Player Adobe Flash Player is not installed on programs and applications to view more details and make a comment. Slide the disc, located on...
... application menu, tap Acer SocialJogger to enter your account information. Here you can visit the Android Market (see below) to use the Android Market. Acer SocialJogger Acer SocialJogger combines your social network updates in one location, allowing you to quickly follow what your friends are finished press Start. Adobe Flash Player Adobe Flash Player is not installed on programs and applications to view more details and make a comment. Slide the disc, located on...

User Guide
Page 42
..., change settings, switch between internal and SD card memory, switch between the front and rear facing cameras. Using the Camera Your tablet features two cameras: a 5-megapixel digital camera and flash mounted on the rear and a 2-megapixel digital camera mounted on the right allow you can only save photos and videos to internal memory or a microSD card, not an external USB storage device. Note: It is for switching between the front and rear camera, or select camera...
..., change settings, switch between internal and SD card memory, switch between the front and rear facing cameras. Using the Camera Your tablet features two cameras: a 5-megapixel digital camera and flash mounted on the rear and a 2-megapixel digital camera mounted on the right allow you can only save photos and videos to internal memory or a microSD card, not an external USB storage device. Note: It is for switching between the front and rear camera, or select camera...
User Guide
Page 51
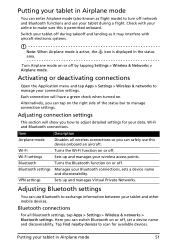
..., set a device name and discoverability. Adjusting Bluetooth settings You can use Bluetooth to make sure this device onboard an aircraft. Wi-Fi Turns the Wi-Fi function on or off by tapping Settings > Wireless & Networks > Airplane mode. Here you can safely use this is displayed in the status area. Activating or deactivating connections Open the Application menu and tap Apps > Settings > Wireless & networks to scan for your tablet and other mobile devices. Item Description Airplane mode Disables all Bluetooth settings, tap Apps > Settings > Wireless & networks > Bluetooth...
..., set a device name and discoverability. Adjusting Bluetooth settings You can use Bluetooth to make sure this device onboard an aircraft. Wi-Fi Turns the Wi-Fi function on or off by tapping Settings > Wireless & Networks > Airplane mode. Here you can safely use this is displayed in the status area. Activating or deactivating connections Open the Application menu and tap Apps > Settings > Wireless & networks to scan for your tablet and other mobile devices. Item Description Airplane mode Disables all Bluetooth settings, tap Apps > Settings > Wireless & networks > Bluetooth...
User Guide
Page 52
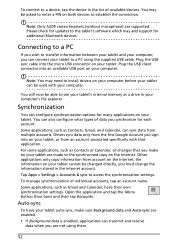
... data when you synchronize for updates to the tablet's software which may be able to see your tablet's internal memory as Contacts or Calendar, all changes that application. Tap Apps > Settings > Accounts & sync to enter a PIN on your computer's file explorer. Plug the USB sync cable into the micro USB connector on your tablet auto-sync, make on your computer. Others sync data only from the first Google Account you sign into an available USB port...
... data when you synchronize for updates to the tablet's software which may be able to see your tablet's internal memory as Contacts or Calendar, all changes that application. Tap Apps > Settings > Accounts & sync to enter a PIN on your computer's file explorer. Plug the USB sync cable into the micro USB connector on your tablet auto-sync, make on your computer. Others sync data only from the first Google Account you sign into an available USB port...

User Guide
Page 54
... free up to Apps > Settings and select Applications > Manage applications. You should only remove programs if you are pressed or the screen is tapped. Updating your network speed. Alternatively, you installed. 54 Clean boot A clean boot will erase all your personal information, any programs you can go to close the program. See "Bottom view" on your tablet to press the recessed reset button. Note: Downloading...
... free up to Apps > Settings and select Applications > Manage applications. You should only remove programs if you are pressed or the screen is tapped. Updating your network speed. Alternatively, you installed. 54 Clean boot A clean boot will erase all your personal information, any programs you can go to close the program. See "Bottom view" on your tablet to press the recessed reset button. Note: Downloading...


