User Manual
Page 2
... implied warranties of Acer Incorporated. Acer LCD Monitor User Guide Model number Serial number Date of purchase Place of purchase Acer and the Acer logo are used herein for a particular purpose. Copyright © 2014. No part of Acer Incorporated. Acer LCD Monitor User Guide Original ...Issue: 07/2014 Changes may be made periodically to your unit should include the serial number, model number and purchase information. Acer Incorporated. This company makes no representations or...
... implied warranties of Acer Incorporated. Acer LCD Monitor User Guide Model number Serial number Date of purchase Place of purchase Acer and the Acer logo are used herein for a particular purpose. Copyright © 2014. No part of Acer Incorporated. Acer LCD Monitor User Guide Original ...Issue: 07/2014 Changes may be made periodically to your unit should include the serial number, model number and purchase information. Acer Incorporated. This company makes no representations or...

User Manual
Page 3
... image, when the same image is displayed for a few hours. Cleaning your safety and comfort Safety instructions Read these guidelines when cleaning the monitor: • Always unplug the monitor before cleaning. • Use a soft cloth to the nature of the previous screen may flicker during initial use . • The LCD... this case, the screen is recovered slowly by changing the image or turning off the power switch and then turn it on LCD monitors The following are normal with the LCD monitor and do not indicate a problem. • Due to wipe the screen and cabinet front and sides.
... image, when the same image is displayed for a few hours. Cleaning your safety and comfort Safety instructions Read these guidelines when cleaning the monitor: • Always unplug the monitor before cleaning. • Use a soft cloth to the nature of the previous screen may flicker during initial use . • The LCD... this case, the screen is recovered slowly by changing the image or turning off the power switch and then turn it on LCD monitors The following are normal with the LCD monitor and do not indicate a problem. • Due to wipe the screen and cabinet front and sides.

User Manual
Page 4
... you need to disconnect power from the equipment, be blocked or covered. If the product falls, it under sporting, exercising, or any kind into this monitor ,do not place the product on a vibrating surface. • Never use this product near or over a radiator or heat register, or in a built-in a fire...
... you need to disconnect power from the equipment, be blocked or covered. If the product falls, it under sporting, exercising, or any kind into this monitor ,do not place the product on a vibrating surface. • Never use this product near or over a radiator or heat register, or in a built-in a fire...

User Manual
Page 7
... comfortable use , consult a physician immediately and inform your sitting height to carpal tunnel syndrome, tendonitis, tenosynovitis or other factors greatly increase the risk of the monitor, using a footrest, or raising your company's health and safety department. vii LCD pixel statement The LCD unit is produced with high-precision manufacturing techniques. Tips...
... comfortable use , consult a physician immediately and inform your sitting height to carpal tunnel syndrome, tendonitis, tenosynovitis or other factors greatly increase the risk of the monitor, using a footrest, or raising your company's health and safety department. vii LCD pixel statement The LCD unit is produced with high-precision manufacturing techniques. Tips...

User Manual
Page 8
... make your display in such a way that the side faces the window or any light source • minimizing room light by looking away from the monitor and focusing on a distant point. • Blink frequently to an awkward viewing angle. • Avoid looking at the middle of the display. • Adjust the...
... make your display in such a way that the side faces the window or any light source • minimizing room light by looking away from the monitor and focusing on a distant point. • Blink frequently to an awkward viewing angle. • Avoid looking at the middle of the display. • Adjust the...

User Manual
Page 9
TABLE OF CONTENTS UNPACKING 1 ATTACHING / REMOVING THE BASE 2 SCREEN POSITION ADJUSTMENT 2 CONNECTING THE POWER CORD 3 SAFETY PRECAUTION 3 CLEANING YOUR MONITOR 3 POWER SAVING 4 DDC...4 CONNECTOR PIN ASSIGNMENT 5 STANDARD TIMING TABLE 8 INSTALLATION 10 MHL (Mobile High-Definition Link) (Only for MHL-input Models) .. 11 USER CONTROLS 12 TROUBLESHOOTING 19
TABLE OF CONTENTS UNPACKING 1 ATTACHING / REMOVING THE BASE 2 SCREEN POSITION ADJUSTMENT 2 CONNECTING THE POWER CORD 3 SAFETY PRECAUTION 3 CLEANING YOUR MONITOR 3 POWER SAVING 4 DDC...4 CONNECTOR PIN ASSIGNMENT 5 STANDARD TIMING TABLE 8 INSTALLATION 10 MHL (Mobile High-Definition Link) (Only for MHL-input Models) .. 11 USER CONTROLS 12 TROUBLESHOOTING 19

User Manual
Page 10
UNPACKING Please check the following items are present when you unpack the box, and save the packing materials in case you will need to ship or transport the monitor in future. LCD Monitor Quick Start Guide Audio Cable (Optional) AC Power Cord AC Adapter DP Cable (Optional) DVI Cable (Optional) HDMI Cable (Optional) MHL Cable (Optional) EN-1
UNPACKING Please check the following items are present when you unpack the box, and save the packing materials in case you will need to ship or transport the monitor in future. LCD Monitor Quick Start Guide Audio Cable (Optional) AC Power Cord AC Adapter DP Cable (Optional) DVI Cable (Optional) HDMI Cable (Optional) MHL Cable (Optional) EN-1

User Manual
Page 11
... base. EN-2 use a cloth to hold the edges of the monitor as indicated by using both of the monitor by arrow below . Carefully place the monitor face-down as shown in the figure below . monitor stand arm. Attach the monitor stand arm to 15 degrees up or 5 degrees down on a... stable surface -- The monitor can adjust the tilt of your hands to avoid scratching ...
... base. EN-2 use a cloth to hold the edges of the monitor as indicated by using both of the monitor by arrow below . Carefully place the monitor face-down as shown in the figure below . monitor stand arm. Attach the monitor stand arm to 15 degrees up or 5 degrees down on a... stable surface -- The monitor can adjust the tilt of your hands to avoid scratching ...

User Manual
Page 12
... moisture, or dust. Do not cover the ventilation slots or openings of the monitor. EN-3 Always put the monitor in a place where there is adequate ventilation. Avoid placing the monitor against a bright background or where sun-light or other heavy object, on the face of... H05VV-F cord and plug rated 10 A, 250 V. Place the monitor just below guidelines when cleaning the monitor. Always unplug the monitor before cleaning. Use a soft cloth to the screen, as screen is fragile. CONNECTING THE POWER CORD...
... moisture, or dust. Do not cover the ventilation slots or openings of the monitor. EN-3 Always put the monitor in a place where there is adequate ventilation. Avoid placing the monitor against a bright background or where sun-light or other heavy object, on the face of... H05VV-F cord and plug rated 10 A, 250 V. Place the monitor just below guidelines when cleaning the monitor. Always unplug the monitor before cleaning. Use a soft cloth to the screen, as screen is fragile. CONNECTING THE POWER CORD...

User Manual
Page 13
...control signal from Active OFF state back to Plug and Play with your system if your system also supports DDC protocol. The monitor supports DDC2B standard. The DDC (Display Data Channel) is able to ON state is around 3 seconds. DDC To make your installation easier,... the monitor is a communication protocol through which the monitor automatically informs the host system about its capabilities, for example, supported resolutions and corresponding timing. State ON Power Saving Mode LED...
...control signal from Active OFF state back to Plug and Play with your system if your system also supports DDC protocol. The monitor supports DDC2B standard. The DDC (Display Data Channel) is able to ON state is around 3 seconds. DDC To make your installation easier,... the monitor is a communication protocol through which the monitor automatically informs the host system about its capabilities, for example, supported resolutions and corresponding timing. State ON Power Saving Mode LED...
User Manual
Page 19
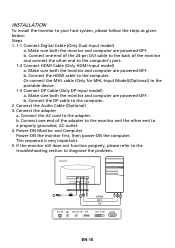
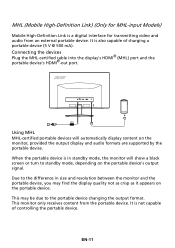
... Connect HDMI Cable (Only HDMI-input model) a. Connect the HDMI cable to diagnose the problem. This sequence is very important. 5. b. If the monitor still does not function properly, please refer to the troubleshooting section to the computer. b. Connect the DP cable to the portable device. 1-3 Connect DP ...model) a. Connect the Audio Cable (Optional) 3. b. Connect one end of the 24-pin DVI cable to the back of the adapter to the monitor and the other end to a properly grounded, AC outlet. 4. Or connect the MHL cable (Only for MHL-Input Model)(Optional) to the computer...
... Connect HDMI Cable (Only HDMI-input model) a. Connect the HDMI cable to diagnose the problem. This sequence is very important. 5. b. If the monitor still does not function properly, please refer to the troubleshooting section to the computer. b. Connect the DP cable to the portable device. 1-3 Connect DP ...model) a. Connect the Audio Cable (Optional) 3. b. Connect one end of the 24-pin DVI cable to the back of the adapter to the monitor and the other end to a properly grounded, AC outlet. 4. Or connect the MHL cable (Only for MHL-Input Model)(Optional) to the computer...
User Manual
Page 20
...a black screen or turn to standby mode, depending on the portable device's output signal. Due to the portable device changing the output format. This monitor only receives content from an external portable device. EN-11 When the portable device is not capable of charging a portable device (5 V @ 500 mA...from the portable device. This may be due to the difference in standby mode, the monitor will automatically display content on the portable device. It is in size and resolution between the monitor and the portable device, you may find the display quality not as crisp as it...
...a black screen or turn to standby mode, depending on the portable device's output signal. Due to the portable device changing the output format. This monitor only receives content from an external portable device. EN-11 When the portable device is not capable of charging a portable device (5 V @ 500 mA...from the portable device. This may be due to the difference in standby mode, the monitor will automatically display content on the portable device. It is in size and resolution between the monitor and the portable device, you may find the display quality not as crisp as it...

User Manual
Page 21
.... Minus / plus OD Brightness Empowering key If the OSD is active, press it to either Normal or Extreme mode. Press the key to open the Acer eColor Management OSD and access the scenario modes. Press the key to activate the OD function and set it to enter a selection. If the OSD... is active, press the Minus or Plus button to exit the OSD. USER CONTROLS Base Controls Icon / Item Power button/ indicator Description To turn the monitor ON or OFF. If the OSD is turned ON. EN-12 Lights up to indicate the power is active, press it to your preferred level.
.... Minus / plus OD Brightness Empowering key If the OSD is active, press it to either Normal or Extreme mode. Press the key to open the Acer eColor Management OSD and access the scenario modes. Press the key to activate the OD function and set it to enter a selection. If the OSD... is active, press the Minus or Plus button to exit the OSD. USER CONTROLS Base Controls Icon / Item Power button/ indicator Description To turn the monitor ON or OFF. If the OSD is turned ON. EN-12 Lights up to indicate the power is active, press it to your preferred level.

User Manual
Page 23
... are done, use the OSD to open the OSD. The OSD can use Exit to following content is for adjusting the settings of your LCD Monitor. For advanced settings, please refer to go back one level. Press the MENU key to adjust the picture quality, OSD position and general settings. Adjusting...
... are done, use the OSD to open the OSD. The OSD can use Exit to following content is for adjusting the settings of your LCD Monitor. For advanced settings, please refer to go back one level. Press the MENU key to adjust the picture quality, OSD position and general settings. Adjusting...

User Manual
Page 27
Then the basic information of LCD monitor will show up the OSD. 2. EN-18 Press the MENU key to bring up for current input. Using the / keys, select Information from the OSD. Product information 1.
Then the basic information of LCD monitor will show up the OSD. 2. EN-18 Press the MENU key to bring up for current input. Using the / keys, select Information from the OSD. Product information 1.
User Manual
Page 28
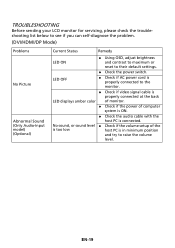
TROUBLESHOOTING Before sending your LCD monitor for servicing, please check the troubleshooting list below to see if you can self-diagnose the problem. (DVI/HDMI/DP Mode) Problems No Picture Abnormal ... raise the volume level. LED OFF Check if AC power cord is properly connected to the monitor. Check if video signal cable is properly connected at the back LED displays amber color of monitor. Check if the power of the is too low host PC is connected. No sound...
TROUBLESHOOTING Before sending your LCD monitor for servicing, please check the troubleshooting list below to see if you can self-diagnose the problem. (DVI/HDMI/DP Mode) Problems No Picture Abnormal ... raise the volume level. LED OFF Check if AC power cord is properly connected to the monitor. Check if video signal cable is properly connected at the back LED displays amber color of monitor. Check if the power of the is too low host PC is connected. No sound...
User Manual
Page 30
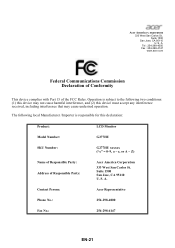
...for this device must accept any interference received, including interference that may not cause harmful interference, and (2) this declaration: Product: LCD Monitor Model Number: G277HU SKU Number: G277HU xxxxxx ("x" = 0~9, a ~ z, or A ~ Z) Name of Responsible Party: Address of the FCC Rules. Tel : 254-298... Declaration of Conformity This device complies with Part 15 of Responsible Party: Acer America Corporation 333 West San Carlos St. S. A. S. Suite 1500 San Jose, CA 95110 U. A. Contact Person: Acer Representative Phone No.: 254-298-4000 Fax No.: 254-298-4147 EN...
...for this device must accept any interference received, including interference that may not cause harmful interference, and (2) this declaration: Product: LCD Monitor Model Number: G277HU SKU Number: G277HU xxxxxx ("x" = 0~9, a ~ z, or A ~ Z) Name of Responsible Party: Address of the FCC Rules. Tel : 254-298... Declaration of Conformity This device complies with Part 15 of Responsible Party: Acer America Corporation 333 West San Carlos St. S. A. S. Suite 1500 San Jose, CA 95110 U. A. Contact Person: Acer Representative Phone No.: 254-298-4000 Fax No.: 254-298-4147 EN...

User Manual
Page 31
....gov or http:// www.energystar.gov/powermangement Acer ENERGY STAR qualified products: • Produce less heat and reduce cooling loads, and warmer climates. • Automatically go into "display sleep" and "computer sleep" mode after 15 and 30 minute of inactivity respectively. • Wake the monitor when it is in Active Off mode...
....gov or http:// www.energystar.gov/powermangement Acer ENERGY STAR qualified products: • Produce less heat and reduce cooling loads, and warmer climates. • Automatically go into "display sleep" and "computer sleep" mode after 15 and 30 minute of inactivity respectively. • Wake the monitor when it is in Active Off mode...


