User Manual
Page 8
BIOS Utility 45 Acer eRecovery 46 Create backup 46 Restore from backup 47 Create factory default image CD 47 Re-install bundled software without CD 48 Change password 48 Acer Disc to Disc Recovery 49 Multilingual operating system installation 49 Restore without a Recovery CD 49 Setup password and exit 50 3 Troubleshooting my computer 51 Frequently-asked questions 53 Troubleshooting tips 56 Error messages 57 Requesting service 58 International Traveler's Warranty (ITW) 58 Before you call 59 Appendix A Specifications 61 Appendix B Notices 67 Index 83
BIOS Utility 45 Acer eRecovery 46 Create backup 46 Restore from backup 47 Create factory default image CD 47 Re-install bundled software without CD 48 Change password 48 Acer Disc to Disc Recovery 49 Multilingual operating system installation 49 Restore without a Recovery CD 49 Setup password and exit 50 3 Troubleshooting my computer 51 Frequently-asked questions 53 Troubleshooting tips 56 Error messages 57 Requesting service 58 International Traveler's Warranty (ITW) 58 Before you call 59 Appendix A Specifications 61 Appendix B Notices 67 Index 83
User Manual
Page 26
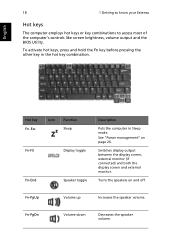
Fn-PgUp Volume up Increases the speaker volume. English 18 1 Getting to know your Extensa Hot keys The computer employs hot keys or key combinations to access most of the computer's controls like screen brightness, volume output and the BIOS Utility. To activate hot keys, press and hold the Fn key before pressing...
Fn-PgUp Volume up Increases the speaker volume. English 18 1 Getting to know your Extensa Hot keys The computer employs hot keys or key combinations to access most of the computer's controls like screen brightness, volume output and the BIOS Utility. To activate hot keys, press and hold the Fn key before pressing...
User Manual
Page 40
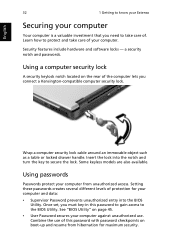
... security keylock notch located on boot-up and resume from unauthorized access. Insert the lock into the BIOS Utility. Setting these passwords creates several different levels of . See "BIOS Utility" on page 45. • User Password secures your computer against unauthorized use of this password... to gain access to protect and take care of protection for maximum security. English 32 1 Getting to know your Extensa Securing your computer Your ...
... security keylock notch located on boot-up and resume from unauthorized access. Insert the lock into the BIOS Utility. Setting these passwords creates several different levels of . See "BIOS Utility" on page 45. • User Password secures your computer against unauthorized use of this password... to gain access to protect and take care of protection for maximum security. English 32 1 Getting to know your Extensa Securing your computer Your ...

User Manual
Page 41
... is set, a password prompt appears in touch with password checkpoints on boot-up and resume from hibernation for four seconds to access the BIOS Utility. Press and hold the power button for maximum security. Combine the use of the display screen. • When the Supervisor Password is...in the center of this password with your dealer or an authorized service center. Then turn on boot parameter is set passwords using the BIOS Utility. If you enter the password incorrectly, a warning message appears. Important! English 33 • Password on Boot secures your computer ...
... is set, a password prompt appears in touch with password checkpoints on boot-up and resume from hibernation for four seconds to access the BIOS Utility. Press and hold the power button for maximum security. Combine the use of the display screen. • When the Supervisor Password is...in the center of this password with your dealer or an authorized service center. Then turn on boot parameter is set passwords using the BIOS Utility. If you enter the password incorrectly, a warning message appears. Important! English 33 • Password on Boot secures your computer ...

User Manual
Page 53
English 45 You can access the Launch Manager by clicking on Start, All Programs, and then Launch Manager to run this utility. Your computer is a hardware configuration program built into your computer's Basic Input/Output System (BIOS). BIOS Utility The BIOS Utility is already properly configured and optimized, and you may need to run it. However, if you encounter configuration problems, you do not need to start the application. To activate the BIOS Utility, press F2 during the Power-On Self Test (POST).
English 45 You can access the Launch Manager by clicking on Start, All Programs, and then Launch Manager to run this utility. Your computer is a hardware configuration program built into your computer's Basic Input/Output System (BIOS). BIOS Utility The BIOS Utility is already properly configured and optimized, and you may need to run it. However, if you encounter configuration problems, you do not need to start the application. To activate the BIOS Utility, press F2 during the Power-On Self Test (POST).
User Manual
Page 57
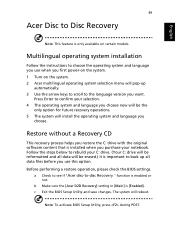
...Main] is enabled or not. Press Enter to confirm your notebook. Note: To activate BIOS Setup Utility, press during POST. a Check to see if "Acer disc-to-disc Recovery " function is [Enabled]. English 49 Acer Disc to Disc Recovery Note: This feature is important to back up all data will be.... 5 The system will install the operating system and language you first power-on the system. 1 Turn on certain models. c Exit the BIOS Setup Utility and save changes. The system will be reformatted and all data files before you use when you choose. Follow the steps below to...
...Main] is enabled or not. Press Enter to confirm your notebook. Note: To activate BIOS Setup Utility, press during POST. a Check to see if "Acer disc-to-disc Recovery " function is [Enabled]. English 49 Acer Disc to Disc Recovery Note: This feature is important to back up all data will be.... 5 The system will install the operating system and language you first power-on the system. 1 Turn on certain models. c Exit the BIOS Setup Utility and save changes. The system will be reformatted and all data files before you use when you choose. Follow the steps below to...

User Manual
Page 58
... Press any key to reboot...", hit any key to eight alphanumeric characters. Please enter 000000:" is displayed. 5 Enter six 0s and continue. 6 "Acer Self-Configuration Preload" window appears. 7 Use the arrow keys to scroll through the items (operating system versions) and press "Enter" to exit the ... to setup password or press "F5" to select. 50 2 Customizing my computer English 1 Restart the system. 2 The instruction "Press to Enter BIOS" is shown at the bottom of the screen, during POST. 3 Press + at the same time to reenter your password for confirmation before continuing.
... Press any key to reboot...", hit any key to eight alphanumeric characters. Please enter 000000:" is displayed. 5 Enter six 0s and continue. 6 "Acer Self-Configuration Preload" window appears. 7 Use the arrow keys to scroll through the items (operating system versions) and press "Enter" to exit the ... to setup password or press "F5" to select. 50 2 Customizing my computer English 1 Restart the system. 2 The instruction "Press to Enter BIOS" is shown at the bottom of the screen, during POST. 3 Press + at the same time to reenter your password for confirmation before continuing.

User Manual
Page 63
...for file transfers) or you need to use the internal modem. The printer does not work . Try attaching an external keyboard to access the BIOS Utility and verify that the printer cable is enabled. If it is turned on. • Make sure that the parallel port is connected securely ... printer is connected to a power outlet and that it works, contact your communications software (e.g. The infrared port does not work . Refer to access the BIOS Utility and verify that the infrared ports of 1 meter apart. • Make sure there is enabled. • Make sure both devices (for printing ...
...for file transfers) or you need to use the internal modem. The printer does not work . Try attaching an external keyboard to access the BIOS Utility and verify that the printer cable is enabled. If it is turned on. • Make sure that the parallel port is connected securely ... printer is connected to a power outlet and that it works, contact your communications software (e.g. The infrared port does not work . Refer to access the BIOS Utility and verify that the infrared ports of 1 meter apart. • Make sure there is enabled. • Make sure both devices (for printing ...

User Manual
Page 65
...center. If you receive an error message, note the message and take the corrective action. Some problems may be solved using the BIOS Utility. Hard Disk 0 Extended Type Error Contact your dealer or an authorized service center. Memory Size Mismatch Press F2 (during POST) ...to enter the BIOS Utility; I/O Parity Error Contact your dealer or an authorized service center. Hard Disk 0 Error Contact your dealer or an authorized service ...
...center. If you receive an error message, note the message and take the corrective action. Some problems may be solved using the BIOS Utility. Hard Disk 0 Extended Type Error Contact your dealer or an authorized service center. Memory Size Mismatch Press F2 (during POST) ...to enter the BIOS Utility; I/O Parity Error Contact your dealer or an authorized service center. Hard Disk 0 Error Contact your dealer or an authorized service ...

User Manual
Page 71
... up to 2 GB • Two DDR DIMM slots • Support 128 MB, 256 MB, 512 MB & 1GB DDR SDRAM modules • 512 KB Flash ROM BIOS Data storage • One high-capacity, Enhanced-IDE hard disk • One internal optical drive Display and video • 14.1" or 15.0" Thin-Film Transistor...
... up to 2 GB • Two DDR DIMM slots • Support 128 MB, 256 MB, 512 MB & 1GB DDR SDRAM modules • 512 KB Flash ROM BIOS Data storage • One high-capacity, Enhanced-IDE hard disk • One internal optical drive Display and video • 14.1" or 15.0" Thin-Film Transistor...
User Manual
Page 91
... lights 13 infrared 38 ITW. Index A AC adapter caring for v AcerMedia drive 24 audio 26 adjusting the volume 26 troubleshooting 54 B battery pack caring for v BIOS utility 45 brightness hotkeys 19 C caps lock 15 on indicator 14 care AC adapter v battery pack v computer iv CD-ROM ejecting 24 ejecting manually 54...
... lights 13 infrared 38 ITW. Index A AC adapter caring for v AcerMedia drive 24 audio 26 adjusting the volume 26 troubleshooting 54 B battery pack caring for v BIOS utility 45 brightness hotkeys 19 C caps lock 15 on indicator 14 care AC adapter v battery pack v computer iv CD-ROM ejecting 24 ejecting manually 54...


