User Manual
Page 3
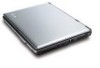
... Reader installed. If you use Adobe Acrobat Reader, access the Help and Support menu. English iii First things first We would like to thank you for making it thoroughly. This User's guide introduces you to the many ways your computer can help you ever need to use your mobile computing needs. For instructions on AcerSystem User's guide. This guide provides clear and concise information about our products, services, and support...
... Reader installed. If you use Adobe Acrobat Reader, access the Help and Support menu. English iii First things first We would like to thank you for making it thoroughly. This User's guide introduces you to the many ways your computer can help you ever need to use your mobile computing needs. For instructions on AcerSystem User's guide. This guide provides clear and concise information about our products, services, and support...
User Manual
Page 7
... Using software 25 Audio 26 Adjusting the volume 26 Power management 26 Moving around with your Extensa 27 Disconnecting from the desktop 27 Moving around 27 Taking the computer home 28 Traveling with the computer 30 Traveling internationally with the computer 31 Securing your computer 32 Using a computer security lock 32 Using passwords 32 2 Customizing my computer 35 Expanding through options 37 Connectivity options 37 Upgrade options 42 Using...
... Using software 25 Audio 26 Adjusting the volume 26 Power management 26 Moving around with your Extensa 27 Disconnecting from the desktop 27 Moving around 27 Taking the computer home 28 Traveling with the computer 30 Traveling internationally with the computer 31 Securing your computer 32 Using a computer security lock 32 Using passwords 32 2 Customizing my computer 35 Expanding through options 37 Connectivity options 37 Upgrade options 42 Using...

User Manual
Page 13
...Latch Latch for opening and closing the computer. 5 Power indicator Lights when the computer is on models with Wireless / Bluetooth® features, respectively. The Wireless / Bluetooth® buttons and indicators only work on . 6 Battery indicator Lights when the battery is being charged. 7 Wireless / Lights to indicate the status of Wireless LAN Bluetooth® (optional) / Bluetooth® (optional) communications communications. • Orange indicates that wireless LAN is enabled. • Blue indicates that wireless LAN & Bluetooth® are enabled. English 5 # Item...
...Latch Latch for opening and closing the computer. 5 Power indicator Lights when the computer is on models with Wireless / Bluetooth® features, respectively. The Wireless / Bluetooth® buttons and indicators only work on . 6 Battery indicator Lights when the battery is being charged. 7 Wireless / Lights to indicate the status of Wireless LAN Bluetooth® (optional) / Bluetooth® (optional) communications communications. • Orange indicates that wireless LAN is enabled. • Blue indicates that wireless LAN & Bluetooth® are enabled. English 5 # Item...
User Manual
Page 14
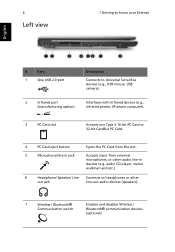
... Card from external microphones, or other out jack line-out audio devices (speakers). 7 Wireless / Bluetooth® Communication switch Enables and disables Wireless / Bluetooth® communication devices. (optional) audio CD player, stereo walkman and etc.) 6 Headphone/ Speaker/ Line- Connects to Universal Serial Bus devices (e.g., USB mouse, USB camera). 2 Infrared port (manufacturing option) Interfaces with infrared devices (e.g., infrared printer, IR-aware computer). 3 PC Card slot Accepts one Type II 16-bit PC Card or 32-bit CardBus PC Card. 4 PC Card eject button...
... Card from external microphones, or other out jack line-out audio devices (speakers). 7 Wireless / Bluetooth® Communication switch Enables and disables Wireless / Bluetooth® communication devices. (optional) audio CD player, stereo walkman and etc.) 6 Headphone/ Speaker/ Line- Connects to Universal Serial Bus devices (e.g., USB mouse, USB camera). 2 Infrared port (manufacturing option) Interfaces with infrared devices (e.g., infrared printer, IR-aware computer). 3 PC Card slot Accepts one Type II 16-bit PC Card or 32-bit CardBus PC Card. 4 PC Card eject button...

User Manual
Page 16
... your Extensa English # Item Description 1 Security keylock Connects to a Kensington-compatible computer security lock. 2 Parallel port Connects to an Ethernet 10/100-based network. option) 3 External display Connects to a display device (e.g., external port monitor, LCD projector) and displays up to 16.7 million colors and up to 1600x1200 at 85 Hz and 2048x1536 at 75 Hz resolution. 4 Two USB 2.0 ports Connects to Universal Serial Bus devices (e.g., USB mouse, USB camera). 5 Modem port Connects to a phone line. 6 Ethernet port Connects to a parallel device...
... your Extensa English # Item Description 1 Security keylock Connects to a Kensington-compatible computer security lock. 2 Parallel port Connects to an Ethernet 10/100-based network. option) 3 External display Connects to a display device (e.g., external port monitor, LCD projector) and displays up to 16.7 million colors and up to 1600x1200 at 85 Hz and 2048x1536 at 75 Hz resolution. 4 Two USB 2.0 ports Connects to Universal Serial Bus devices (e.g., USB mouse, USB camera). 5 Modem port Connects to a phone line. 6 Ethernet port Connects to a parallel device...
User Manual
Page 23
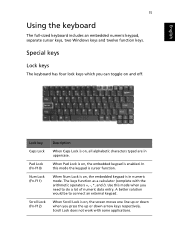
... need to connect an external keypad. In this mode when you can toggle on , the screen moves one line up or down when you press the up or down arrow keys respectively. When Pad Lock is on , all alphabetic characters typed are in numeric mode. A better solution would be to do a lot of numeric data entry. Use this mode the keypad is enabled. Scroll Lock...
... need to connect an external keypad. In this mode when you can toggle on , the screen moves one line up or down when you press the up or down arrow keys respectively. When Pad Lock is on , all alphabetic characters typed are in numeric mode. A better solution would be to do a lot of numeric data entry. Use this mode the keypad is enabled. Scroll Lock...
User Manual
Page 26
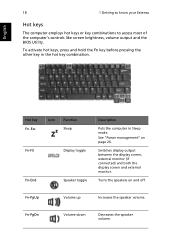
... the speaker volume. To activate hot keys, press and hold the Fn key before pressing the other key in Sleep mode. Hot key Fn-Esc Fn-F5 Fn-End Icon Function Sleep Display toggle Speaker toggle Description Puts the computer in the hot key combination. English 18 1 Getting to know your Extensa Hot keys The computer employs hot keys or key combinations to access most of the computer's controls like screen brightness, volume output and the BIOS Utility.
... the speaker volume. To activate hot keys, press and hold the Fn key before pressing the other key in Sleep mode. Hot key Fn-Esc Fn-F5 Fn-End Icon Function Sleep Display toggle Speaker toggle Description Puts the computer in the hot key combination. English 18 1 Getting to know your Extensa Hot keys The computer employs hot keys or key combinations to access most of the computer's controls like screen brightness, volume output and the BIOS Utility.
User Manual
Page 34
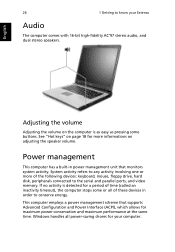
... that monitors system activity. Windows handles all of these devices in power management unit that supports Advanced Configuration and Power Interface (ACPI), which allows for a period of the following devices: keyboard, mouse, floppy drive, hard disk, peripherals connected to the serial and parallel ports, and video memory. See "Hot keys" on the computer is detected for maximum power conservation and maximum performance at the same time. Adjusting the volume Adjusting the volume on page 18 for your Extensa Audio...
... that monitors system activity. Windows handles all of these devices in power management unit that supports Advanced Configuration and Power Interface (ACPI), which allows for a period of the following devices: keyboard, mouse, floppy drive, hard disk, peripherals connected to the serial and parallel ports, and video memory. See "Hot keys" on the computer is detected for maximum power conservation and maximum performance at the same time. Adjusting the volume Adjusting the volume on page 18 for your Extensa Audio...
User Manual
Page 35
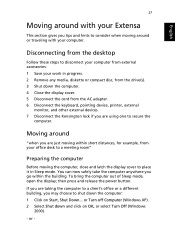
... in progress. 2 Remove any media, diskette or compact disc, from the drive(s). 3 Shut down the computer. 4 Close the display cover. 5 Disconnect the cord from the AC adapter. 6 Disconnect the keyboard, pointing device, printer, external monitor, and other external devices. 7 Disconnect the Kensington lock if you may choose to shut down and click on Start, Shut Down... or - Moving around or traveling with your Extensa This section...
... in progress. 2 Remove any media, diskette or compact disc, from the drive(s). 3 Shut down the computer. 4 Close the display cover. 5 Disconnect the cord from the AC adapter. 6 Disconnect the keyboard, pointing device, printer, external monitor, and other external devices. 7 Disconnect the Kensington lock if you may choose to shut down and click on Start, Shut Down... or - Moving around or traveling with your Extensa This section...
User Manual
Page 40
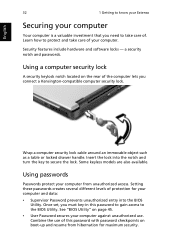
... and passwords. Once set, you connect a Kensington-compatible computer security lock. Insert the lock into the BIOS Utility. Wrap a computer security lock cable around an immovable object such as a table or locked drawer handle. Setting these passwords creates several different levels of your computer and data: • Supervisor Password prevents unauthorized entry into the notch and turn the key to the BIOS Utility. Combine the use . Some keyless models are...
... and passwords. Once set, you connect a Kensington-compatible computer security lock. Insert the lock into the BIOS Utility. Wrap a computer security lock cable around an immovable object such as a table or locked drawer handle. Setting these passwords creates several different levels of your computer and data: • Supervisor Password prevents unauthorized entry into the notch and turn the key to the BIOS Utility. Combine the use . Some keyless models are...

User Manual
Page 41
... this password with your password, please get in touch with password checkpoints on boot-up . • Type the Supervisor Password and press Enter to enter a password. If you enter the password incorrectly, a warning message appears. Important! Then turn on boot parameter is set passwords using the BIOS Utility. If you press F2 to enter the BIOS Utility at boot-up. • Type the User Password and press Enter to use of the display screen. • When the Supervisor Password is enabled, a prompt...
... this password with your password, please get in touch with password checkpoints on boot-up . • Type the Supervisor Password and press Enter to enter a password. If you enter the password incorrectly, a warning message appears. Important! Then turn on boot parameter is set passwords using the BIOS Utility. If you press F2 to enter the BIOS Utility at boot-up. • Type the User Password and press Enter to use of the display screen. • When the Supervisor Password is enabled, a prompt...
User Manual
Page 45
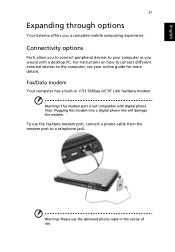
...: Please use the fax/data modem port, connect a phone cable from the modem port to a telephone jack. Connectivity options Ports allow you a complete mobile computing experience. Plugging this modem into a digital phone line will damage the modem. This modem port is not compatible with a desktop PC. English 37 Expanding through options Your Extensa offers you to connect peripheral devices to your online guide for more...
...: Please use the fax/data modem port, connect a phone cable from the modem port to a telephone jack. Connectivity options Ports allow you a complete mobile computing experience. Plugging this modem into a digital phone line will damage the modem. This modem port is not compatible with a desktop PC. English 37 Expanding through options Your Extensa offers you to connect peripheral devices to your online guide for more...
User Manual
Page 54
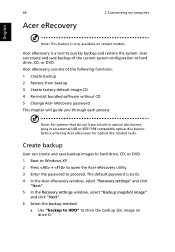
... an external USB or IEEE1394 compatible optical disc burner before entering Acer eRecovery for optical disc related tasks. User can create and save backup of the following functions: 1 Create backup 2 Restore from backup 3 Create factory default image CD 4 Re-install bundled software without CD 5 Change Acer eRecovery password This chapter will guide you through each process. Create backup User can create and save backup images to hard drive, CD, or DVD. 1 Boot to Windows XP 2 Press + to open the Acer eRecovery utility. 3 Enter the password to hard drive, CD, or DVD.
... an external USB or IEEE1394 compatible optical disc burner before entering Acer eRecovery for optical disc related tasks. User can create and save backup of the following functions: 1 Create backup 2 Restore from backup 3 Create factory default image CD 4 Re-install bundled software without CD 5 Change Acer eRecovery password This chapter will guide you through each process. Create backup User can create and save backup images to hard drive, CD, or DVD. 1 Boot to Windows XP 2 Press + to open the Acer eRecovery utility. 3 Enter the password to hard drive, CD, or DVD.

User Manual
Page 55
... Acer eRecovery window, select "Recovery settings" and click "Next". 5 In the Recovery settings window, select "Burn image to disk" and click "Next". 6 In the Burn image to complete the restore process. The default password is a user backup stored on CD or DVD. 7 After choosing the backup method, click "Next". Restore from hard drive, CD, or DVD. 1 Boot to Windows XP. 2 Press + to open the Acer eRecovery utility. 3 Enter the password to store the backup disc image on the hard drive...
... Acer eRecovery window, select "Recovery settings" and click "Next". 5 In the Recovery settings window, select "Burn image to disk" and click "Next". 6 In the Burn image to complete the restore process. The default password is a user backup stored on CD or DVD. 7 After choosing the backup method, click "Next". Restore from hard drive, CD, or DVD. 1 Boot to Windows XP. 2 Press + to open the Acer eRecovery utility. 3 Enter the password to store the backup disc image on the hard drive...
User Manual
Page 57
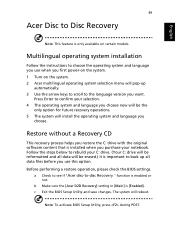
... steps below to rebuild your notebook. Before performing a restore operation, please check the BIOS settings. The system will reboot. a Check to see if "Acer disc-to-disc Recovery " function is important to back up automatically. 3 Use the arrow keys to scroll to the language version you restore the C: drive with the original software content that is [Enabled]. b Make sure the [Acer D2D Recovery] setting in [Main] is installed when you choose now will...
... steps below to rebuild your notebook. Before performing a restore operation, please check the BIOS settings. The system will reboot. a Check to see if "Acer disc-to-disc Recovery " function is important to back up automatically. 3 Use the arrow keys to scroll to the language version you restore the C: drive with the original software content that is [Enabled]. b Make sure the [Acer D2D Recovery] setting in [Main] is installed when you choose now will...
User Manual
Page 61
... computer. • If the Sleep indicator is lit, the computer is in Sleep mode. Press Fn-↑ (increase) to adjust the brightness level. • The display device might be set to restart the system. Press the display toggle hot key Fn-F5 to toggle the display back to turn the display back on the screen. Press and release the power button to save power. Remove or replace it is not lit...
... computer. • If the Sleep indicator is lit, the computer is in Sleep mode. Press Fn-↑ (increase) to adjust the brightness level. • The display device might be set to restart the system. Press the display toggle hot key Fn-F5 to toggle the display back to turn the display back on the screen. Press and release the power button to save power. Remove or replace it is not lit...

User Manual
Page 62
... you set to the appropriate resolution. No audio is not full-screen. You can also use the volume control buttons to fill the computer display. I want to the line-out port on page 18 for the 14.1"/15.0". Then click on an external monitor. Resolutions lower than this, the screen expands to adjust the volume. See "Hot keys" on the computer's left panel, the internal speakers automatically turn off...
... you set to the appropriate resolution. No audio is not full-screen. You can also use the volume control buttons to fill the computer display. I want to the line-out port on page 18 for the 14.1"/15.0". Then click on an external monitor. Resolutions lower than this, the screen expands to adjust the volume. See "Hot keys" on the computer's left panel, the internal speakers automatically turn off...

User Manual
Page 63
... not work . To properly use the internal modem. Check the following : • Make sure that it works, contact your location: 1 Click on Start, Settings, Control Panel. 2 Double-click on Modems. 3 Click on the rear or left of 1 meter apart. • Make sure there is a clear path between the two infrared ports. Refer to access the BIOS Utility and verify that the parallel port is enabled. • Make sure both devices are...
... not work . To properly use the internal modem. Check the following : • Make sure that it works, contact your location: 1 Click on Start, Settings, Control Panel. 2 Double-click on Modems. 3 Click on the rear or left of 1 meter apart. • Make sure there is a clear path between the two infrared ports. Refer to access the BIOS Utility and verify that the parallel port is enabled. • Make sure both devices are...
User Manual
Page 91
... 3 H hard disk 24 help online services 58 Hibernation mode hotkey 18 hotkeys 18 I IEEE 1394 port 40 indicator lights 13 infrared 38 ITW. See warranty K keyboard 15 embedded numeric keypad 16 hotkeys 18 lock keys 15 troubleshooting 55 Windows keys 17 L LEDs 13 M memory installing 43 upgrading 42 Index A AC adapter caring for v AcerMedia drive 24 audio 26 adjusting the volume 26 troubleshooting 54 B battery pack caring for v BIOS utility 45 brightness hotkeys 19 C caps lock 15 on indicator 14 care AC adapter v battery pack...
... 3 H hard disk 24 help online services 58 Hibernation mode hotkey 18 hotkeys 18 I IEEE 1394 port 40 indicator lights 13 infrared 38 ITW. See warranty K keyboard 15 embedded numeric keypad 16 hotkeys 18 lock keys 15 troubleshooting 55 Windows keys 17 L LEDs 13 M memory installing 43 upgrading 42 Index A AC adapter caring for v AcerMedia drive 24 audio 26 adjusting the volume 26 troubleshooting 54 B battery pack caring for v BIOS utility 45 brightness hotkeys 19 C caps lock 15 on indicator 14 care AC adapter v battery pack...

User Manual
Page 92
84 messages error 57 modem 37 N network 38 notice DVD copyright protection 76 num lock 15 on indicator 14 numeric keypad num lock 16 O online services 58 options memory upgrade 42 P password 32 types 32 PC Card 40 ejecting 41 inserting 41 ports 37 POST (power-on self-test) 45 printer troubleshooting 55 problems 53 CD-ROM 54 display 53, 54 keyboard 55 printer 55 startup 53 troubleshooting 52 Q questions setting location for modem use 55...
84 messages error 57 modem 37 N network 38 notice DVD copyright protection 76 num lock 15 on indicator 14 numeric keypad num lock 16 O online services 58 options memory upgrade 42 P password 32 types 32 PC Card 40 ejecting 41 inserting 41 ports 37 POST (power-on self-test) 45 printer troubleshooting 55 problems 53 CD-ROM 54 display 53, 54 keyboard 55 printer 55 startup 53 troubleshooting 52 Q questions setting location for modem use 55...


