
User Manual
Page 3
... uneven brightness on the screen depending on LCD monitors The following guidelines when connecting and disconnecting power from the LCD monitor: • Make sure the monitor is recovered slowly by unplugging all power cords from the power supplies. It may include blemishes of the fluorescent light, the screen may remain after switching the image, when the same image is displayed for hours. Information for your monitor Please carefully follow these instructions carefully. Cleaning...
... uneven brightness on the screen depending on LCD monitors The following guidelines when connecting and disconnecting power from the LCD monitor: • Make sure the monitor is recovered slowly by unplugging all power cords from the power supplies. It may include blemishes of the fluorescent light, the screen may remain after switching the image, when the same image is displayed for hours. Information for your monitor Please carefully follow these instructions carefully. Cleaning...

User Manual
Page 4
... listening To protect your hearing, follow these instructions. • Gradually increase the volume until you can 't hear people speaking near you plug the power cord into is easily accessible and located as possible. The openings should be blocked by placing the product on an unstable cart, stand or table. Using electrical power • This product should never be operated...
... listening To protect your hearing, follow these instructions. • Gradually increase the volume until you can 't hear people speaking near you plug the power cord into is easily accessible and located as possible. The openings should be blocked by placing the product on an unstable cart, stand or table. Using electrical power • This product should never be operated...
User Manual
Page 5
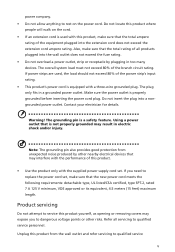
... inserting the power cord plug. Note: The grounding pin also provides good protection from the wall outlet and refer servicing to qualified service v Do not locate this product from unexpected noise produced by plugging in a grounded power outlet. Also, make sure that may expose you need to replace the power cord set . Refer all products plugged into the wall outlet does not exceed the fuse rating. •...
... inserting the power cord plug. Note: The grounding pin also provides good protection from the wall outlet and refer servicing to qualified service v Do not locate this product from unexpected noise produced by plugging in a grounded power outlet. Also, make sure that may expose you need to replace the power cord set . Refer all products plugged into the wall outlet does not exceed the fuse rating. •...

User Manual
Page 6
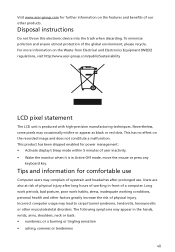
...: • the power cord or plug is strongly committed to reduce the environmental impact of small children. Switch off the device near gas pumps at Acer are very conscious of the environmental effects of our business and strive to identify and provide the best working procedures to environmental protection and views recycling, in performance, indicating a need for service • the...
...: • the power cord or plug is strongly committed to reduce the environmental impact of small children. Switch off the device near gas pumps at Acer are very conscious of the environmental effects of our business and strive to identify and provide the best working procedures to environmental protection and views recycling, in performance, indicating a need for service • the...
User Manual
Page 7
...; Activate display's Sleep mode within 5 minutes of user inactivity. • Wake the monitor when it is produced with high-precision manufacturing techniques. Incorrect computer usage may complain of eyestrain and headaches after long hours of working conditions, personal health and other factors greatly increase the risk of physical injury. For more information on the recorded image and...
...; Activate display's Sleep mode within 5 minutes of user inactivity. • Wake the monitor when it is produced with high-precision manufacturing techniques. Incorrect computer usage may complain of eyestrain and headaches after long hours of working conditions, personal health and other factors greatly increase the risk of physical injury. For more information on the recorded image and...

User Manual
Page 8
... of the monitor, using a footrest, or raising your eyes. Observe the following section provides tips for enhanced text readability and graphics clarity. • Eliminate glare and reflections by adjusting the viewing angle of your vision Long viewing hours, wearing incorrect glasses or contact lenses, glare, excessive room lighting, poorly focused screens, very small typefaces and low-contrast displays could...
... of the monitor, using a footrest, or raising your eyes. Observe the following section provides tips for enhanced text readability and graphics clarity. • Eliminate glare and reflections by adjusting the viewing angle of your vision Long viewing hours, wearing incorrect glasses or contact lenses, glare, excessive room lighting, poorly focused screens, very small typefaces and low-contrast displays could...

User Manual
Page 9
Developing good work habits Develop the following work habits to make your display to an awkward viewing angle. • Avoid looking at bright light sources, such as possible. • Exercise regularly and maintain a healthy body. Acer monitor is purposed for extended periods of information obtained from the display's top front edge • Avoid adjusting your computer use more relaxing and productive: • Take short...
Developing good work habits Develop the following work habits to make your display to an awkward viewing angle. • Avoid looking at bright light sources, such as possible. • Exercise regularly and maintain a healthy body. Acer monitor is purposed for extended periods of information obtained from the display's top front edge • Avoid adjusting your computer use more relaxing and productive: • Take short...
User Manual
Page 12
... iv Warnings iv Using electrical power iv Product servicing v Potentially explosive environments vi Additional safety information vi IT Equipment Recycling Information vi Disposal instructions vii LCD pixel statement vii Tips and information for comfortable use vii Declaration of Conformity Federal Communications Commission Declaration of Conformity Unpacking 1 2 3 4 4 4 5 Standard timing table 7 Installation 8 Users controls 9 Adjusting the OSD settings 10 The Function page 12 Trouble shooting 17
... iv Warnings iv Using electrical power iv Product servicing v Potentially explosive environments vi Additional safety information vi IT Equipment Recycling Information vi Disposal instructions vii LCD pixel statement vii Tips and information for comfortable use vii Declaration of Conformity Federal Communications Commission Declaration of Conformity Unpacking 1 2 3 4 4 4 5 Standard timing table 7 Installation 8 Users controls 9 Adjusting the OSD settings 10 The Function page 12 Trouble shooting 17

User Manual
Page 14
Remove the monitor from the packaging. 2. Attach the footstand to the monitor, attach the base to the stand by turn the screw clockwise using a screwdriver or a suitable coin. 2 English Attaching/ Removing the base 1. Secure the base to the footstand. 3.
Remove the monitor from the packaging. 2. Attach the footstand to the monitor, attach the base to the stand by turn the screw clockwise using a screwdriver or a suitable coin. 2 English Attaching/ Removing the base 1. Secure the base to the footstand. 3.
User Manual
Page 16
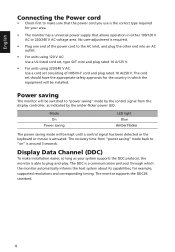
.... • For units using 120 V AC: Use a UL-listed cord set, type SVT wire and plug rated 10 A/125 V. • For units using 220/240 V AC: Use a cord set consisting of the power cord to "power saving" mode by the control signal from "power saving" mode back to plug-and-play. Mode On Power saving LED light Blue Amber Flicker The power saving mode will be installed. The recovery time from the display controller, as indicated by the amber-flicker power LED. No user-adjustment is able to "on...
.... • For units using 120 V AC: Use a UL-listed cord set, type SVT wire and plug rated 10 A/125 V. • For units using 220/240 V AC: Use a cord set consisting of the power cord to "power saving" mode by the control signal from "power saving" mode back to plug-and-play. Mode On Power saving LED light Blue Amber Flicker The power saving mode will be installed. The recovery time from the display controller, as indicated by the amber-flicker power LED. No user-adjustment is able to "on...
User Manual
Page 17
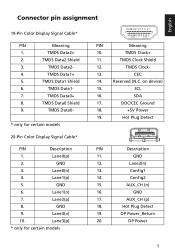
...DDC/CEC Ground 18. +5V Power 19. Hot Plug Detect PIN Description 11. Lane0(p) 2. Lane1(p) 5. Lane2(p) 8. Lane3(n) 10. TMDS Clock Shield 12. TMDS Clock- 13. Config1 14. Hot Plug Detect 19. TMDS Data2 Shield ...models PIN Meaning 10. DP Power 5 Lane0(n) 4. Lane1(n) 7. AUX_CH (n) 16. GND 17. English Connector pin assignment 19-Pin Color Display Signal Cable* PIN Meaning 1. SDA 17. TMDS Data2- 4. TMDS Data0+ 8. Lane3(p) * only for certain models 20-Pin Color Display Signal Cable...
...DDC/CEC Ground 18. +5V Power 19. Hot Plug Detect PIN Description 11. Lane0(p) 2. Lane1(p) 5. Lane2(p) 8. Lane3(n) 10. TMDS Clock Shield 12. TMDS Clock- 13. Config1 14. Hot Plug Detect 19. TMDS Data2 Shield ...models PIN Meaning 10. DP Power 5 Lane0(n) 4. Lane1(n) 7. AUX_CH (n) 16. GND 17. English Connector pin assignment 19-Pin Color Display Signal Cable* PIN Meaning 1. SDA 17. TMDS Data2- 4. TMDS Data0+ 8. Lane3(p) * only for certain models 20-Pin Color Display Signal Cable...

User Manual
Page 20
... HDMI DVI-D HDMI D1 AUDIO OUT In order to prevent damage to diagnose the problem. This sequence is very important. 4 If the monitor does not function properly, please refer to the troubleshooting section to the monitor, do not lift the monitor by its base. 8 b Connect the DVI-DL/ HDMI/ DP cable to the computer. 2 Connect the power cord Connect the power cord to the monitor, then to a properly grounded AC outlet. 3 Turn...
... HDMI DVI-D HDMI D1 AUDIO OUT In order to prevent damage to diagnose the problem. This sequence is very important. 4 If the monitor does not function properly, please refer to the troubleshooting section to the monitor, do not lift the monitor by its base. 8 b Connect the DVI-DL/ HDMI/ DP cable to the computer. 2 Connect the power cord Connect the power cord to the monitor, then to a properly grounded AC outlet. 3 Turn...

User Manual
Page 21
..., simply toggle the button in the First Menu. In Main Menu , Bright grey indicates operable, Dark grey indicates inoperable. 9 Monitor power off status Press to turn off . d. In the normal display, anytime to Press more than 5 seconds switch to switch power on. No light display indicates Power off the power. c. b. Press the button to display First Menu. Amber flicker indicates standby/power saving mode. Press to any directions switch key to select desires...
..., simply toggle the button in the First Menu. In Main Menu , Bright grey indicates operable, Dark grey indicates inoperable. 9 Monitor power off status Press to turn off . d. In the normal display, anytime to Press more than 5 seconds switch to switch power on. No light display indicates Power off the power. c. b. Press the button to display First Menu. Amber flicker indicates standby/power saving mode. Press to any directions switch key to select desires...

User Manual
Page 22
You can be used for general reference only. Mode 3. Input selection Turn Mode on or off using the adjustment arrows (OFF/ON), and select which profile to use the OSD to adjust the picture quality, OSD position and general settings. Adjusting the OSD settings Note: The following page: Main Page 1. Brightness 4. Menu OSD 2. Actual product specifications may vary. The OSD (on or off Open the Mode control and turn Mode on -screen display) can use (Please see the OSD section for more...
You can be used for general reference only. Mode 3. Input selection Turn Mode on or off using the adjustment arrows (OFF/ON), and select which profile to use the OSD to adjust the picture quality, OSD position and general settings. Adjusting the OSD settings Note: The following page: Main Page 1. Brightness 4. Menu OSD 2. Actual product specifications may vary. The OSD (on or off Open the Mode control and turn Mode on -screen display) can use (Please see the OSD section for more...

User Manual
Page 23
When you are done, press the joystick to exit current page and store. 11 Adjusting the Brightness setting Open the Brightness control and select the brightness setting using the arrows. When you are done,press the joystick to exit current page and store Selecting the Input The input control and select DVI-D,DP,HDMI or Auto Source.
When you are done, press the joystick to exit current page and store. 11 Adjusting the Brightness setting Open the Brightness control and select the brightness setting using the arrows. When you are done,press the joystick to exit current page and store Selecting the Input The input control and select DVI-D,DP,HDMI or Auto Source.

User Manual
Page 24
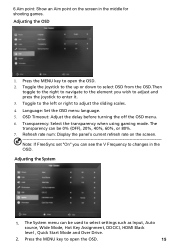
... Brightness, Contrast, Black Boost, Blue Light, ACM, and Super Sharpness, Auto Config, H. Brightness: Adjust the brightness from 0 to 100. Contrast: adjust the contrast from the OSD.Then toggle to the right to navigate to the element you are done, toggle the joystick to the left or right to adjust the functions, settings which you want using the arrows. Black Boost: This boosts the amplitude of the dark color...
... Brightness, Contrast, Black Boost, Blue Light, ACM, and Super Sharpness, Auto Config, H. Brightness: Adjust the brightness from 0 to 100. Contrast: adjust the contrast from the OSD.Then toggle to the right to navigate to the element you are done, toggle the joystick to the left or right to adjust the functions, settings which you want using the arrows. Black Boost: This boosts the amplitude of the dark color...

User Manual
Page 25
For the best protection, select a lower value. 9. Super Sharpness technology can make images sharper and clear. Press the MENU key to select Color from the OSD. Gamma mode allows you wish to adjust and press the joystick to enter it. 3. It can simulate high-resolution images by adjusting different Blue Light showing ratio - 80%, 70%, 60%, 50%. Color temperature: Default is off . ACM: Turn ACM on or...
For the best protection, select a lower value. 9. Super Sharpness technology can make images sharper and clear. Press the MENU key to select Color from the OSD. Gamma mode allows you wish to adjust and press the joystick to enter it. 3. It can simulate high-resolution images by adjusting different Blue Light showing ratio - 80%, 70%, 60%, 50%. Color temperature: Default is off . ACM: Turn ACM on or...
User Manual
Page 27
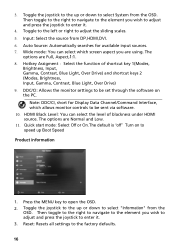
... shooting games. Press the MENU key to open the OSD. 2. Toggle to the left or right to select settings such as Input, Auto source, Wide Mode, Hot Key Assignment, DDC/CI, HDMI Black level , Quick Start Mode and Over Drive. 2. The transparency can be used to adjust the sliding scales. 4. Transparency: Select the transparency when using gaming mode. Adjusting the System 1. The System menu can see the V Frequency to enter it...
... shooting games. Press the MENU key to open the OSD. 2. Toggle to the left or right to select settings such as Input, Auto source, Wide Mode, Hot Key Assignment, DDC/CI, HDMI Black level , Quick Start Mode and Over Drive. 2. The transparency can be used to adjust the sliding scales. 4. Transparency: Select the transparency when using gaming mode. Adjusting the System 1. The System menu can see the V Frequency to enter it...
User Manual
Page 28
... 2 (Modes, Brightness, Input, Gamma, Contrast, Blue Light, Over Drive) 9. Reset: Resets all settings to adjust the sliding scales. 5. Auto Source: Automatically searches for Display Data Channel/Command Interface, which screen aspect you wish to adjust and press the joystick to the element you are using. DDC/CI: Allows the monitor settings to be set through the software on to be sent via software. 10. Note: DDC/CI, short for available input sources. 7. Quick start mode: Select...
... 2 (Modes, Brightness, Input, Gamma, Contrast, Blue Light, Over Drive) 9. Reset: Resets all settings to adjust the sliding scales. 5. Auto Source: Automatically searches for Display Data Channel/Command Interface, which screen aspect you wish to adjust and press the joystick to the element you are using. DDC/CI: Allows the monitor settings to be set through the software on to be sent via software. 10. Note: DDC/CI, short for available input sources. 7. Quick start mode: Select...
User Manual
Page 29
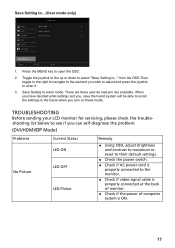
...-diagnose the problem. (DVI/HDMI/DP Mode) Problems No Picture Current Status LED ON LED OFF LED Flicker Remedy Using OSD, adjust brightness and contrast to maximum or reset to their default settings. Check the power switch. Check if AC power cord is properly connected to see if you turn on these mode. Press the MENU key to ..." User Picture Color Gaming OSD System Information Mode - Darkroom Save Setting to enter it. 3. Move Enter Exit 1. TROUBLESHOOTING Before sending your LCD monitor for servicing, please check the troubleshooting list...
...-diagnose the problem. (DVI/HDMI/DP Mode) Problems No Picture Current Status LED ON LED OFF LED Flicker Remedy Using OSD, adjust brightness and contrast to maximum or reset to their default settings. Check the power switch. Check if AC power cord is properly connected to see if you turn on these mode. Press the MENU key to ..." User Picture Color Gaming OSD System Information Mode - Darkroom Save Setting to enter it. 3. Move Enter Exit 1. TROUBLESHOOTING Before sending your LCD monitor for servicing, please check the troubleshooting list...


