User Manual
Page 2
.... Such changes will be made periodically to the information in the space provided below. Acer LCD Monitor User's Guide Model number Serial number Date of purchase Place of purchase Acer and the Acer logo are registered trademarks of purchase information in this manual or supplementary documents and publications. Record the model number, serial number...
.... Such changes will be made periodically to the information in the space provided below. Acer LCD Monitor User's Guide Model number Serial number Date of purchase Place of purchase Acer and the Acer logo are registered trademarks of purchase information in this manual or supplementary documents and publications. Record the model number, serial number...

User Manual
Page 3
...the electrical outlet. iii Information for future reference. Cleaning your safety and comfort Safety instructions Read these guidelines when cleaning the monitor: • Always unplug the monitor before connecting any cable or unplugging the power cord. • If the system has multiple sources of power, disconnect power... to its base before connecting the power cord to the AC power outlet. • Make sure both the LCD monitor and the computer are normal with the LCD monitor and do not indicate a problem. • Due to the nature of the fluorescent light, the screen may include...
...the electrical outlet. iii Information for future reference. Cleaning your safety and comfort Safety instructions Read these guidelines when cleaning the monitor: • Always unplug the monitor before connecting any cable or unplugging the power cord. • If the system has multiple sources of power, disconnect power... to its base before connecting the power cord to the AC power outlet. • Make sure both the LCD monitor and the computer are normal with the LCD monitor and do not indicate a problem. • Due to the nature of the fluorescent light, the screen may include...

User Manual
Page 7
... light by looking at a higher level than the top edge of the display so your eyes point downward when looking away from the monitor and focusing on how to keep your eyes regular breaks by using a footrest, or raising your display in front of a computer. The...height to a comfortable level for enhanced text readability and graphics clarity. • Eliminate glare and reflections by adjusting the viewing angle of the monitor, using drapes, shades or blinds vii Observe the following sections provide suggestions on a distant point. • Blink frequently to reduce eyestrain. ...
... light by looking at a higher level than the top edge of the display so your eyes point downward when looking away from the monitor and focusing on how to keep your eyes regular breaks by using a footrest, or raising your display in front of a computer. The...height to a comfortable level for enhanced text readability and graphics clarity. • Eliminate glare and reflections by adjusting the viewing angle of the monitor, using drapes, shades or blinds vii Observe the following sections provide suggestions on a distant point. • Blink frequently to reduce eyestrain. ...

User Manual
Page 8
... looking at bright light sources, such as possible. • Exercise regularly and maintain a healthy body. • In order to prevent damage to the monitor, do not lift the monitor by its base. viii • using a task light • changing the display's viewing angle • using a glare-reduction filter • using a display visor...
... looking at bright light sources, such as possible. • Exercise regularly and maintain a healthy body. • In order to prevent damage to the monitor, do not lift the monitor by its base. viii • using a task light • changing the display's viewing angle • using a glare-reduction filter • using a display visor...

User Manual
Page 9
...affixing CE marking 2017. Acer Incorporated 8F, 88, Sec. 1, Xintai 5th Rd., Xizhi New Taipei City 221, Taiwan Declaration of Conformity We, Acer Incorporated 8F, 88, Sec. 1, Xintai 5th Rd., Xizhi, New Taipei City 221, Taiwan And, Acer Italy s.r.l Via Lepetit, 40, 20020... (MI) Italy Tel: +39-02-939-921 ,Fax: +39-02 9399-2913 www.acer.it Product: Trade Name: Model Number: SKU Number: LCD Monitor Acer EB490QK EB490QK xxxxxx; ("x" = 0~9, a ~ z, A ~ Z, or blank) We, Acer Incorporated, hereby declare under our sole responsibility that the product described above is in conformity with ...
...affixing CE marking 2017. Acer Incorporated 8F, 88, Sec. 1, Xintai 5th Rd., Xizhi New Taipei City 221, Taiwan Declaration of Conformity We, Acer Incorporated 8F, 88, Sec. 1, Xintai 5th Rd., Xizhi, New Taipei City 221, Taiwan And, Acer Italy s.r.l Via Lepetit, 40, 20020... (MI) Italy Tel: +39-02-939-921 ,Fax: +39-02 9399-2913 www.acer.it Product: Trade Name: Model Number: SKU Number: LCD Monitor Acer EB490QK EB490QK xxxxxx; ("x" = 0~9, a ~ z, A ~ Z, or blank) We, Acer Incorporated, hereby declare under our sole responsibility that the product described above is in conformity with ...

User Manual
Page 10
... cause undesired operation. S. A. Suite 1500 San Jose, CA 95110 U. Tel : 254-298-4000 Fax : 254-298-4147 www.acer.com Federal Communications Commission Declaration of Conformity This device complies with Part 15 of Responsible Party: 333 West San Carlos St. A. The following... two conditions: (1) this device may not cause harmful interference, and (2) this declaration: Product: LCD Monitor Model Number: EB490QK SKU Number: EB490QK xxxxxx ; ("x" = 0~9, a ~ z, A ~ Z or Blank) Name of Responsible Party: Acer America Corporation Address of the FCC Rules.
... cause undesired operation. S. A. Suite 1500 San Jose, CA 95110 U. Tel : 254-298-4000 Fax : 254-298-4147 www.acer.com Federal Communications Commission Declaration of Conformity This device complies with Part 15 of Responsible Party: 333 West San Carlos St. A. The following... two conditions: (1) this device may not cause harmful interference, and (2) this declaration: Product: LCD Monitor Model Number: EB490QK SKU Number: EB490QK xxxxxx ; ("x" = 0~9, a ~ z, A ~ Z or Blank) Name of Responsible Party: Acer America Corporation Address of the FCC Rules.
User Manual
Page 11
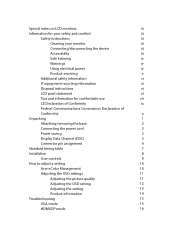
... Information for your safety and comfort iii Safety instructions iii Cleaning your monitor iii Connecting/disconnecting the device iii Accessibility iii Safe listening iv Warnings iv Using electrical power iv Product servicing v ...cord 3 Power saving 3 Display Data Channel (DDC) 3 Connector pin assignment 4 Standard timing table 7 Installation 8 User controls 9 How to adjust a setting 10 Acer eColor Management 10 Adjusting the OSD settings 11 Adjusting the picture quality 11 Adjusting the OSD setting 12 Adjusting the setting 13 Product information 14...
... Information for your safety and comfort iii Safety instructions iii Cleaning your monitor iii Connecting/disconnecting the device iii Accessibility iii Safe listening iv Warnings iv Using electrical power iv Product servicing v ...cord 3 Power saving 3 Display Data Channel (DDC) 3 Connector pin assignment 4 Standard timing table 7 Installation 8 User controls 9 How to adjust a setting 10 Acer eColor Management 10 Adjusting the OSD settings 11 Adjusting the picture quality 11 Adjusting the OSD setting 12 Adjusting the setting 13 Product information 14...
User Manual
Page 12
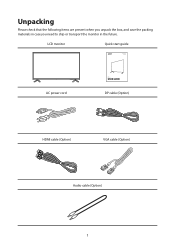
Unpacking Please check that the following items are present when you unpack the box, and save the packing materials in case you need to ship or transport the monitor in the future. LCD monitor Quick start guide LCD MONITOR EB490QK AC power cord EB0 Series USER GUIDE DP cable (Option) HDMI cable (Option) VGA cable (Option) Audio cable (Option) 1
Unpacking Please check that the following items are present when you unpack the box, and save the packing materials in case you need to ship or transport the monitor in the future. LCD monitor Quick start guide LCD MONITOR EB490QK AC power cord EB0 Series USER GUIDE DP cable (Option) HDMI cable (Option) VGA cable (Option) Audio cable (Option) 1
User Manual
Page 14
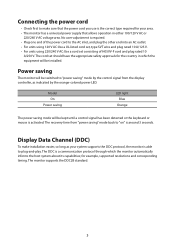
... Data Channel (DDC) To make sure that the power cord you use is the correct type required for your system supports the DDC protocol, the monitor is able to "on" is around 3 seconds. No user-adjustment is required. • Plug one end of H05VV-F cord and plug rated 10 ... approvals for example, supported resolutions and corresponding timing. for the country in either 100/120 V AC or 220/240 V AC voltage area. The monitor supports the DDC2B standard. 3 The DDC is a communication protocol through which the equipment will be installed. Model On Power saving LED light Blue Orange...
... Data Channel (DDC) To make sure that the power cord you use is the correct type required for your system supports the DDC protocol, the monitor is able to "on" is around 3 seconds. No user-adjustment is required. • Plug one end of H05VV-F cord and plug rated 10 ... approvals for example, supported resolutions and corresponding timing. for the country in either 100/120 V AC or 220/240 V AC voltage area. The monitor supports the DDC2B standard. 3 The DDC is a communication protocol through which the equipment will be installed. Model On Power saving LED light Blue Orange...
User Manual
Page 19
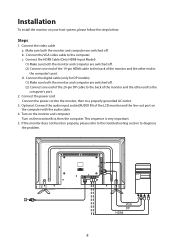
.... 5. Connect the VGA video cable to a properly grounded AC outlet. 3. c. If the monitor does not function properly, please refer to the troubleshooting section to the computer's port. 2. Installation To install the monitor on the monitor first, then the computer. Connect the HDMI Cable (Only HDMI-Input Model) (1) Make sure ... computer are switched off . (2) Connect one end of the 20-pin DP cable to the back of the monitor and the other end to the back of the LCD monitor and the line-out port on the computer with the audio cable. 4. Optional: Connect the audio input socket(AUDIO...
.... 5. Connect the VGA video cable to a properly grounded AC outlet. 3. c. If the monitor does not function properly, please refer to the troubleshooting section to the computer's port. 2. Installation To install the monitor on the monitor first, then the computer. Connect the HDMI Cable (Only HDMI-Input Model) (1) Make sure ... computer are switched off . (2) Connect one end of the 20-pin DP cable to the back of the monitor and the other end to the back of the LCD monitor and the line-out port on the computer with the audio cable. 4. Optional: Connect the audio input socket(AUDIO...
User Manual
Page 20
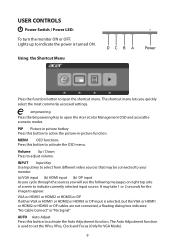
... function button to active the picture-in picture hotkey Press this button to open the Acer eColor Management OSD and accessthe scenario modes. PIP Picture in -picture function. It may be connected to your monitor. (a) VGA input (b) HDMI input (b) DP input As you cycle through the sources... the most commonly accessed settings. The Auto Adjustment function is used to appear. USER CONTROLS Power Switch / Power LED: To turn the monitor ON or OFF. empowering Press the Empowering Key to activate the OSD menu. MENU OSD functions Press this button to adjust volume. Volume ...
... function button to active the picture-in picture hotkey Press this button to open the Acer eColor Management OSD and accessthe scenario modes. PIP Picture in -picture function. It may be connected to your monitor. (a) VGA input (b) HDMI input (b) DP input As you cycle through the sources... the most commonly accessed settings. The Auto Adjustment function is used to appear. USER CONTROLS Power Switch / Power LED: To turn the monitor ON or OFF. empowering Press the Empowering Key to activate the OSD menu. MENU OSD functions Press this button to adjust volume. Volume ...
User Manual
Page 22
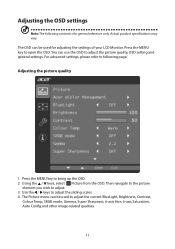
For advanced settings, please refer to following content is for adjusting the settings of your LCD Monitor. You can be used for general reference only. The OSD can use the OSD to adjust the picture quality, OSD setting and general settings. Press ...
For advanced settings, please refer to following content is for adjusting the settings of your LCD Monitor. You can be used for general reference only. The OSD can use the OSD to adjust the picture quality, OSD setting and general settings. Press ...

User Manual
Page 25
Product information 1 Press the MENU key to bring up for current input. 14 Then the basic information of LCD monitor will show up the OSD. 2 Using the / keys, select Information from the OSD.
Product information 1 Press the MENU key to bring up for current input. 14 Then the basic information of LCD monitor will show up the OSD. 2 Using the / keys, select Information from the OSD.
User Manual
Page 26
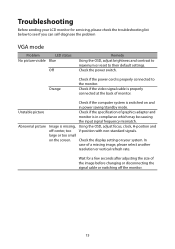
...mode Problem LED status No picture visible Blue Off Remedy Using the OSD, adjust brightness and contrast to maximum or reset to the monitor. Orange Check if the power cord is properly connected to their default settings. Abnormal picture Image is switched on and in compliance ...Check if the computer system is missing, Using the OSD, adjust focus, clock, H-position and off the monitor. 15 Unstable picture Check if the specification of graphics adapter and monitor is properly connected at the back of a missing image, please select another resolution or vertical refresh rate. ...
...mode Problem LED status No picture visible Blue Off Remedy Using the OSD, adjust brightness and contrast to maximum or reset to the monitor. Orange Check if the power cord is properly connected to their default settings. Abnormal picture Image is switched on and in compliance ...Check if the computer system is missing, Using the OSD, adjust focus, clock, H-position and off the monitor. 15 Unstable picture Check if the specification of graphics adapter and monitor is properly connected at the back of a missing image, please select another resolution or vertical refresh rate. ...
User Manual
Page 27
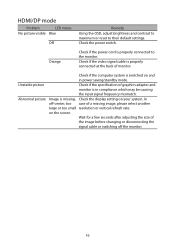
.... HDMI/DP mode Problem LED status No picture visible Blue Off Remedy Using the OSD, adjust brightness and contrast to maximum or reset to the monitor. Abnormal picture Image is properly connected to their default settings. Check if the computer system is in power saving/standby mode. on and in compliance... which may be causing the input signal frequency mismatch. Check the power switch. Unstable picture Check if the specification of monitor. Check if the video signal cable is properly connected at the back of graphics adapter and...
.... HDMI/DP mode Problem LED status No picture visible Blue Off Remedy Using the OSD, adjust brightness and contrast to maximum or reset to the monitor. Abnormal picture Image is properly connected to their default settings. Check if the computer system is in power saving/standby mode. on and in compliance... which may be causing the input signal frequency mismatch. Check the power switch. Unstable picture Check if the specification of monitor. Check if the video signal cable is properly connected at the back of graphics adapter and...


