
User Manual
Page 2
... person of Acer Incorporated. Acer LCD Monitor User's Guide Original Issue: 05/2017 Changes may be incorporated in the space provided below. Record the model number, serial number, purchase date and place of merchantability or fitness for identification purposes only and belong to your unit should include the serial number, model number and purchase information. Acer LCD Monitor User's Guide Model number Serial number Date of purchase Place of Acer Incorporated. This company makes no representations...
... person of Acer Incorporated. Acer LCD Monitor User's Guide Original Issue: 05/2017 Changes may be incorporated in the space provided below. Record the model number, serial number, purchase date and place of merchantability or fitness for identification purposes only and belong to your unit should include the serial number, model number and purchase information. Acer LCD Monitor User's Guide Model number Serial number Date of purchase Place of Acer Incorporated. This company makes no representations...

User Manual
Page 3
... these instructions carefully. Follow all the time. • Due to wipe the screen and cabinet front and sides. Turn off the power switch and then turn it on again to make sure the flicker disappears. • You may remain after switching the image, when the same image is attached to its base before connecting the power cord to the AC power outlet. • Make sure both the LCD monitor...
... these instructions carefully. Follow all the time. • Due to wipe the screen and cabinet front and sides. Turn off the power switch and then turn it on again to make sure the flicker disappears. • You may remain after switching the image, when the same image is attached to its base before connecting the power cord to the AC power outlet. • Make sure both the LCD monitor...

User Manual
Page 4
... may result in too many devices. Also, make sure that the total rating of the power strip's input rating. • This product's power cord is used , the load should never be seriously damaged. • Slots and openings are used with a three-wire grounded plug. Using electrical power • This product should never be blocked or covered. The plug only fits in a fire or electric shock...
... may result in too many devices. Also, make sure that the total rating of the power strip's input rating. • This product's power cord is used , the load should never be seriously damaged. • Slots and openings are used with a three-wire grounded plug. Using electrical power • This product should never be blocked or covered. The plug only fits in a fire or electric shock...
User Manual
Page 5
...; the product exhibits a distinct change in performance, indicating a need to replace the power cord set . Refer all signs and instructions. Observe restrictions on boats, chemical transfer or storage facilities, vehicles using liquefied petroleum gas (such as propane or butane), and areas where the air contains chemicals or particles such as opening or removing covers may contain small parts. Areas with a potentially explosive...
...; the product exhibits a distinct change in performance, indicating a need to replace the power cord set . Refer all signs and instructions. Observe restrictions on boats, chemical transfer or storage facilities, vehicles using liquefied petroleum gas (such as propane or butane), and areas where the air contains chemicals or particles such as opening or removing covers may contain small parts. Areas with a potentially explosive...

User Manual
Page 6
... the best working procedures to reduce the environmental impact of our products.For more information on the recorded image and does not constitute a malfunction. Disposal instructions Do not throw this website: http://www.acergroup.com/public/Sustainability/ Visit www.acer-group.com for power management: • Activate display's Sleep mode within 15 minutes of user inactivity. • Activate computer's Sleep mode within...
... the best working procedures to reduce the environmental impact of our products.For more information on the recorded image and does not constitute a malfunction. Disposal instructions Do not throw this website: http://www.acergroup.com/public/Sustainability/ Visit www.acer-group.com for power management: • Activate display's Sleep mode within 15 minutes of user inactivity. • Activate computer's Sleep mode within...

User Manual
Page 7
... after long hours of working conditions, personal health and other factors greatly increase the risk of physical injury. Users are also at risk of your vision Long viewing hours, wearing incorrect glasses or contact lenses, glare, excessive room lighting, poorly focused screens, very small typefaces and low-contrast displays could stress your display in one fixed posture • avoid...
... after long hours of working conditions, personal health and other factors greatly increase the risk of physical injury. Users are also at risk of your vision Long viewing hours, wearing incorrect glasses or contact lenses, glare, excessive room lighting, poorly focused screens, very small typefaces and low-contrast displays could stress your display in one fixed posture • avoid...

User Manual
Page 8
... as often as open windows, for extended periods of time. Developing good work habits Develop the following work habits to make your display to an awkward viewing angle. • Avoid looking at bright light sources, such as possible. • Exercise regularly and maintain a healthy body. • In order to prevent damage to the monitor, do not lift the monitor by its base. viii
... as often as open windows, for extended periods of time. Developing good work habits Develop the following work habits to make your display to an awkward viewing angle. • Avoid looking at bright light sources, such as possible. • Exercise regularly and maintain a healthy body. • In order to prevent damage to the monitor, do not lift the monitor by its base. viii

User Manual
Page 9
... Date ix EN 50564:2011 Year to begin affixing CE marking 2017. Acer Incorporated 8F, 88, Sec. 1, Xintai 5th Rd., Xizhi New Taipei City 221, Taiwan Declaration of Conformity We, Acer Incorporated 8F, 88, Sec. 1, Xintai 5th Rd., Xizhi, New Taipei City...20020 Lainate (MI) Italy Tel: +39-02-939-921 ,Fax: +39-02 9399-2913 www.acer.it Product: Trade Name: Model Number: SKU Number: LCD Monitor Acer EB490QK EB490QK xxxxxx; ("x" = 0~9, a ~ z, A ~ Z, or blank) We, Acer Incorporated, hereby declare under our sole responsibility that the product described above is in conformity with the ...
... Date ix EN 50564:2011 Year to begin affixing CE marking 2017. Acer Incorporated 8F, 88, Sec. 1, Xintai 5th Rd., Xizhi New Taipei City 221, Taiwan Declaration of Conformity We, Acer Incorporated 8F, 88, Sec. 1, Xintai 5th Rd., Xizhi, New Taipei City...20020 Lainate (MI) Italy Tel: +39-02-939-921 ,Fax: +39-02 9399-2913 www.acer.it Product: Trade Name: Model Number: SKU Number: LCD Monitor Acer EB490QK EB490QK xxxxxx; ("x" = 0~9, a ~ z, A ~ Z, or blank) We, Acer Incorporated, hereby declare under our sole responsibility that the product described above is in conformity with the ...
User Manual
Page 11
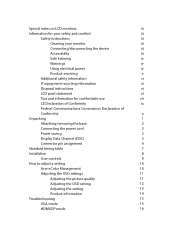
... for comfortable use vii CE Declaration of Conformity ix Federal Communications Commission Declaration of Conformity x Unpacking 1 Attaching/removing the base 2 Connecting the power cord 3 Power saving 3 Display Data Channel (DDC) 3 Connector pin assignment 4 Standard timing table 7 Installation 8 User controls 9 How to adjust a setting 10 Acer eColor Management 10 Adjusting the OSD settings 11 Adjusting the picture quality 11 Adjusting the OSD setting 12 Adjusting the setting 13 Product information 14 Troubleshooting 15 VGA mode 15 HDMI/DP mode 16
... for comfortable use vii CE Declaration of Conformity ix Federal Communications Commission Declaration of Conformity x Unpacking 1 Attaching/removing the base 2 Connecting the power cord 3 Power saving 3 Display Data Channel (DDC) 3 Connector pin assignment 4 Standard timing table 7 Installation 8 User controls 9 How to adjust a setting 10 Acer eColor Management 10 Adjusting the OSD settings 11 Adjusting the picture quality 11 Adjusting the OSD setting 12 Adjusting the setting 13 Product information 14 Troubleshooting 15 VGA mode 15 HDMI/DP mode 16
User Manual
Page 12
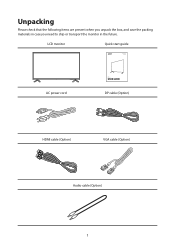
Unpacking Please check that the following items are present when you unpack the box, and save the packing materials in case you need to ship or transport the monitor in the future. LCD monitor Quick start guide LCD MONITOR EB490QK AC power cord EB0 Series USER GUIDE DP cable (Option) HDMI cable (Option) VGA cable (Option) Audio cable (Option) 1
Unpacking Please check that the following items are present when you unpack the box, and save the packing materials in case you need to ship or transport the monitor in the future. LCD monitor Quick start guide LCD MONITOR EB490QK AC power cord EB0 Series USER GUIDE DP cable (Option) HDMI cable (Option) VGA cable (Option) Audio cable (Option) 1

User Manual
Page 13
Remove: Reverse the steps to remove the base. 2 Attaching/removing the base Installation: By aligning the front-end of the bracket with the corresponding slot on the back of the display, and fix the stand onto the display by screwing the four screws clockwise.
Remove: Reverse the steps to remove the base. 2 Attaching/removing the base Installation: By aligning the front-end of the bracket with the corresponding slot on the back of the display, and fix the stand onto the display by screwing the four screws clockwise.
User Manual
Page 14
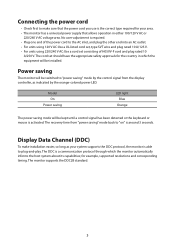
... DDC is around 3 seconds. Power saving The monitor will be switched to "on" is a communication protocol through which the equipment will be installed. Model On Power saving LED light Blue Orange The power saving mode will be kept until a control signal has been detected or the keyboard or mouse is able to plug-and-play. Display Data Channel (DDC) To make sure that the power cord you use is the correct type...
... DDC is around 3 seconds. Power saving The monitor will be switched to "on" is a communication protocol through which the equipment will be installed. Model On Power saving LED light Blue Orange The power saving mode will be kept until a control signal has been detected or the keyboard or mouse is able to plug-and-play. Display Data Channel (DDC) To make sure that the power cord you use is the correct type...
User Manual
Page 19
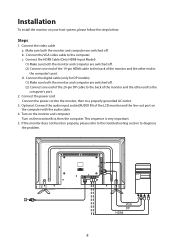
... are switched off . (2) Connect one end of the 20-pin DP cable to the back of the LCD monitor and the line-out port on the monitor first, then the computer. Connect the VGA video cable to the computer's port. 2. d. Turn on the monitor and computer Turn on the computer with the audio cable. 4. Connect the HDMI Cable (Only HDMI-Input Model) (1) Make sure both the monitor and computer are switched off . Connect the video cable a. Installation To install the monitor on...
... are switched off . (2) Connect one end of the 20-pin DP cable to the back of the LCD monitor and the line-out port on the monitor first, then the computer. Connect the VGA video cable to the computer's port. 2. d. Turn on the monitor and computer Turn on the computer with the audio cable. 4. Connect the HDMI Cable (Only HDMI-Input Model) (1) Make sure both the monitor and computer are switched off . Connect the video cable a. Installation To install the monitor on...
User Manual
Page 20
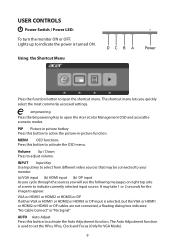
... the OSD menu. empowering Press the Empowering Key to your monitor. (a) VGA input (b) HDMI input (b) DP input As you cycle through the sources you quickly select the most commonly accessed settings. It may be connected to open the shortcut menu. Volume Up / Down Press to active the picture-in-picture function. INPUT Input Key Use Input key to select from different video sources that may take 1 or 2 seconds for VGA Mode). 9 The Auto Adjustment function is turned ON. VGA...
... the OSD menu. empowering Press the Empowering Key to your monitor. (a) VGA input (b) HDMI input (b) DP input As you cycle through the sources you quickly select the most commonly accessed settings. It may be connected to open the shortcut menu. Volume Up / Down Press to active the picture-in-picture function. INPUT Input Key Use Input key to select from different video sources that may take 1 or 2 seconds for VGA Mode). 9 The Auto Adjustment function is turned ON. VGA...
User Manual
Page 21
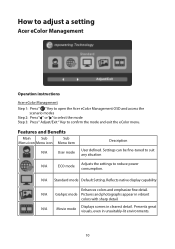
... to adjust a setting Acer eColor Management Operation instructions Acer eColor Management Step 1: Press " " Key to open the Acer eColor Management OSD and access the scenario modes Step 2: Press " " or " " to select the mode Step 3: Press " Adjust/Exit " Key to reduce power consumption. Features and Benefits Main Sub Sub Menu icon Menu icon Menu item N/A User mode Description User defined. N/A Grahpic mode Pictures and photographs appear in unsuitably-lit environments. 10 Settings...
... to adjust a setting Acer eColor Management Operation instructions Acer eColor Management Step 1: Press " " Key to open the Acer eColor Management OSD and access the scenario modes Step 2: Press " " or " " to select the mode Step 3: Press " Adjust/Exit " Key to reduce power consumption. Features and Benefits Main Sub Sub Menu icon Menu icon Menu item N/A User mode Description User defined. N/A Grahpic mode Pictures and photographs appear in unsuitably-lit environments. 10 Settings...
User Manual
Page 22
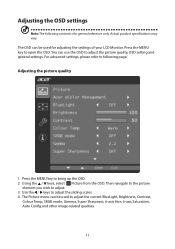
... picture quality 1 Press the MENU key to bring up the OSD. 2 Using the / keys, select Picture from the OSD. Press the MENU key to adjust the picture quality, OSD setting and general settings. For advanced settings, please refer to adjust the current BlueLight, Brightness, Contrast, Colour Temp, SRGB mode, Gamma, Super Sharpness, 6‐axis Hue, 6‐axis Saturation, Auto Config and other image‐related qualities. 11 Actual product specifications...
... picture quality 1 Press the MENU key to bring up the OSD. 2 Using the / keys, select Picture from the OSD. Press the MENU key to adjust the picture quality, OSD setting and general settings. For advanced settings, please refer to adjust the current BlueLight, Brightness, Contrast, Colour Temp, SRGB mode, Gamma, Super Sharpness, 6‐axis Hue, 6‐axis Saturation, Auto Config and other image‐related qualities. 11 Actual product specifications...

User Manual
Page 23
Adjusting the OSD setting 1 Press the MENU key to adjust. 12 Then navigate to the feature you wish to bring up the OSD. 2 Using the directional keys, select OSD from the on screen display.
Adjusting the OSD setting 1 Press the MENU key to adjust. 12 Then navigate to the feature you wish to bring up the OSD. 2 Using the directional keys, select OSD from the on screen display.

User Manual
Page 24
... main source display. 6 "Wide Mode" is not supported when using PBP function. 7 DP Format selection, the default out of DP 1.1 or DP 1.2. 13 The PIP signal so urce needs to be selected manually. 5 When using PIP/PBP, "Wide Mode", "6-axis Hue", "6-axis Saturate", "ACM", "Gamma", "sRGB", and "Super Sharpness" will be used to adjust the screen Wide Mode and other important settings. 4 Select PIP to adjust picture‐in‐picture settings. Then...
... main source display. 6 "Wide Mode" is not supported when using PBP function. 7 DP Format selection, the default out of DP 1.1 or DP 1.2. 13 The PIP signal so urce needs to be selected manually. 5 When using PIP/PBP, "Wide Mode", "6-axis Hue", "6-axis Saturate", "ACM", "Gamma", "sRGB", and "Super Sharpness" will be used to adjust the screen Wide Mode and other important settings. 4 Select PIP to adjust picture‐in‐picture settings. Then...
User Manual
Page 26
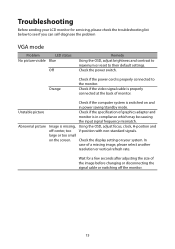
... problem VGA mode Problem LED status No picture visible Blue Off Remedy Using the OSD, adjust brightness and contrast to maximum or reset to the monitor. Abnormal picture Image is properly connected at the back of graphics adapter and monitor is in power saving/standby mode. Unstable picture Check if the specification of monitor. Check the display setting on your LCD monitor for a few seconds after adjusting the size of a missing image, please select another resolution or vertical refresh rate. Check the power switch. Orange Check if the power cord is switched...
... problem VGA mode Problem LED status No picture visible Blue Off Remedy Using the OSD, adjust brightness and contrast to maximum or reset to the monitor. Abnormal picture Image is properly connected at the back of graphics adapter and monitor is in power saving/standby mode. Unstable picture Check if the specification of monitor. Check the display setting on your LCD monitor for a few seconds after adjusting the size of a missing image, please select another resolution or vertical refresh rate. Check the power switch. Orange Check if the power cord is switched...
User Manual
Page 27
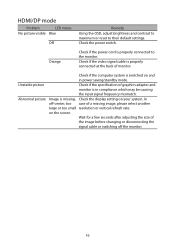
... vertical refresh rate. Orange Check if the power cord is properly connected to their default settings. on and in compliance which may be causing the input signal frequency mismatch. Wait for a few seconds after adjusting the size of the image before changing or disconnecting the signal cable or switching off -center, too case of monitor. In off the monitor. 16 HDMI/DP mode Problem LED status No picture visible Blue Off Remedy Using the OSD, adjust brightness and contrast to maximum or reset...
... vertical refresh rate. Orange Check if the power cord is properly connected to their default settings. on and in compliance which may be causing the input signal frequency mismatch. Wait for a few seconds after adjusting the size of the image before changing or disconnecting the signal cable or switching off -center, too case of monitor. In off the monitor. 16 HDMI/DP mode Problem LED status No picture visible Blue Off Remedy Using the OSD, adjust brightness and contrast to maximum or reset...


