
User Manual
Page 2
... company makes no representations or warranties, either expressed or implied, with respect to the contents hereof and specifically disclaims the implied warranties of purchase information in any form or by photocopy, recording or otherwise, without obligation to your unit should include the serial number, model number and purchase information. All Rights Reserved. Acer LCD Monitor User's Guide Original Issue: 08/2008 Changes...
... company makes no representations or warranties, either expressed or implied, with respect to the contents hereof and specifically disclaims the implied warranties of purchase information in any form or by photocopy, recording or otherwise, without obligation to your unit should include the serial number, model number and purchase information. All Rights Reserved. Acer LCD Monitor User's Guide Original Issue: 08/2008 Changes...

User Manual
Page 3
... changing the image or turning off the power switch and then turn it on again to make sure the flicker disappears. • You may find slightly uneven brightness on the screen depending on the desktop pattern you use . iii Special notes on LCD monitors The following are normal with the LCD monitor and do not indicate a problem. • Due to the nature of the fluorescent light, the screen...
... changing the image or turning off the power switch and then turn it on again to make sure the flicker disappears. • You may find slightly uneven brightness on the screen depending on the desktop pattern you use . iii Special notes on LCD monitors The following are normal with the LCD monitor and do not indicate a problem. • Due to the nature of the fluorescent light, the screen...

User Manual
Page 4
... be sure to unplug the power cord from overheating. Using electrical power • This product should never be blocked or covered. When you need to disconnect power from the equipment, be operated from the type of time listening to music at high volume. • Avoid turning up the volume to block out noisy surroundings. • Turn the volume down if you can...
... be sure to unplug the power cord from overheating. Using electrical power • This product should never be blocked or covered. When you need to disconnect power from the equipment, be operated from the type of time listening to music at high volume. • Avoid turning up the volume to block out noisy surroundings. • Turn the volume down if you can...

User Manual
Page 5
... properly grounded before inserting the power cord plug. Using a power outlet that is equipped with the supplied power supply cord set , make sure that the total rating of all servicing to replace the power cord set . Unplug this product from unexpected noise produced by plugging in a grounded power outlet. If power strips are used, the load should not exceed 80% of the power strip's input rating. • This product's power cord is not properly grounded may...
... properly grounded before inserting the power cord plug. Using a power outlet that is equipped with the supplied power supply cord set , make sure that the total rating of all servicing to replace the power cord set . Unplug this product from unexpected noise produced by plugging in a grounded power outlet. If power strips are used, the load should not exceed 80% of the power strip's input rating. • This product's power cord is not properly grounded may...

User Manual
Page 6
...work by a qualified technician to restore the product to turn off your vehicle engine. Sparks in such areas could cause an explosion or fire resulting in any area with a potentially explosive atmosphere are covered by the operating instructions, since improper adjustment of our products. chemical plants; Switch off the device near gas pumps at Acer...or particles such as one of our other controls may contain small parts. Areas with a potentially explosive atmosphere and obey all signs and instructions. Keep them out of the reach of used equipment, as grain, dust or metal ...
...work by a qualified technician to restore the product to turn off your vehicle engine. Sparks in such areas could cause an explosion or fire resulting in any area with a potentially explosive atmosphere are covered by the operating instructions, since improper adjustment of our products. chemical plants; Switch off the device near gas pumps at Acer...or particles such as one of our other controls may contain small parts. Areas with a potentially explosive atmosphere and obey all signs and instructions. Keep them out of the reach of used equipment, as grain, dust or metal ...

User Manual
Page 7
... or electronic products containing an LCD/CRT monitor or display: lamp(s) inside this electronic device into the trash when discarding. Acer is committed to offer products and services worldwide that are ENERGY STAR qualified use less energy and prevent greenhouse gas emissions by meeting strict energy efficiency guidelines set by reducing energy costs and helps protect the environment without...
... or electronic products containing an LCD/CRT monitor or display: lamp(s) inside this electronic device into the trash when discarding. Acer is committed to offer products and services worldwide that are ENERGY STAR qualified use less energy and prevent greenhouse gas emissions by meeting strict energy efficiency guidelines set by reducing energy costs and helps protect the environment without...
User Manual
Page 8
... working in front of a computer. Finding your comfort zone Find your comfort zone by pushing the power button. Users are registered U.S. viii Acer ENERGY STAR qualified products: •Produce less heat and reduce cooling loads, and warmer climates. •Automatically go into "display sleep" and "computer sleep" mode after 15 and 30 minute of inactivity respectively. •Wake the monitor...
... working in front of a computer. Finding your comfort zone Find your comfort zone by pushing the power button. Users are registered U.S. viii Acer ENERGY STAR qualified products: •Produce less heat and reduce cooling loads, and warmer climates. •Automatically go into "display sleep" and "computer sleep" mode after 15 and 30 minute of inactivity respectively. •Wake the monitor...

User Manual
Page 9
...; Blink frequently to keep your display in such a way that the side faces the window or any light source • minimizing room light by looking at bright light sources, such as possible. • Exercise regularly and maintain a healthy body. Eyes • Rest your eyes frequently. • Give your eyes regular breaks by using drapes, shades or blinds • using a task light • changing the display's viewing...
...; Blink frequently to keep your display in such a way that the side faces the window or any light source • minimizing room light by looking at bright light sources, such as possible. • Exercise regularly and maintain a healthy body. Eyes • Rest your eyes frequently. • Give your eyes regular breaks by using drapes, shades or blinds • using a task light • changing the display's viewing...
User Manual
Page 14
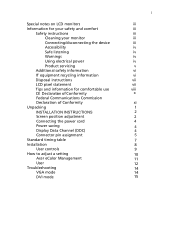
... listening Warnings Using electrical power Product servicing Additional safety information IT equipment recycling information Disposal instructions LCD pixel statement Tips and information for comfortable use CE Declaration of Conformity Federal Communications Commission Declaration of Conformity Unpacking INSTALLATION INSTRUCTIONS Screen position adjustment Connecting the power cord Power saving Display Data Channel (DDC) Connector pin assignment Standard timing table Installation User controls How to adjust a setting Acer eColor Management User Troubleshooting VGA mode DVI mode 1 iii iii...
... listening Warnings Using electrical power Product servicing Additional safety information IT equipment recycling information Disposal instructions LCD pixel statement Tips and information for comfortable use CE Declaration of Conformity Federal Communications Commission Declaration of Conformity Unpacking INSTALLATION INSTRUCTIONS Screen position adjustment Connecting the power cord Power saving Display Data Channel (DDC) Connector pin assignment Standard timing table Installation User controls How to adjust a setting Acer eColor Management User Troubleshooting VGA mode DVI mode 1 iii iii...

User Manual
Page 17
then, you can lift the position of the display, lift up or down. SCREEN POSITION ADJUSTMENT In oder to prevent the display from the left, and remove the connectors; 2 INSTALLATION INSTRUCTIONS English Do not perform a pulling or plugging action when the display is under slanting status to optimize the best viewing position, you can adjust the height/tilt/ swivel of the monitor. • Height Adjustment Press the top of the display up the rubber strip from ejecting.
then, you can lift the position of the display, lift up or down. SCREEN POSITION ADJUSTMENT In oder to prevent the display from the left, and remove the connectors; 2 INSTALLATION INSTRUCTIONS English Do not perform a pulling or plugging action when the display is under slanting status to optimize the best viewing position, you can adjust the height/tilt/ swivel of the monitor. • Height Adjustment Press the top of the display up the rubber strip from ejecting.

User Manual
Page 19
... power saving mode will be switched to "power saving" mode by the amber-colored power LED. English 4 Connecting the power cord • Check first to make installation easier, so long as indicated by the control signal from "power saving" mode back to "on" is around 3 seconds. No user-adjustment is required. • Plug one end of the power cord to plug-and-play. for the country in either 100/120 V AC or 220/240 V AC voltage area. The monitor supports...
... power saving mode will be switched to "power saving" mode by the amber-colored power LED. English 4 Connecting the power cord • Check first to make installation easier, so long as indicated by the control signal from "power saving" mode back to "on" is around 3 seconds. No user-adjustment is required. • Plug one end of the power cord to plug-and-play. for the country in either 100/120 V AC or 220/240 V AC voltage area. The monitor supports...

User Manual
Page 21
Description 13 NC 14 +5 V power 15 GND (return for +5 V hsync.vsync) 16 Hot-plug detection 17 TMDS data 0- 18 TMDS data 0+ 19 TMDS data 0/5 shield 20 NC 21 NC 22 TMDS clock shield 23 TMDS clock+ 24 DDC TMDS clock- 6 English 24-pin color display signal cable PIN No. Description 1 TMDS data 2- 2 TMDS data 2+ 3 TMDS data 2/4 shield 4 NC 5 NC 6 DDC clock 7 DDC data 8 NC 9 TMDS data 1- 10 TMDS data 1+ 11 TMDS data 1/3 shield 12 NC PIN No.
Description 13 NC 14 +5 V power 15 GND (return for +5 V hsync.vsync) 16 Hot-plug detection 17 TMDS data 0- 18 TMDS data 0+ 19 TMDS data 0/5 shield 20 NC 21 NC 22 TMDS clock shield 23 TMDS clock+ 24 DDC TMDS clock- 6 English 24-pin color display signal cable PIN No. Description 1 TMDS data 2- 2 TMDS data 2+ 3 TMDS data 2/4 shield 4 NC 5 NC 6 DDC clock 7 DDC data 8 NC 9 TMDS data 1- 10 TMDS data 1+ 11 TMDS data 1/3 shield 12 NC PIN No.
User Manual
Page 23
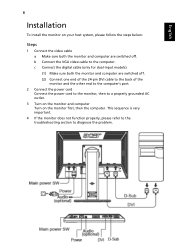
.... English 8 Installation To install the monitor on the monitor first, then the computer. c Connect the digital cable (only for dual-input models). (1) Make sure both the monitor and computer are switched off. (2) Connect one end of the 24-pin DVI cable to the back of the monitor and the other end to the computer's port. 2 Connect the power cord Connect the power cord to the monitor, then to a properly grounded AC outlet. 3 Turn on the monitor and...
.... English 8 Installation To install the monitor on the monitor first, then the computer. c Connect the digital cable (only for dual-input models). (1) Make sure both the monitor and computer are switched off. (2) Connect one end of the 24-pin DVI cable to the back of the monitor and the other end to the computer's port. 2 Connect the power cord Connect the power cord to the monitor, then to a properly grounded AC outlet. 3 Turn on the monitor and...

User Manual
Page 24
... mode. When the OSD menu is inactive, press this button will act as the exit key (exit OSD menu). Press < or > to change the settings of the current function. 5 Menu/Enter: Activate the OSD menu when the OSD is off . 3.4 < / > : Press < or > to navigate to the desired function, press Enter to select the function. 9 User controls English Front panel controls 1 Power LED: Lights up to indicate the power is turned on. 2 Power Switch: Turn the power...
... mode. When the OSD menu is inactive, press this button will act as the exit key (exit OSD menu). Press < or > to change the settings of the current function. 5 Menu/Enter: Activate the OSD menu when the OSD is off . 3.4 < / > : Press < or > to navigate to the desired function, press Enter to select the function. 9 User controls English Front panel controls 1 Power LED: Lights up to indicate the power is turned on. 2 Power Switch: Turn the power...

User Manual
Page 25
Only analog-input mode II. Only digital-input mode User: If "User" is selected, the Acer eColor Management OSD will appear. If you want to adjust any other function, repeat steps 2 to change the settings of the current function. 5 To exit and save, select the exit function. B. English 10 How to adjust a setting 1 Press the Menu button to activate the OSD window. 2 Press < or > to select the desired function. 3 Press the Menu button again...
Only analog-input mode II. Only digital-input mode User: If "User" is selected, the Acer eColor Management OSD will appear. If you want to adjust any other function, repeat steps 2 to change the settings of the current function. 5 To exit and save, select the exit function. B. English 10 How to adjust a setting 1 Press the Menu button to activate the OSD window. 2 Press < or > to select the desired function. 3 Press the Menu button again...

User Manual
Page 26
.... Pictures and photographs appear in clearest detail. Default settings. Reflects native display capability. Displays scenes in vibrant colors with sharp detail. Optimal balance of brightness and contrast to confirm the mode and run Auto Adjust. • Features and benefits Main menu icon Sub menu item User mode Text mode Standard mode Graphic mode Movie mode Description User-defined. English 11 Acer eColor Management • Operation instructions 1 Press the Empowering Key to open the Acer eColor Management OSD and...
.... Pictures and photographs appear in clearest detail. Default settings. Reflects native display capability. Displays scenes in vibrant colors with sharp detail. Optimal balance of brightness and contrast to confirm the mode and run Auto Adjust. • Features and benefits Main menu icon Sub menu item User mode Text mode Standard mode Graphic mode Movie mode Description User-defined. English 11 Acer eColor Management • Operation instructions 1 Press the Empowering Key to open the Acer eColor Management OSD and...

User Manual
Page 27
...Cool User/red Sets the color temperature to cool white. H. User/green Adjusts green intensity. Focus Adjusts picture focus (available in analog mode only). Position Adjusts the horizontal position (available in analog mode only). English 12 User Main Sub menu menu icon icon Sub menu item Contrast Brightness Description Adjusts the contrast between the foreground and background of the screen image. V. Adjusts red intensity. User/blue Adjusts blue intensity. ACM ACM (Adaptive Contrast Management) ACM On/Off switch, default Off. Sets the color temperature...
...Cool User/red Sets the color temperature to cool white. H. User/green Adjusts green intensity. Focus Adjusts picture focus (available in analog mode only). Position Adjusts the horizontal position (available in analog mode only). English 12 User Main Sub menu menu icon icon Sub menu item Contrast Brightness Description Adjusts the contrast between the foreground and background of the screen image. V. Adjusts red intensity. User/blue Adjusts blue intensity. ACM ACM (Adaptive Contrast Management) ACM On/Off switch, default Off. Sets the color temperature...
User Manual
Page 28
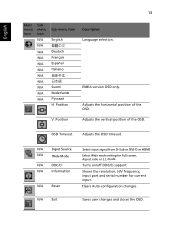
Position Description Language selection. V. N/A Input Source N/A Wide Mode N/A DDC/CI N/A Information N/A Reset Select input signal from D-Sub or DVI-D or HDMI Select Wide mode setting for Full screen, Aspect ratio or 1:1 mode Turns on/off DDC/CI support Shows the resolution, H/V frequency, input port and serial number for current input. EMEA version OSD only. Adjusts the horizontal position of the OSD. OSD Timeout Adjusts the OSD timeout. English 13 Main Sub menu menu icon icon N/A N/A N/A N/A N/A N/A N/A N/A N/A N/A N/A Sub menu item English Deutsch Français ...
Position Description Language selection. V. N/A Input Source N/A Wide Mode N/A DDC/CI N/A Information N/A Reset Select input signal from D-Sub or DVI-D or HDMI Select Wide mode setting for Full screen, Aspect ratio or 1:1 mode Turns on/off DDC/CI support Shows the resolution, H/V frequency, input port and serial number for current input. EMEA version OSD only. Adjusts the horizontal position of the OSD. OSD Timeout Adjusts the OSD timeout. English 13 Main Sub menu menu icon icon N/A N/A N/A N/A N/A N/A N/A N/A N/A N/A N/A Sub menu item English Deutsch Français ...

User Manual
Page 29
... input signal frequency mismatch. Check if the video signal cable is in power saving/ standby mode. Amber Check if the power cord is switched on the screen. Check if the specification of graphics adapter and monitor is properly connected at the back of a missing image, please select another resolution or vertical refresh rate. Check the power switch. VGA mode Problem No picture visible LED status Blue Off Remedy Using the OSD, adjust brightness and contrast to maximum or reset to see if you can self-diagnose the problem. Wait for servicing, please check...
... input signal frequency mismatch. Check if the video signal cable is in power saving/ standby mode. Amber Check if the power cord is switched on the screen. Check if the specification of graphics adapter and monitor is properly connected at the back of a missing image, please select another resolution or vertical refresh rate. Check the power switch. VGA mode Problem No picture visible LED status Blue Off Remedy Using the OSD, adjust brightness and contrast to maximum or reset to see if you can self-diagnose the problem. Wait for servicing, please check...

User Manual
Page 30
Amber Check if the AC power cord is properly connected to their default settings. Check that the computer system is properly connected at the back of monitor. Check if the video signal cable is switched on and in power saving/ standby mode. Check the power switch. English DVI mode Problem No picture visible 15 LED status Blue Off Remedy Using the OSD, adjust brightness and contrast to maximum or reset to the monitor.
Amber Check if the AC power cord is properly connected to their default settings. Check that the computer system is properly connected at the back of monitor. Check if the video signal cable is switched on and in power saving/ standby mode. Check the power switch. English DVI mode Problem No picture visible 15 LED status Blue Off Remedy Using the OSD, adjust brightness and contrast to maximum or reset to the monitor.

