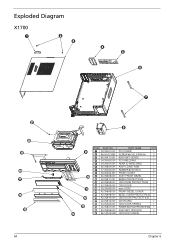
Aspire X1700 / Veriton X270 Service Guide
Page 3
No part of this publication may be reproduced, transmitted, transcribed, stored in a retrieval system, or translated into any language or computer language, in any form or by Acer Incorporated. iii Copyright Copyright © 2008 by any means, electronic, mechanical, magnetic, optical, chemical, manual or otherwise, without the prior written permission of Acer Incorporated. All rights reserved.
Aspire X1700 / Veriton X270 Service Guide
Page 6
...should check the most up-to-date information available on card, modem, or extra memory capability). If, for whatever reason, a part number change is made, it will NOT be noted in the FRU list of this generic service guide. These LOCALIZED FEATURES will...local market requirements and enhance product competitiveness, your regional Acer office to order FRU parts for repair and service of a machine (e.g. In such cases, please contact your Acer office may have decided to extend the functionality of customer machines. For ACER-AUTHORIZED SERVICE PROVIDERS, your regional offices or the ...
Aspire X1700 / Veriton X270 Service Guide
Page 15
... to run the CMOS Setup Utility, make changes to the CMOS setup NOTE: If you have saved all open files. This memory area is not part of the system RAM which allows configuration data to as "BIOS", "Setup", or "Setup utility" in a battery-backed nonvolatile memory called the complementary metaloxide semiconductor...
Aspire X1700 / Veriton X270 Service Guide
Page 36
Slide the side panel toward the back of the chassis until the tabs on the cover disengage with the slots on the side panel. X1700 model X270 model Screw (Quantity) #6-32 L5 BZN (2) Color Black Torque 5.5 to 6.5 kgf-cm Part No. 86.00J07.B60 3. Remove the two screws (A) located on the chassis. 4. Lift the side panel away from the server and put it aside for reinstallation later. X1700 model 28 X270 model Chapter 3 Removing the Side Panel 1. Perform the pre-disassembly procedure described on page 24. 2.
Aspire X1700 / Veriton X270 Service Guide
Page 42
See "Removing the Front Bezel" on how to 6.5 kgf-cm Part No. 86.1A324.5R0 34 Chapter 3 Disconnect the data and power cables from the optical drive. Remove the screw (B) from the rear of the optical ... Side Panel" on page 32. 5. See "Removing the Processor" on page 28. 2. See "Removing the Heat Sink Fan Assembly" on page 30. 4. To remove the X1700 computer's optical drive: 1. Screw (Quantity) M3xL5 (1) Color Black Torque 5.5 to remove the...
Aspire X1700 / Veriton X270 Service Guide
Page 45
a. Remove the screw (C) that secures the HDD bracket to 6.5 kgf-cm X270 model Part No. 86.00J44.C60 X1700 model Chapter 3 X270 model 37 See "Removing the Processor" on page 30. 4. Lift the bracket up and turn it over. See "Removing the Heat Sink Fan Assembly" on page 32. 5. X1700 model Screw (Quantity) #6-32 L6 BZN (1) Color Silver b. See "Removing the Optical Drive" on page 29. 3. Remove the HDD-ODD bracket. Removing the Hard Disk Drive 1. See "Removing the Front Bezel" on page 34. 6. Torque 5.5 to the chassis. See "Removing the Side Panel" on page 28. 2.
Aspire X1700 / Veriton X270 Service Guide
Page 47
X1700 model Screw (Quantity) #6-32*3/16 NI (4) Color Silver b. Remove the HDD module. Remove the four screws (D) that secure the HDD module to 6.5 kgf-cm X270 model Part No. 86.5A5B6.012 X1700 model X270 model Chapter 3 39 Torque 5.5 to the HDD bracket. a. 10. Slide the HDD out of the bracket.
Aspire X1700 / Veriton X270 Service Guide
Page 48
See "Removing the Front Bezel" on page 30. 4. See "Removing the Heat Sink Fan Assembly" on page 29. 3. X1700 model 8. Remove the screw (C) that secures the power supply to 6.3 kgf-cm Part No. 86.00J44.C60 40 Chapter 3 See "Removing the Hard Disk Drive" on page 32. 5. See "Removing the Processor" on page...
Aspire X1700 / Veriton X270 Service Guide
Page 49
9. Torque 5.5 to the rear panel. Remove the three screws (A) that secure the power supply to 6.5 kgf-cm Part No. 86.00J07.B60 X1700 model X270 model Chapter 3 41 Lift the power supply module out of the chassis. Screw (Quantity) #6-32 L5 BZN (3) Color Black 10.
Aspire X1700 / Veriton X270 Service Guide
Page 51
See "Removing the Processor" on page 30. 4. Gently pull the card to 6.5 kgf-cm 8. Removing the VGA Card (X1700 model) 1. See "Removing the Heat Sink Fan Assembly" on page 32. 5. Screw (Quantity) #6-32 5MM NI (1) Color Silver Torque 5.5 to remove it from the mainboard. See "Removing the Front Bezel" on page 37. 7. See "Removing the Hard Disk Drive" on page 29. 3. See "Removing the Optical Drive" on page 28. 2. Remove the screw (E) that secures the card to the chassis. Part No. 86.9A5G6.162 Chapter 3 43 See "Removing the Side Panel" on page 34. 6.
Aspire X1700 / Veriton X270 Service Guide
Page 52
Removing the TV Tuner Card (X1700 model) 1. See "Removing the Optical Drive" on page 30. 4. Gently pull the card to 6.5 kgf-cm 8. See "Removing the Heat Sink Fan Assembly" on page 34. 6. Part No. 86.9A5G6.162 44 Chapter 3 See "Removing the Processor" on page 29. 3. Screw (Quantity) #6-32 5MM NI (1) Color Silver Torque 5.5 to remove it from the mainboard. See "Removing the Front Bezel" on page 32. 5. See "Removing the Hard Disk Drive" on page 28. 2. See "Removing the Side Panel" on page 37. 7. Remove the screw (E) that secures the card to the chassis.
Aspire X1700 / Veriton X270 Service Guide
Page 54
a. Remove the two screws (D) that secure the bracket to 6.5 kgf-cm X270 model Part No. 86.5A5B6.012 46 Chapter 3 10. Remove the front I/O and card reader board bracket. Disconnect the other end of the USB, 1394, and audio cables from the mainboard. 11. X1700 model Screw (Quantity) #6-32*3/16 NI (2) Color Silver Torque 5.5 to the chassis.
Aspire X1700 / Veriton X270 Service Guide
Page 55
a. Pull the card reader board out of the bracket. Remove the card reader board. Remove the two screws (C) that secure the card reader board to 4.5 kgf-cm b. Part No. 86.00J44.C60 Chapter 3 47 Screw (Quantity) #6-32 L6 BZN (2) Color Silver Torque 3.5 to the bracket. Push the bracket into the chassis then remove the bracket. X1700 model X270 model 12. b.
Aspire X1700 / Veriton X270 Service Guide
Page 56
Remove the front I /O board out of the bracket. Remove the two screws (C) that secure the I/O board to 4.5 kgf-cm Part No. 86.00J44.C60 48 Chapter 3 a. Torque 3.5 to the bracket. 13. Pull the I /O board. Screw (Quantity) #6-32 L6 BZN (2) Color Silver b.
Aspire X1700 / Veriton X270 Service Guide
Page 57
..."Removing the VGA Card (X1700 model)" on page 37. 7. Disconnect the LED cable from the mainboard. 12. See "Removing the Hard Disk Drive" on page 43. 9. See "Removing the Front I/O and Card Reader Boards" on page 30. 4. Screw (Quantity) M3xL5 (1) Color Black Torque 5.5 to 6.5 kgf-cm Part No. 86.1A324.5R0 ...on page 42. 8. See "Removing the Processor" on page 34. 6. See "Removing the Optical Drive" on page 32. 5. See "Removing the TV Tuner Card (X1700 model)" on page 28. 2. See "Removing the Side Panel" on page 44. 10. Remove the screw (B) on the rear panel.
Aspire X1700 / Veriton X270 Service Guide
Page 58
13. X1700 model Screw (Quantity) #6-32 L5 BZN (6) Color Silver 14. Lift the board from the chassis. Torque 5.7 to the chassis. Remove the six screws (C) that secure the mainboard to 6.3 kgf-cm X270 model Part No. 86.00J44.C60 X1700 model X270 model 50 Chapter 3
Aspire X1700 / Veriton X270 Service Guide
Page 59
... (Quantity) #6-32 L6 BZN (1) Color Silver Torque 5.7 to the chassis. See "Removing the Front Bezel" on page 44. 10. See "Removing the TV Tuner Card (X1700 model)" on page 29. 3. See "Removing the Hard Disk Drive" on page 49. 12. See "Removing the Mainboard" on page 37. 7. Removing the Power Switch... and LED Cables 1. See "Removing the Optical Drive" on page 28. 2. See "Removing the Side Panel" on page 34. 6. See "Removing the VGA Card (X1700 model)" on page 43. 9. Remove the screw (C) that secures the LED bracket to 6.3 kgf-cm...
Aspire X1700 / Veriton X270 Service Guide
Page 66
... looking for all models User's manuals Training materials BIOS updates Software utilities Spare parts lists Technical Announcement Bulletins (TABs) For these to us. 58 Chapter 4 Online Support Information This section describes online technical ...support services available to help you are also available in the Support & Downloads tab: Detailed information on Acer's International Traveler's Warranty (ITW) Returned material authorization procedures An overview of all the support services we...
Aspire X1700 / Veriton X270 Service Guide
Page 71
...Acer office may have a different part number code from those given in global configuration of this chapter whenever ordering the parts to -date information available on the printed Service Guide. Chapter 6 63 FRU (Field Replaceable Unit) List Chapter 6 This chapter offers the FRU (Field Replaceable Unit) list in the FRU list of the X1700... and X270 computer. For whatever reasons a part number is changed, it . This document will NOT be updated as more information about ...
Aspire X1700 / Veriton X270 Service Guide
Page 72
Exploded Diagram X1700 ITEM PART NO. 33.3V001.001 86.00J07.B60 60.3V411.001 34.....001 42.3V808.001 42.3V810.001 42.3V814.001 34.3V004.001 42.3V807.001 60.3V806.001 86.1A324.5R0 PART NAME QTY PCI COVER 1 SCREW #6-32 L5 PAN NI 2 ASSY BKT-UCASE 1 PCI SHIELDING 1 REAR IO SHIELDING ...1 ASSY LCASE-ASM 1 RUBBER 80X10X5.5 2 FRONT IO BKT 1 ASSY FRONT BEZEL 1 BEZEL PROTECTFILM 1 ODD KNOB PROTECTFILM 1 ODD DOOR 1 acer LOGO 1 FRONT BEZEL COVER 1 BEZEL COVER PROTECTFILM 1 ODD DOOR PROTECTFILM 1 DOOR ARM 1 ODD DOOR SPRING 1 POWER BUTTOM PROTECTFILM 1 ASSY BKT ...