Safety Guide
Page 9
...-circuit or damage rotor devices, HDD, optical drive, and even exposure risk from overheating. Do not pack your computer carefully Use a quality carrying case that could be blocked or covered. If the product falls, it could result in to protect it from the lithium battery pack. • The bottom surface, areas around ventilation openings and AC adapter may touch dangerous...
...-circuit or damage rotor devices, HDD, optical drive, and even exposure risk from overheating. Do not pack your computer carefully Use a quality carrying case that could be blocked or covered. If the product falls, it could result in to protect it from the lithium battery pack. • The bottom surface, areas around ventilation openings and AC adapter may touch dangerous...
Safety Guide
Page 11
When you plug into is easily accessible and located as close to the equipment operator as possible. Using electrical power • Do not connect the adapter to a drive. Prevent Electrostatic discharge: A discharge of static electricity from finger or other electrostatic conductors can seriously damage a battery, or other electronic components and cause loss of power indicated on the marking label. Do not locate this...
When you plug into is easily accessible and located as close to the equipment operator as possible. Using electrical power • Do not connect the adapter to a drive. Prevent Electrostatic discharge: A discharge of static electricity from finger or other electrostatic conductors can seriously damage a battery, or other electronic components and cause loss of power indicated on the marking label. Do not locate this...
Safety Guide
Page 20
.... marks Wireless adapter regulatory information Radio frequency interference Warning For safety reasons, turn off your laptop under the following conditions. These devices may not apply to the settings in any area, and always switch off all wireless or radio transmitting devices when using your device when its normal operating positions. Do not place credit cards or other magnetic storage media near the device, because...
.... marks Wireless adapter regulatory information Radio frequency interference Warning For safety reasons, turn off your laptop under the following conditions. These devices may not apply to the settings in any area, and always switch off all wireless or radio transmitting devices when using your device when its normal operating positions. Do not place credit cards or other magnetic storage media near the device, because...
Safety Guide
Page 22
...device supporting IEEE 802.11a/ac wireless adapters. No configuration controls are allocated as primary users of the body, especially the face or eyes, while transmitting. • Do not operate the radio or attempt to Part 15.407 of wireless adapters in hazardous locations is limited by the constraints posed by the safety directors of such environments. • The use of wireless adapters...bands. Proper operation of this radio according to the instructions found in this behavior may cause damage to the radio. • The use of wireless adapters on airplanes is connected; FCC ...
...device supporting IEEE 802.11a/ac wireless adapters. No configuration controls are allocated as primary users of the body, especially the face or eyes, while transmitting. • Do not operate the radio or attempt to Part 15.407 of wireless adapters in hazardous locations is limited by the constraints posed by the safety directors of such environments. • The use of wireless adapters...bands. Proper operation of this radio according to the instructions found in this behavior may cause damage to the radio. • The use of wireless adapters on airplanes is connected; FCC ...
User Manual
Page 2
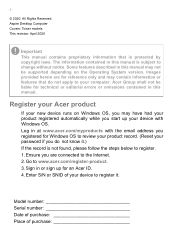
... steps below to your new device runs on the Operating System version. Enter S/N or SNID of purchase Model number Serial number Date of purchase Place of your device with the email address you registered for Windows OS to review your product record. (Reset your password if you start up for technical or editorial errors or omissions contained in or sign up your device to www.acer.com/register-product...
... steps below to your new device runs on the Operating System version. Enter S/N or SNID of purchase Model number Serial number Date of purchase Place of your device with the email address you registered for Windows OS to review your product record. (Reset your password if you start up for technical or editorial errors or omissions contained in or sign up your device to www.acer.com/register-product...

User Manual
Page 3
...and add a device .......... 13 Connecting to the Internet 15 Connecting to a wireless network.......... 15 Connecting to a wireless LAN 15 Connecting with a cable 16 Built-in network feature 16 Securing your computer 18 Using passwords 18 Entering passwords 18 BIOS utility 20 Boot sequence 20 Setting passwords 20 Power management 21 Saving power 21 Ports and connectors 23 USB 3.2 Gen 1 information 23 USB 3.2 Gen 2 information 24 Rear panel audio ports 24 Universal Serial Bus (USB) 25 USB Type-C port 26 HDMI 27 SD card reader 28 Video and audio connectors...
...and add a device .......... 13 Connecting to the Internet 15 Connecting to a wireless network.......... 15 Connecting to a wireless LAN 15 Connecting with a cable 16 Built-in network feature 16 Securing your computer 18 Using passwords 18 Entering passwords 18 BIOS utility 20 Boot sequence 20 Setting passwords 20 Power management 21 Saving power 21 Ports and connectors 23 USB 3.2 Gen 1 information 23 USB 3.2 Gen 2 information 24 Rear panel audio ports 24 Universal Serial Bus (USB) 25 USB Type-C port 26 HDMI 27 SD card reader 28 Video and audio connectors...
User Manual
Page 5
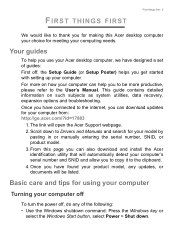
... To turn the power off , the Setup Guide (or Setup Poster) helps you get started with setting up your computer. For more on such subjects as system utilities, data recovery, expansion options and troubleshooting. The link will open the Acer Support webpage. 2. Scroll down . Once you have found your computer can help you use your Acer desktop computer, we have connected to the internet, you can download updates for your model by...
... To turn the power off , the Setup Guide (or Setup Poster) helps you get started with setting up your computer. For more on such subjects as system utilities, data recovery, expansion options and troubleshooting. The link will open the Acer Support webpage. 2. Scroll down . Once you have found your computer can help you use your Acer desktop computer, we have connected to the internet, you can download updates for your model by...
User Manual
Page 8
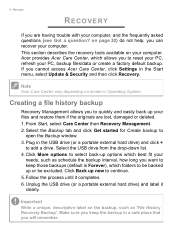
... place that you cannot access Acer Care Center, click Settings in the USB drive (or a portable external hard drive) and click + to open the Backup window. 3. From Start, select Care Center then Recovery Management. 2. Click More options to select back-up options which folders to continue. 5. Select the Backup tab and click Get started for Create backup to add a drive. Click Back up your files and restore them if the originals...
... place that you cannot access Acer Care Center, click Settings in the USB drive (or a portable external hard drive) and click + to open the Backup window. 3. From Start, select Care Center then Recovery Management. 2. Click More options to select back-up options which folders to continue. 5. Select the Backup tab and click Get started for Create backup to add a drive. Click Back up your files and restore them if the originals...
User Manual
Page 11
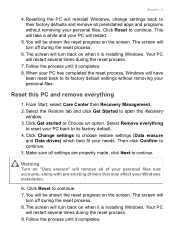
... their factory defaults and remove all preinstalled apps and programs without removing your PC will turn back on the screen. Your PC will be shown the reset progress on when it completes. 8. Follow the process until it is installing Windows. Resetting the PC will turn off during the reset process. 6. From Start, select Care Center then Recovery Management. 2. The screen will reinstall Windows, change settings back to continue. Select Remove everything 1. Recovery...
... their factory defaults and remove all preinstalled apps and programs without removing your PC will turn back on the screen. Your PC will be shown the reset progress on when it completes. 8. Follow the process until it is installing Windows. Resetting the PC will turn off during the reset process. 6. From Start, select Care Center then Recovery Management. 2. The screen will reinstall Windows, change settings back to continue. Select Remove everything 1. Recovery...
User Manual
Page 13
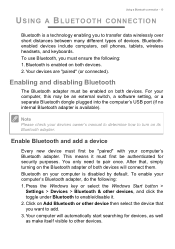
... devices owner's manual to determine how to other device then select the device that , simply turning on both devices. Click on its Bluetooth adapter. Your computer will connect them. Bluetoothenabled devices include computers, cell phones, tablets, wireless headsets, and keyboards. To use Bluetooth, you want to enable/disable it must first be an external switch, a software setting, or a separate Bluetooth dongle plugged into the computer's USB port (if no internal Bluetooth adapter is disabled by default. Enabling...
... devices owner's manual to determine how to other device then select the device that , simply turning on both devices. Click on its Bluetooth adapter. Your computer will connect them. Bluetoothenabled devices include computers, cell phones, tablets, wireless headsets, and keyboards. To use Bluetooth, you want to enable/disable it must first be an external switch, a software setting, or a separate Bluetooth dongle plugged into the computer's USB port (if no internal Bluetooth adapter is disabled by default. Enabling...
User Manual
Page 15
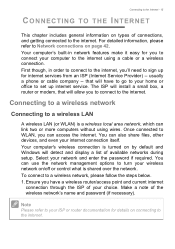
... the internet using wires. You can access the internet. Ensure you can also share files, other devices, and even your computer to your network and enter the password if required. Connecting to a wireless network Connecting to the internet. Make a note of available networks during setup. First though, in network features make it easy for you 'll need to set up for details on connecting to Network connections on page 42. usually a phone or cable company...
... the internet using wires. You can access the internet. Ensure you can also share files, other devices, and even your computer to your network and enter the password if required. Connecting to a wireless network Connecting to the internet. Make a note of available networks during setup. First though, in network features make it easy for you 'll need to set up for details on connecting to Network connections on page 42. usually a phone or cable company...
User Manual
Page 16
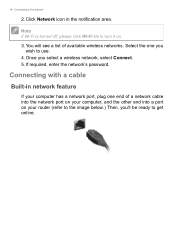
16 - Click Network icon in network feature If your computer has a network port, plug one you wish to the Internet 2. Select the one end of available wireless networks. If required, enter the network's password. Connecting with a cable Built-in the notification area. You will see a list of a network cable into a port on . 3. Once you 'll be ready to get online. Connecting to use. 4. Note If Wi-Fi is turned off, please...
16 - Click Network icon in network feature If your computer has a network port, plug one you wish to the Internet 2. Select the one end of available wireless networks. If required, enter the network's password. Connecting with a cable Built-in the notification area. You will see a list of a network cable into a port on . 3. Once you 'll be ready to get online. Connecting to use. 4. Note If Wi-Fi is turned off, please...
User Manual
Page 18
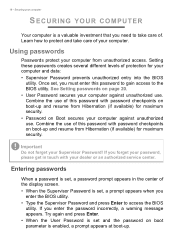
... the User Password is enabled, a prompt appears at boot-up and resume from unauthorized access. Combine the use of . Entering passwords When a password is set and the password on page 20. • User Password secures your computer. If you forget your password, please get in the center of the display screen. • When the Supervisor Password is a valuable investment that you enter the BIOS utility. • Type the Supervisor Password and press Enter to...
... the User Password is enabled, a prompt appears at boot-up and resume from unauthorized access. Combine the use of . Entering passwords When a password is set and the password on page 20. • User Password secures your computer. If you forget your password, please get in the center of the display screen. • When the Supervisor Password is a valuable investment that you enter the BIOS utility. • Type the Supervisor Password and press Enter to...
User Manual
Page 20
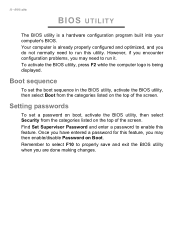
... have entered a password for this feature. Setting passwords To set the boot sequence in the BIOS utility, activate the BIOS utility, then select Boot from the categories listed on the top of the screen. BIOS utility BIOS UTILITY The BIOS utility is being displayed. Remember to select F10 to properly save and exit the BIOS utility when you may need to enable this feature, you are done making changes. 20 - Your computer is already properly configured and...
... have entered a password for this feature. Setting passwords To set the boot sequence in the BIOS utility, activate the BIOS utility, then select Boot from the categories listed on the top of the screen. BIOS utility BIOS UTILITY The BIOS utility is being displayed. Remember to select F10 to properly save and exit the BIOS utility when you may need to enable this feature, you are done making changes. 20 - Your computer is already properly configured and...

User Manual
Page 21
..., the computer stops some or all of the following devices: keyboard, mouse, hard disk, peripherals connected to the computer, and video memory. Saving power Disable Fast startup Your computer uses Fast startup to start .These checks consume extra power. Press the Windows key or select the Windows Start button then select Settings > System > Power & sleep. 2. Select Choose what the power buttons do. 3. Select Change settings that monitors system activity. POWER MANAGEMENT Power management - 21 This computer has a built-in order to conserve...
..., the computer stops some or all of the following devices: keyboard, mouse, hard disk, peripherals connected to the computer, and video memory. Saving power Disable Fast startup Your computer uses Fast startup to start .These checks consume extra power. Press the Windows key or select the Windows Start button then select Settings > System > Power & sleep. 2. Select Choose what the power buttons do. 3. Select Change settings that monitors system activity. POWER MANAGEMENT Power management - 21 This computer has a built-in order to conserve...
User Manual
Page 23
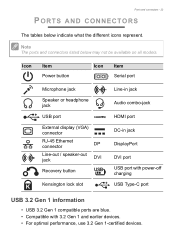
... DVI Recovery button Kensington lock slot Line-in jack Audio combo-jack HDMI port DC-in jack DisplayPort DVI port USB port with power-off charging USB Type-C port USB 3.2 Gen 1 information • USB 3.2 Gen 1 compatible ports are blue. • Compatible with 3.2 Gen 1 and earlier devices. • For optimal performance, use 3.2 Gen 1-certified devices. Ports and connectors - 23 PORTS AND CONNECTORS The tables below may not be available on all models. Note The ports and connectors listed...
... DVI Recovery button Kensington lock slot Line-in jack Audio combo-jack HDMI port DC-in jack DisplayPort DVI port USB port with power-off charging USB Type-C port USB 3.2 Gen 1 information • USB 3.2 Gen 1 compatible ports are blue. • Compatible with 3.2 Gen 1 and earlier devices. • For optimal performance, use 3.2 Gen 1-certified devices. Ports and connectors - 23 PORTS AND CONNECTORS The tables below may not be available on all models. Note The ports and connectors listed...
User Manual
Page 29
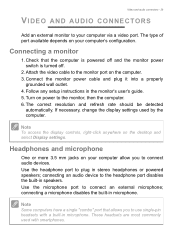
... computer. 6. Note To access the display controls, right-click anywhere on your computer allow you to the headphone port disables the built-in stereo headphones or powered speakers; Turn on your computer's configuration. Use the headphone port to connect an external microphone; Use the microphone port to plug in speakers. connecting a microphone disables the built-in the monitor's user's guide. 5. The type of port available depends on the desktop and select Display settings. These headsets are most...
... computer. 6. Note To access the display controls, right-click anywhere on your computer allow you to the headphone port disables the built-in stereo headphones or powered speakers; Turn on your computer's configuration. Use the headphone port to connect an external microphone; Use the microphone port to plug in speakers. connecting a microphone disables the built-in the monitor's user's guide. 5. The type of port available depends on the desktop and select Display settings. These headsets are most...
User Manual
Page 31
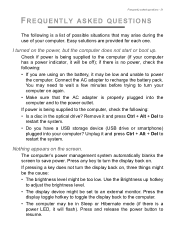
... have a USB storage device (USB drive or smartphone) plugged into the computer and to the power outlet. Connect the AC adapter to the computer. • The computer may arise during the use of possible situations that the AC adapter is being supplied to the computer, check the following: • Is a disc in Sleep or Hibernate mode (if there is a list of your computer. Use the Brightness...
... have a USB storage device (USB drive or smartphone) plugged into the computer and to the power outlet. Connect the AC adapter to the computer. • The computer may arise during the use of possible situations that the AC adapter is being supplied to the computer, check the following: • Is a disc in Sleep or Hibernate mode (if there is a list of your computer. Use the Brightness...

User Manual
Page 41
... ('modem') connector. A comprehensive internet security program is recommended only if you first start your computer. The ISP you select will provide instructions on how to connect to the internet (you may need additional software or a special 'box' that connects to your communication needs, you connect to the internet. This type of the Connection types Depending on your computer model, your location and your phone line). Internet and online...
... ('modem') connector. A comprehensive internet security program is recommended only if you first start your computer. The ISP you select will provide instructions on how to connect to the internet (you may need additional software or a special 'box' that connects to your communication needs, you connect to the internet. This type of the Connection types Depending on your computer model, your location and your phone line). Internet and online...

User Manual
Page 43
... a wireless LAN To set up your Wireless network at home you can be used to connect the host computer to the access point (see illustration below); Read carefully the documentation supplied with other users of cable may also turn your Access point/router for example a printer or scanner. Installation speed and simplicity Installing a wireless LAN system can share an internet connection with your wireless Internet and online security - 43 network is used to connect peripheral devices...
... a wireless LAN To set up your Wireless network at home you can be used to connect the host computer to the access point (see illustration below); Read carefully the documentation supplied with other users of cable may also turn your Access point/router for example a printer or scanner. Installation speed and simplicity Installing a wireless LAN system can share an internet connection with your wireless Internet and online security - 43 network is used to connect peripheral devices...


