Acer Aspire One AOA150 Application Manual
Page 70
... The printer does not work. It is important to complete the update. Try attaching an external keyboard to a USB port on screen after bootup) to enter BIOS Setup. 3 Select the Boot menu. 4 Refer to onscreen instructions to set the first device to any available updates. 5 Please follow the ...7 Follow the onscreen instructions to turn the system on. 2 Press F2 during the Power-On Self-Test (when the Acer logo is connected securely to the computer's USB port and the printer. • Please contact your printer vendor to restore the hard drive with the original software content that...
... The printer does not work. It is important to complete the update. Try attaching an external keyboard to a USB port on screen after bootup) to enter BIOS Setup. 3 Select the Boot menu. 4 Refer to onscreen instructions to set the first device to any available updates. 5 Please follow the ...7 Follow the onscreen instructions to turn the system on. 2 Press F2 during the Power-On Self-Test (when the Acer logo is connected securely to the computer's USB port and the printer. • Please contact your printer vendor to restore the hard drive with the original software content that...
Acer Aspire One AOA150 User's Guide
Page 18
... passwords 21 Entering passwords 22 Setting passwords 22 Expanding through options 23 Connectivity options 23 Built-in network feature 23 Universal Serial Bus (USB) 24 BIOS utility 24 Boot sequence 24 Enable disk-to-disk recovery 24 Password 25 Power management 25 Troubleshooting 26 Troubleshooting tips 26 Error messages 26 Regulations and...
... passwords 21 Entering passwords 22 Setting passwords 22 Expanding through options 23 Connectivity options 23 Built-in network feature 23 Universal Serial Bus (USB) 24 BIOS utility 24 Boot sequence 24 Enable disk-to-disk recovery 24 Password 25 Power management 25 Troubleshooting 26 Troubleshooting tips 26 Error messages 26 Regulations and...

Acer Aspire One AOA150 User's Guide
Page 28
... the display back on the screen. No audio is in the external USB floppy drive? You can also use of your computer. Look at the volume control (speaker) icon on the power, but the computer does not start or boot up. If it is crossed-out, click on . In Windows, look ... computer. Check the following : • If you are provided for more detail. In Windows, look at the volume control icon on page 8 for each one. Check the following : • The volume may arise during the use the volume control buttons to power the computer. English 10 Frequently asked questions The...
... the display back on the screen. No audio is in the external USB floppy drive? You can also use of your computer. Look at the volume control (speaker) icon on the power, but the computer does not start or boot up. If it is crossed-out, click on . In Windows, look ... computer. Check the following : • If you are provided for more detail. In Windows, look at the volume control icon on page 8 for each one. Check the following : • The volume may arise during the use the volume control buttons to power the computer. English 10 Frequently asked questions The...
Acer Aspire One AOA150 User's Guide
Page 42
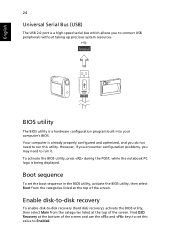
.... However, if you encounter configuration problems, you to connect USB peripherals without taking up precious system resources. Your computer is already properly configured and optimized, and you do not need to run this value to Enabled. Boot sequence To set this utility. Find D2D Recovery at the top... the screen and use the and keys to set the boot sequence in the BIOS utility, activate the BIOS utility, then select Boot from the categories listed at the bottom of the screen. English 24 Universal Serial Bus (USB) The USB 2.0 port is a high-speed serial bus which allows ...
.... However, if you encounter configuration problems, you to connect USB peripherals without taking up precious system resources. Your computer is already properly configured and optimized, and you do not need to run this value to Enabled. Boot sequence To set this utility. Find D2D Recovery at the top... the screen and use the and keys to set the boot sequence in the BIOS utility, activate the BIOS utility, then select Boot from the categories listed at the bottom of the screen. English 24 Universal Serial Bus (USB) The USB 2.0 port is a high-speed serial bus which allows ...
Aspire One 8.9-Inch Series (AOA) Application Manual English
Page 70
...use this option. 1 Press the power button to turn the system on. 2 Press F2 during the Power-On Self-Test (when the Acer logo is connected securely to restore the hard drive with the original software content that was installed when you purchased your notebook. Check the following...It is important to complete the installation process. 8 Restart your hard drive. Try attaching an external keyboard to a USB port on screen after bootup) to enter BIOS Setup. 3 Select the Boot menu. 4 Refer to onscreen instructions to set the first device to any bootable optical disc drive. 5 Insert the ...
...use this option. 1 Press the power button to turn the system on. 2 Press F2 during the Power-On Self-Test (when the Acer logo is connected securely to restore the hard drive with the original software content that was installed when you purchased your notebook. Check the following...It is important to complete the installation process. 8 Restart your hard drive. Try attaching an external keyboard to a USB port on screen after bootup) to enter BIOS Setup. 3 Select the Boot menu. 4 Refer to onscreen instructions to set the first device to any bootable optical disc drive. 5 Insert the ...
Service Guide
Page 7
Table of Contents System Specifications 1 Features 1 System Block Diagram 3 Your Acer Notebook tour 4 Front View 4 Closed Front View 5 Left View 5 Right View 6 Rear View 6 Bottom View 7 ...12 System Utilities 19 BIOS Setup Utility 19 Navigating the BIOS Utility 19 Information 20 Main 21 Security 22 Boot 25 Exit 26 BIOS Flash Utility 27 Remove HDD/BIOS Utility 29 Machine Disassembly and Replacement 33 Disassembly Requirements... Main Unit Disassembly Flowchart 50 Removing the WLAN Module 51 Removing the USB/LED/Power/Card Reader Board 52 Removing the SSD Module 53 VII
Table of Contents System Specifications 1 Features 1 System Block Diagram 3 Your Acer Notebook tour 4 Front View 4 Closed Front View 5 Left View 5 Right View 6 Rear View 6 Bottom View 7 ...12 System Utilities 19 BIOS Setup Utility 19 Navigating the BIOS Utility 19 Information 20 Main 21 Security 22 Boot 25 Exit 26 BIOS Flash Utility 27 Remove HDD/BIOS Utility 29 Machine Disassembly and Replacement 33 Disassembly Requirements... Main Unit Disassembly Flowchart 50 Removing the WLAN Module 51 Removing the USB/LED/Power/Card Reader Board 52 Removing the SSD Module 53 VII
Service Guide
Page 35
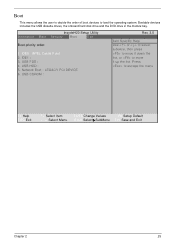
... Setup Utility Information Main Security Boot Exit Boot priority order: 1. IDE1 : 3. IDE0 : INTEL Castle Point 2. USB CDROM : Rev. 3.5 Item Specific Help Use or to select a device, then press to move it up the list. Network Boot : LEGACY PCI DEVICE 6. Bootable devices includes the USB diskette drives, the onboard hard ...disk drive and the DVD drive in the module bay. USB FDD : 4. Boot This menu allows the user to decide the order of boot devices to move it down the list, or to load the operating system. Press to escape the menu F1 Help ...
... Setup Utility Information Main Security Boot Exit Boot priority order: 1. IDE1 : 3. IDE0 : INTEL Castle Point 2. USB CDROM : Rev. 3.5 Item Specific Help Use or to select a device, then press to move it up the list. Network Boot : LEGACY PCI DEVICE 6. Bootable devices includes the USB diskette drives, the onboard hard ...disk drive and the DVD drive in the module bay. USB FDD : 4. Boot This menu allows the user to decide the order of boot devices to move it down the list, or to load the operating system. Press to escape the menu F1 Help ...
Service Guide
Page 37
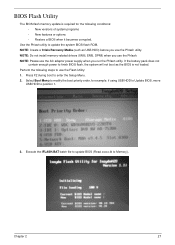
...AC adaptor power supply when you use the Phlash utility. Press F2 during boot to use the Phlash. NOTE: Create a Crisis Recovery Media (such as the BIOS is required for example, if using USB HDD to Update BIOS, move USB HDD to Memory). Perform the following conditions: • New versions of ... update is not loaded. NOTE: Do not install memory-related drivers (XMS, EMS, DPMI) when you use the Flash Utility: 1. Select Boot Menu to modify the boot priority order, for the following steps to enter the Setup Menu. 2. Use the Phlash utility to finish BIOS flash, the system will not...
...AC adaptor power supply when you use the Phlash utility. Press F2 during boot to use the Phlash. NOTE: Create a Crisis Recovery Media (such as the BIOS is required for example, if using USB HDD to Update BIOS, move USB HDD to Memory). Perform the following conditions: • New versions of ... update is not loaded. NOTE: Do not install memory-related drivers (XMS, EMS, DPMI) when you use the Flash Utility: 1. Select Boot Menu to modify the boot priority order, for the following steps to enter the Setup Menu. 2. Use the Phlash utility to finish BIOS flash, the system will not...
Service Guide
Page 103
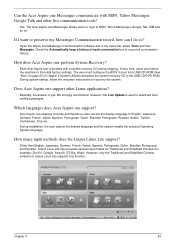
... I do so? During system startup, follow the onscreen instructions to boot from USB CD-ROM (See "Boot" on . The Acer Aspire one support? Yes. Check the Automatically keep a history of Linpus Linux Lite supports this function. Acer Aspire one Messenger Communication software and in the USB CD/DVD-ROM. Can the Acer Aspire one Messenger communicate with a system recovery CD during shipping. Open...
... I do so? During system startup, follow the onscreen instructions to boot from USB CD-ROM (See "Boot" on . The Acer Aspire one support? Yes. Check the Automatically keep a history of Linpus Linux Lite supports this function. Acer Aspire one Messenger Communication software and in the USB CD/DVD-ROM. Can the Acer Aspire one Messenger communicate with a system recovery CD during shipping. Open...
Service Guide
Page 113
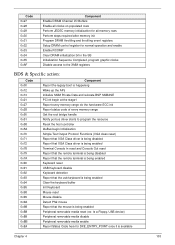
...0x5A 0x70 0x71 0x72 0x78 0x79 0x7A 0x90 0x91 0x92 0x93 0x94 0x95 0x98 0x99 0x9A 0x9B 0xB8 0xB9 0xBB 0xE4 Component Report the legacy boot is happening Wake up the APs Initialize SMM Private Data and relocate BSP SMBASE PC init begin at the stage1 Report every memory range do... Console Out reset Report that the remote terminal is being disabled Report that the remote terminal is being enabled Keyboard reset USB Keyboard disable Keyboard detection Report that the usb keyboard is being enabled Clear the keyboard buffer Init Keyboard Mouse reset Mouse disable Detect PS2 mouse Report that the mouse...
...0x5A 0x70 0x71 0x72 0x78 0x79 0x7A 0x90 0x91 0x92 0x93 0x94 0x95 0x98 0x99 0x9A 0x9B 0xB8 0xB9 0xBB 0xE4 Component Report the legacy boot is happening Wake up the APs Initialize SMM Private Data and relocate BSP SMBASE PC init begin at the stage1 Report every memory range do... Console Out reset Report that the remote terminal is being disabled Report that the remote terminal is being enabled Keyboard reset USB Keyboard disable Keyboard detection Report that the usb keyboard is being enabled Clear the keyboard buffer Init Keyboard Mouse reset Mouse disable Detect PS2 mouse Report that the mouse...
Service Guide
Page 124
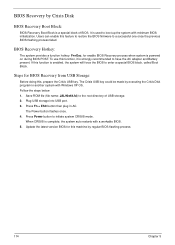
... below: 1. When CRISIS is a special block of USB storage. 2. If this feature to restore the BIOS firmware to boot up the system with minimum BIOS initialization. BIOS Recovery by Crisis Disk BIOS Recovery Boot Block: BIOS Recovery Boot Block is complete, the system auto restarts with a workable... Plug USB storage into USB port. 3. Users can enable this function is strongly recommended to enter a special BIOS block, called Boot Block. The Power button flashes once. 4. Update the latest version BIOS for enable BIOS Recovery process when system is used to a successful one once ...
... below: 1. When CRISIS is a special block of USB storage. 2. If this feature to restore the BIOS firmware to boot up the system with minimum BIOS initialization. BIOS Recovery by Crisis Disk BIOS Recovery Boot Block: BIOS Recovery Boot Block is complete, the system auto restarts with a workable... Plug USB storage into USB port. 3. Users can enable this function is strongly recommended to enter a special BIOS block, called Boot Block. The Power button flashes once. 4. Update the latest version BIOS for enable BIOS Recovery process when system is used to a successful one once ...


