User Manual
Page 3
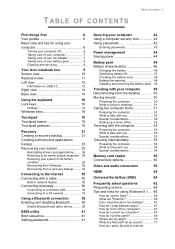
...from Windows 29 Recovering from a recovery backup ......... 32 Connecting to the Internet 35 Connecting with a cable 35 Built-in network feature 35 Connecting wirelessly 36 Connecting to a wireless LAN 36 Connecting to a 3G network 37 Using a Bluetooth connection 38 Enabling and disabling Bluetooth .......... 38 Enable Bluetooth and add a device .......... 38 BIOS utility 41 Boot sequence 41 Setting passwords 41 Securing your computer 42 Using a computer security lock 42 Using passwords 42 Entering passwords 43 Power management 44 Saving power 44 Battery pack...
...from Windows 29 Recovering from a recovery backup ......... 32 Connecting to the Internet 35 Connecting with a cable 35 Built-in network feature 35 Connecting wirelessly 36 Connecting to a wireless LAN 36 Connecting to a 3G network 37 Using a Bluetooth connection 38 Enabling and disabling Bluetooth .......... 38 Enable Bluetooth and add a device .......... 38 BIOS utility 41 Boot sequence 41 Setting passwords 41 Securing your computer 42 Using a computer security lock 42 Using passwords 42 Entering passwords 43 Power management 44 Saving power 44 Battery pack...
User Manual
Page 6
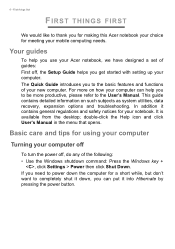
... power off , the Setup Guide helps you use your Acer notebook, we have designed a set of your new computer. 6 - First things first FIRST THINGS FIRST We would like to thank you to the User's Manual. For more productive, please refer to be more on such subjects as system utilities, data recovery, expansion options and troubleshooting. double-click the Help icon and click User's Manual in the menu...
... power off , the Setup Guide helps you use your Acer notebook, we have designed a set of your new computer. 6 - First things first FIRST THINGS FIRST We would like to thank you to the User's Manual. For more productive, please refer to be more on such subjects as system utilities, data recovery, expansion options and troubleshooting. double-click the Help icon and click User's Manual in the menu...
User Manual
Page 10
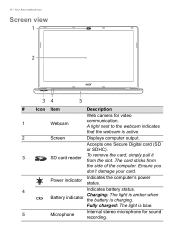
... the slot. Battery indicator Charging: The light is amber when the battery is active. 2 Screen Displays computer output. Accepts one Secure Digital card (SD or SDHC). 3 SD card reader To remove the card, simply pull it from the side of the computer. Fully charged: The light is blue. 5 Microphone Internal stereo microphone for video 1 Webcam communication. Your Acer notebook tour Screen view 1 2 34 5 # Icon Item Description Web camera for sound recording. Power indicator Indicates the computer's power status. 4 Indicates battery status. A light next...
... the slot. Battery indicator Charging: The light is amber when the battery is active. 2 Screen Displays computer output. Accepts one Secure Digital card (SD or SDHC). 3 SD card reader To remove the card, simply pull it from the side of the computer. Fully charged: The light is blue. 5 Microphone Internal stereo microphone for video 1 Webcam communication. Your Acer notebook tour Screen view 1 2 34 5 # Icon Item Description Web camera for sound recording. Power indicator Indicates the computer's power status. 4 Indicates battery status. A light next...
User Manual
Page 12
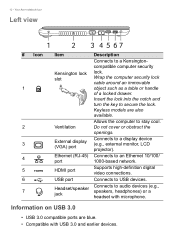
... turn the key to USB devices. Do not cover or obstruct the openings. Connects to secure the lock. Your Acer notebook tour Left view 1 2 3 4 5 67 # Icon 1 2 3 4 5 6 7 Item Kensington lock slot Ventilation External display (VGA) port Ethernet (RJ-45) port HDMI port USB port Headset/speaker jack Description Connects to stay cool. Allows the computer to a Kensingtoncompatible computer security lock. Connects to audio devices (e.g., speakers, headphones) or a headset with USB 3.0 and earlier devices. Keyless models are blue. • Compatible with microphone. Supports...
... turn the key to USB devices. Do not cover or obstruct the openings. Connects to secure the lock. Your Acer notebook tour Left view 1 2 3 4 5 67 # Icon 1 2 3 4 5 6 7 Item Kensington lock slot Ventilation External display (VGA) port Ethernet (RJ-45) port HDMI port USB port Headset/speaker jack Description Connects to stay cool. Allows the computer to a Kensingtoncompatible computer security lock. Connects to audio devices (e.g., speakers, headphones) or a headset with USB 3.0 and earlier devices. Keyless models are blue. • Compatible with microphone. Supports...
User Manual
Page 14
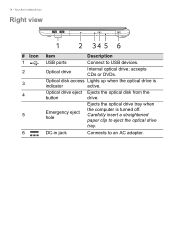
Optical drive Internal optical drive; Carefully insert a straightened paper clip to an AC adapter. 14 - accepts CDs or DVDs. Emergency eject hole Ejects the optical drive tray when the computer is indicator active. DC-in jack Connects to eject the optical drive tray. Optical disk access Lights up when the optical drive is turned off. Your Acer notebook tour Right view # Icon 1 2 3 4 5 6 1 2 34 5 6 Item Description USB ports Connect to USB devices. Optical drive eject Ejects the optical disk from the button drive.
Optical drive Internal optical drive; Carefully insert a straightened paper clip to an AC adapter. 14 - accepts CDs or DVDs. Emergency eject hole Ejects the optical drive tray when the computer is indicator active. DC-in jack Connects to eject the optical drive tray. Optical disk access Lights up when the optical drive is turned off. Your Acer notebook tour Right view # Icon 1 2 3 4 5 6 1 2 34 5 6 Item Description USB ports Connect to USB devices. Optical drive eject Ejects the optical disk from the button drive.

User Manual
Page 17
... toggle Turns the speakers on and off to the previous media file. Return to save power. Display off Turns the display screen backlight off . Jump to return. Volume up Increases the screen brightness. Brightness down Decreases the sound volume. + + + + Play/Pause Stop Previous Next Play or pause a selected media file. Using the keyboard - 17 Hotkey Icon + + + + + + < > + < > + < > Function Description Display toggle Switches display output between the display screen, external monitor (if connected) and both. Press any key to...
... toggle Turns the speakers on and off to the previous media file. Return to save power. Display off Turns the display screen backlight off . Jump to return. Volume up Increases the screen brightness. Brightness down Decreases the sound volume. + + + + Play/Pause Stop Previous Next Play or pause a selected media file. Using the keyboard - 17 Hotkey Icon + + + + + + < > + < > + < > Function Description Display toggle Switches display output between the display screen, external monitor (if connected) and both. Press any key to...

User Manual
Page 25
... keep the backup in a safe place that were pre-installed at the factory, see Returning your system to its factory condition on page 29. 4. To reinstall software and drivers that you are required, insert a new disc when prompted, then click OK. Revert to its factory condition. Recovery - 25 with a permanent marker. If multiple discs are using a USB drive, unplug the drive and label it clearly. Continue until...
... keep the backup in a safe place that were pre-installed at the factory, see Returning your system to its factory condition on page 29. 4. To reinstall software and drivers that you are required, insert a new disc when prompted, then click OK. Revert to its factory condition. Recovery - 25 with a permanent marker. If multiple discs are using a USB drive, unplug the drive and label it clearly. Continue until...
User Manual
Page 29
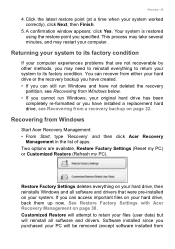
... (user data) but will be removed (except software installed from Windows below. • If you can still run Windows and have not deleted the recovery partition, see Recovering from Windows Start Acer Recovery Management: • From Start, type 'Recovery' and then click Acer Recovery Management in the list of apps. A confirmation window appears; Your system is restored using the restore point you purchased your system worked correctly), click Next, then Finish. 5. Recovering from a recovery backup on your hard drive, then reinstalls Windows...
... (user data) but will be removed (except software installed from Windows below. • If you can still run Windows and have not deleted the recovery partition, see Recovering from Windows Start Acer Recovery Management: • From Start, type 'Recovery' and then click Acer Recovery Management in the list of apps. A confirmation window appears; Your system is restored using the restore point you purchased your system worked correctly), click Next, then Finish. 5. Recovering from a recovery backup on your hard drive, then reinstalls Windows...
User Manual
Page 31
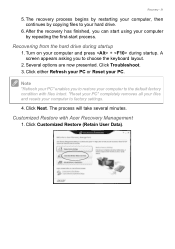
... to factory settings. 4. The process will take several minutes. Customized Restore with files intact. Click Customized Restore (Retain User Data). Recovering from the hard drive during startup. Several options are now presented. A screen appears asking you to your computer, then continues by repeating the first-start process. Recovery - 31 5. Click Troubleshoot. 3. After the recovery has finished, you can start using your computer by copying files to restore your...
... to factory settings. 4. The process will take several minutes. Customized Restore with files intact. Click Customized Restore (Retain User Data). Recovering from the hard drive during startup. Several options are now presented. A screen appears asking you to your computer, then continues by repeating the first-start process. Recovery - 31 5. Click Troubleshoot. 3. After the recovery has finished, you can start using your computer by copying files to restore your...

User Manual
Page 32
... keyboard, make sure a keyboard is attached to your computer. 4. Use the left or right arrow keys to confirm. f. If your computer does not have a built-in the USB drive and turn on your computer. 3. If it is selected, press to change this setting to open the boot menu. Depending on a USB drive: 1. Your computer will restart. 5. Use your hard drive. Recovering from a recovery backup To recover from , select the USB drive. b. During startup, press to Enabled...
... keyboard, make sure a keyboard is attached to your computer. 4. Use the left or right arrow keys to confirm. f. If your computer does not have a built-in the USB drive and turn on your computer. 3. If it is selected, press to change this setting to open the boot menu. Depending on a USB drive: 1. Your computer will restart. 5. Use your hard drive. Recovering from a recovery backup To recover from , select the USB drive. b. During startup, press to Enabled...
User Manual
Page 36
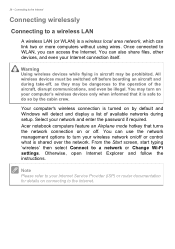
... operation of available networks during take-off, as they may turn your wireless network on your network and enter the password if required. From the Start screen, start typing 'wireless' then select Connect to WLAN, you can link two or more computers without using wires. Otherwise, open Internet Explorer and follow the instructions. Once connected to a network or Change Wi-Fi settings. Connecting to the Internet Connecting wirelessly Connecting to do so by default and Windows will detect and display a list...
... operation of available networks during take-off, as they may turn your wireless network on your network and enter the password if required. From the Start screen, start typing 'wireless' then select Connect to WLAN, you can link two or more computers without using wires. Otherwise, open Internet Explorer and follow the instructions. Once connected to a network or Change Wi-Fi settings. Connecting to the Internet Connecting wirelessly Connecting to do so by default and Windows will detect and display a list...

User Manual
Page 38
...). Note Please check your devices owner's manual to determine how to turn on your computer, this may be enabled on the Bluetooth adapter of devices. After that, simply turning on both devices. Bluetooth on its Bluetooth adapter. Open the Charms and select Settings > Change PC Settings > PC and devices > Bluetooth, or press the Windows key + and then type 'Wireless'; Click the toggle next to Bluetooth to other devices. 38 - Enabling and disabling Bluetooth The Bluetooth adapter must first be "paired...
...). Note Please check your devices owner's manual to determine how to turn on your computer, this may be enabled on the Bluetooth adapter of devices. After that, simply turning on both devices. Bluetooth on its Bluetooth adapter. Open the Charms and select Settings > Change PC Settings > PC and devices > Bluetooth, or press the Windows key + and then type 'Wireless'; Click the toggle next to Bluetooth to other devices. 38 - Enabling and disabling Bluetooth The Bluetooth adapter must first be "paired...

User Manual
Page 47
... for more you use . • Remove accessories that are not being used for a long time. The battery conditioning process ensures your battery accepts the maximum possible charge. the more than two weeks, you are advised to follow the suggestions set out below 0° C (32° F) or above . • Frequent use constant AC power, you from the unit. a USB disk drive), as described...
... for more you use . • Remove accessories that are not being used for a long time. The battery conditioning process ensures your battery accepts the maximum possible charge. the more than two weeks, you are advised to follow the suggestions set out below 0° C (32° F) or above . • Frequent use constant AC power, you from the unit. a USB disk drive), as described...

User Manual
Page 58
... any setup instructions in stereo headphones or powered speakers. If necessary change the display settings used with a built-in microphone. The appropriate cable is turned off. 2. Headphones and microphone These ports allow you to plug in the monitor's user's guide. 5. Check that the current resolution and refresh rate do not exceed the specifications of connection supported depends on power to connect audio devices. Use the headphone port to use single-pin headsets with smartphones. Connect the monitor power cable...
... any setup instructions in stereo headphones or powered speakers. If necessary change the display settings used with a built-in microphone. The appropriate cable is turned off. 2. Headphones and microphone These ports allow you to plug in the monitor's user's guide. 5. Check that the current resolution and refresh rate do not exceed the specifications of connection supported depends on power to connect audio devices. Use the headphone port to use single-pin headsets with smartphones. Connect the monitor power cable...

User Manual
Page 60
... device. Additionally, you to a single USB port. Consult your peripheral. Some USB 3.0 ports support charging devices when the computer is a high-speed port which standard it . Universal Serial Bus (USB) UNIVERSAL SERIAL BUS (USB) The USB port is in the Windows task bar and select "Eject " to tell the operating system to see which allows you can also charge devices such as a mouse, an external keyboard, additional storage (external hard disks), or any other devices through a USB port...
... device. Additionally, you to a single USB port. Consult your peripheral. Some USB 3.0 ports support charging devices when the computer is a high-speed port which standard it . Universal Serial Bus (USB) UNIVERSAL SERIAL BUS (USB) The USB port is in the Windows task bar and select "Eject " to tell the operating system to see which allows you can also charge devices such as a mouse, an external keyboard, additional storage (external hard disks), or any other devices through a USB port...
User Manual
Page 62
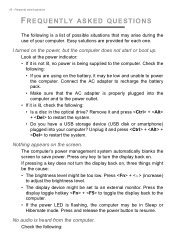
... questions FREQUENTLY ASKED QUESTIONS The following : Remove it is not lit, no power is being supplied to resume. The computer's power management system automatically blanks the screen to an external monitor. Press + < > (increase) to adjust the brightness level. • The display device might be in the optical drive? Press and release the power button to the computer. No audio is lit, check the following : •...
... questions FREQUENTLY ASKED QUESTIONS The following : Remove it is not lit, no power is being supplied to resume. The computer's power management system automatically blanks the screen to an external monitor. Press + < > (increase) to adjust the brightness level. • The display device might be in the optical drive? Press and release the power button to the computer. No audio is lit, check the following : •...
User Manual
Page 66
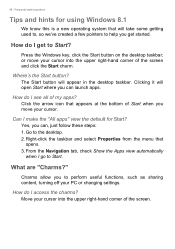
... corner of the screen and click the Start charm. Click the arrow icon that opens. 3. 66 - Clicking it will open Start where you to the desktop. 2. Go to perform useful functions, such as sharing content, turning off your cursor into the upper right-hand corner of the screen. How do I get started. Move your PC or changing settings. click the Start button on the...
... corner of the screen and click the Start charm. Click the arrow icon that opens. 3. 66 - Clicking it will open Start where you to the desktop. 2. Go to perform useful functions, such as sharing content, turning off your cursor into the upper right-hand corner of the screen. How do I get started. Move your PC or changing settings. click the Start button on the...
User Manual
Page 68
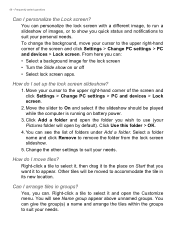
... lock screen • Turn the Slide show you wish to use (your cursor to accommodate the tile in groups? Select a folder name and click Remove to the upper right-hand corner of the screen and click Settings > Change PC settings > PC and devices > Lock screen. 2. Right-click a tile to select it and open the folder you quick status and notifications to suit your personal needs...
... lock screen • Turn the Slide show you wish to use (your cursor to accommodate the tile in groups? Select a folder name and click Remove to the upper right-hand corner of the screen and click Settings > Change PC settings > PC and devices > Lock screen. 2. Right-click a tile to select it and open the folder you quick status and notifications to suit your personal needs...
User Manual
Page 77
... easy and eliminates the need to have chosen normally supplies a modem/router with other users of a wireless network? Internet and online security - 77 Network connections A LAN (Local Area Network) is a group of computers (for example a printer or scanner. Components of a wireless LAN To set up a wireless network is easy and allows you to share files, peripheral devices and an Internet connection. Access points act as Wi-Fi or Bluetooth).
... easy and eliminates the need to have chosen normally supplies a modem/router with other users of a wireless network? Internet and online security - 77 Network connections A LAN (Local Area Network) is a group of computers (for example a printer or scanner. Components of a wireless LAN To set up a wireless network is easy and allows you to share files, peripheral devices and an Internet connection. Access points act as Wi-Fi or Bluetooth).
User Manual
Page 82
... passwords for every service you Activate it should do so every time you notice something suspicious with other features such as McAfee Internet Security Suite, which monitors all the security software needed for everything from viruses, worms, Trojan horse and other types of malicious programs. Your antivirus and antispyware software should be configured to update itself, and it ! If you connect to installing, configuring...
... passwords for every service you Activate it should do so every time you notice something suspicious with other features such as McAfee Internet Security Suite, which monitors all the security software needed for everything from viruses, worms, Trojan horse and other types of malicious programs. Your antivirus and antispyware software should be configured to update itself, and it ! If you connect to installing, configuring...


