User Manual
Page 3
... system to its factory 17 condition 47 Your guides 17 Recovering from Windows 48 Basic care and tips for using your Recovering from a recovery backup ........ 52 computer 17 Turning your computer on and off 17 Power management 56 Taking care of your computer 18 Disable Fast startup ...19 Battery pack 59 Taking care of your battery pack 19 Cleaning and servicing 19 Battery pack characteristics 59 Charging the battery 59 Your Acer notebook tour 21 Optimizing battery life 61 Screen view 22 Keyboard view 24 Left view 25 Information on USB 3.0 26 Checking the battery...
... system to its factory 17 condition 47 Your guides 17 Recovering from Windows 48 Basic care and tips for using your Recovering from a recovery backup ........ 52 computer 17 Turning your computer on and off 17 Power management 56 Taking care of your computer 18 Disable Fast startup ...19 Battery pack 59 Taking care of your battery pack 19 Cleaning and servicing 19 Battery pack characteristics 59 Charging the battery 59 Your Acer notebook tour 21 Optimizing battery life 61 Screen view 22 Keyboard view 24 Left view 25 Information on USB 3.0 26 Checking the battery...
User Manual
Page 17
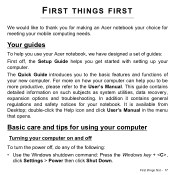
... and safety notices for meeting your mobile computing needs. This guide contains detailed information on how your computer can help you for making an Acer notebook your choice for your notebook. It is available from Desktop; Basic care and tips for using your computer Turning your computer on and.... First things first - 17 For more productive, please refer to the User's Manual. FIRST THINGS FIRST We would like to thank you use your Acer notebook, we have designed a set of guides: First off , do any of your new computer. The Quick Guide introduces you get started with setting...
... and safety notices for meeting your mobile computing needs. This guide contains detailed information on how your computer can help you for making an Acer notebook your choice for your notebook. It is available from Desktop; Basic care and tips for using your computer Turning your computer on and.... First things first - 17 For more productive, please refer to the User's Manual. FIRST THINGS FIRST We would like to thank you use your Acer notebook, we have designed a set of guides: First off , do any of your new computer. The Quick Guide introduces you get started with setting...
User Manual
Page 35
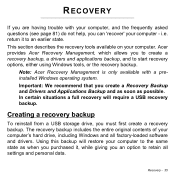
... as when you purchased it to retain all factory-loaded software and drivers. i.e. Recovery - 35 Acer provides Acer Recovery Management, which allows you must first create a recovery backup. The recovery backup includes the entire original contents of your computer. This section describes the recovery tools available on your computer's hard drive, including Windows and all settings and...
... as when you purchased it to retain all factory-loaded software and drivers. i.e. Recovery - 35 Acer provides Acer Recovery Management, which allows you must first create a recovery backup. The recovery backup includes the entire original contents of your computer. This section describes the recovery tools available on your computer's hard drive, including Windows and all settings and...
User Manual
Page 36
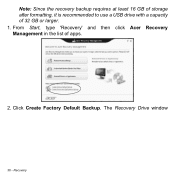
The Recovery Drive window 36 - From Start, type 'Recovery' and then click Acer Recovery Management in the list of 32 GB or larger. 1. Click Create Factory Default Backup. Recovery Note: Since the recovery backup requires at least 16 GB of storage after formatting, it is recommended to use a USB drive with a capacity of apps. 2.
The Recovery Drive window 36 - From Start, type 'Recovery' and then click Acer Recovery Management in the list of 32 GB or larger. 1. Click Create Factory Default Backup. Recovery Note: Since the recovery backup requires at least 16 GB of storage after formatting, it is recommended to use a USB drive with a capacity of apps. 2.
User Manual
Page 37
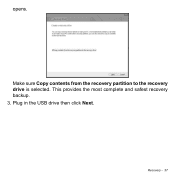
opens. Plug in the USB drive then click Next. Make sure Copy contents from the recovery partition to the recovery drive is selected. Recovery - 37 This provides the most complete and safest recovery backup. 3.
opens. Plug in the USB drive then click Next. Make sure Copy contents from the recovery partition to the recovery drive is selected. Recovery - 37 This provides the most complete and safest recovery backup. 3.
User Manual
Page 38
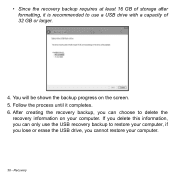
After creating the recovery backup, you can only use a USB drive with a capacity of 32 GB or larger. 4. • Since the recovery backup requires at least 16 GB of storage after formatting, it completes. 6. Recovery If you delete this information, you cannot restore your computer. You will be shown the backup progress on your computer. 38 - Follow the process until it is recommended to use the USB recovery backup to restore your computer, if you lose or erase the USB drive, you can choose to delete the recovery information on the screen. 5.
After creating the recovery backup, you can only use a USB drive with a capacity of 32 GB or larger. 4. • Since the recovery backup requires at least 16 GB of storage after formatting, it completes. 6. Recovery If you delete this information, you cannot restore your computer. You will be shown the backup progress on your computer. 38 - Follow the process until it is recommended to use the USB recovery backup to restore your computer, if you lose or erase the USB drive, you can choose to delete the recovery information on the screen. 5.

User Manual
Page 39
Unplug the USB drive and label it clearly. Make sure you keep the backup in a safe place that contains the factoryloaded software and drivers needed by your computer, you will remember. Creating a drivers and applications backup To create a Drivers and Applications Backup, that you may use either Recovery - 39 Important: Write a unique, descriptive label on the backup, such as 'Windows Recovery Backup'. 7.
Unplug the USB drive and label it clearly. Make sure you keep the backup in a safe place that contains the factoryloaded software and drivers needed by your computer, you will remember. Creating a drivers and applications backup To create a Drivers and Applications Backup, that you may use either Recovery - 39 Important: Write a unique, descriptive label on the backup, such as 'Windows Recovery Backup'. 7.
User Manual
Page 40
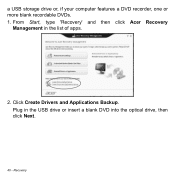
Plug in the list of apps. 2. From Start, type 'Recovery' and then click Acer Recovery Management in the USB drive or insert a blank DVD into the optical drive, then click Next. 40 - Click Create Drivers and Applications Backup. Recovery a USB storage drive or, if your computer features a DVD recorder, one or more blank recordable DVDs. 1.
Plug in the list of apps. 2. From Start, type 'Recovery' and then click Acer Recovery Management in the USB drive or insert a blank DVD into the optical drive, then click Next. 40 - Click Create Drivers and Applications Backup. Recovery a USB storage drive or, if your computer features a DVD recorder, one or more blank recordable DVDs. 1.
User Manual
Page 41
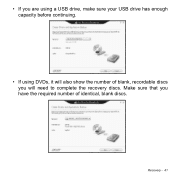
Recovery - 41 • If you will need to complete the recovery discs. Make sure that you have the required number of blank, recordable discs you are using a USB drive, make sure your USB drive has enough capacity before continuing. • If using DVDs, it will also show the number of identical, blank discs.
Recovery - 41 • If you will need to complete the recovery discs. Make sure that you have the required number of blank, recordable discs you are using a USB drive, make sure your USB drive has enough capacity before continuing. • If using DVDs, it will also show the number of identical, blank discs.
User Manual
Page 42
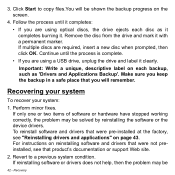
..., the drive ejects each backup, such as it completes burning it clearly. Make sure you will be 42 - Recovering your system To recover your system: 1. Recovery 3. Important: Write a unique, descriptive label on each disc as 'Drivers and Applications Backup'. Revert to copy files.You will remember. If reinstalling software or drivers...
..., the drive ejects each backup, such as it completes burning it clearly. Make sure you will be 42 - Recovering your system To recover your system: 1. Recovery 3. Important: Write a unique, descriptive label on each disc as 'Drivers and Applications Backup'. Revert to copy files.You will remember. If reinstalling software or drivers...
User Manual
Page 43
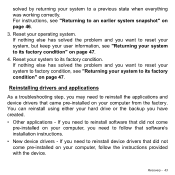
... applications As a troubleshooting step, you want to reset your system to factory condition, see "Returning your system to a previous state when everything was working correctly. Recovery - 43 You can reinstall using either your operating system. If nothing else has solved the problem and you have created. • Other applications - Reset your...
... applications As a troubleshooting step, you want to reset your system to factory condition, see "Returning your system to a previous state when everything was working correctly. Recovery - 43 You can reinstall using either your operating system. If nothing else has solved the problem and you have created. • Other applications - Reset your...
User Manual
Page 44
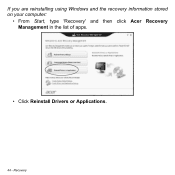
If you are reinstalling using Windows and the recovery information stored on your computer: • From Start, type 'Recovery' and then click Acer Recovery Management in the list of apps. • Click Reinstall Drivers or Applications. 44 - Recovery
If you are reinstalling using Windows and the recovery information stored on your computer: • From Start, type 'Recovery' and then click Acer Recovery Management in the list of apps. • Click Reinstall Drivers or Applications. 44 - Recovery
User Manual
Page 45
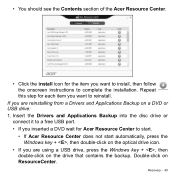
... a DVD wait for each item you want to install, then follow the onscreen instructions to start. • If Acer Resource Center does not start automatically, press the Windows key + , then double-click on the optical drive icon. ... you are reinstalling from a Drivers and Applications Backup on a DVD or USB drive: 1. Repeat this step for Acer Resource Center to complete the installation. If you are using a USB drive, press the Windows key + , then.... • You should see the Contents section of the Acer Resource Center. • Click the install icon for the item you want to reinstall...
... a DVD wait for each item you want to install, then follow the onscreen instructions to start. • If Acer Resource Center does not start automatically, press the Windows key + , then double-click on the optical drive icon. ... you are reinstalling from a Drivers and Applications Backup on a DVD or USB drive: 1. Repeat this step for Acer Resource Center to complete the installation. If you are using a USB drive, press the Windows key + , then.... • You should see the Contents section of the Acer Resource Center. • Click the install icon for the item you want to reinstall...
User Manual
Page 46
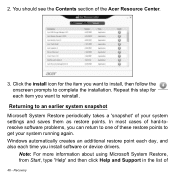
... Microsoft System Restore periodically takes a 'snapshot' of these restore points to one of your system running again. 2. You should see the Contents section of 46 - Recovery Repeat this step for the item you want to install, then follow the onscreen prompts to reinstall. Windows automatically creates an additional restore point each... installation. Note: For more information about using Microsoft System Restore, from Start, type 'Help' and then click Help and Support in the list of the Acer Resource Center. 3.
... Microsoft System Restore periodically takes a 'snapshot' of these restore points to one of your system running again. 2. You should see the Contents section of 46 - Recovery Repeat this step for the item you want to install, then follow the onscreen prompts to reinstall. Windows automatically creates an additional restore point each... installation. Note: For more information about using Microsoft System Restore, from Start, type 'Help' and then click Help and Support in the list of the Acer Resource Center. 3.
User Manual
Page 47
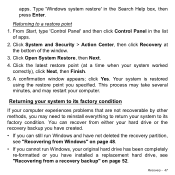
... using the restore point you may restart your original hard drive has been completely re-formatted or you have not deleted the recovery partition, see "Recovering from a recovery backup" on page 48. • If you cannot run Windows and have installed a replacement hard drive, see "Recovering from..., then press Enter. Type 'Windows system restore' in the list of the window. 3. Recovery - 47 Click Open System Restore, then Next. 4. You can recover from either your hard drive or the recovery backup you have created. • If you can still run Windows, your computer. Click ...
... using the restore point you may restart your original hard drive has been completely re-formatted or you have not deleted the recovery partition, see "Recovering from a recovery backup" on page 48. • If you cannot run Windows and have installed a replacement hard drive, see "Recovering from..., then press Enter. Type 'Windows system restore' in the list of the window. 3. Recovery - 47 Click Open System Restore, then Next. 4. You can recover from either your hard drive or the recovery backup you have created. • If you can still run Windows, your computer. Click ...

User Manual
Page 48
.... If you purchased your system. Customized Restore will be removed (except software installed from Windows Start Acer Recovery Management: • From Start, type 'Recovery' and then click Acer Recovery Management in the list of apps. Restore Factory Settings deletes everything on your PC will attempt to ...retain your hard drive, back them up now. See "Restore Factory Settings with Acer Recovery Management" on page 49. Recovery Two options are available, Restore Factory Settings (Reset my PC) or Customized Restore (Refresh my PC). See "Customized ...
.... If you purchased your system. Customized Restore will be removed (except software installed from Windows Start Acer Recovery Management: • From Start, type 'Recovery' and then click Acer Recovery Management in the list of apps. Restore Factory Settings deletes everything on your PC will attempt to ...retain your hard drive, back them up now. See "Restore Factory Settings with Acer Recovery Management" on page 49. Recovery Two options are available, Restore Factory Settings (Reset my PC) or Customized Restore (Refresh my PC). See "Customized ...
User Manual
Page 49
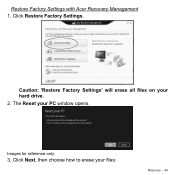
Caution: 'Restore Factory Settings' will erase all files on your PC window opens. Images for reference only. 3. Restore Factory Settings with Acer Recovery Management 1. Click Restore Factory Settings. The Reset your hard drive. 2. Click Next, then choose how to erase your files: Recovery - 49
Caution: 'Restore Factory Settings' will erase all files on your PC window opens. Images for reference only. 3. Restore Factory Settings with Acer Recovery Management 1. Click Restore Factory Settings. The Reset your hard drive. 2. Click Next, then choose how to erase your files: Recovery - 49
User Manual
Page 50
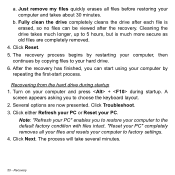
... during startup. Turn on your PC. The process will take several minutes. 50 - Fully clean the drive completely cleans the drive after the recovery. Click Reset. 5. A screen appears asking you to restore your computer to the default factory condition with files intact. "Reset your PC"... before restoring your computer, then continues by repeating the first-start using your computer by copying files to your hard drive. 6. a. The recovery process begins by restarting your computer and takes about 30 minutes. Note: "Refresh your PC" enables you to 5 hours, but is erased...
... during startup. Turn on your PC. The process will take several minutes. 50 - Fully clean the drive completely cleans the drive after the recovery. Click Reset. 5. A screen appears asking you to restore your computer to the default factory condition with files intact. "Reset your PC"... before restoring your computer, then continues by repeating the first-start using your computer by copying files to your hard drive. 6. a. The recovery process begins by restarting your computer and takes about 30 minutes. Note: "Refresh your PC" enables you to 5 hours, but is erased...
User Manual
Page 51
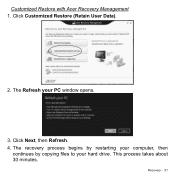
This process takes about 30 minutes. The Refresh your hard drive. The recovery process begins by restarting your computer, then continues by copying files to your PC window opens. 3. Recovery - 51 Click Customized Restore (Retain User Data). 2. Customized Restore with Acer Recovery Management 1. Click Next, then Refresh. 4.
This process takes about 30 minutes. The Refresh your hard drive. The recovery process begins by restarting your computer, then continues by copying files to your PC window opens. 3. Recovery - 51 Click Customized Restore (Retain User Data). 2. Customized Restore with Acer Recovery Management 1. Click Next, then Refresh. 4.
User Manual
Page 52
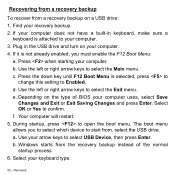
...Depending on the type of the normal startup process. 6. Your computer will restart. 5. During startup, press to Enabled. Recovering from a recovery backup To recover from the recovery backup instead of BIOS your computer uses, select Save Changes and Exit or Exit Saving Changes and press Enter. b. d. b. If it ...select USB Device, then press Enter. Use your computer does not have a built-in the USB drive and turn on a USB drive: 1. Recovery The boot menu allows you must enable the F12 Boot Menu: a. If your arrow keys to confirm. Use the left or right arrow keys...
...Depending on the type of the normal startup process. 6. Your computer will restart. 5. During startup, press to Enabled. Recovering from a recovery backup To recover from the recovery backup instead of BIOS your computer uses, select Save Changes and Exit or Exit Saving Changes and press Enter. b. d. b. If it ...select USB Device, then press Enter. Use your computer does not have a built-in the USB drive and turn on a USB drive: 1. Recovery The boot menu allows you must enable the F12 Boot Menu: a. If your arrow keys to confirm. Use the left or right arrow keys...


