
Acer Aspire 7250 Service Guide
Page 7
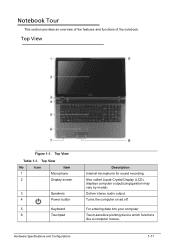
... stereo audio output. For entering data into your computer Touch-sensitive pointing device which functions like a computer mouse. Top View No Icon Item 1 Microphone 2 Display screen 3 Speakers 4 Power button 5 Keyboard 6 Touchpad Description Internal microphone for sound recording. Top View 0 Figure 1-1.
... stereo audio output. For entering data into your computer Touch-sensitive pointing device which functions like a computer mouse. Top View No Icon Item 1 Microphone 2 Display screen 3 Speakers 4 Power button 5 Keyboard 6 Touchpad Description Internal microphone for sound recording. Top View 0 Figure 1-1.

Acer Aspire 7250 Service Guide
Page 14
... have the following definitions: When On, the system boots with external keyboard/keypad Num Lock status On. Off by the numeric keys. When On, the screen moves one line up or down when pressing up or down arrow keys. When On, internal keyboard acts as numeric key padlock. If an external...
... have the following definitions: When On, the system boots with external keyboard/keypad Num Lock status On. Off by the numeric keys. When On, the screen moves one line up or down when pressing up or down arrow keys. When On, internal keyboard acts as numeric key padlock. If an external...
Acer Aspire 7250 Service Guide
Page 17
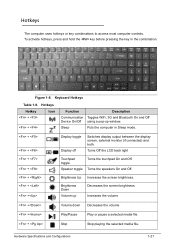
... before pressing the key in Sleep mode. + + + + + + + Display toggle Display off Switches display output between the display screen, external monitor (if connected) and both. Hotkeys Hotkey + + Icon Function Description Communication Toggles WiFi, 3G and Bluetooth On and Off Device... On/Off using a pop-up Decreases the screen brightness. Brightness Down Volume up window. Brightness Up Increases the screen brightness. Hotkeys 0 The computer uses hotkeys or key combinations to access most computer controls. ...
... before pressing the key in Sleep mode. + + + + + + + Display toggle Display off Switches display output between the display screen, external monitor (if connected) and both. Hotkeys Hotkey + + Icon Function Description Communication Toggles WiFi, 3G and Bluetooth On and Off Device... On/Off using a pop-up Decreases the screen brightness. Brightness Down Volume up window. Brightness Up Increases the screen brightness. Hotkeys 0 The computer uses hotkeys or key combinations to access most computer controls. ...

Acer Aspire 7250 Service Guide
Page 27
Item Specification Screen Diagonal (mm) 438.4 (17.3W") Active Area (mm) 382.08 x 214.92 Display resolution (pixels) 1600x900 Pixel Pitch (mm) 0.0796x0.2388 Typical White Luminance 200 ...
Item Specification Screen Diagonal (mm) 438.4 (17.3W") Active Area (mm) 382.08 x 214.92 Display resolution (pixels) 1600x900 Pixel Pitch (mm) 0.0796x0.2388 Typical White Luminance 200 ...
Acer Aspire 7250 Service Guide
Page 37
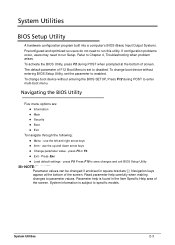
... press F2 during POST to run Setup. use the left and right arrow keys Item - Navigation keys appear at the bottom of the screen. Read parameter help is subject to specific models. Navigating the BIOS Utility 0 Five menu options are: Information Main Security Boot Exit To ... entering the BIOS SETUP, Press F12 during POST when prompted at the bottom of screen. System Utilities 2-3 Preconfigured and optimized so users do not need to disabled. The default parameter of the screen. If configuration problems occur, users may need to enter multi-boot menu. Refer ...
... press F2 during POST to run Setup. use the left and right arrow keys Item - Navigation keys appear at the bottom of the screen. Read parameter help is subject to specific models. Navigating the BIOS Utility 0 Five menu options are: Information Main Security Boot Exit To ... entering the BIOS SETUP, Press F12 during POST when prompted at the bottom of screen. System Utilities 2-3 Preconfigured and optimized so users do not need to disabled. The default parameter of the screen. If configuration problems occur, users may need to enter multi-boot menu. Refer ...

Acer Aspire 7250 Service Guide
Page 38
Figure 2-1. BIOS 0 The following is a description of computer hardware information. BIOS Information 2-4 System Utilities Actual values may differ by model. Information 0 This tab shows a summary of the tabs found on the InsydeH20 Setup Utility screen: NOTE: NOTE: The screens provided are for reference only.
Figure 2-1. BIOS 0 The following is a description of computer hardware information. BIOS Information 2-4 System Utilities Actual values may differ by model. Information 0 This tab shows a summary of the tabs found on the InsydeH20 Setup Utility screen: NOTE: NOTE: The screens provided are for reference only.
Acer Aspire 7250 Service Guide
Page 41
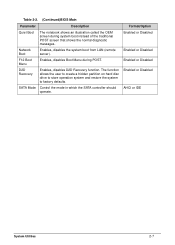
Table 2-2. (Continued)BIOS Main Parameter Description Format/Option Quiet Boot The notebook shows an illustration called the OEM screen during POST. Enabled or Disabled Network Boot Enables, disables the system boot from LAN (remote server). Enabled or Disabled D2D ... the SATA controller should operate. Enabled or Disabled F12 Boot Menu Enables, disables Boot Menu during system boot instead of the traditional POST screen that shows the normal diagnostic messages. AHCI or IDE System Utilities 2-7 The function allows the user to create a hidden partition on hard...
Table 2-2. (Continued)BIOS Main Parameter Description Format/Option Quiet Boot The notebook shows an illustration called the OEM screen during POST. Enabled or Disabled Network Boot Enables, disables the system boot from LAN (remote server). Enabled or Disabled D2D ... the SATA controller should operate. Enabled or Disabled F12 Boot Menu Enables, disables Boot Menu during system boot instead of the traditional POST screen that shows the normal diagnostic messages. AHCI or IDE System Utilities 2-7 The function allows the user to create a hidden partition on hard...

Acer Aspire 7250 Service Guide
Page 43
... Set Supervisor Password parameter and press Enter key. The Set Supervisor Password box appears. Removing a Password 0 Perform the following to enable the Password on the screen. 3. Set Supervisor Password 2. Use the ↑ and ↓ keys to Set. Figure 2-4. Password length is not to save changes and exit the BIOS Setup Utility...
... Set Supervisor Password parameter and press Enter key. The Set Supervisor Password box appears. Removing a Password 0 Perform the following to enable the Password on the screen. 3. Set Supervisor Password 2. Use the ↑ and ↓ keys to Set. Figure 2-4. Password length is not to save changes and exit the BIOS Setup Utility...

Acer Aspire 7250 Service Guide
Page 44
...: NOTE: Users can enable the Password on boot parameter. 5. Figure 2-6. NOTE: NOTE: If the current password entered does not match the actual current password, the screen will show the Setup Warning (Figure 2-9). 2-10 System Utilities The computer sets User Password parameter to save changes and exit the BIOS Setup Utility. Figure... Password 2. Type the current password in the Enter Current Password field and press Enter. 3. Press Enter. This Setup Warning The password setting is OK, the screen will show as following.
...: NOTE: Users can enable the Password on boot parameter. 5. Figure 2-6. NOTE: NOTE: If the current password entered does not match the actual current password, the screen will show the Setup Warning (Figure 2-9). 2-10 System Utilities The computer sets User Password parameter to save changes and exit the BIOS Setup Utility. Figure... Password 2. Type the current password in the Enter Current Password field and press Enter. 3. Press Enter. This Setup Warning The password setting is OK, the screen will show as following.

Acer Aspire 7250 Service Guide
Page 51
Click OK to use the WinFlash Utility: 1. Figure 2-15. WinFlash Utility 0 Perform the following to begin the update. InsydeFlash System Utilities 2-17 A progress screen is shown (Figure 2-15). Double click the WinFlash executable. 2.
Click OK to use the WinFlash Utility: 1. Figure 2-15. WinFlash Utility 0 Perform the following to begin the update. InsydeFlash System Utilities 2-17 A progress screen is shown (Figure 2-15). Double click the WinFlash executable. 2.

Acer Aspire 7250 Service Guide
Page 130
... and select Personalize Display Settings. Check the display resolution is listed under Other Devices 7. If the POST or video appears on -screen prompts. 9. If extensive pixel damage is discovered. 9. If permanent vertical/horizontal lines or dark spots appear in the application. If... desktop display resolution is not normal, right-click on the screen), the LCD is still not resolved, refer to Disassembly Process. If the Issue is faulty and should be replaced. Refer to ...
... and select Personalize Display Settings. Check the display resolution is listed under Other Devices 7. If the POST or video appears on -screen prompts. 9. If extensive pixel damage is discovered. 9. If permanent vertical/horizontal lines or dark spots appear in the application. If... desktop display resolution is not normal, right-click on the screen), the LCD is still not resolved, refer to Disassembly Process. If the Issue is faulty and should be replaced. Refer to ...

Acer Aspire 7250 Service Guide
Page 135
... earlier time and date. 11. If these function correctly, the internal speaker or I/O board may be defective. If they do not show, right-click on -screen prompts to start Speaker Setup. Troubleshooting 4-11 6. Confirm that Speakers are selected as the default audio device (green check mark). Reinstall the Operating System. 12...
... earlier time and date. 11. If these function correctly, the internal speaker or I/O board may be defective. If they do not show, right-click on -screen prompts to start Speaker Setup. Troubleshooting 4-11 6. Confirm that Speakers are selected as the default audio device (green check mark). Reinstall the Operating System. 12...

Acer Aspire 7250 Service Guide
Page 136
... still not resolved, refer to MB Check Mic module? Select the Levels tab. 5. No Swap Mic module and cable Replace M/B Figure 4-7. The microphone appears on -screen prompts to the maximum setting and click OK. 6. No Re-assemble Mic cable to Online Support Information. 4-12 Troubleshooting
... still not resolved, refer to MB Check Mic module? Select the Levels tab. 5. No Swap Mic module and cable Replace M/B Figure 4-7. The microphone appears on -screen prompts to the maximum setting and click OK. 6. No Re-assemble Mic cable to Online Support Information. 4-12 Troubleshooting


