Aspire 4310, 4710, 4710Z User's Guide EN
Page 13
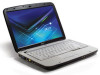
...and release the power button below the LCD screen beside the easy-launch buttons. It is not installed on your computer, clicking on the screen to complete the installation. xiii First things first We would like to thank you for making an Acer notebook your choice for Starters... This ...guide contains detailed information on your computer on and off , the Just for meeting your Acer notebook, we have ...
...and release the power button below the LCD screen beside the easy-launch buttons. It is not installed on your computer, clicking on the screen to complete the installation. xiii First things first We would like to thank you for making an Acer notebook your choice for Starters... This ...guide contains detailed information on your computer on and off , the Just for meeting your Acer notebook, we have ...

Aspire 4310, 4710, 4710Z User's Guide EN
Page 36
... details. 8 Keyboard For entering data into your computer. 9 Palmrest Comfortable support area for more details. 6 Empowering key Lanuch Acer Empowering Technology 7 Easy-launch Buttons for launching frequently used buttons programs. See "Easy-launch buttons" on page 25 for your ... details. 13 Speakers Left and right speakers deliver stereo audio output. 16 English # Icon Item Description 3 Display screen Also called Liquid-Crystal Display (LCD), displays computer output. 4 Power button Turns the computer on and off. 5 Status indicators Light-Emitting Diodes (...
... details. 8 Keyboard For entering data into your computer. 9 Palmrest Comfortable support area for more details. 6 Empowering key Lanuch Acer Empowering Technology 7 Easy-launch Buttons for launching frequently used buttons programs. See "Easy-launch buttons" on page 25 for your ... details. 13 Speakers Left and right speakers deliver stereo audio output. 16 English # Icon Item Description 3 Display screen Also called Liquid-Crystal Display (LCD), displays computer output. 4 Power button Turns the computer on and off. 5 Status indicators Light-Emitting Diodes (...

Aspire 4310, 4710, 4710Z User's Guide EN
Page 110
... ergonomic specifications English Design viewing distance Design inclination angle Design azimuth angle Viewing direction range class Screen tilt angle Design screen illuminance Reflection class of LCD panel (positive and negative polarity) Image polarity Reference white: Pre-setting of luminance and color temperature @ 6500K (tested under ... 85.0° • Illuminance level: [250 + (250cosα)] lx where α = 85° • Color: Source D65 • Ordinary LCD: Class I • Protective or Acer CrystalBrite™ LCD: Class III Both • Yn • u'n • v'n Class II
... ergonomic specifications English Design viewing distance Design inclination angle Design azimuth angle Viewing direction range class Screen tilt angle Design screen illuminance Reflection class of LCD panel (positive and negative polarity) Image polarity Reference white: Pre-setting of luminance and color temperature @ 6500K (tested under ... 85.0° • Illuminance level: [250 + (250cosα)] lx where α = 85° • Color: Source D65 • Ordinary LCD: Class I • Protective or Acer CrystalBrite™ LCD: Class III Both • Yn • u'n • v'n Class II

Aspire 4310, 4710, 4710Z Service Guide
Page 14
Also called Liquid-Crystal Display (LCD), displays computer output. Light-Emitting Diodes (LEDs) that...and right buttons function like a computer mouse. 11 Keyboard For entering data into your new Aspire computer. Your Acer Notebook Tour After knowing your computer features, let us show the status of the computer's functions...components. 9 Click buttons (left, center The left and right mouse buttons; Front View # Item 1 Acer PureZone 2 Display screen 3 Power button 4 Status indicators 5 Empowering key Description Internal microphone for your hands when you around your ...
Also called Liquid-Crystal Display (LCD), displays computer output. Light-Emitting Diodes (LEDs) that...and right buttons function like a computer mouse. 11 Keyboard For entering data into your new Aspire computer. Your Acer Notebook Tour After knowing your computer features, let us show the status of the computer's functions...components. 9 Click buttons (left, center The left and right mouse buttons; Front View # Item 1 Acer PureZone 2 Display screen 3 Power button 4 Status indicators 5 Empowering key Description Internal microphone for your hands when you around your ...
Aspire 4310, 4710, 4710Z Service Guide
Page 47
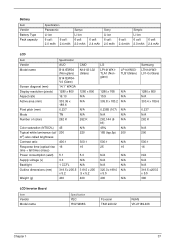
...cell: 2.4 mAh Sony Li-ion 6 cell: 2.0 mAh 6 cell: 2.4 mAh Simplo Li-ion 6 cell: 2.0 mAh 6 cell: 2.4 mAh LCD Item Vendor Model name Screen diagonal (mm) Display resolution (pixels) Aspect ratio Active area (mm) Pixel pitch (mm) Mode Number of colors Specification AUO B141EW04 (Non-glare) ...N/A 25 16 N/A N/A N/A N/A N/A N/A 320.0 x 199.0 N/A x 5.5 400 N/A 1280 x 800 N/A 303.4 x 189.6 0.237 N/A 262 K N/A 200 500:1 16 N/A N/A N/A 319.5 x205.5 x 5.5 390 LCD Inverter Board Item Vendor Model name Specification YEC YNV-W06S Foxconn T621240.02 RoHS VK.21189.406 Chapter 1 37
...cell: 2.4 mAh Sony Li-ion 6 cell: 2.0 mAh 6 cell: 2.4 mAh Simplo Li-ion 6 cell: 2.0 mAh 6 cell: 2.4 mAh LCD Item Vendor Model name Screen diagonal (mm) Display resolution (pixels) Aspect ratio Active area (mm) Pixel pitch (mm) Mode Number of colors Specification AUO B141EW04 (Non-glare) ...N/A 25 16 N/A N/A N/A N/A N/A N/A 320.0 x 199.0 N/A x 5.5 400 N/A 1280 x 800 N/A 303.4 x 189.6 0.237 N/A 262 K N/A 200 500:1 16 N/A N/A N/A 319.5 x205.5 x 5.5 390 LCD Inverter Board Item Vendor Model name Specification YEC YNV-W06S Foxconn T621240.02 RoHS VK.21189.406 Chapter 1 37

Aspire 4310, 4710, 4710Z Service Guide
Page 73
Removing the Middle Cover 1. Open the LCD screen all the way to facilitate the easy removal of the cover releases from the power board, then remove the middle cover. Carefully insert the flat screwdriver between the middle cover and lower case and gently pry up the middle cover. 5. Chapter 3 63 Continue prying the middle cover until the full length of the middle cover. 4. Detach the power board cable from the main unit, then turn it over. 6. See "Removing the Battery Pack" on page 62. 3. See "Removing the Keyboard" on page 51. 2.
Removing the Middle Cover 1. Open the LCD screen all the way to facilitate the easy removal of the cover releases from the power board, then remove the middle cover. Carefully insert the flat screwdriver between the middle cover and lower case and gently pry up the middle cover. 5. Chapter 3 63 Continue prying the middle cover until the full length of the middle cover. 4. Detach the power board cable from the main unit, then turn it over. 6. See "Removing the Battery Pack" on page 62. 3. See "Removing the Keyboard" on page 51. 2.

Aspire 4310, 4710, 4710Z Service Guide
Page 112
... or do the following in sequence T Power source (battery pack and power adapter). T Keyboard (if contrast and brightness function key doesn't work LCD is too dark LCD brightness cannot be adjusted LCD contrast cannot be adjusted Unreadable LCD screen Missing pels in BIOS Setup Utility, then reboot system. Index of Symptom-to-FRU Error Message...
... or do the following in sequence T Power source (battery pack and power adapter). T Keyboard (if contrast and brightness function key doesn't work LCD is too dark LCD brightness cannot be adjusted LCD contrast cannot be adjusted Unreadable LCD screen Missing pels in BIOS Setup Utility, then reboot system. Index of Symptom-to-FRU Error Message...


